So you’re back! In the last installment of this series, we created a JHipster application taking the monolithic route. It was the Red Pill route; life as pretty much you are accustomed to.
But maybe you like a challenge. Maybe you want to move beyond the Red Pill and try out the Blue Pill. In this case, the Blue Pill is the microservice JHipster approach.
In this blog, we are going to create a microservice architecture using JHipster’s available options for doing so. There is quite a bit more work to do with this approach, but in the end, I think it pays off. Get your favorite beverage and set aside some time. This will be pretty intensive.
Microservice Overview
What are these things anyways?
A “microservice” architecture splits the front end and the back end so that it’s easier for your application to scale and survive infrastructure issues.
The thought here is to decouple things as much as possible. You can create the back end(s) and run them without being tied to anything on the front end and vice versa. Each can have multiple instances and can spin up and down without affecting the end user. Possibly eliminating downtime to your application.
It gives it the ability to grow and expand over time with little architectural effort. The backend becomes more of something to consume and the front end is the output shown to the world. The front end can be just about anything you want. Traditional websites, mobile applications, or whatever else you can think of.
Microservice Path
The Blue Pill
So you’ve decided to take the gulp and swallow the Blue Pill. You want to give yourself a challenge, maybe? Let’s get started.
Gateway
A gateway is a JHipster-generated application (using application type microservice gateway when you generate it) that handles Web traffic, and serves an AngularJS application. There can be several different gateways, if you want to follow the Backends for Frontends pattern, but that’s not mandatory.
This will pretty much be the hub of all the activity. It will have a front end to it so you can see the calls, memory, etc. You can add/remove users, and all that fun stuff. That stuff is all fairly packaged up and you can look at it on your own. We won’t go into that much here.
Registry
The JHipster Registry is a runtime application, using the usual JHipster structure, on which all applications registers and get their configuration from. We won’t touch on this much more than just pulling it down and using it. It is just the home of “configuration” for the most part. Just clone the repo and move on. More info on this below.
https://jhipster.github.io/microservices-architecture/#registry_overview
Clone: https://github.com/jhipster/jhipster-registry
Microservice
Microservices are JHipster-generated applications (using application type microservice application when you generate them), that handle REST requests. They are stateless, and several instances of them can be launched in parallel to handle heavy loads.
Let’s Do This
Gateway
We will be pretty much following JHipster’s microservice guide for this exercise.
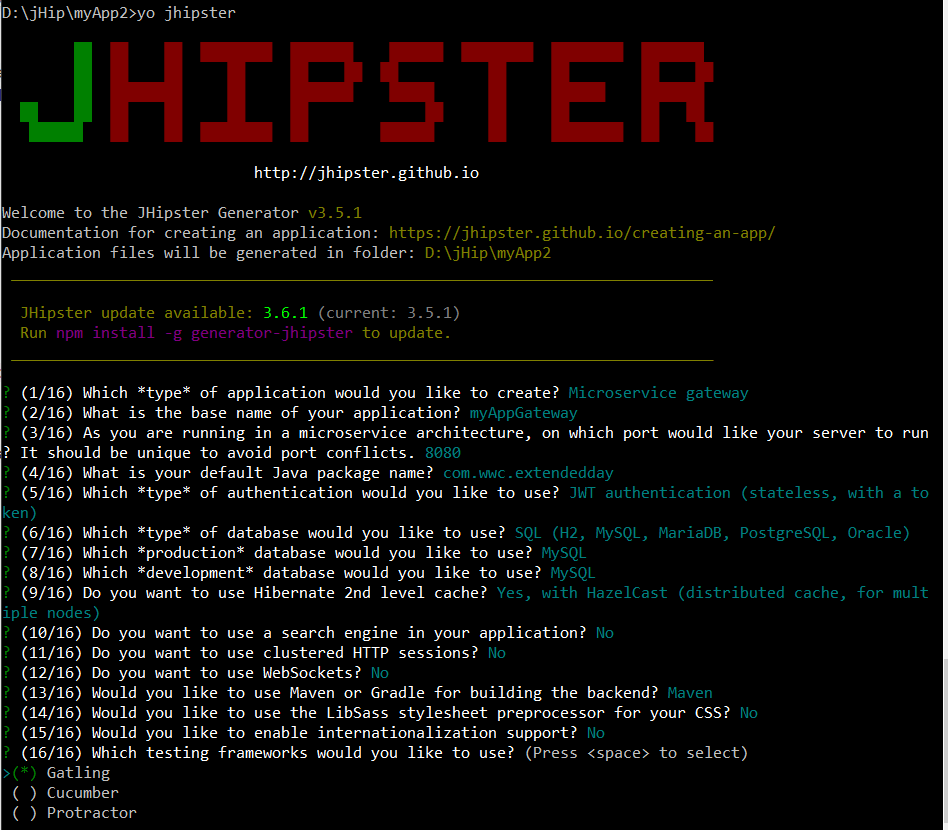
1. Start with yo jhipster
2. Choose “Microservice gateway”
3. Answer all the questions
4. Coffee time!!!
This app is pretty much just a monolithic app with configuration to handle all the web flow traffic
Registry
Clone https://github.com/jhipster/jhipster-registry if you haven’t already. Add to your project space. Go ahead and fire it up.
Look for the Java file that has @SpringBootApplication annotation and run it as a Java application. This applies to each step below.
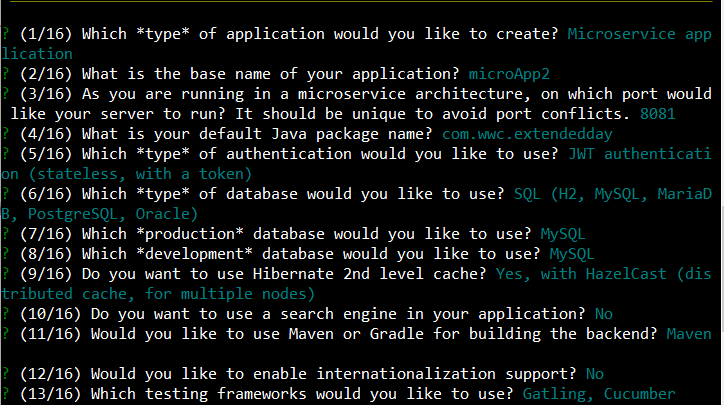
Microservice App
First thing is to make a new directory. Call it what you like and then go into that directory. Now type yo jhipster. See that pattern here?
This time, though, we will choose “Microservice Application.” Answer the questions.
This time, in two shakes of a dog’s tail, you’ll have your microservice!
Microservice In Action
Registry
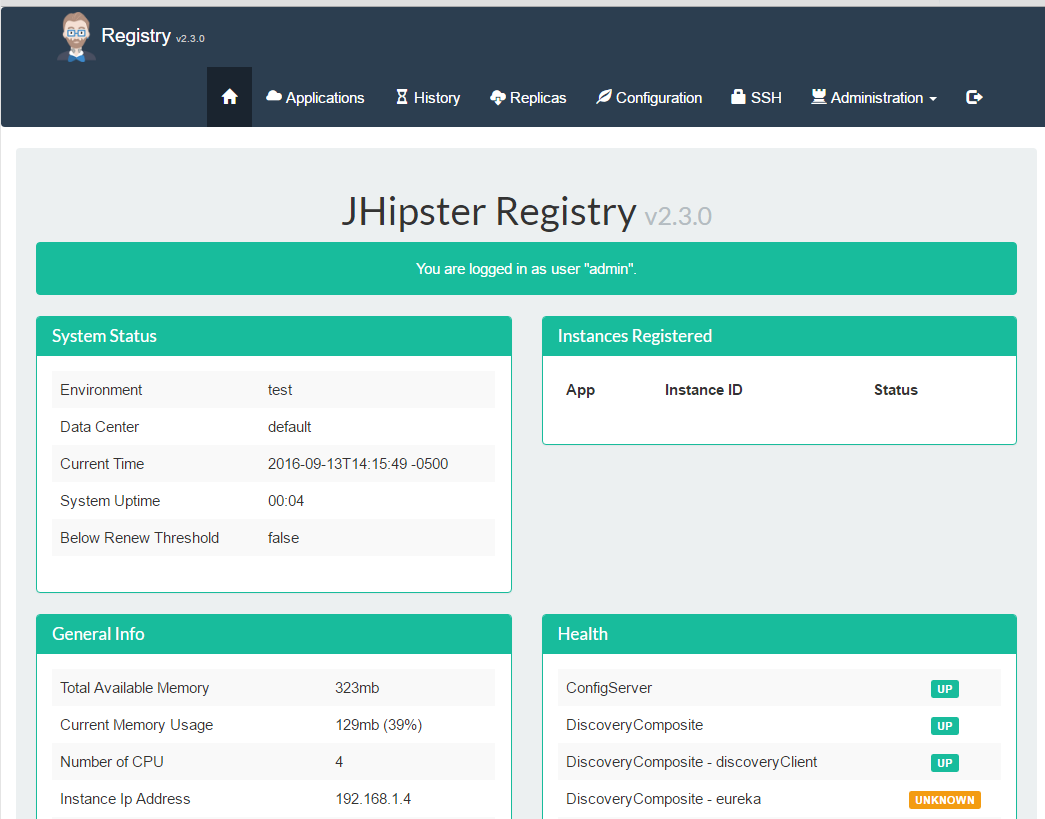
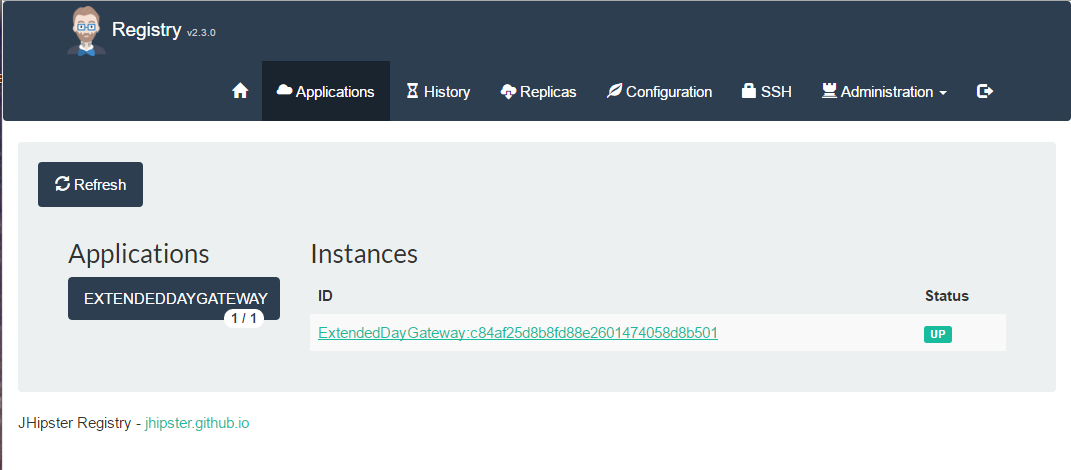
If you haven’t spun up the registry, go ahead and launch it. It should run on http://localhost:8761. Visit it, and see the basic information it has for you. Then click on the “Applications” link. Notice that it is blank.
Gateway
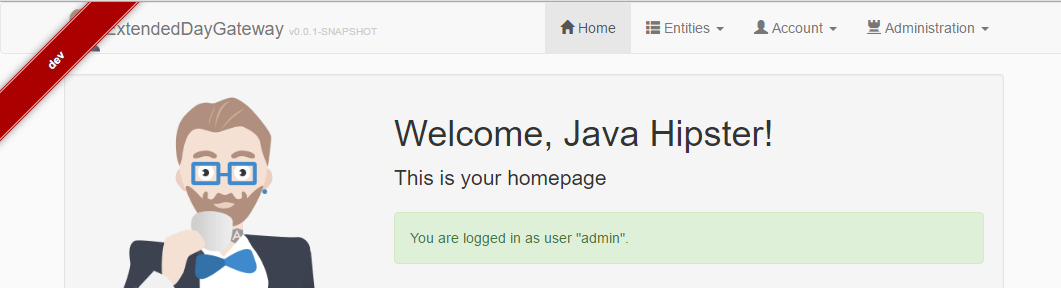
Now it is time to spin up the gateway. You will see this output in the console.
----------------------------------------------------------
	Application 'ExtendedDayGateway' is running! Access URLs:
	Local: 		http://127.0.0.1:8080
	External: 	http://192.168.1.4:8080
----------------------------------------------------------
2016-09-13 14:19:29.643  INFO 10856 --- [  restartedMain] c.wwc.extendedday.ExtendedDayGatewayApp  :
----------------------------------------------------------
	Config Server: 	Connected to the JHipster Registry config server!
----------------------------------------------------------
Notice how it shows you the URL and it shows you that it has gotten its configuration from the JHipster Registry. Let’s also go take a look at the application. http://localhost:8080
Also, take a look at the Applications page again in the registry application. http://localhost:8761/#/applications.
Notice that our Gateway shows up now. It is self registered.
Microservice App
Now we have two out of three of the items running. It’s now time for what will definitely be the powerhouse, I think, of this scenario. We will add in the microservice app that will provide our “backend” to whatever requests it.
1. Create a Java class to be our “api” endpoint. In our case we will just have one that returns a static data set. Easy peasy.
@RestController
@RequestMapping("/api")
public class DemoResource {...
2. Add a method to return our “students.”
/**
     * GET  /students : get all the students.
     *
     * @return the ResponseEntity with status 200 (OK) and the list of students in body
     */
    @JsonView(Student.Info.class)
    @RequestMapping(value = "/demostudents",
        method = RequestMethod.GET,
        produces = MediaType.APPLICATION_JSON_VALUE)
    @Timed
    public List<Student> getAllStudents() {
        log.debug("REST request to get all Students");

        List<Student> userStudents = new ArrayList<Student>();
        Student student = new Student();

        student.setFirstName("Joe");
        student.setLastName("Smith");
        student.setSex(0);
        student.setGrade(3);

        userStudents.add(student);

        return userStudents;
    }
3. Save and spin up the microservice. It should look something like this:
----------------------------------------------------------
	Application 'extendedDayAPI' is running! Access URLs:
	Local: 		http://127.0.0.1:8081
	External: 	http://192.168.1.4:8081
----------------------------------------------------------
2016-09-14 11:36:13.927  INFO 13980 --- [  restartedMain] com.wwc.extendedday.ExtendedDayApiApp    :
----------------------------------------------------------
	Config Server: 	Connected to the JHipster Registry config server!
----------------------------------------------------------
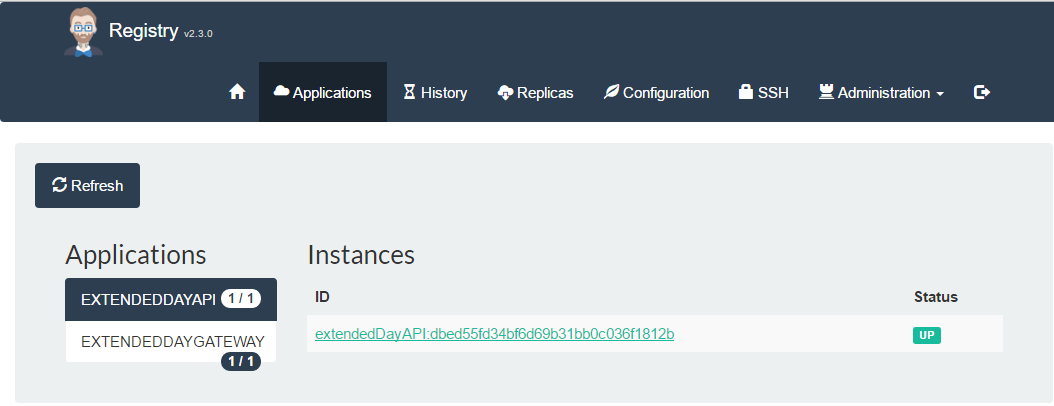
4. Revisit http://localhost:8761/#/applications again or refresh the view. Notice how our microservice has registered itself.
5. Go to your browser and type in http://localhost:8080/yourappapiname/api/demostudents. Note that you will be forbidden even if you have logged in.
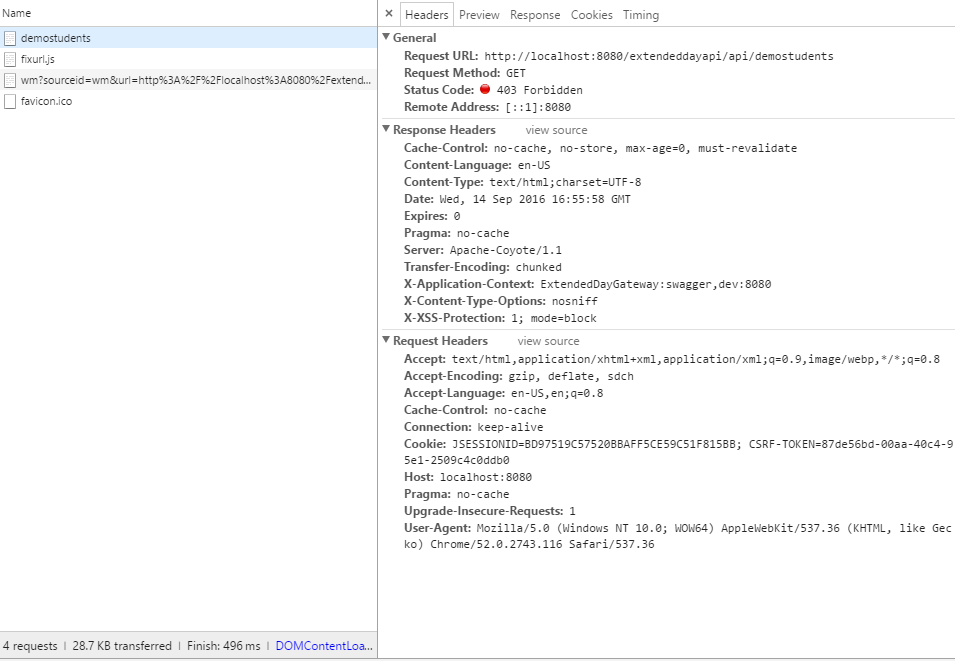
6. Log out of localhost:8080 and then back in with Chrome open.
Then inspect the login call and grab the token in “Authorization.” It should start with “Bearer…” and then a whole bunch of encoded stuff. Select it all.
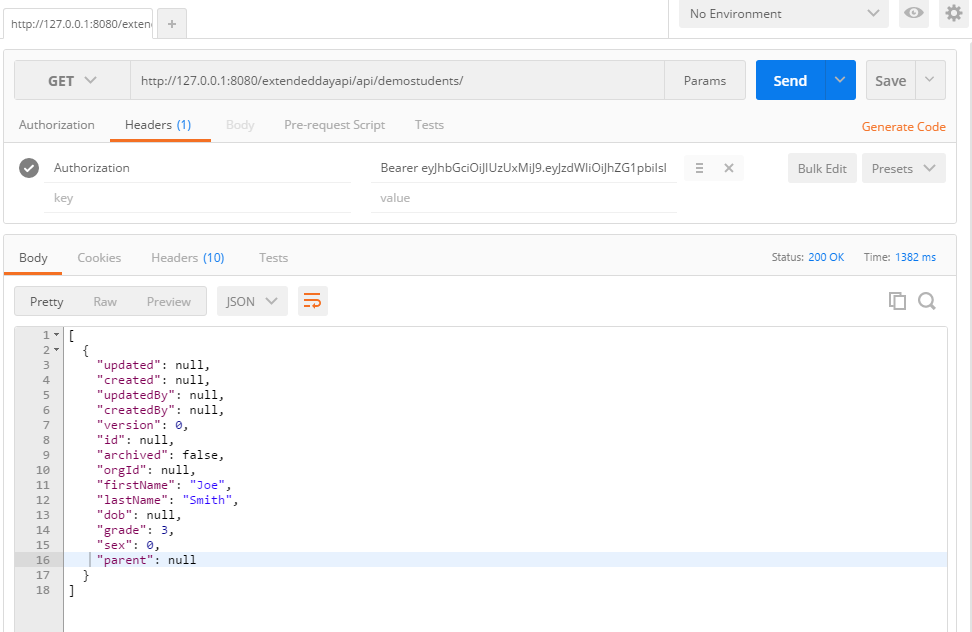
You must pass this token with your request. There are many different ways to do this via your code. In our test scenario,
- Postman will suffice to show you the output.
- Open up postman
- Type in your API call from above
- Under “Headers” add in the “Authorization” key and paste in the token you grabbed.
You should see something like this:
Woo hoo!!! You have done it! You have created a microservice using jHipster.
Conclusion
We have stepped through creating a microservice architecture using JHipster’s available options for creating a microservice. I hope that you have found this information helpful.
At this point, we can add as many different microservices we want to. Each has its own port number and functionality. In a distributed environment, we would have many instances that could be spun up/down as we make changes to them. Hopefully you can see the benefits and flexibility in decoupling our different layers of our architecture. Each layer is not dependent upon another to run.
The topics of Microservices, gateways, registries and in using different front ends does begin to go outside of the basic how-to’s of using JHipster. For more information about these topics, check out the free Keyhole blogs and white paper.
Check back for Part 3 with tricks, tips and gotchas when using JHipster. Have a great day and continue being “Hip.”
| Reference: | Getting Started With JHipster, Part 2 from our JCG partner Matt McCandless at the Keyhole Software blog. |
