Introduction
Elasticsearch (ES) is a search engine based on Lucene. It provides a distributed, multitenant-capable, full-text search engine with an HTTP web interface and schema-free JSON documents.
Kibana is an open source data visualization plugin for Elasticsearch. It provides visualization capabilities on top of the content indexed on an Elasticsearch cluster. Users can create bar, line, and scatter plots, or pie charts and maps on top of large volumes of data.
These two products are widely used in the market today for data analytics. However, security is one aspect that was not initially built into the product. Since data is the lifeline of any organization today, it becomes essential that Elasticsearch and Kibana be “secured.” In this blog post, we will be looking at one of the ways in which authentication, authorization, and encryption can be implemented for them.
Assumptions
The tutorial assumes the following:
- MapR Sandbox is running
- Elasticsearch and Kibana have been installed and are running
Options Available for Securing Elasticsearch and Kibana
The most popular options for securing Elasticsearch and Kibana are compared in the table below.
Shield is a security plugin developed by the same company that developed Elasticsearch. It allows you to easily protect this data with a username and password while simplifying your architecture. Advanced security features like encryption, role-based access control, IP filtering, and auditing are also available when you need them.
NGINX is an open source web server. It can act as a proxy server and can do load balancing, among other things. In combination with LUA and external scripts, it can be used for securing Elasticsearch and Kibana. We will be using this approach in this tutorial.
Searchguard is an open source alternative for Shield. It provides almost all the same functionalities as Shield, except for some features like LDAP authentication. However, these features are available in the paid variant.
| SHIELD | NGINX | SEARCHGUARD |
| A security plugin for Elasticsearch and Kibana made by Elasticsearch. | NGINX (pronounced “engine x”) is a web server. It can act as a reverse proxy server, load balancer, and an HTTP cache. | Search Guard is an Elasticsearch plugin that offers encryption, authentication, and authorization. |
Has native support for:
| Role-based access control is implemented with the help of the LUA module.LDAP authentication can be implemented by the use of external programs. | No support for LDAP-based authentication or audit logging is available in the free version. |
| $1600 / Year / Cluster | Free. NGINX Plus is the paid version – $1900 / instance | Free. A commercial version is also available. |
Installing NGINX
NGINX is an open source web server, focused on high performance, concurrency, and a low memory footprint.
NGINX has been designed with a proxy role in mind from the start, and supports many related configuration directives and options. We will be using NGINX to set up LDAP-based authentication and authorization.
OpenResty™ is a full-fledged web platform by integrating the standard NGINX core, LuaJIT, many carefully written Lua libraries, lots of high quality, third party NGINX modules, and most of their external dependencies.
By taking advantage of various well-designed NGINX features, OpenResty effectively turns the NGINX server into a powerful web app server.
Steps
- Download the latest release of “OpenResty” from here:
http://openresty.org/en/download.html - Build and install the package using the following commands:
tar xvf openresty-.tar.gz

cd openresty-

./configure --prefix=/usr/local/openresty --with-luajit
--with-http_auth_request_module

gmake

gmake install

export PATH=/usr/local/openresty/bin:/usr/local/openresty/nginx/sbin:$PATH
Authentication
We will be looking at the following two methods of authentication in this tutorial:
- Basic HTTP Authentication
- LDAP Authentication
Basic HTTP Authentication
Step 1 — Installing Apache Tools
You’ll need the htpassword command to configure the password that will restrict access to Elasticsearch and Kibana. This command is part of the apache2-utils package, so the first step is to install that package.
sudo apt-get install apache2-utils
Step 2 — Setting up HTTP Basic Authentication Credentials
In this step, you’ll create a password for the user who should be allowed access to Elasticsearch and Kibana. That password and the associated username will be stored in a file that you specify.
The password will be encrypted and the name of the file can be anything you like. Here, we use the file /opt/elk/.espasswd and the username vikash.
To create the password, run the following command. You’ll need to authenticate, then specify and confirm a password.
sudo htpasswd -c /opt/elk/.espasswd vikash
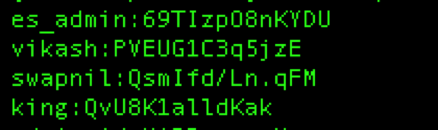
You can check the contents of the newly created file to see the username and hashed password.
cat /opt/elk/.espasswd
Step 3 — Updating the NGINX Configuration
Now that you’ve created the HTTP basic authentication credential, the next step is to update the NGINX configuration for Elasticsearch and Kibana to use it.
HTTP basic authentication is made possible by the auth_basic and auth_basic_user_file directives.
The value of auth_basic is any string, and will be displayed at the authentication prompt. The value of auth_basic_user_file is the path to the password file that was created in Step 2. Both directives should be added under the location section.
Check if any NGINX processes are running and kill them:
cd /usr/local/openresty/nginx/
sbin/nginx -s stop

		(Or)

      ps –ef | grep nginx
kill -9 <pid1> <pid2> …. <pidn>
Start the NGINX server with this configuration file as given below:
cd /usr/local/openresty/nginx
sbin/nginx -p $PWD -c conf/nginx_basic_http_authentication.conf
The contents of the configuration file are given below:
worker_processes 1;
error_log /usr/local/openresty/nginx/logs/lua.log debug;
events {
worker_connections 1024;
}
http {
upstream elasticsearch {
server 127.0.0.1:9201;
keepalive 15;
}
upstream kibana {
server 127.0.0.1:5701;
keepalive 15;
}
server {
listen 8881;
location / {
auth_basic "Protected Elasticsearch";<
auth_basic_user_file /opt/elk/.espasswd;
proxy_pass http://elasticsearch;
proxy_redirect off;
proxy_buffering off;
proxy_http_version 1.1;
proxy_set_header Connection "Keep-Alive";
proxy_set_header Proxy-Connection "Keep-Alive";
}
}
server {
listen 8882;
location / {
auth_basic "Protected Kibana";
auth_basic_user_file /opt/elk/.espasswd;
proxy_pass http://kibana;
proxy_redirect off;
proxy_buffering off;
proxy_http_version 1.1;
proxy_set_header Connection "Keep-Alive";
proxy_set_header Proxy-Connection "Keep-Alive";
}
}
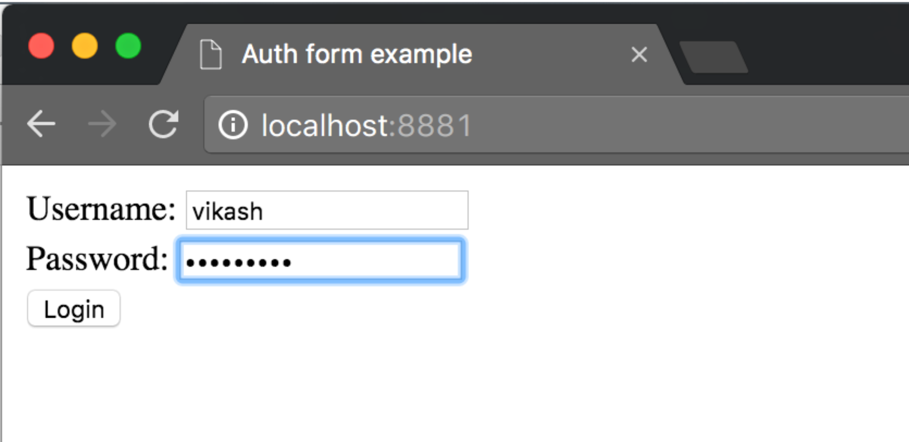
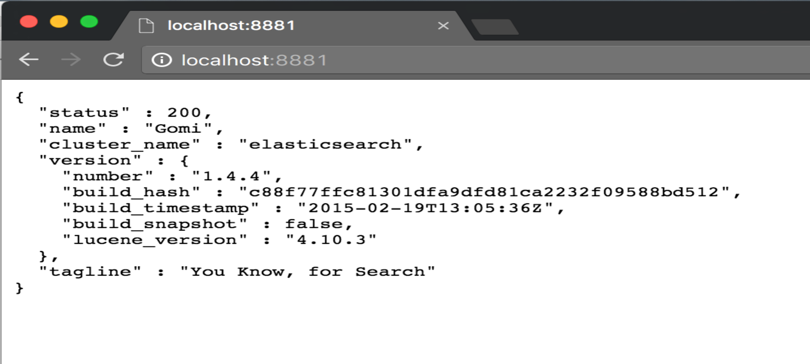
}Provided below are the screenshots when the user tries to access Elasticsearch.
Note: NGINX is configured to listen to port 8881 for connections to Elasticsearch and port 8882 for connections to Kibana in this example.
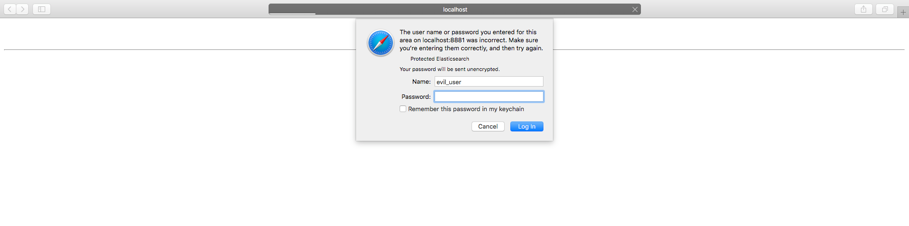
Screenshots showing “evil_user” not having access to Elasticsearch
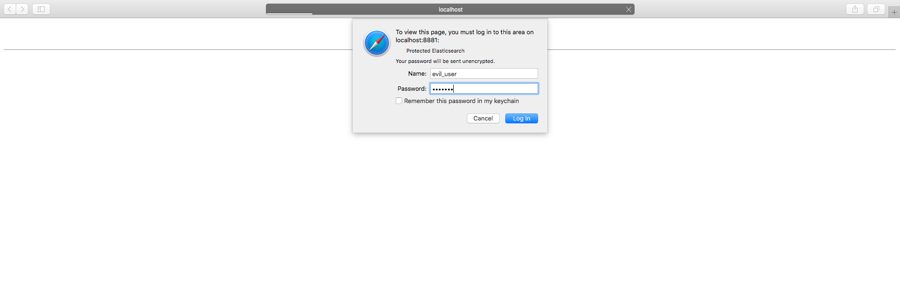
Since the user is not present in the password file he/she has been redirected to the Login page again.
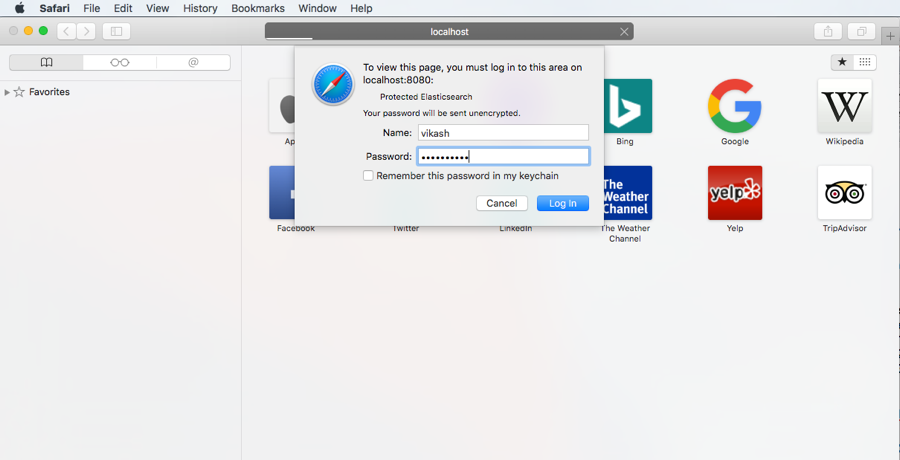
Screenshot showing that user ‘vikash’ has access to Elasticsearch


LDAP Authentication
Step 1: If an LDAP server is not already running, install and configure one. For the purpose of this example, please follow the instructions at https://github.com/osixia/docker-openldap to setup a LDAP server.
As the LDAP server runs on a Docker container, the below commands will be useful for restarting and performing administrative tasks with it:
docker ps –a – Lists all Docker processes running
docker exec -it <Docker PID> bash – Opens a bash shell on the Docker machine
Step 2: For the purpose of this example, we will be running a backend server written in Python, which serves a Login page, and an LDAP Authentication Daemon written in Python. The Python code files are available in this GitHub repository:
https://github.com/nginxinc/nginx-ldap-auth
Step 3: On the host where the ldap-auth daemon is to run, install the following additional software. We recommend using the versions that are distributed with the operating system, instead of downloading the software from an open source repository.
- Python version 2. Version 3 is not supported.
- The Python LDAP module, python-ldap (By python-ldap.org OS project).
Step 4: Provided below is the NGINX Plus configuration file. The important directives are discussed herein.
Filename - /usr/local/openresty/nginx/conf/conf/nginx-ldap-auth.conf

error_log logs/error.log debug;

error_log /usr/local/openresty/nginx/logs/lua.log notice;

events { }

http {
    proxy_cache_path cache/  keys_zone=auth_cache:10m;

    # The back-end daemon listens on port 9000 as implemented
    # in backend-sample-app.py.
    # Change the IP address if the daemon is not running on the
    # same host as NGINX/NGINX Plus.
    upstream backend {
        server 127.0.0.1:9000;
    }

    upstream elasticsearch {
        server 127.0.0.1:9200;
    }

    upstream kibana4 {
        server 127.0.0.1:5601;
    }

    # NGINX/NGINX Plus listen on port 8081 for requests that require
    # authentication. Change the port number as appropriate.


    server {
        listen 8881;

        # Protected application
        location / {

            auth_request /auth-proxy;

            # redirect 401 and 403 to login form
            error_page 401 403 =200 /login;

       	    auth_request_set $user $upstream_http_LDAPUser;

	    access_by_lua_file '/usr/local/openresty/nginx/authorize_es_ldap.lua';

	    proxy_pass http://elasticsearch/;
        }


        location /login {
            proxy_pass http://backend/login;
	    # Login service returns a redirect to the original URI
            # and sets the cookie for the ldap-auth daemon
            proxy_set_header X-Target $request_uri;
        }

        location = /auth-proxy {
            internal;

            # The ldap-auth daemon listens on port 8888, as set
            # in nginx-ldap-auth-daemon.py.
            # Change the IP address if the daemon is not running on
            # the same host as NGINX/NGINX Plus.
            proxy_pass http://127.0.0.1:8888;

            proxy_pass_request_body off;
            proxy_set_header X-Target 'http://localhost:9200/';
	    #proxy_set_header Content-Length "";
            proxy_cache auth_cache;
            proxy_cache_valid 200 403 10m;

            # The following directive adds the cookie to the cache key
            proxy_cache_key "$http_authorization$cookie_nginxauth";

            # As implemented in nginx-ldap-auth-daemon.py, the ldap-auth daemon
            # communicates with an OpenLDAP server, passing in the following
            # parameters to specify which user account to authenticate. To
            # eliminate the need to modify the Python code, this file contains
            # 'proxy_set_header' directives that set the values of the
            # parameters. Set or change them as instructed in the comments.
            #
            #    Parameter      Proxy header
            #    -----------    ----------------
            #    basedn         X-Ldap-BaseDN
            #    binddn         X-Ldap-BindDN
            #    bindpasswd     X-Ldap-BindPass
            #    cookiename     X-CookieName
            #    realm          X-Ldap-Realm
            #    template       X-Ldap-Template
            #    url            X-Ldap-URL

            # (Required) Set the URL and port for connecting to the LDAP server,
            # by replacing 'example.com' and '636'.
            proxy_set_header X-Ldap-URL      "ldap://172.17.0.1:389";

            # (Required) Set the Base DN, by replacing the value enclosed in
            # double quotes.
            proxy_set_header X-Ldap-BaseDN   "dc=example,dc=org";

            # (Required) Set the Bind DN, by replacing the value enclosed in
            # double quotes.
            proxy_set_header X-Ldap-BindDN   "cn=admin,dc=example,dc=org";

            # (Required) Set the Bind password, by replacing 'secret'.
            proxy_set_header X-Ldap-BindPass "admin";

            # (Required) The following directives set the cookie name and pass
            # it, respectively. They are required for cookie-based
            # authentication. Comment them out if using HTTP basic
            # authentication.
            proxy_set_header X-CookieName "nginxauth";
            proxy_set_header Cookie nginxauth=$cookie_nginxauth;

            # (Required if using Microsoft Active Directory as the LDAP server)
            # Set the LDAP template by uncommenting the following directive.
            #proxy_set_header X-Ldap-Template "(SAMAccountName=%(username)s)";

            # (Optional if using OpenLDAP as the LDAP server) Set the LDAP
            # template by uncommenting the following directive and replacing
            # '(cn=%(username)s)' which is the default set in
            # nginx-ldap-auth-daemon.py.
            #proxy_set_header X-Ldap-Template "(cn=%(username)s)";

            # (Optional) Set the realm name, by uncommenting the following
            # directive and replacing 'Restricted' which is the default set
            # in nginx-ldap-auth-daemon.py.
            #proxy_set_header X-Ldap-Realm    "Restricted";

	}
    }


    server {
        listen 8882;

        # Protected application
        location / {

            auth_request /auth-proxy;

            # redirect 401 and 403 to login form
            error_page 401 403 =200 /login;

       	    auth_request_set $user $upstream_http_LDAPUser;

	    access_by_lua_file '/usr/local/openresty/nginx/authorize_kibana4_ldap.lua';

	    proxy_pass http://kibana4/;
        }


        location /login {
            proxy_pass http://backend/login;
	    # Login service returns a redirect to the original URI
            # and sets the cookie for the ldap-auth daemon
            proxy_set_header X-Target $request_uri;
        }

        location = /auth-proxy {
            internal;

            # The ldap-auth daemon listens on port 8888, as set
            # in nginx-ldap-auth-daemon.py.
            # Change the IP address if the daemon is not running on
            # the same host as NGINX/NGINX Plus.
            proxy_pass http://127.0.0.1:8888;

            proxy_pass_request_body off;
            proxy_set_header X-Target 'http://localhost:5601/';
	    #proxy_set_header Content-Length "";
            proxy_cache auth_cache;
            proxy_cache_valid 200 403 10m;

            # The following directive adds the cookie to the cache key
            proxy_cache_key "$http_authorization$cookie_nginxauth";

            # As implemented in nginx-ldap-auth-daemon.py, the ldap-auth daemon
            # communicates with an OpenLDAP server, passing in the following
            # parameters to specify which user account to authenticate. To
            # eliminate the need to modify the Python code, this file contains
            # 'proxy_set_header' directives that set the values of the
            # parameters. Set or change them as instructed in the comments.
            #
            #    Parameter      Proxy header
            #    -----------    ----------------
            #    basedn         X-Ldap-BaseDN
            #    binddn         X-Ldap-BindDN
            #    bindpasswd     X-Ldap-BindPass
            #    cookiename     X-CookieName
            #    realm          X-Ldap-Realm
            #    template       X-Ldap-Template
            #    url            X-Ldap-URL

            # (Required) Set the URL and port for connecting to the LDAP server,
            # by replacing 'example.com' and '636'.
            proxy_set_header X-Ldap-URL      "ldap://172.17.0.1:389";

            # (Required) Set the Base DN, by replacing the value enclosed in
            # double quotes.
            proxy_set_header X-Ldap-BaseDN   "dc=example,dc=org";

            # (Required) Set the Bind DN, by replacing the value enclosed in
            # double quotes.
            proxy_set_header X-Ldap-BindDN   "cn=admin,dc=example,dc=org";

            # (Required) Set the Bind password, by replacing 'secret'.
            proxy_set_header X-Ldap-BindPass "admin";

            # (Required) The following directives set the cookie name and pass
            # it, respectively. They are required for cookie-based
            # authentication. Comment them out if using HTTP basic
            # authentication.
            proxy_set_header X-CookieName "nginxauth";
            proxy_set_header Cookie nginxauth=$cookie_nginxauth;

            # (Required if using Microsoft Active Directory as the LDAP server)
            # Set the LDAP template by uncommenting the following directive.
            #proxy_set_header X-Ldap-Template "(SAMAccountName=%(username)s)";

            # (Optional if using OpenLDAP as the LDAP server) Set the LDAP
            # template by uncommenting the following directive and replacing
            # '(cn=%(username)s)' which is the default set in
            # nginx-ldap-auth-daemon.py.
            #proxy_set_header X-Ldap-Template "(cn=%(username)s)";

            # (Optional) Set the realm name, by uncommenting the following
            # directive and replacing 'Restricted' which is the default set
            # in nginx-ldap-auth-daemon.py.
            #proxy_set_header X-Ldap-Realm    "Restricted";

	}
    }

}
LDAP Settings
# URL and port for connecting to the LDAP server
# Use “ldaps://< IP Address of the LDAP Server >:636” if you are using secure LDAP
proxy_set_header X-Ldap-URL "ldap://< IP Address of the LDAP Server > ";

# Base DN
proxy_set_header X-Ldap-BaseDN "cn=admin,dc=example,dc=org";

# Bind DN
proxy_set_header X-Ldap-BindDN "cn=admin,dc=example,dc=org";

# Bind password
proxy_set_header X-Ldap-BindPass "admin";


IP Address for Backend Daemon

If the backend daemon is not running on the same host as NGINX Plus, change the IP address for it in the upstream configuration block:

upstream backend {
    server 127.0.0.1:9000;
 }

IP Address for ldap-auth Daemon

If the ldap-auth daemon is not running on the same host as NGINX Plus, change the IP address in this proxy_pass directive:

location = /auth-proxy {
    proxy_pass http://127.0.0.1:8888;
    ...
}

IP Address and Port on Which NGINX Listens

If the client is not running on the same host as NGINX Plus, change the IP address in this listen directive (or remove the address completely to accept traffic from any client). You can also change the port on which NGINX listens from 8081 if you wish:

server {
    listen 127.0.0.1:8081;
    …
 }
Note: Elasticsearch is running on port 9200 and NGINX is listening for connections to Elasticsearch on port 8081.
Step 5: Start the NGINX server, backend and LDAP authentication daemon:
Check if any NGINX server process is already running and kill them:
cd /usr/local/openresty/nginx/
 sbin/nginx -s stop

		(Or)

 ps –ef | grep nginx
kill -9 <pid1> <pid2> …. <pidn>
Start the NGINX server with the corresponding configuration file:
cd  /usr/local/openresty/nginx/
sbin/nginx -p $PWD -c conf/nginx-ldap-auth.conf
Start the backend server:
cd  /usr/local/openresty/nginx-ldap-auth
python backend-sample-app.py
Start the LDAP authentication daemon:
cd  /usr/local/openresty/nginx-ldap-auth
python nginx-ldap-auth-daemon.py
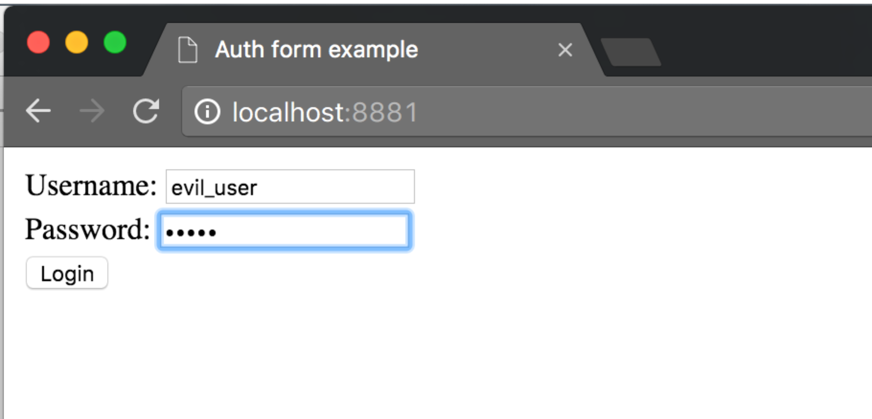
Below are screenshots showing the output from the backend, LDAP authentication daemon, and the browser trying to access Elasticsearch.
- Trying to access Elasticsearch with invalid credentials

- LDAP authentication daemon showing authentication failure (drag image at bottom corner to get a clearer view).

- Trying to access Elasticsearch by providing valid credentials

- Web browser being redirected to Elasticsearch upon successful authentication

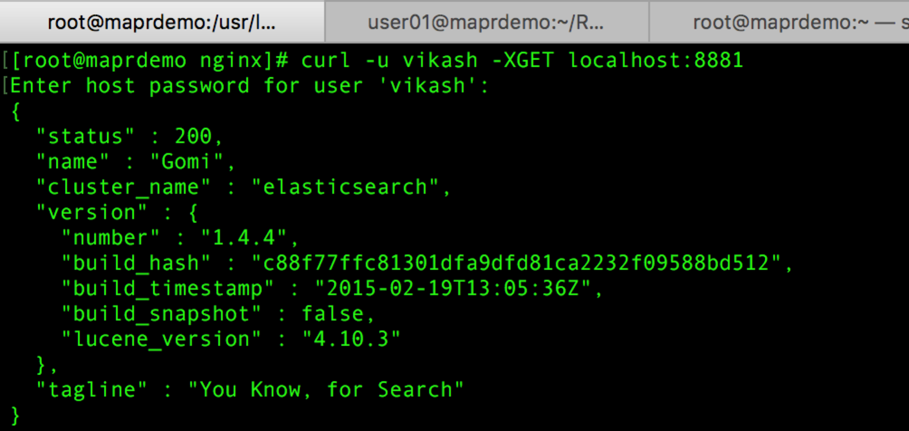
- LDAP authentication for CURL requests


Authorization
We will be showing how to implement the following methods of authorization:
- Access Control based on LUA scripts
- Multi Level Security for different Elasticsearch / Kibana instances
Access Control with LUA Scripts
The “access_by_lua_file” directive in NGINX configuration file is used to specify the path to the LUA file that controls access to a specific resource within Elasticsearch.
Below is a sample LUA script which shows how to allow only user “vikash” to access the index “traffic” and restrict user “swapnil”.
-- authorization rules

local restrictions = {
  all  = {
    ["^/$"]                             = { "HEAD" }
  },

  swapnil = {
    ["^/$"]                             = { "GET" },
    ["^/?[^/]*/?[^/]*/_search"]         = { "GET", "POST" },
    ["^/?[^/]*/?[^/]*/_msearch"]        = { "GET", "POST" },
    ["^/?[^/]*/?[^/]*/_validate/query"] = { "GET", "POST" },
    ["/_aliases"]                       = { "GET" },
    ["/_cluster.*"]                     = { "GET" }
  },
  vikash = {
    ["^/$"]                             = { "GET" },
    ["^/?[^/]*/?[^/]*/_search"]         = { "GET", "POST" },
    ["^/?[^/]*/?[^/]*/_msearch"]        = { "GET", "POST" },
    ["^/?[^/]*/traffic*"]               = { "GET", "POST", "PUT", "DELETE" },
    ["^/?[^/]*/?[^/]*/_validate/query"] = { "GET", "POST" },
    ["/_aliases"]                       = { "GET" },
    ["/_cluster.*"]                     = { "GET" }
  },

  admin = {
    ["^/?[^/]*/?[^/]*/_bulk"]          = { "GET", "POST" },
    ["^/?[^/]*/?[^/]*/_refresh"]       = { "GET", "POST" },
    ["^/?[^/]*/?[^/]*/?[^/]*/_create"] = { "GET", "POST" },
    ["^/?[^/]*/?[^/]*/?[^/]*/_update"] = { "GET", "POST" },
    ["^/?[^/]*/?[^/]*/?.*"]            = { "GET", "POST", "PUT", "DELETE" },
    ["^/?[^/]*/?[^/]*$"]               = { "GET", "POST", "PUT", "DELETE" },
    ["/_aliases"]                      = { "GET", "POST" }
  }
}

-- get authenticated user as role
local role = ngx.var.remote_user
ngx.log(ngx.DEBUG, role)

-- exit 403 when no matching role has been found
if restrictions[role] == nil then
  ngx.header.content_type = 'text/plain'
  ngx.log(ngx.WARN, "Unknown role ["..role.."]")
  ngx.status = 403
  ngx.say("403 Forbidden: You don\'t have access to this resource.")
  return ngx.exit(403)
end

-- get URL
local uri = ngx.var.uri
ngx.log(ngx.DEBUG, uri)

-- get method
local method = ngx.req.get_method()
ngx.log(ngx.DEBUG, method)

local allowed  = false

for path, methods in pairs(restrictions[role]) do

  -- path matched rules?
  local p = string.match(uri, path)

  local m = nil

  -- method matched rules?
  for _, _method in pairs(methods) do
    m = m and m or string.match(method, _method)
  end

  if p and m then
    allowed = true
    ngx.log(ngx.NOTICE, method.." "..uri.." matched: "..tostring(m).." "..tostring(path).." for "..role)
    break
  end
end

if not allowed then
  ngx.header.content_type = 'text/plain'
  ngx.log(ngx.WARN, "Role ["..role.."] not allowed to access the resource ["..method.." "..uri.."]")
  ngx.status = 403
  ngx.say("403 Forbidden: You don\'t have access to this resource.")
  return ngx.exit(403)
end
cd /usr/local/openresty/nginx/ sbin/nginx -s stop (Or) ps –ef | grep nginx kill -9 <pid1> <pid2> …. <pidn>
Start NGINX service with these configurations:
cd /usr/local/openresty/nginx/ sbin/nginx -p $PWD -c conf/nginx_authorize_by_lua.conf
Screenshots showing access being denied to the “traffic” index for user ‘swapnil’
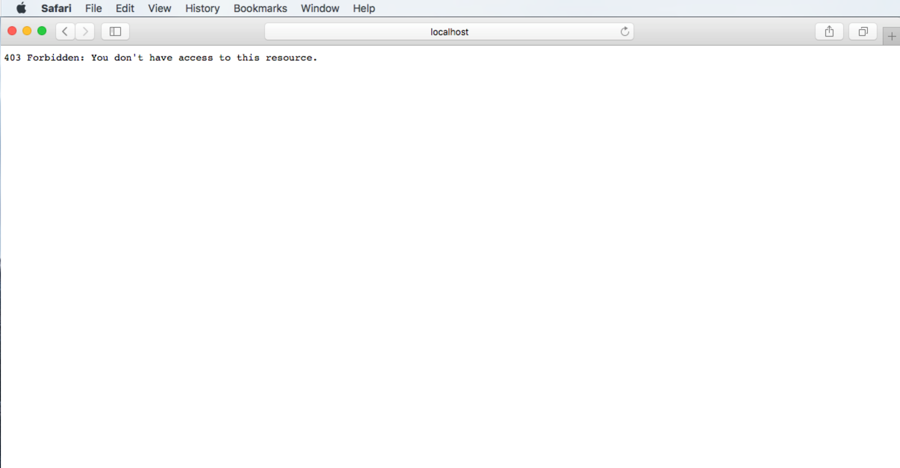
Screenshots showing user ‘swapnil’ being able to access other resources other than “traffic”
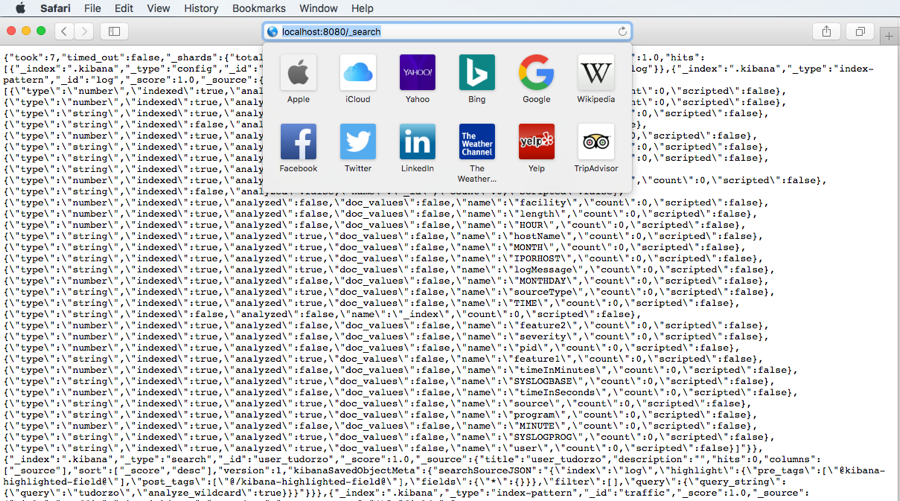
Screenshot showing that user ‘vikash’ has access to “traffic” index
Multilevel Security (MLS)
The problem with the above approach is that we cannot replicate that process for Kibana. Kibana gets all its data from Elasticsearch, and it rewrites all the URLs internally, so we no longer know what are the URLs and hence cannot write rules for them.
In situations like these, it is better to go for MLS approaches. Accordingly, we will be having three different instances of Elasticsearch and Kibana, each corresponding to different levels of clearance, and thus we solve the problem of authorization. Authentication for these instances can be either Basic HTTP Authentication or LDAP-based.
Step 1: Setup multiple instances of Elasticsearch (ES) and expose one common URL to the end users. In this case, it was set to http://localhost:8081.
For this experiment, three Elasticsearch instances were set up, each listening to a different port on the local machine.
ES Node 1 – http://localhost:9201 ES Node 2 – http://localhost:9202 ES Node 3 – http://localhost:9203
Create three different Elasticsearch configuration files, one for each of these instances, and run them using the following command:
ES_HOME=/opt/elk/elasticsearch-1.4.4/ nohup $ES_HOME/bin/elasticsearch \ -Des.config=$ES_HOME/config/elasticsearch_node1.yml >> /tmp/elasticsearch_node1.out \ 2>&1 & nohup $ES_HOME/bin/elasticsearch \ -Des.config=$ES_HOME/config/elasticsearch_node2.yml >> /tmp/elasticsearch_node2.out \ 2>&1 & nohup $ES_HOME/bin/elasticsearch \ -Des.config=$ES_HOME/config/elasticsearch_node3.yml >> /tmp/elasticsearch_node3.out \ 2>&1 &
A sample configuration file for Elasticsearch is given in the resource section. The name of the file is :
/opt/elk/elasticsearch-1.4.4/config/elasticsearch_node1.yml
Step 2: Setup multiple instances of Kibana, one for each level of clearance and expose one URL for the end users; in this case, it was set to http://localhost:8082.
For this experiment, three Kibana instances were set up, each listening to a different port on the local machine corresponding to a different clearance level.
Kibana Node 1 – http://localhost:5701 - Top Secret – Connects to ES Node 1 Kibana Node 2 – http://localhost:5702 - Secret – Connects to ES Node 2 Kibana Node 3 – http://localhost:5703 - Public – Connects to ES Node 3
Run them using the following command:
nohup /opt/elk/kibana_nodes/kibana_node1/bin/kibana > /tmp/kibana_node1.out 2>&1 & nohup /opt/elk/kibana_nodes/kibana_node2/bin/kibana > /tmp/kibana_node2.out 2>&1 & nohup /opt/elk/kibana_nodes/kibana_node3/bin/kibana > /tmp/kibana_node3.out 2>&1 &
A sample configuration file for Kibana is given in the resource section. The name of the file is :
/opt/elk/kibana_nodes/kibana_node1/config/kibana.yml
Step 3: Setup a NGINX proxy listening for connections to either Elasticsearch (ES) or Kibana (NGINX will be listening on http://localhost:8081 for connections to ES and http://localhost:8082 for connections to Kibana). Kindly look at the File “Installing NGINX And LDAP Authentication.docx” in the zip for step by step instructions on how to setup the same.
Authenticate the user against an LDAP database and check what level of authorization he/she has based on information read from a database (in this case, a local file which contained a listing of users and authorization levels was used), and redirect the user to the appropriate Elasticsearch / Kibana server.
LDAP Server – Runs on a Docker container (https://github.com/osixia/docker-openldap)
User-Roles Database – The file is provided in the resources section (File Name – “user_authorization_level.dat”)
NGINX Config File – The file is provided in the resources section (File Name – “nginx-ldap-auth-clusters.conf”)
Python Daemon to check against LDAP Server (File Name “nginx-ldap-auth-daemon.py”)
Python Backend Login Form (File Name “backend-sample-app.py”)
Both the above Python files can be found at: https://github.com/nginxinc/nginx-ldap-auth
Step 4: Start the NGINX server as given below:
Check if any NGINX server processes are already running and kill them:
cd /usr/local/openresty/nginx/
 sbin/nginx -s stop

		(Or)

 ps –ef | grep nginx
kill -9 <pid1> <pid2> …. <pidn>
Start the backend server:
cd /usr/local/openresty/nginx-ldap-auth python backend-sample-app.py
Start the LDAP authentication daemon:
cd /usr/local/openresty/nginx-ldap-auth python nginx-ldap-auth-daemon.py
Check if any NGINX server processes are already running and kill them:
cd /usr/local/openresty/nginx/
 sbin/nginx -s stop

		(Or)

 ps –ef | grep nginx
kill -9 <pid1> <pid2> …. <pidn>
Start the NGINX server with the corresponding configuration file:
cd /usr/local/openresty/nginx/
sbin/nginx -p $PWD -c conf/nginx-ldap-auth-clusters.conf
Screenshots:
The user “admin” is logged in and he has “Top Secret” clearance level. The Kibana server corresponding to this is http://localhost:5701 which is connected to the Elasticsearch server http://localhost:9201 which has only the index “shakespeare” in it.
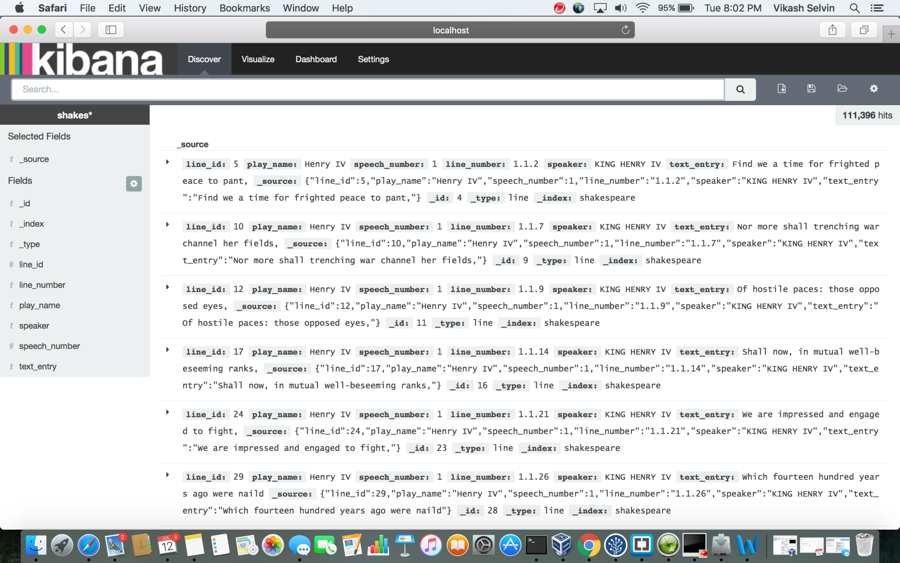
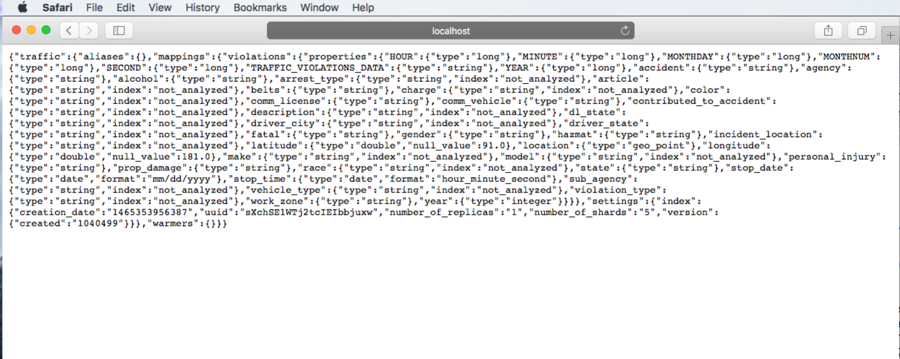
Elasticsearch showing that only “shakespeare” index is available on it


Log file showing that “user” admin has Top Secret “clearance” level

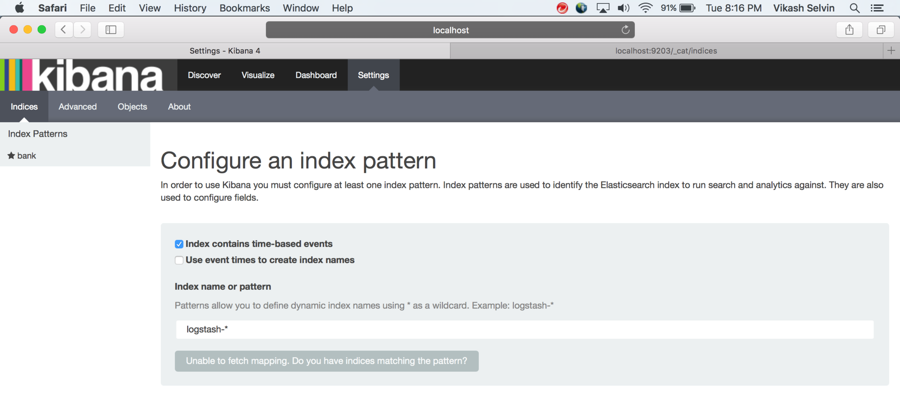
The user “vikash” is logged in and he has “Secret” clearance level. The Kibana server corresponding to this is http://localhost:5702 which is connected to the Elasticsearch server http://localhost:9202 which has the indices “logstash*” in it.

Elasticsearch showing that only “logstash*” indices are available on it


Log file showing that “user” vikash has only Secret “clearance” level

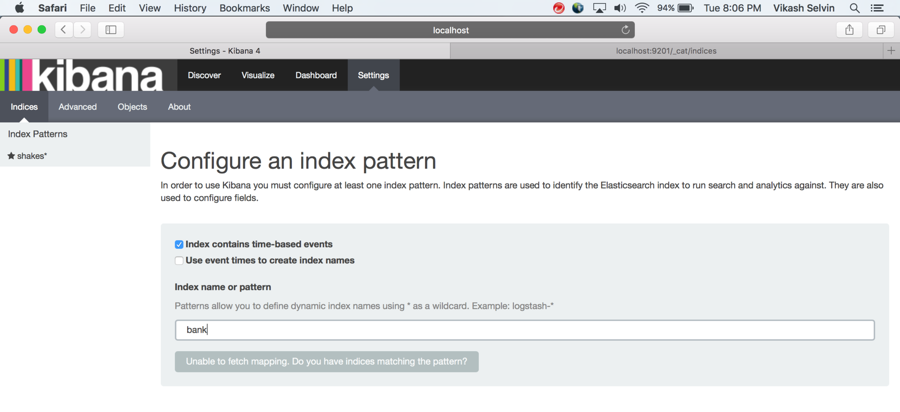
The user “swapnil” is logged in and he has “Public” clearance level. The Kibana server corresponding to this is http://localhost:5703 which is connected to the Elasticsearch server http://localhost:9203 which has only the index “bank” in it.
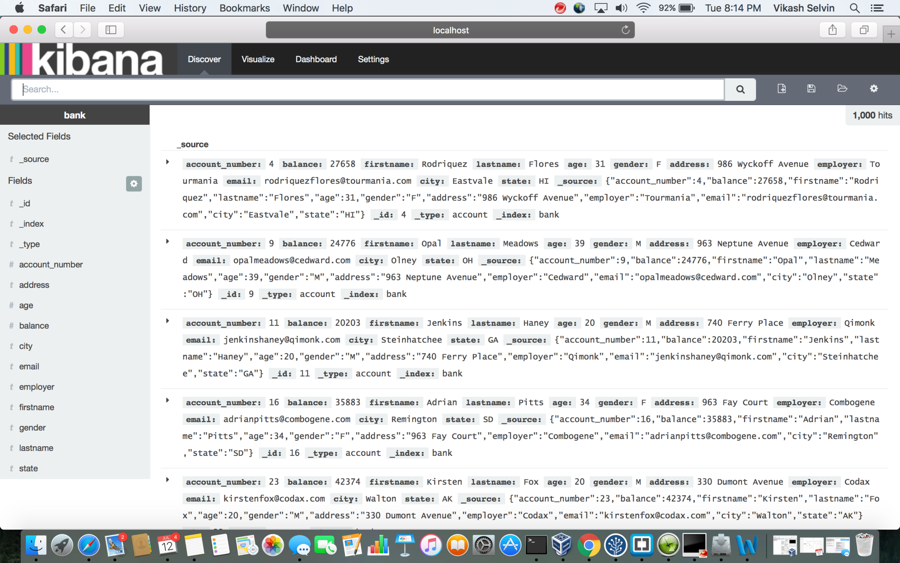
Elasticsearch showing that only “bank” index is available on it


Log file showing that “user” swapnil has only public “clearance” level

Note: All the index mappings and data was downloaded from
https://www.elastic.co/guide/en/kibana/current/getting-started.html
ENCRYPTION
If you noticed carefully you would have figured out that we have been using only “http” so far. In production environments, we would often want to use “https” as this encrypts all the data and prevents attackers from stealing the information. The tutorial below walks you through the steps needed to use “https” protocol.
Step 1: Create a self-signed SSL certificate.
cd /usr/local/openresty/nginx

mkdir certs

cd certs

openssl genrsa 2048 > host.key

openssl req -new -x509 -nodes -sha1 -days 3650 -key host.key > host.cert

openssl x509 -noout -fingerprint -text < host.cert > host.info

cat host.cert host.key > host.pem
Step 2: Add the information related to the certificate to the NGINX configuration file.
ssl on;
  ssl_certificate /usr/local/openresty/nginx/certs/host.cert;
  ssl_certificate_key /usr/local/openresty/nginx/certs/host.key;
  ssl_session_timeout 5m;
  ssl_protocols TLSv1.2 TLSv1.1 TLSv1;
  ssl_ciphers HIGH:!aNULL:!eNULL:!LOW:!MD5;
  ssl_prefer_server_ciphers on;
Note: The entire NGINX configuration file is provided below for your reference.
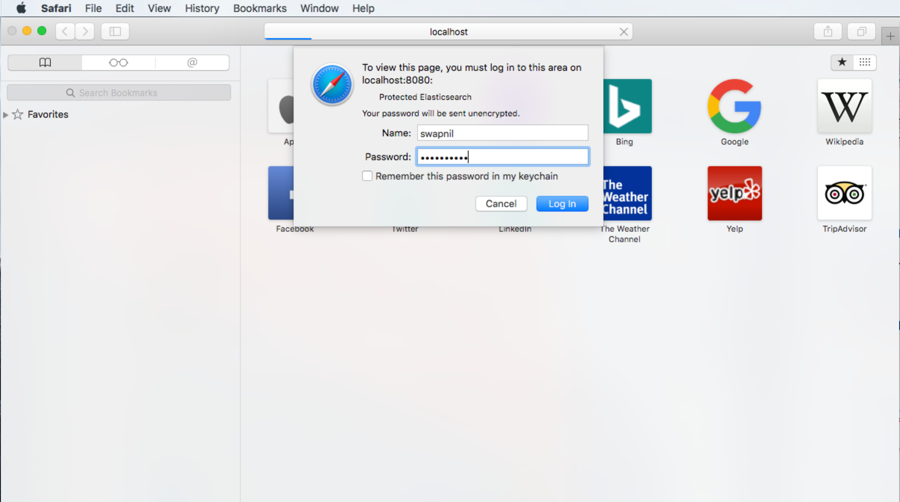
NGINX listens to port 8080 for connections to ES and it implements Basic HTTP Authentication
NGINX Config File
worker_processes  1;

error_log /usr/local/openresty/nginx/logs/nginx_https.log debug;

events {
  worker_connections 1024;
}

http {

	upstream elasticsearch {
  		server 127.0.0.1:9200;
  		keepalive 15;
	}

	server {
  		listen 8080;
  		keepalive_timeout   60s;
  		ssl on;
  		ssl_certificate /usr/local/openresty/nginx/certs/host.cert;
  		ssl_certificate_key /usr/local/openresty/nginx/certs/host.key;
  		ssl_session_timeout 1m;
  		ssl_protocols TLSv1.2 TLSv1.1 TLSv1;
  		ssl_ciphers HIGH:!aNULL:!eNULL:!LOW:!MD5;
  		ssl_prefer_server_ciphers on;

  		auth_basic "ElasticSearch";
  		auth_basic_user_file /opt/elk/.espasswd;

  		location / {
    			proxy_pass http://elasticsearch;
    			proxy_http_version 1.1;
    			proxy_set_header Connection "Keep-Alive";
    			proxy_set_header Proxy-Connection "Keep-Alive";
  		}
	}
}
Since this is a self-signed certificate, you will see a “red” https icon that is crossed out. If you use a certificate from a trusted third party like Verisign, you will see that it turns to a “green” icon.
In this blog post, you learned about one of the ways in which authentication, authorization, and encryption can be implemented for Elasticsearch and Kibana. If you have any questions, please ask them in the comments section below.
| Reference: | How to Secure Elasticsearch and Kibana from our JCG partner Chase Hooley at the Mapr blog. |

I am reading your article and when I trying to get the remote_user in lua, logs say that it is nil, …