Building Identity Management, including authentication and authorization? Try Stormpath! Our REST API and robust Java SDK support can eliminate your security risk and can be implemented in minutes. Sign up, and never build auth again!
Update 5/12/2016: Building a Java application? JJWT is a Java library providing end-to-end JWT creation and verification, developed by our very own Les Hazlewood. Forever free and open-source (Apache License, Version 2.0), JJWT is simple to use and understand. It was designed with a builder-focused fluent interface hiding most of its complexity. We’d love to have you try it out, and let us know what you think! (And, if you’re a Node developer, check out NJWT!)
In my last post, we covered a lot of ground, including how we traditionally go about securing websites, some of the pitfalls of using cookies and sessions, and how to address those pitfalls by traditional means.
In this post we’ll go beyond the traditional and take a deep dive into how token authentication with JWTs (JSON Web Tokens) not only addresses these concerns, but also gives us the benefit of inspectable meta-data and strong cryptographic signatures.
Token Authentication to the Rescue!
Let’s first examine what we mean by authentication and token in this context.
Authentication is proving that a user is who they say they are.
A token is a self-contained singular chunk of information. It could have intrinsic value or not. We are going to look at a particular type of token that does have intrinsic value and addresses a number of the concerns with session IDs.
JSON Web Tokens (JWTs)
JWTs are a URL-safe, compact, self-contained string with meaningful information that is usually digitally signed or encrypted. They’re quickly becoming a de-facto standard for token implementations across the web.
URL-safe is a fancy way of saying that the entire string is encoded so there are no special characters and the token can fit in a URL.
The string is opaque and can be used standalone in much the same way that session IDs are used. By opaque, I mean that looking at the string itself provides no additional information.
However, the string can also be decoded to pull out-meta data and it’s signature can be cryptographically verified so that your application knows that the token has not been tampered with.
JWTs and OAuth2 Access Tokens
Many OAuth2 implementations are using JWTs for their access tokens. It should be stated that the OAuth2 and JWT specifications are completely separate from each other and don’t have any dependencies on each other. Using JWTs as the token mechanism for OAuth2 affords a lot of benefit as we’ll see below.
JWTs can be stored in cookies, but all the rules for cookies we discussed before still apply. You can entirely replace your session id with a JWT. You can then gain the additional benefit of accessing the meta-information directly from that session id.
In the wild, they look like just another ugly string:
eyJ0eXAiOiJKV1QiLCJhbGciOiJIUzI1NiJ9.eyJpc3MiOiJodHRwOi8vdHJ1c3R5YXBwLmNvbS8iLCJleHAiOjEzMDA4MTkzODAsInN1YiI6InVzZXJzLzg5ODM0NjIiLCJzY29wZSI6InNlbGYgYXBpL2J1eSJ9.43DXvhrwMGeLLlP4P4izjgsBB2yrpo82oiUPhADakLs
If you look carefully, you can see that there are two periods in the string. These are significant as they delimit different sections of the JWT.
eyJ0eXAiOiJKV1QiLCJhbGciOiJIUzI1NiJ9
.
eyJpc3MiOiJodHRwOi8vdHJ1c3R5YXBwLmNvbS8iLCJleHAiOjEzMDA4MTkzODAsInN1YiI6InVzZXJzLzg5ODM0NjIiLCJzY29wZSI6InNlbGYgYXBpL2J1eSJ9
.
43DXvhrwMGeLLlP4P4izjgsBB2yrpo82oiUPhADakLs
JWT Structure
JWTs have a three part structure, each of which is base64-encoded:
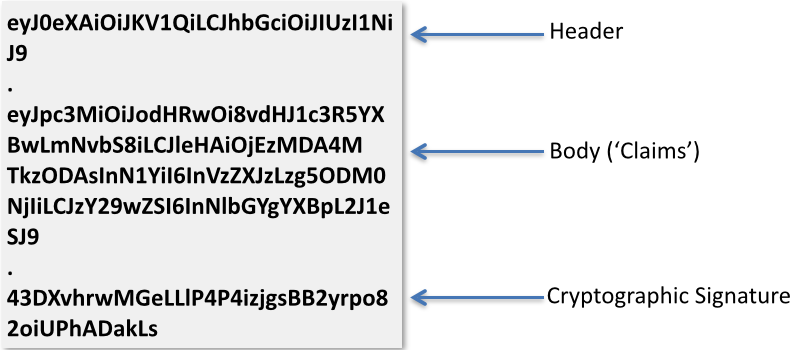
Here are the parts decoded:
Header
{
  "typ": "JWT",
  "alg": "HS256"
}
Claims
{
  "iss":"http://trustyapp.com/",
  "exp": 1300819380,
  "sub": "users/8983462",
  "scope": "self api/buy"
}
Cryptographic Signature
tß´—™à%O˜v+nî…SZu¯µ€U…8H×
JWT Claims
Let’s examine the claims sections. Each type of claim that is part of the JWT Specification can be found here.
iss is who issued the token.
exp is when the token expires.
sub is the subject of the token. This is usually a user identifier of some sort.
The above parts of the claim are all included in the JWT specification. scope is not included in the specification, but it is commonly used to provide authorization information. That is, what parts of the application the user has access to.
One advantage of JWTs is that arbitrary data can be encoded into the claims as with scope above. Another advantage is that the client can now react to this information without any further interaction with the server. For instance, a portion of the page may be hidden based on the data found in thescope claim.
NOTE: It is still critical and a best practice for the server to always verify actions taken by the client. If, for instance, some administrative action was being taken on the client, you would still want to verify on the application server that the current user had permission to perform that action. You would never rely on client side authorization information alone.
You may have picked up on another advantage: the cryptographic signature. The signature can be verified which proves that the JWT has not been tampered with. Note that the presence of a crytpographic signature does not guarantee confidentiality. Confidentiality is ensured only when the JWT is encrypted as well as signed.
Now, for the big kicker: statelessness. While the server will need to generate the JWT, it does not need to store it anywhere as all of the user meta-data is encoded right in to the JWT. The server and client could pass the JWT back and forth and never store it. This scales very well.
Managing Bearer Token Security
Implicit trust is a tradeoff. These types of tokens are often referred to as Bearer Tokens because all that is required to gain access to the protected sections of an application is the presentation of a valid, unexpired token.
You have to address issues like: How long should the token be good for? How will you revoke it? (There’s a whole other post we could do on refresh tokens.)
You have to be mindful of what you store in the JWT if they are not encrypted. Do not store any sensitive information. It is generally accepted practice to store a user identifier in the form of the subclaim. When a JWT is signed, it’s referred to as a JWS. When it’s encrypted, it’s referred to as a JWE.
Java, JWT and You!
We are very proud of the JJWT project on Github. Primarily authored by Stormpath’s own CTO, Les Hazlewood, it’s a fully open-source JWT solution for Java. It’s the easiest to use and understand library for creating and verifying JSON Web Tokens on the JVM.
How do you create a JWT? Easy peasy!
import io.jsonwebtoken.Jwts;
import io.jsonwebtoken.SignatureAlgorithm;

byte[] key = getSignatureKey();

String jwt =
    Jwts.builder().setIssuer("http://trustyapp.com/")
        .setSubject("users/1300819380")
        .setExpiration(expirationDate)
        .put("scope", "self api/buy")
        .signWith(SignatureAlgorithm.HS256,key)
        .compact();
The first thing to notice is the fluent builder api used to create a JWT. Method calls are chained culminating in the compact call which returns the final JWT string.
Also notice that when we are setting one of the claims from the specification, we use a setter. For example: .setSubject("users/1300819380"). When a custom claim is set, we use a call to put and specify both the key and value. For example: .put("scope", "self api/buy")
It’s just as easy to verify a JWT.
String subject = "HACKER";
try {
    Jws jwtClaims =
        Jwts.parser().setSigningKey(key).parseClaimsJws(jwt);

    subject = claims.getBody().getSubject();

    //OK, we can trust this JWT

} catch (SignatureException e) {

    //don't trust the JWT!
}
If the JWT has been tampered with in any way, parsing the claims will throw a SignatureExceptionand the value of the subject variable will stay HACKER. If it’s a valid JWT, then subject will be extracted from it: claims.getBody().getSubject()
What is OAuth?
In the next section, we’ll look at an example using Stormpath’s OAuth2 implementation, which makes use of JWTs.
There’s a lot of confusion around the OAuth2 spec. That’s, in part, because it is really an über spec – it has a lot of complexity. It’s also because OAuth1.a and OAuth2 are very different beasts. We are going to look at a very specific, easy to use, subset of the OAuth2 spec. We have an excellent post that goes into much more detail on What the Heck is OAuth. Here, we’ll give some brief background and then jump right into the examples.
OAuth2 is basically a protocol that supports authorization workflows. What this means is that it gives you a way to ensure that a specific user has permissions to do something.
That’s it.
OAuth2 isn’t meant to do stuff like validate a user’s identity — that’s taken care of by an Authentication service. Authentication is when you validate a user’s identity (like asking for a username / password to log in), whereas authorization is when you check to see what permissions an existing user already has.
Just remember that OAuth2 is a protocol for authorization.
Using OAuth Grant Types for Authorization
Let’s look at a typical OAuth2 interaction.
POST /oauth/token HTTP/1.1
Origin: https://foo.com
Content-Type: application/x-www-form-urlencoded

grant_type=password&username=username&password=password
grant_type is required. The application/x-www-form-urlencoded content type is required for this type of interaction as well. Given that you are passing the username and password over the wire, you would always want the connection to be secure. The good thing, however, is that the response will have an OAuth2 bearer token. This token will then be used for every interaction between the browser and server going forward. There is a very brief exposure here where the username and password are passed over the wire. Assuming the authentication service on the server verifies the username and password, here’s the response:
HTTP/1.1 200 OK
Content-Type: application/json;charset=UTF-8
Cache-Control: no-store
Pragma: no-cache

{
    "access_token":"2YotnFZFEjr1zCsicMWpAA...",
    "token_type":"example",
    "expires_in":3600,
    "refresh_token":"tGzv3JOkF0XG5Qx2TlKWIA...",
    "example_parameter":"example_value"
}
Notice the Cache-Control and Pragma headers. We don’t want this response being cached anywhere. The access_token is what will be used by the browser in subsequent requests. Again, there is not direct relationship between OAuth2 and JWT. However, the access_token can be a JWT. That’s where the extra benefit of the encoded meta-data comes in. Here’s how the access token is leveraged in future requests:
GET /admin HTTP/1.1
Authorization: Bearer 2YotnFZFEjr1zCsicMW...
The Authorization header is a standard header. No custom headers are required to use OAuth2. Rather than the type being Basic, in this case the type is Bearer. The access token is included directly after the Bearer keyword. This completes the OAuth2 interaction for the password grant type. Every subsequent request from the browser can use the Authorizaion: Bearer header with the access token.
There’s another grant type known as client_credentials which uses client_id andclient_secret, rather than username and password. This grant type is typically used for API interactions. While the client id and slient secret function similarly to a username and password, they are usually of a higher quality security and not necessarily human readable.
Take Us Home: OAuth2 Java Example
We’ve arrived! It’s time to dig into some specific code that demonstrates JWTs in action.
Spring Boot Web MVC
There are a number of examples in the Stormpath Java SDK. Here, we are going to look at a Spring Boot Web MVC example. Here’s the HelloController from the example:
@RestController
public class HelloController {

    @RequestMapping("/")
    String home(HttpServletRequest request) {

        String name = "World";

        Account account = AccountResolver.INSTANCE.getAccount(request);
        if (account != null) {
            name = account.getGivenName();
        }

        return "Hello " + name + "!";
    }

}
The key line, for the purposes of this demonstration is:
Account account = AccountResolver.INSTANCE.getAccount(request);
Behind the scenes, account will resolve to an Account object (and not be null) ONLY if an authenticated session is present.
Build and Run the Example Code
To build and run this example, do the following:
☺ dogeared jobs:0 ~/Projects/StormPath/stormpath-sdk-java (master|8100m)
➥ cd examples/spring-boot-webmvc/
☺ dogeared jobs:0 ~/Projects/StormPath/stormpath-sdk-java/examples/spring-boot-webmvc (master|8100m)
➥ mvn clean package
[INFO] Scanning for projects...
[INFO]
[INFO] ------------------------------------------------------------------------
[INFO] Building Stormpath Java SDK :: Examples :: Spring Boot Webapp 1.0.RC4.6-SNAPSHOT
[INFO] ------------------------------------------------------------------------

... skipped output ...

[INFO] ------------------------------------------------------------------------
[INFO] BUILD SUCCESS
[INFO] ------------------------------------------------------------------------
[INFO] Total time: 4.865 s
[INFO] Finished at: 2015-08-04T11:46:05-04:00
[INFO] Final Memory: 31M/224M
[INFO] ------------------------------------------------------------------------
☺ dogeared jobs:0 ~/Projects/StormPath/stormpath-sdk-java/examples/spring-boot-webmvc (master|8100m
Launch the Spring Boot Example
You can then launch the Spring Boot example like so:
☺ dogeared jobs:0 ~/Projects/StormPath/stormpath-sdk-java/examples/spring-boot-webmvc (master|8104m)
➥ java -jar target/stormpath-sdk-examples-spring-boot-web-1.0.RC4.6-SNAPSHOT.jar

  .   ____          _            __ _ _
 /\\ / ___'_ __ _ _(_)_ __  __ _ \ \ \ \
( ( )\___ | '_ | '_| | '_ \/ _` | \ \ \ \
 \\/  ___)| |_)| | | | | || (_| |  ) ) ) )
  '  |____| .__|_| |_|_| |_\__, | / / / /
 =========|_|==============|___/=/_/_/_/
 :: Spring Boot ::        (v1.2.1.RELEASE)

2015-08-04 11:51:00.127  INFO 17973 --- [           main] tutorial.Application                     : Starting Application v1.0.RC4.6-SNAPSHOT on MacBook-Pro.local with PID 17973

... skipped output ...

2015-08-04 11:51:04.558  INFO 17973 --- [           main] s.b.c.e.t.TomcatEmbeddedServletContainer : Tomcat started on port(s): 8080 (http)
2015-08-04 11:51:04.559  INFO 17973 --- [           main] tutorial.Application                     : Started Application in 4.599 seconds (JVM running for 5.103)
NOTE: This assumes that you’ve already setup a Stormpath account and that your api keys are located in ~/.stormpath/apiKey.properties. Look here for more information on quick setup up of Stormpath with Spring Boot.
Authenticate with a JSON Web Token (or Not)
Now, we can exercise the example and show some JWTs in action! First, hit your endpoint without any authentication. I like to use httpie, but any command line http client will do.
➥ http -v localhost:8080
GET / HTTP/1.1
Accept: */*
Accept-Encoding: gzip, deflate
Connection: keep-alive
Host: localhost:8080
User-Agent: HTTPie/0.9.2


HTTP/1.1 200 OK
Accept-Charset: big5, big5-hkscs, cesu-8, euc-jp, euc-kr, gb18030, ...
Content-Length: 12
Content-Type: text/plain;charset=UTF-8
Date: Tue, 04 Aug 2015 15:56:41 GMT
Server: Apache-Coyote/1.1

Hello World!
The -v parameter produces verbose output and shows all the headers for the request and the response. In this case, the output message is simply: Hello World!. This is because there is not an established session.
Authenticate with the Stormpath OAuth Endpoint
Now, let’s hit the oauth endpoint so that our server can authenticate with Stormpath. You may ask, “What oauth endpoint?” The controller above doesn’t indicate any such endpoint. Are there other controllers with other endpoints in the example? No, there are not! Stormpath gives you oauth (and many other) endpoints right out-of-the-box. Check it out:
➥ http -v --form POST http://localhost:8080/oauth/token  \
> 'Origin:http://localhost:8080' \
> grant_type=password username=micah+demo.jsmith@stormpath.com password=
POST /oauth/token HTTP/1.1
Content-Type: application/x-www-form-urlencoded; charset=utf-8
Host: localhost:8080
Origin: http://localhost:8080
User-Agent: HTTPie/0.9.2

grant_type=password&username=micah%2Bdemo.jsmith%40stormpath.com&password=

HTTP/1.1 200 OK
Cache-Control: no-store
Content-Length: 325
Content-Type: application/json;charset=UTF-8
Date: Tue, 04 Aug 2015 16:02:08 GMT
Pragma: no-cache
Server: Apache-Coyote/1.1
Set-Cookie: account=eyJhbGciOiJIUzI1NiJ9.eyJqdGkiOiIxNDQyNmQxMy1mNThiLTRhNDEtYmVkZS0wYjM0M2ZjZDFhYzAiLCJpYXQiOjE0Mzg3MDQxMjgsInN1YiI6Imh0dHBzOi8vYXBpLnN0b3JtcGF0aC5jb20vdjEvYWNjb3VudHMvNW9NNFdJM1A0eEl3cDRXaURiUmo4MCIsImV4cCI6MTQzODk2MzMyOH0.wcXrS5yGtUoewAKqoqL5JhIQ109s1FMNopL_50HR_t4; Expires=Wed, 05-Aug-2015 16:02:08 GMT; Path=/; HttpOnly

{
    "access_token": "eyJhbGciOiJIUzI1NiJ9.eyJqdGkiOiIxNDQyNmQxMy1mNThiLTRhNDEtYmVkZS0wYjM0M2ZjZDFhYzAiLCJpYXQiOjE0Mzg3MDQxMjgsInN1YiI6Imh0dHBzOi8vYXBpLnN0b3JtcGF0aC5jb20vdjEvYWNjb3VudHMvNW9NNFdJM1A0eEl3cDRXaURiUmo4MCIsImV4cCI6MTQzODk2MzMyOH0.wcXrS5yGtUoewAKqoqL5JhIQ109s1FMNopL_50HR_t4",
    "expires_in": 259200,
    "token_type": "Bearer"
}
There’s a lot going on here, so let’s break it down.
On the first line, I am telling httpie that I want to make a form url-encoded POST – that’s what the --form and POST parameters do. I am hitting the /oauth/token endpoint of my locally running server. I specify an Origin header. This is required to interact with Stormpath for the security reasons we talked about previously. As per the OAuth2 spec, I am passing up grant_type=password along with ausername and password.
The response has a Set-Cookie header as well as a JSON body containing the OAuth2 access token. And guess what? That access token is also a JWT. Here are the claims decoded:
{
  "jti": "14426d13-f58b-4a41-bede-0b343fcd1ac0",
  "iat": 1438704128,
  "sub": "https://api.stormpath.com/v1/accounts/5oM4WI3P4xIwp4WiDbRj80",
  "exp": 1438963328
}
Notice the sub key. That’s the full Stormpath URL to the account I authenticated as. Now, let’s hit our basic Hello World endpoint again, only this time, we will use the OAuth2 access token:
➥ http -v localhost:8080 \
> 'Authorization: Bearer eyJhbGciOiJIUzI1NiJ9.eyJqdGkiOiIxNDQyNmQxMy1mNThiLTRhNDEtYmVkZS0wYjM0M2ZjZDFhYzAiLCJpYXQiOjE0Mzg3MDQxMjgsInN1YiI6Imh0dHBzOi8vYXBpLnN0b3JtcGF0aC5jb20vdjEvYWNjb3VudHMvNW9NNFdJM1A0eEl3cDRXaURiUmo4MCIsImV4cCI6MTQzODk2MzMyOH0.wcXrS5yGtUoewAKqoqL5JhIQ109s1FMNopL_50HR_t4'
GET / HTTP/1.1
Authorization: Bearer eyJhbGciOiJIUzI1NiJ9.eyJqdGkiOiIxNDQyNmQxMy1mNThiLTRhNDEtYmVkZS0wYjM0M2ZjZDFhYzAiLCJpYXQiOjE0Mzg3MDQxMjgsInN1YiI6Imh0dHBzOi8vYXBpLnN0b3JtcGF0aC5jb20vdjEvYWNjb3VudHMvNW9NNFdJM1A0eEl3cDRXaURiUmo4MCIsImV4cCI6MTQzODk2MzMyOH0.wcXrS5yGtUoewAKqoqL5JhIQ109s1FMNopL_50HR_t4
Connection: keep-alive
Host: localhost:8080
User-Agent: HTTPie/0.9.2


HTTP/1.1 200 OK
Content-Length: 11
Content-Type: text/plain;charset=UTF-8
Date: Tue, 04 Aug 2015 16:44:28 GMT
Server: Apache-Coyote/1.1

Hello John!
Notice on the last line of the output that the message addresses us by name. Now that we’ve established an authenticated session with Stormpath using OAuth2, these lines in the controller retrieve the first name:
Account account = AccountResolver.INSTANCE.getAccount(request);
if (account != null) {
    name = account.getGivenName();
}
Summary: Token Authentication for Java Apps
In this post, we’ve looked at how token authentication with JWTs not only addresses the concerns of traditional approaches, but also gives us the benefit of inspectable meta-data and strong cryptographic signatures.
We gave an overview of the OAuth2 protocol and went through a detailed example of how Stormpath’s implementation of OAuth2 uses JWTs.
Here are some other links to posts on token based authentication, JWTs and Spring Boot:
- Token Based Authentication for Angular.js
- JJWT – JSON Web Token for Java and Android
- Spring Boot Webapp Sample Quickstart
- JWT Specification
Building Identity Management, including authentication and authorization? Try Stormpath! Our REST API and robust Java SDK support can eliminate your security risk and can be implemented in minutes. Sign up, and never build auth again!
