DCHQ, a San Francisco-based startup delivering hybrid-cloud and enterprise application automation, is unveiling its support for OVH Public Cloud, an offering based on OpenStack with data centers in France and Canada.
DCHQ now allows users to automate the provisioning and auto-scaling of cloud services (including compute, network, and storage) on OVH Public Cloud. Once the infrastructure is provisioned, DCHQ specializes in application deployment automation – providing the service discovery and data-binding frameworks needed to capture complex dependencies for both non-cloud native applications (e.g. Oracle, SAP, etc.) as well as microservices architectures.
In this blog, we will cover the deployment automation of a multi-tier Docker Java application on OVH cloud instances provisioned through DCHQ.
What is DCHQ?
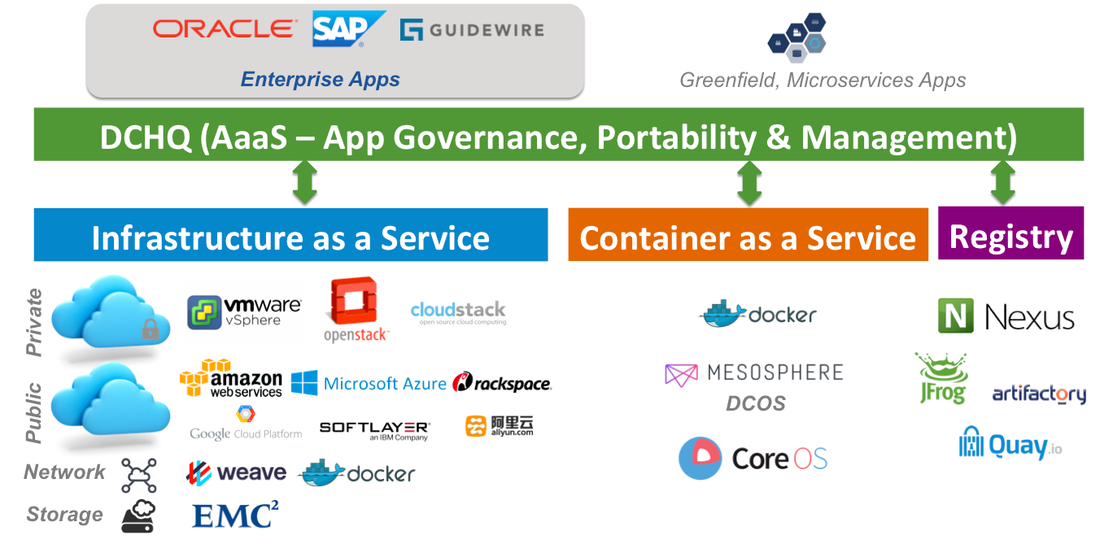
DCHQ deploys and manages existing enterprise applications and cloud-native applications seamlessly across any cloud or container infrastructure – including VMware vSphere, OpenStack, OVH, AWS, Microsoft Azure, and many others.
It provides “on-the-fly” containerization of enterprise applications – including Oracle Database Cluster, SAP, and others. By doing so, DCHQ transforms non-cloud-native applications into completely portable applications that can take advantage of cloud scaling, storage redundancy and most importantly, deployment agility.
DCHQ supports advanced multi-tier applications providing data binding and injection to capture complex dependencies across application components. It also provides an infinitely flexible plug-ins framework that can be invoked at 20+ application life-cycle states to provide service discovery and automatic application updates.
The platform is tailored for enterprises providing a clear separation of concerns with role-based access controls, quota policies based on resource utilization, entitlements to extend management of apps to other business users, approval policies to enable painless management, and cost profiles to enable resource billing.
The application-modeling framework enables modular app blueprints using component profiles, storage profiles, DBaaS profiles, and configuration scripting profiles. Once an application is deployed, users get access to monitoring, alerts, continuous delivery, application backups, scale in/out, in-browser terminal to access the containers, log streaming, and application updates.
DCHQ Overview
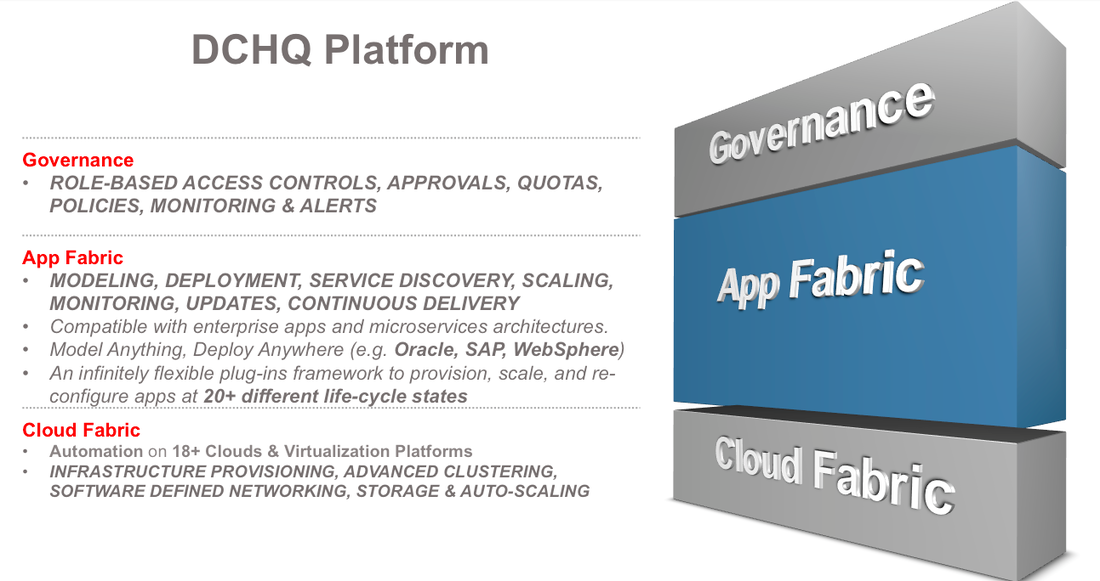
DCHQ Platform Features
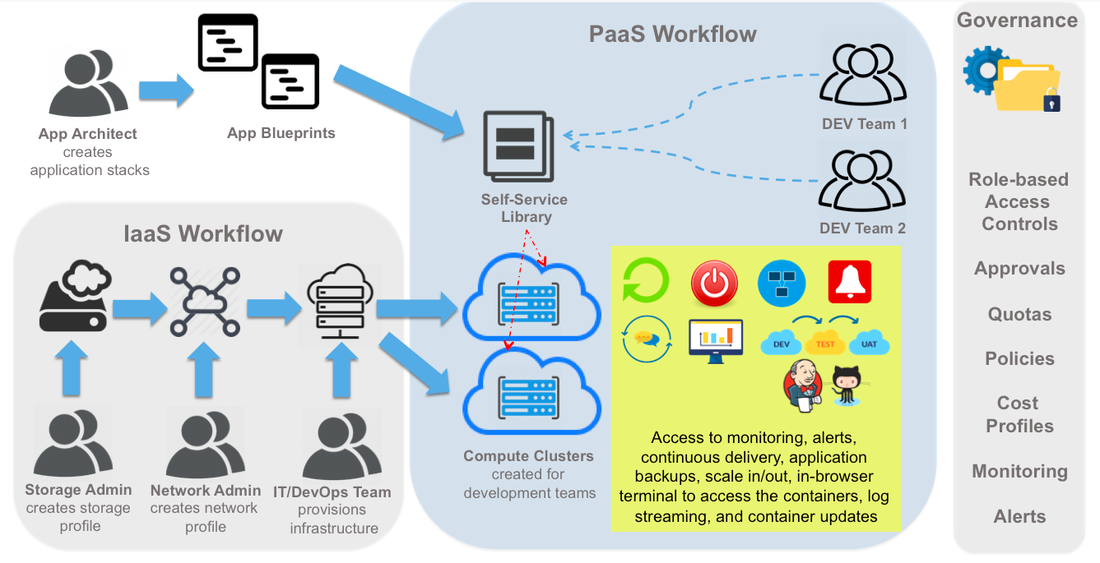
DCHQ Workflow
Challenges in Managing Docker Infrastructure
With all the advancements in Docker orchestration, DevOps engineers and infrastructure operators still struggle with the following questions:
- How can I automate the provisioning of Docker-enabled infrastructure?
- How can I group servers across different clouds into clusters that map to business groups, development teams, or application projects?
- How do I monitor these clusters and get insight into the resource consumption by different groups or users?
- How do I set up networking across servers in a cluster so that containers across multiple hosts can communicate with each other?
- How do I define my own capacity-based placement policy so that I can use every bit of compute in a cluster?
- How can I automatically scale out the cluster to meet the demands of the developers for new container-based application deployments?
DCHQ, available in hosted and on-premise versions, addresses all of these challenges and provides the most advanced infrastructure provisioning, auto-scaling, clustering and placement policies for infrastructure operators or DevOps engineers.
3 Easy Steps to Set Up your Docker OVH Cluster
Before you start, you will need to get access to DCHQ:
- Sign Up on DCHQ.io — http://dchq.io (no credit card required), or
- Download DCHQ On-Premise — http://dchq.co/dchq-on-premise-download.html
Step 1 – Create a Cloud Provider for OVH using the OpenStack End-Point
Before registering a Cloud Provider for OVH, a user need to complete the following steps on OVH.
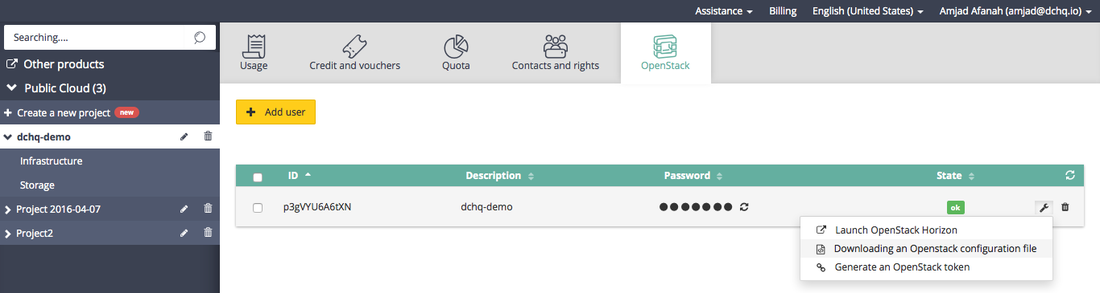
Add a User for OpenStack
1. Log in the OVH management console: https://ca.ovh.com/manager/login/
2. Click on Public Cloud and create a new Project (if not already created)
3. Click on Project Management and Consolidation.
4. Click on OpenStack.
5. Click on Add User to generate a new token.
6. Save the ID and Password.
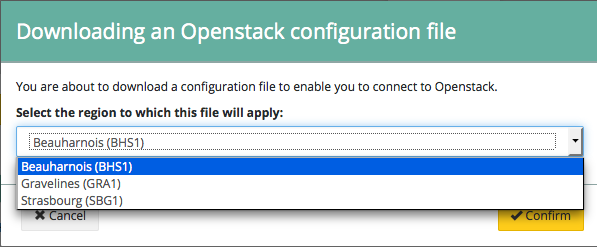
7. Click on the configuration icon and select “Downloading an OpenStack configuration file“. IMPORTANT — make sure you’re completing this task in the region in which you plan on launching instances.
Open that file and copy the OS_TENANT_NAME. This will be needed along with the ID and Password when registering the Cloud Provider.
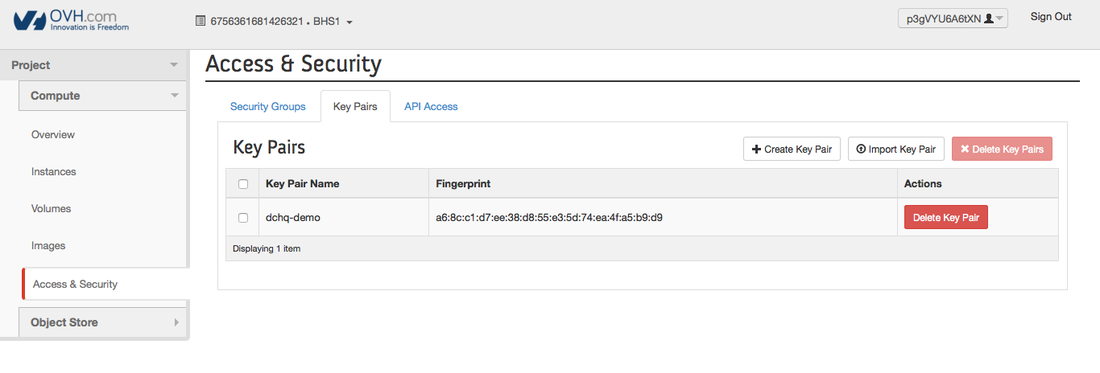
Create a Private Key for the OpenStack Project
Navigate to the Access and Security page and log in using the ID and Password created earlier for OpenStack. https://horizon.cloud.ovh.net/project/access_and_security/
Click on the “Key Pairs” tab. Make sure that the region selected in the top matches the region on which you plan on launching instances.
Click on Create Key Pair and save the generated PEM file.
Register a Cloud Provider for OVH Public Cloud
A user can register a Cloud Provider for OVH Public Cloud by navigating to Cloud Providers and then clicking on the + button to select OpenStack. Here are the required fields:
- Endpoint URL: https://auth.cloud.ovh.net/v2.0
- Username: OS_TENANT_NAME:ID (e.g. 6756121681216381:p4yVY12A6tXN). The OS_TENANT_NAME can be retrieved from the OpenStack config file (openrc.sh). The ID is from the User created for OpenStack.
- Password: This is the password for the User created for OpenStack.
The optional fields allow you to enforce granular access controls and associate this provider with a quota policy.
- Entitled Users — these are the users who are allowed to use this Cloud Provider for infrastructure provisioning. The entitled users do not have permission to manage or delete this cloud provider and will not be able to view any of the credentials.
- Entitled Blueprints — these are the Machine Compose templates that can be used with this cloud provider. For example, if a Tenant Admin wishes to restrict users to provisioning 4GB machines on certified operating systems, then users will not be able to use this cloud provider to provision any other machine.
- VM Limit — this is the maximum number of virtual machines that can be used with this cloud provider
- Quota Policies — these are pre-defined policies for setting quotas on the number of VM’s or the cost of VM’s. Multiple quota policies can be selected to customize controls per user or per group of users.

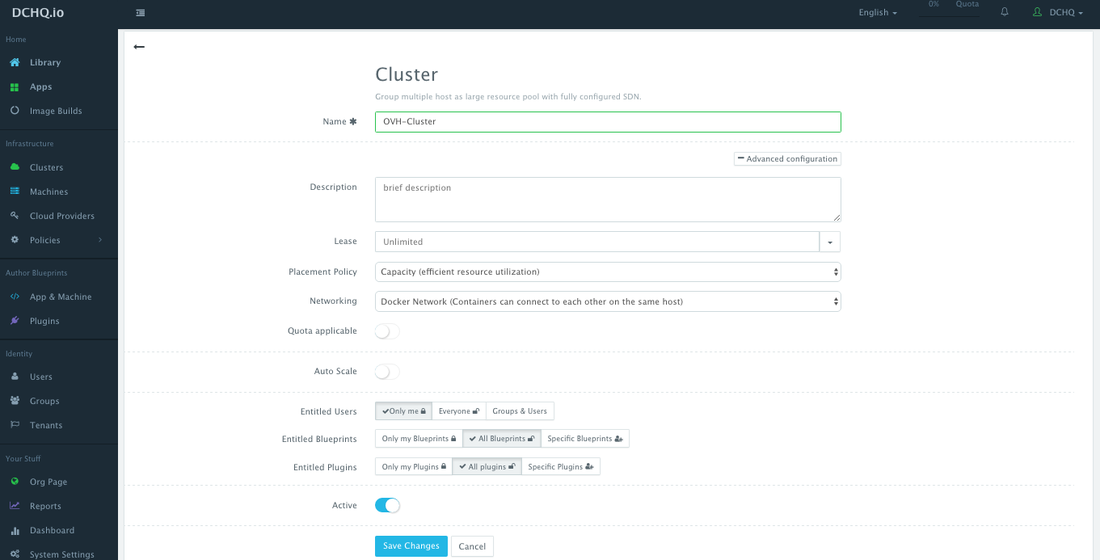
Step 2 – Create a Cluster for OVH
Servers across hybrid clouds or local development machines can be associated with a cluster, which is a logical mapping of infrastructure. A user can create a cluster by navigating to Clusters page and then clicking on the + button.
A cluster has advanced options, like:
- Lease – a user can specify when the applications deployed on servers in this cluster expire so that DCHQ can automatically destroy those applications.
- Placement Policy – a user can select from a number of placement policies like a proximity-based policy, round robin, or the default policy, which is a capacity-based placement policy that will place the Docker workload on the host that has sufficient compute resources.
- Networking – a user can select either Docker networking or Weave as a software-defined networking to facilitate cross-container communication across multiple hosts
- Quota – a user can indicate whether or not this cluster adheres to the quota profiles that are assigned to users and groups. For example, in DCHQ.io, all users are assigned a quota of 8GB of Memory.
- Auto-Scale Policy – a user can define an auto-scale policy to automatically add servers if the cluster runs out of compute resources to meet the developer’s demands for new container-based application deployments
- Granular Access Controls – a tenant admin can define access controls to a cluster to dictate who is able to deploy Docker applications to it through Entitled Users. For example, a developer may register his/her local machine and mark it as private. A tenant admin, on the other hand, may share a cluster with a specific group of users or with all tenant users. Additionally, the cluster owner can specify what application templates can be deployed to this cluster through Entitled Blueprints. If the cluster will be used in upstream environments, then only specific application templates (or “blueprints”) can be deployed on it.
Step 3 – Register Already Running OVH Instances OR Provision New OVH Public Cloud Instances
Option 1: Registering Already Running OVH Instances
A user can register an already running OVH instance. This can be done by navigating to Machines and then clicking on the + button. A user can then select the “VM/Bare-Metal” workflow and complete the required fields.
- Name — the name of the server you would like to register. This does not necessarily need to be the actual hostname.
- IP Address — this is the IP address of the server you’re registering.
- Cluster — this the cluster that the new server will be part of. Make sure that you create the cluster first — before registering servers or provisioning new ones.
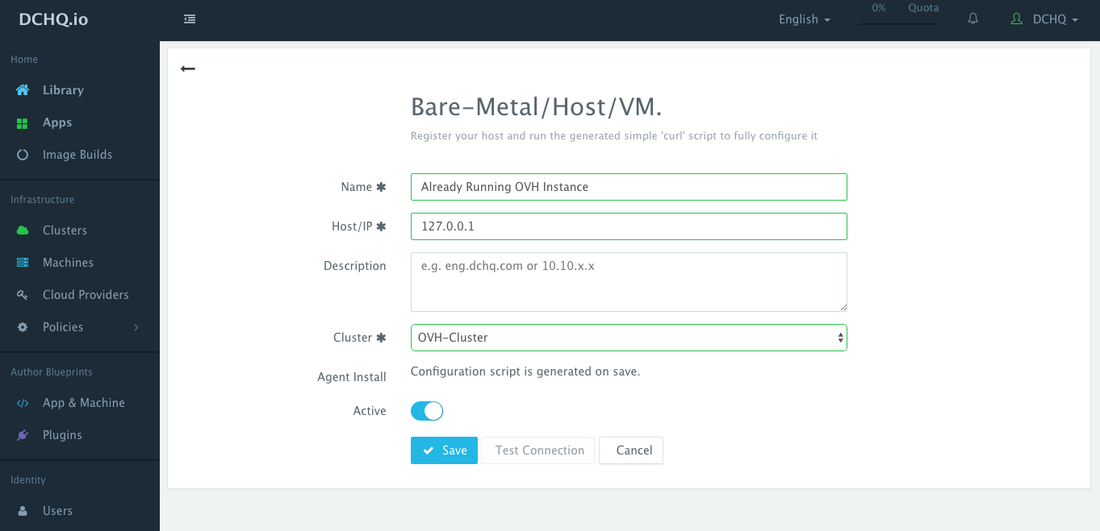
Once a user clicks Save, then an automatically generated script appears. You can run this script on the host you’re trying to register as a root user. The script checks if Docker is already installed. If not, then Docker, the DCHQ agent and Weave (optional) will be installed.
Here’s what the script looks like with Docker networking:
curl -Ls <dchq.agent.script.url>| bash -s <DCHQ Server Key><dchq.agent.connect.ip><dchq.agent.connect.port> docker.local <New Server IP>
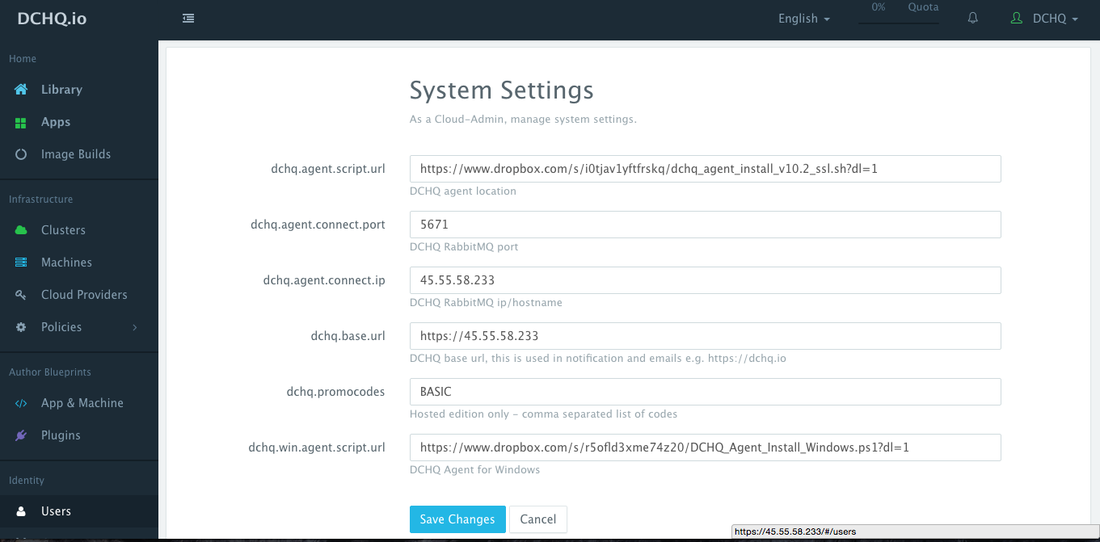
If you’re using DCHQ On-Premise, then you will be able to change the default arguments by navigating to System Settings.
Note that if Weave had been enabled on this cluster, then the script would follow this format.
curl -Ls <dchq.agent.script.url> | bash -s <DCHQ Server Key> <dchq.agent.connect.ip> <dchq.agent.connect.port> weave.local <weave-password> <weave.ip>
where <weave.ip> is the IP address of the 1st server in the Weave cluster
This task can be automated programmatically using our REST API’s for creating “Docker Servers” (https://dchq.readme.io/docs/dockerservers)
Option 2: Provisioning Docker-Enabled OVH Instances
A user can provision OVH Instances on the newly created cluster by defining a simple YAML-based Machine Compose template that can be requested from the Self-Service Library.
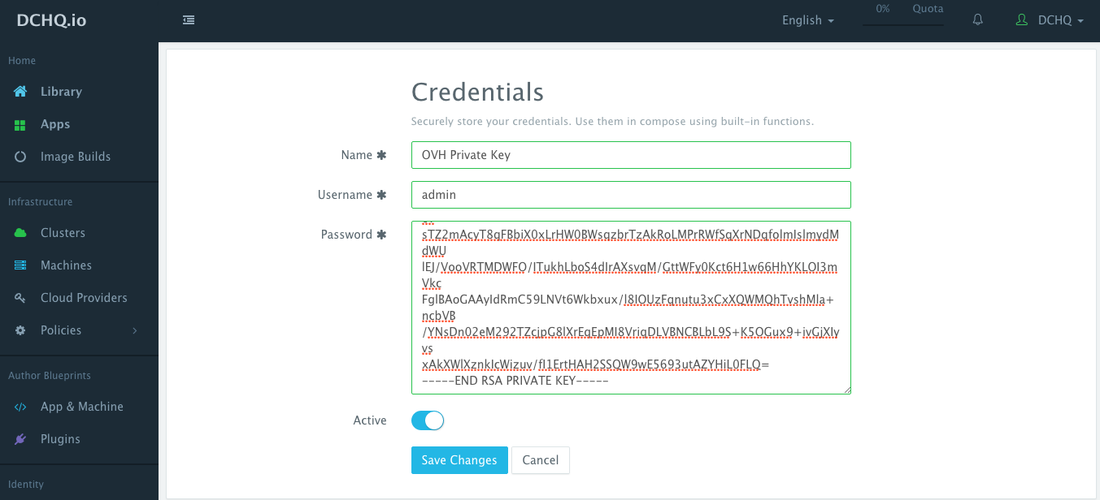
(Mandatory) Before creating a Machine Compose template, a user can securely store the private key (or PEM file) in the Credentials Store. This can be done by navigating to Cloud Providers and then clicking on the + button to select Credentials. The username and the password need to be provided. Once this credential item is saved, then click Edit on the new item saved to copy the newly generated ID for this credential item.
A user can navigate to Machines and then click on + button to select OpenStack.
If the Cloud Provider was registered correctly, then the regions, flavors and images menus should load the OVH options available.
Here are the three regions available (as of April 11, 2016).
- Beauharnois in Canada
- Gravelines in France
- Strasbourg in France

Once the selections are made, click on the Machine Compose button to generate a YAML template.
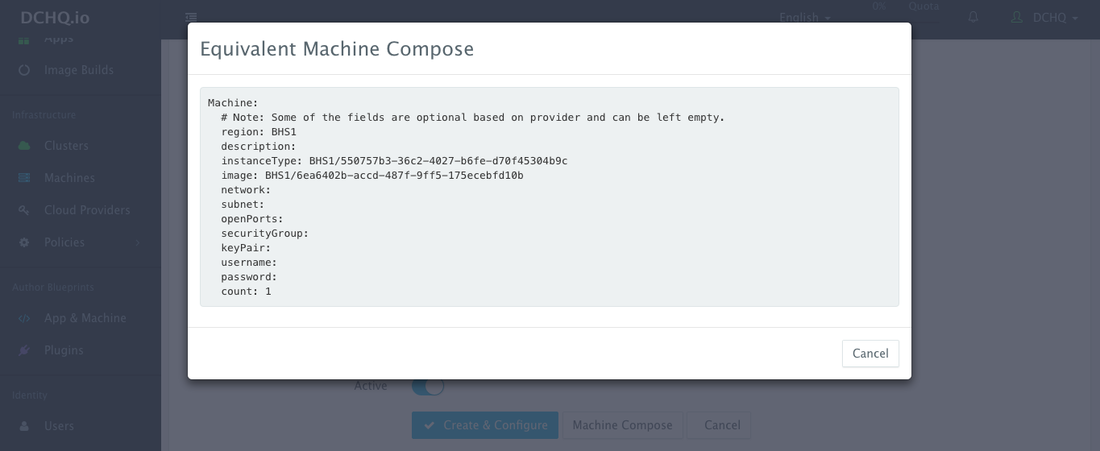
A user can create a Machine Compose template for OVH by navigating to App & Machine and then clicking on the + button to select Machine Compose.
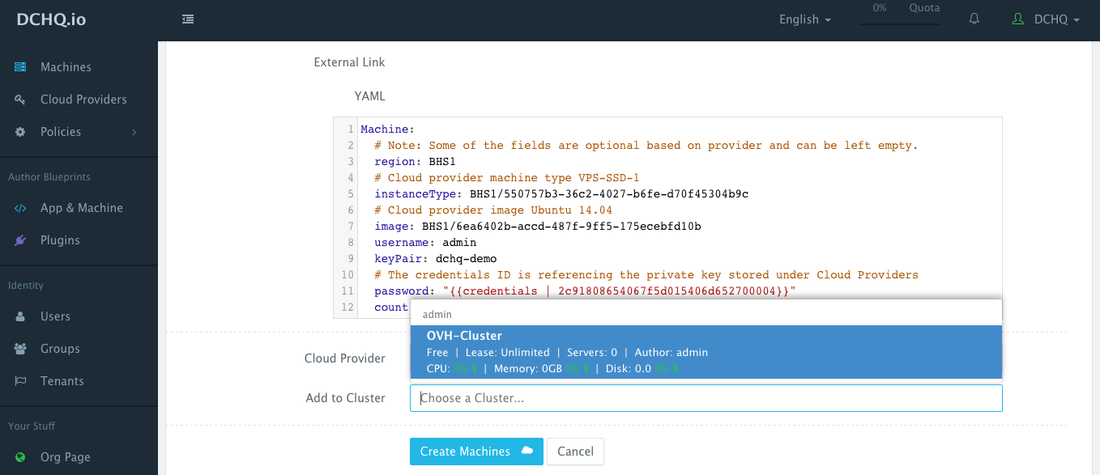
A user can copy and paste the generated Machine Compose template from the previous UI workflow — however the username, keyPair and password parameters are needed as well.
Here’s the template for requesting a Ubuntu 14.04 instance with 2GB of Memory (VPS-SSD-1) in the BHS1 region (i.e. Canada).
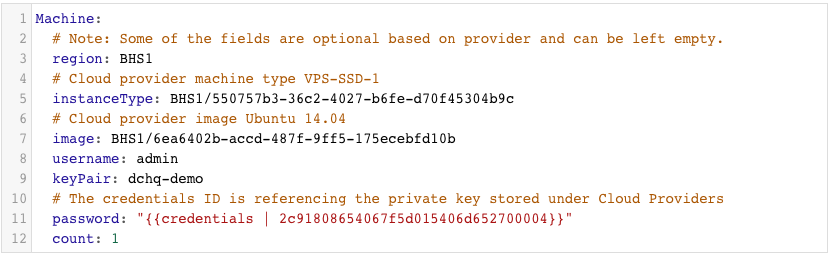
The supported parameters for the Machine Compose template are summarized below:
- description: Description of the blueprint/template
- instanceType: Cloud provider specific value (e.g. BHS1/550757b3-36c2-4027-b6fe-d70f45304b9c)
- region: Cloud provider specific value (e.g. BHS1)
- image: Mandatory – fully qualified image ID/name (e.g. BHS1/6ea6402b-accd-487f-9ff5-175ecebfd10b)
- username: This the username used to connect to the server
- password: This can reference a password or private key stored in the Credentials store. The ID of the credential item stored in the Cloud Providers page will be needed. Here’s the acceptable format: “{{credentials | 2c91802a520x3622x01520xa6393098322}}”
- keyPair: This is the name of the key pair used for OpenStack
- count: Total no of VM’s, defaults to 1.
It is important that you open the required inbound ports in your security group.
In addition to these supported parameters, you will also notice that this template is referencing a “plugin”. A plugin can be invoked as follows:
  plugins:
- !plugin
id: <plugin-id>
The plug-in can be created by Navigating to Plugins and then clicking on the + button. A plug-in is a simple script that can run on either the server being provisioned or on the Docker container. The server plugins can be used for any number of configuration requirements:
- Installing Puppet Modules, Chef Recipes, Ansible Playbook, etc.
- Retrieving the CA certificate needed for the private Docker registry from a secure storage location.
The Machine Compose template has additional advanced options.
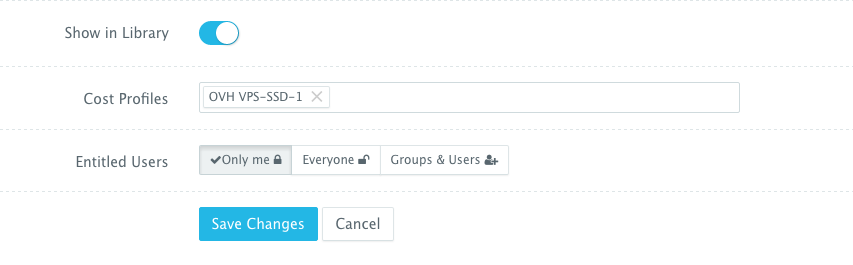
- Cost Profiles — these are the cost profiles that you can create under Policies > Cost Profiles. You can define cost per resource on an hourly/weekly/monthly basis. You can attach multiple cost profiles to a single template — e.g. different cost profiles for the instance type, etc.
- Entitled Users — these are the users who are allowed to use this template to provision OVH instances. The entitled users do not have permission to manage or delete this template and will only be able to consume it.
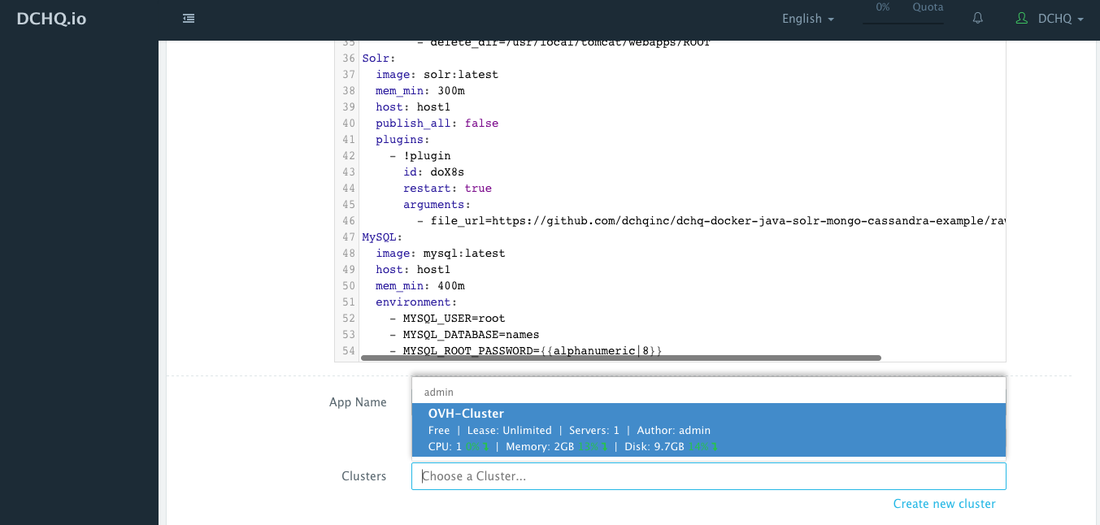
Once the Machine Compose template is saved, a user can request this machine from the Self-Service Library. A user can click Customize and then select the Cloud Provider and Cluster to use for provisioning the OVH Instance(s).
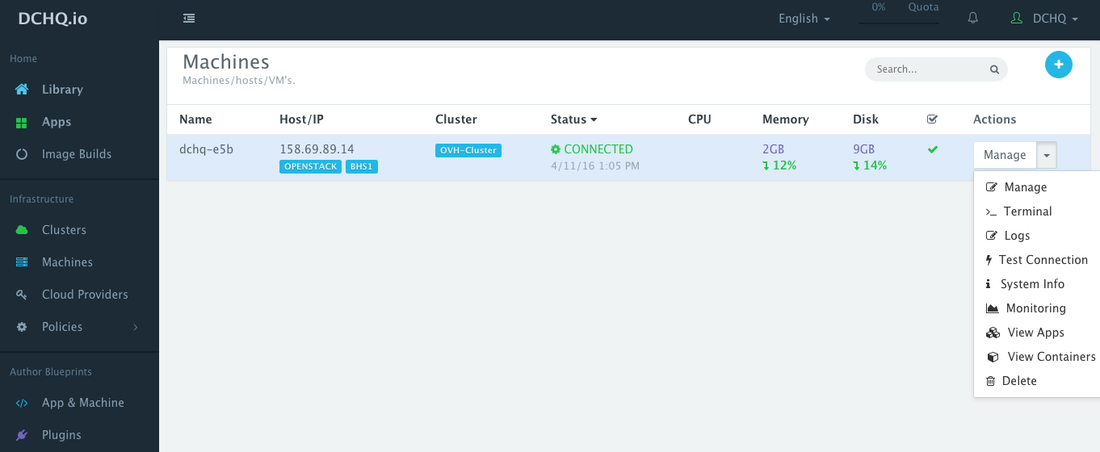
Once the OVH instance is provisioned, a user can monitor key statistics like CPU, Memory, Disk Utilization, Images Pulled and Containers Running. This can be done by navigating to Machines and then selecting Monitoring from the Manage drop-down menu.
An in-browser terminal to the provisioned machine is also accessible. This can be accessed by navigating to Machines and then selecting Terminal from the Manage drop-down menu.
Deploying Docker Java Application (Nginx-Tomcat-Solr-MySQL) on Provisioned OVH Instances
Now that your cluster is set up, you can now run any Docker application on the newly created server(s). This can be done by navigating to the Library and then clicking on Customize on any of the published application templates. You can then select a Cluster and click Run.
Check out our published Docker application templates — including multi-tier Java stacks, LAMP, LAOP & LAPP stacks, Node.js, Rails, Python, Mongo Replica Set, Couchbase Cluster, MEAN.JS, WordPress, Drupal, and many others. https://www.dchq.io/landing/products.html#/library?org=DCHQ
Creating the Application Template
Docker Compose is a YAML template for defining multi-tier or multi-image distributed applications that can run on any Docker-enabled Linux host running anywhere.
Once logged in to DCHQ (either the hosted DCHQ.io or on-premise version), a user can navigate to App & Machine and then click on the + button to create a new Docker Compose template.
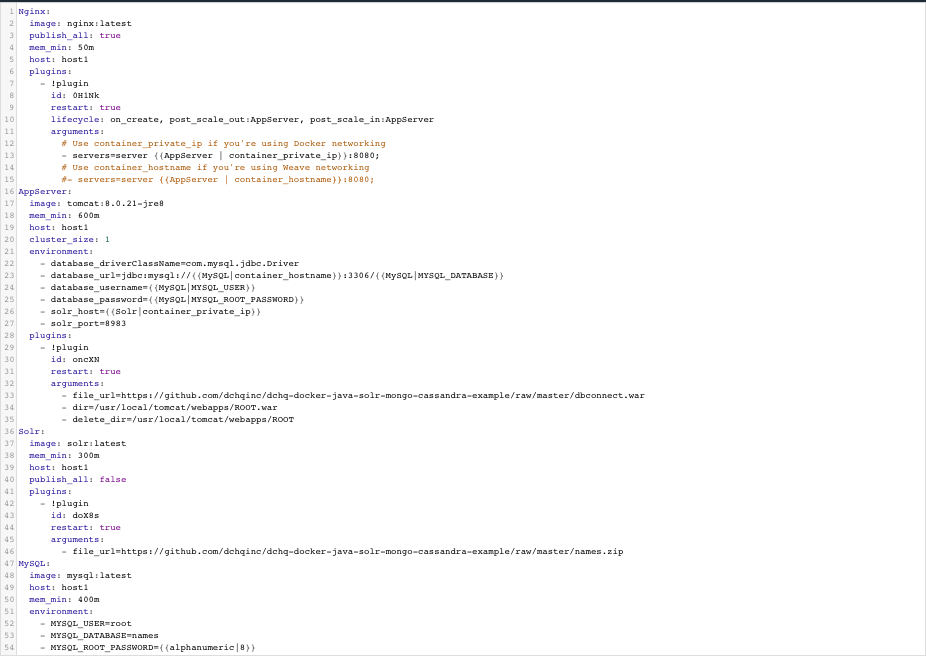
Here’s the example template that contains the following components:
• Nginx — for reverse proxy and load balancing
• Tomcat — the application server running the Java application
• Solr — use for the full-text search in the application
• MySQL — the underlying database
Nginx:
  image: nginx:latest
  publish_all: true
  mem_min: 50m
  host: host1
  plugins:
    - !plugin
      id: 0H1Nk
      restart: true
      lifecycle: on_create, post_scale_out:AppServer, post_scale_in:AppServer
      arguments:
        # Use container_private_ip if you're using Docker networking
        - servers=server {{AppServer | container_private_ip}}:8080;
        # Use container_hostname if you're using Weave networking
        #- servers=server {{AppServer | container_hostname}}:8080;
AppServer:
  image: tomcat:8.0.21-jre8
  mem_min: 600m
  host: host1
  cluster_size: 1
  environment:
    - database_driverClassName=com.mysql.jdbc.Driver
    - database_url=jdbc:mysql://{{MySQL|container_hostname}}:3306/{{MySQL|MYSQL_DATABASE}}
    - database_username={{MySQL|MYSQL_USER}}
    - database_password={{MySQL|MYSQL_ROOT_PASSWORD}}
    - solr_host={{Solr|container_private_ip}}
    - solr_port=8983
  plugins:
    - !plugin
      id: oncXN
      restart: true
      arguments:
        - file_url=https://github.com/dchqinc/dchq-docker-java-solr-mongo-cassandra-example/raw/master/dbconnect.war
        - dir=/usr/local/tomcat/webapps/ROOT.war
        - delete_dir=/usr/local/tomcat/webapps/ROOT
Solr:
  image: solr:latest
  mem_min: 300m
  host: host1
  publish_all: false
  plugins:
    - !plugin
      id: doX8s
      restart: true
      arguments:
        - file_url=https://github.com/dchqinc/dchq-docker-java-solr-mongo-cassandra-example/raw/master/names.zip
MySQL:
  image: mysql:latest
  host: host1
  mem_min: 400m
  environment:
    - MYSQL_USER=root
    - MYSQL_DATABASE=names
    - MYSQL_ROOT_PASSWORD={{alphanumeric|8}}
Using Environment Variable Bindings to Capture Complex App Dependencies
A user can create cross-image environment variable bindings by making a reference to another image’s environment variable. In this case, we have made several bindings – including database_url=jdbc:mysql://{{MySQL|container_hostname}}:3306/{{MySQL|MYSQL_DATABASE}} – in which the database container internal IP address is resolved dynamically at request time and is used to ensure that Tomcat can establish a connection with the database.
Here is a list of supported environment variable values:
- {{alphanumeric | 8}} – creates a random 8-character alphanumeric string. This is most useful for creating random passwords.
- {{Image Name | ip}} – allows you to enter the host IP address of a container as a value for an environment variable. This is most useful for allowing the middleware tier to establish a connection with the database.
- {{Image Name | container_hostname}} or {{Image Name | container_ip}} – allows you to enter the name of a container as a value for an environment variable. This is most useful for allowing the middleware tier to establish a secure connection with the database (without exposing the database port).
- {{Image Name | container_private_ip}} – allows you to enter the internal IP of a container as a value for an environment variable. This is most useful for allowing the middleware tier to establish a secure connection with the database (without exposing the database port).
- {{Image Name | port_Port Number}} – allows you to enter the Port number of a container as a value for an environment variable. This is most useful for allowing the middleware tier to establish a connection with the database. In this case, the port number specified needs to be the internal port number – i.e. not the external port that is allocated to the container. For example, {{PostgreSQL | port_5432}} will be translated to the actual external port that will allow the middleware tier to establish a connection with the database.
- {{Image Name | Environment Variable Name}} – allows you to enter the value an image’s environment variable into another image’s environment variable. The use cases here are endless – as most multi-tier applications will have cross-image dependencies.
Using plug-ins for Service Discovery and the host parameter to deploy a highly-available Java application
You will notice that the cluster_size parameter allows you to specify the number of containers to launch (with the same application dependencies). In this case, a cluster of Tomcat application servers can be deployed by specifying the cluster_size.
The host parameter allows you to specify the host you would like to use for container deployments. This is possible if you have selected Weave as the networking layer when creating your clusters. That way you can ensure high-availability for your application server clusters across different hosts (or regions) and you can comply with affinity rules to ensure that the database runs on a separate host for example. Here are the values supported for the host parameter:
- host1, host2, host3, etc. – selects a host randomly within a data-center (or cluster) for container deployments
- IP Address 1, IP Address 2, etc. — allows a user to specify the actual IP addresses to use for container deployments
- Hostname 1, Hostname 2, etc. — allows a user to specify the actual hostnames to use for container deployments
- Wildcards (e.g. “db-”, or “app-srv-”) – to specify the wildcards to use within a hostname
The service discovery framework in DCHQ provides event-driven life-cycle stages that executes custom scripts to re-configure application components. This is critical when scaling out clusters for which a load balancer may need to be re-configured or a replica set may need to be re-balanced.
You will notice that the Nginx plug-in is getting executed during these different stages or events:
- When the Nginx container is created — in this case, the container IP’s of the application servers are injected into the default configuration file to facilitate the load balancing to the right services
- When the application server cluster is scaled in or scale out — in this case, the updated container IP’s of the application servers are injected into the default configuration file to facilitate the load balancing to the right services
- When the application servers are stopped or started — in this case, the updated container IP’s of the application servers are injected into the default configuration file to facilitate the load balancing to the right services
So the service discovery framework here is doing both service registration (by keeping track of the container IP’s and environment variable values) and service discovery (by executing the right scripts during certain events or stages).
The lifecycle parameter in plug-ins allows you to specify the exact stage or event to execute the plug-in. If no lifecycle is specified, then by default, the plug-in will be execute on_create. Here are the supported lifecycle stages:
- on_create — executes the plug-in when creating the container
- on_start — executes the plug-in after a container starts
- on_stop — executes the plug-in before a container stops
- on_destroy — executes the plug-in before destroying a container
- post_create — executes the plug-in after the container is created and running
- post_start[:Node] — executes the plug-in after another container starts
- post_stop[:Node] — executes the plug-in after another container stops
- post_destroy[:Node] — executes the plug-in after another container is destroyed
- post_scale_out[:Node] — executes the plug-in after another cluster of containers is scaled out
- post_scale_in[:Node] — executes the plug-in after another cluster of containers is scaled in
Deploying the Java Application on OVH
This can be done by navigating to the Library and then clicking on Customize on any of the published application templates. You can then select a Cluster and click Run.
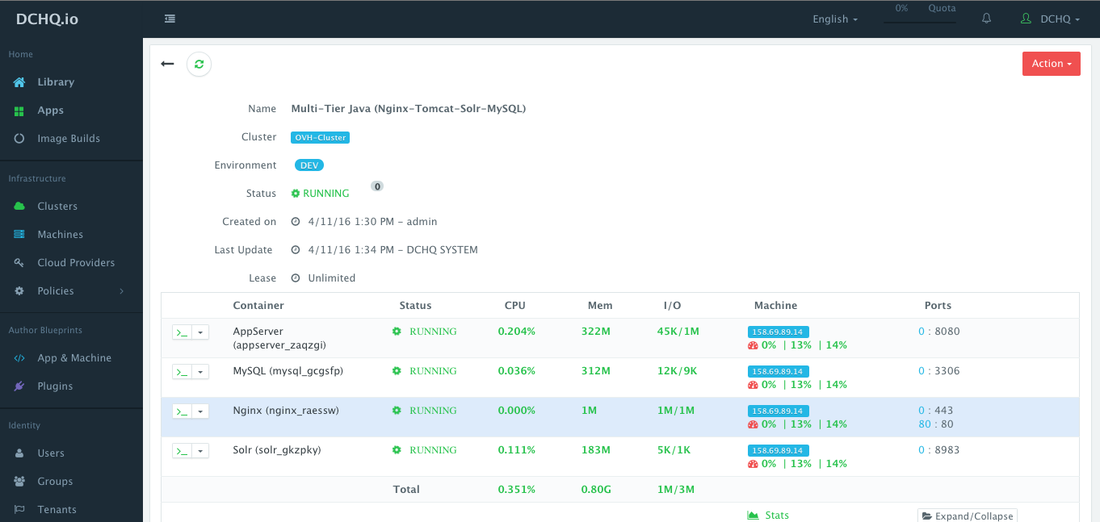
Access the Deployed Application
Once an application is deployed, users get access to monitoring, alerts, continuous delivery, application backups, scale in/out, in-browser terminal to access the containers, log streaming, and application updates.
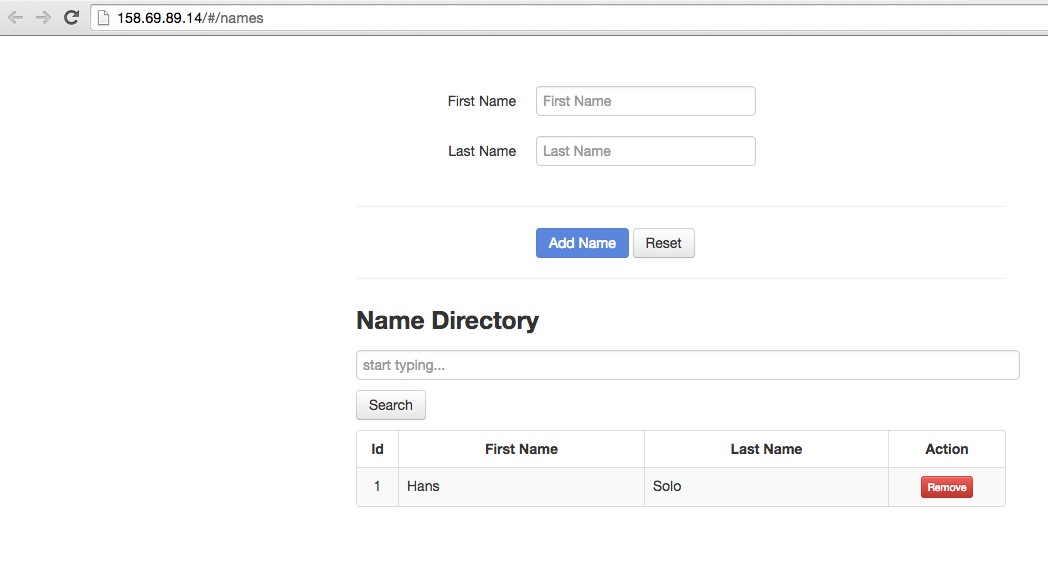
To access the application, a user can simply click on the exposed port for Nginx.
Monitor the Performance of Containers
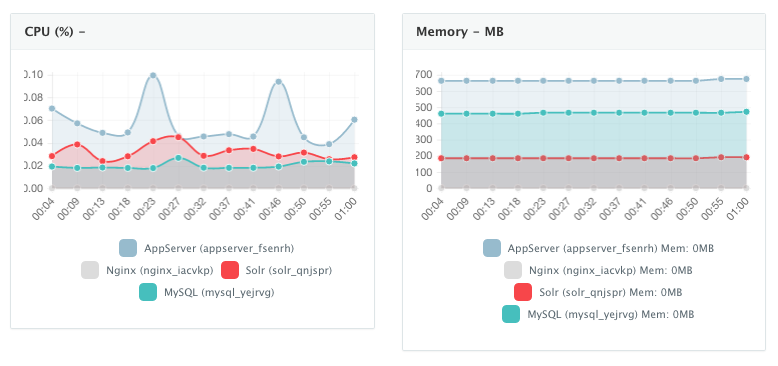
Once the application is up and running, users can monitor the CPU, Memory, & I/O of the running containers to get alerts when these metrics exceed a pre-defined threshold. DCHQ also monitors the underlying OVH instances on which the application is running — capturing metrics like CPU. Memory, and Disk Utilization.
A user can perform historical monitoring analysis and correlate issues to container updates or build deployments. This can be done by clicking on the Stats link. A custom date range can be selected to view CPU, Memory and I/O historically.
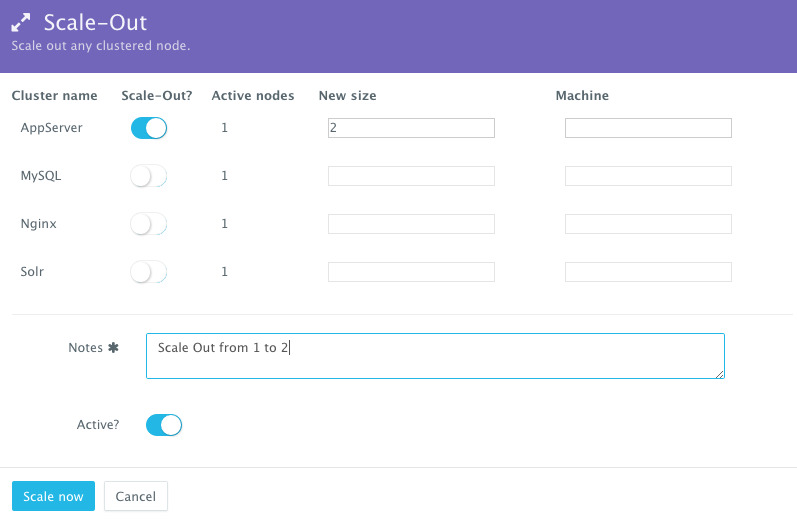
Scale Out the Application
If the running application becomes resource constrained, a user can to scale out the application to meet the increasing load. Moreover, a user can schedule the scale out during business hours and the scale in during weekends for example.
To scale out the cluster of Tomcat servers from 1 to 2, a user can click on the Actions menu of the running application and then select Scale Out. A user can then specify the new size for the cluster and then click on Run Now.
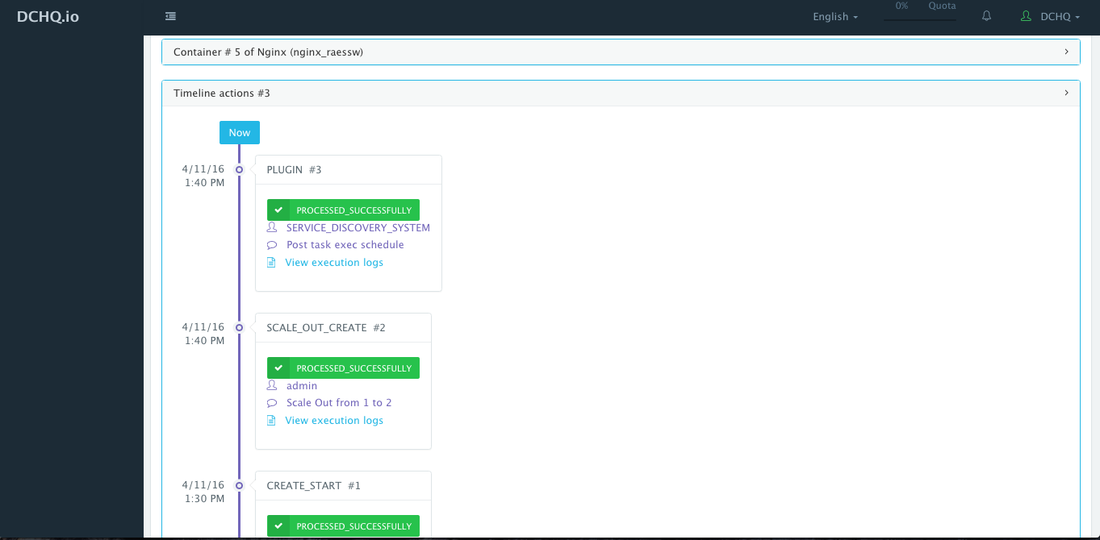
As the scale out is executed, the Service Discovery framework will be used to update the load balancer. A plug-in will automatically be executed on Nginx to update Nginx’s default.conf file so that it’s aware of the new application server added. This is because we have specified post_scale_out:AppServer as the lifecycle event for this plugin.
An application time-line is available to track every change made to the application for auditing and diagnostics. This can be accessed from the expandable menu at the bottom of the page of a running application. In this case, the Service Discovery framework executed the Apache HTTP Server plugin automatically right after the Application Server cluster was scaled out.
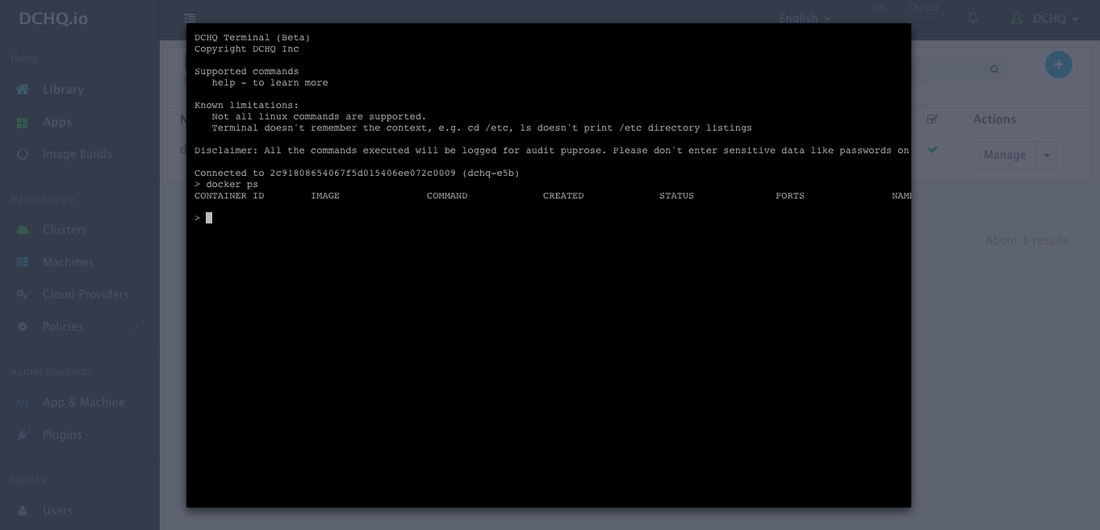
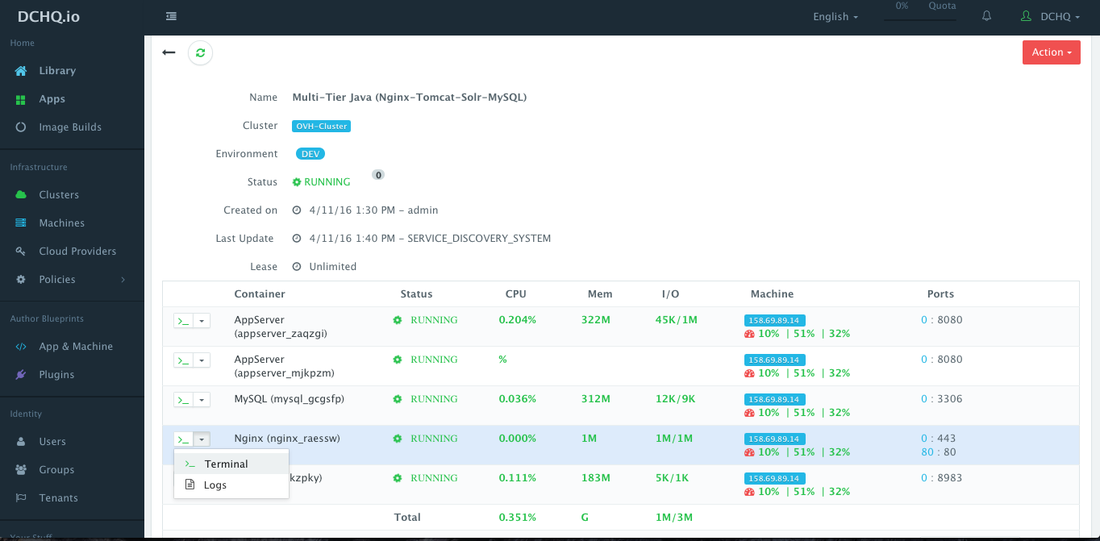
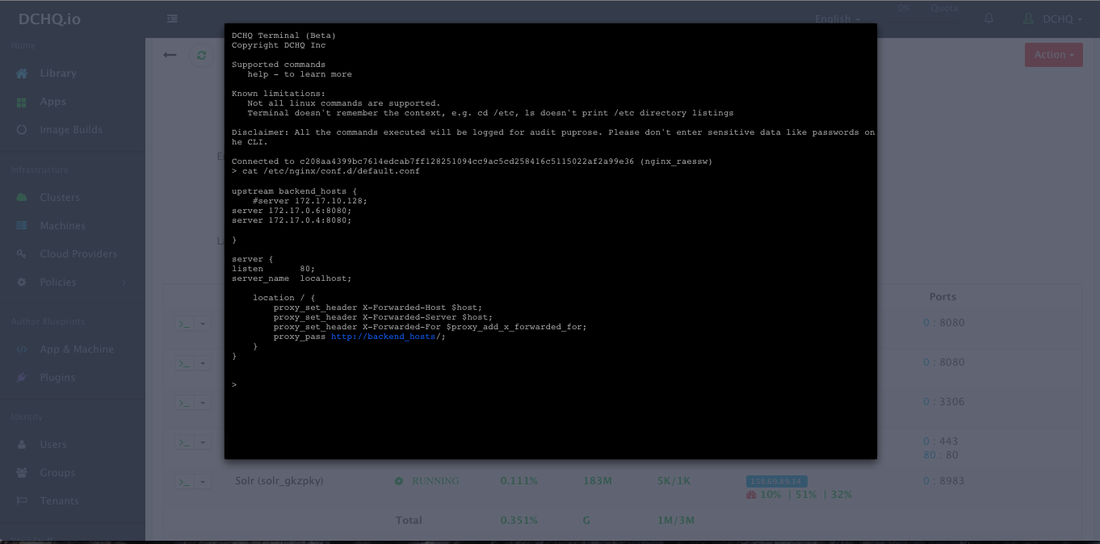
Access an In-Browser Terminal for Containers
A command prompt icon should be available next to the containers’ names on the Live Apps page. This allows users to enter the container using a secure communication protocol through the agent message queue. A white list of commands can be defined by the Tenant Admin to ensure that users do not make any harmful changes on the running containers.
For the Nginx container for example, we used the command prompt to make sure that the new container IP was added automatically after the scale out was complete.
Download DCHQ On-Premise Now
- Download DCHQ On-Premise — http://dchq.co/dchq-on-premise-download.html
| Reference: | Automated Docker Application Deployment On OVH Public Cloud from our JCG partner Amjad Afanah at the DCHQ.io blog. |
