Last week we’ve set up JUnit 5 to be able to write tests. So let’s do it!
Overview
This post is part of a series about JUnit 5:
- Setup
- Basics
- Architecture
- Conditions
- Injection
- …
Most of what you will read here and more can be found in the emerging JUnit 5 user guide. Note that it is based on an alpha version and hence subject to change.
Indeed, we are encouraged to open issues or pull requests so that JUnit 5 can improve further. Please make use of this opportunity! It is our chance to help JUnit help us, so if something you see here could be improved, make sure to take it upstream.
This post will get updated when it becomes necessary. The code samples I show here can be found on GitHub.
Philosophy
The new architecture, which we will discuss another time, is aimed at extensibility. It is possible that someday very alien (at least to us run-of-the-mill Java devs) testing techniques will be possible with JUnit 5.
But for now the basics are very similar to the current version 4. JUnit 5’s surface undergoes a deliberately incremental improvement and developers should feel right at home. At least I do and I think you will, too:
Basic Lifecycle And Features
class Lifecycle {

	@BeforeAll
	static void initializeExternalResources() {
		System.out.println("Initializing external resources...");
	}

	@BeforeEach
	void initializeMockObjects() {
		System.out.println("Initializing mock objects...");
	}

	@Test
	void someTest() {
		System.out.println("Running some test...");
		assertTrue(true);
	}

	@Test
	void otherTest() {
		assumeTrue(true);

		System.out.println("Running another test...");
		assertNotEquals(1, 42, "Why wouldn't these be the same?");
	}

	@Test
	@Disabled
	void disabledTest() {
		System.exit(1);
	}

	@AfterEach
	void tearDown() {
		System.out.println("Tearing down...");
	}

	@AfterAll
	static void freeExternalResources() {
		System.out.println("Freeing external resources...");
	}

}
See? No big surprises.
The Basics Of JUnit 5
Visibility
The most obvious change is that test classes and methods do not have to be public anymore. Package visibility suffices but private does not. I think this is a sensible choice and in line with how we intuit the different visibility modifiers.
Great! I’d say, less letters to type but you haven’t been doing that manually anyways, right? Still less boilerplate to ignore while scrolling through a test class.
Test Lifecycle
@Test
The most basic JUnit annotation is @Test, which marks methods that are to be run as tests.
It is virtually unchanged, although it no longer takes optional arguments. Expected exceptions can now be verified via assertions but as far as I know there is not yet a replacement for timeouts.
JUnit 5 creates a new test instance for each test method (same as JUnit 4).
Before And After
You might want to run code to set up and tear down your tests. There are four method annotations to help you do that:
@BeforeAll: Executed once; runs before the tests and methods marked with @BeforeEach.@BeforeEach: Executed before each test.@AfterEach: Executed after each test.@AfterAll: Executed once; runs after all tests and methods marked with @AfterEach.
Because a new instance is created for each test, there is no obvious instance on which to call the @BeforeAll/ @AfterAll methods, so they have to be static.
The order in which different methods annotated with the same annotation are executed is undefined. As far as I can tell the same is true for inherited methods. Whether it should be possible to define an order is currently being discussed.
Except in name, these annotations work exactly like in JUnit 4. While not uncommon, I am not convinced of the names, though. See this issue for details.
Disabling Tests
It’s Friday afternoon and you just want to go home? No problem, just slap @Disabled on the test (optionally giving a reason) and run.
A Disabled Test
@Test
@Disabled("Y U No Pass?!")
void failingTest() {
	assertTrue(false);
}
Test Class Lifecycle
Compared to the prototype it is interesting to note that the test class lifecycle didn’t make it into the alpha version. It would run all tests on the same instance of the test class, thus allowing the tests to interact with each other by mutating state.
As I already wrote while discussing the prototype: I think this is a typical case of a feature that is harmful in 99% of the cases but indispensable in the other 1%. Considering the very real risk of horrible inter-test-dependencies I’d say it was a good thing that it was taken out in its original form.
But the JUnit team is discussing to bring it back in with a different name and added semantics. This would make its use very deliberate. What do you think?
Assertions
If @Test, @Before..., and @After... are a test suite’s skeleton, assertions are its heart. After the instance under test was prepared and the functionality to test was executed on it, assertions make sure that the desired properties hold. If they don’t, they fail the running test.
Classic
Classic assertions either check a property of a single instance (e.g. that it is not null) or do some kind of comparison (e.g. that two instances are equal). In both cases they optionally take a message as a last parameter, which is shown when the assertion fails. If constructing the message is expensive, it can be specified as a lambda expression, so construction is delayed until the message is actually required.
Classic Assertions
@Test
void assertWithBoolean() {
	assertTrue(true);
	assertTrue(this::truism);

	assertFalse(false, () -> "Really " + "expensive " + "message" + ".");
}

boolean truism() {
	return true;
}

@Test
void assertWithComparison() {
	List<String> expected = asList("element");
	List<String> actual = new LinkedList<>(expected);

	assertEquals(expected, actual);
	assertEquals(expected, actual, "Should be equal.");
	assertEquals(expected, actual, () -> "Should " + "be " + "equal.");

	assertNotSame(expected, actual, "Obviously not the same instance.");
}
As you can see JUnit 5 doesn’t change much here. The names are the same as before and comparative assertions still take a pair of an expected and an actual value (in that order).
That the expected-actual order is so critical in understanding the test’s failure message and intention, but can be mixed up so easily is a big blind spot. There’s nothing much to do, though, except to create a new assertion framework. Considering big players like Hamcrest (ugh!) or AssertJ (yeah!), this would not have been a sensible way to invest the limited time. Hence the goal was to keep the assertions focused and effort-free.
New is that failure message come last. I like it because it keeps the eye on the ball, i.e. the property being asserted. As a nod to Java 8, Boolean assertions now accept suppliers, which is a nice detail.
Extended
Aside from the classical assertions that check specific properties, there are a couple of others.
The first is not even a real assertion, it just fails the test with a failure message.
‘fail’
@Test
void failTheTest() {
	fail("epicly");
}
Then we have assertAll, which takes a variable number of assertions and tests them all before reporting which failed (if any).
‘assertAll’
@Test
void assertAllProperties() {
	Address address = new Address("New City", "Some Street", "No");

	assertAll("address",
			() -> assertEquals("Neustadt", address.city),
			() -> assertEquals("Irgendeinestraße", address.street),
			() -> assertEquals("Nr", address.number)
	);
}
Failure Message For ‘AssertAll’
org.opentest4j.MultipleFailuresError: address (3 failures)
	expected: <Neustadt> but was: <New City>
	expected: <Irgendeinestraße> but was: <Some Street>
	expected: <Nr> but was: <No>
This is great to check a number of related properties and get values for all of them as opposed to the common behavior where the test reports the first one that failed and you never know the other values.
Finally we have assertThrows and expectThrows. Both fail the test if the given method does not throw the specified exception. The latter also returns the exceptions so it can be used for further verifications, e.g. asserting that the message contains certain information.
‘assertThrows’ And ‘excpectThrows’
@Test
void assertExceptions() {
	assertThrows(Exception.class, this::throwing);

	Exception exception = expectThrows(Exception.class, this::throwing);
	assertEquals("Because I can!", exception.getMessage());
}
Assumptions
Assumptions allow to only run tests if certain conditions are as expected. This can be used to reduce the run time and verbosity of test suites, especially in the failure case.
‘assumeTrue’, ‘assumeFalse’, and ‘assumingThat’
@Test
void exitIfFalseIsTrue() {
	assumeTrue(false);
	System.exit(1);
}

@Test
void exitIfTrueIsFalse() {
	assumeFalse(this::truism);
	System.exit(1);
}

private boolean truism() {
	return true;
}

@Test
void exitIfNullEqualsString() {
	assumingThat(
			"null".equals(null),
			() -> System.exit(1)
	);
}
Assumptions can either be used to abort tests whose preconditions are not met or to execute (parts of) a test only if a condition holds. The main difference is that aborted tests are reported as disabled, whereas a test that was empty because a condition did not hold is plain green.
Nesting Tests
JUnit 5 makes it near effortless to nest test classes. Simply annotate inner classes with @Nested and all test methods in there will be executed as well:
‘@Nested’
package org.codefx.demo.junit5;// NOT_PUBLISHED

import org.junit.gen5.api.BeforeEach;
import org.junit.gen5.api.Nested;
import org.junit.gen5.api.Test;

import static org.junit.gen5.api.Assertions.assertEquals;
import static org.junit.gen5.api.Assertions.assertTrue;

class Nest {

	int count = Integer.MIN_VALUE;

	@BeforeEach
	void setCountToZero() {
		count = 0;
	}

	@Test
	void countIsZero() {
		assertEquals(0, count);
	}

	@Nested
	class CountGreaterZero {

		@BeforeEach
		void increaseCount() {
			count++;
		}

		@Test
		void countIsGreaterZero() {
			assertTrue(count > 0);
		}

		@Nested
		class CountMuchGreaterZero {

			@BeforeEach
			void increaseCount() {
				count += Integer.MAX_VALUE / 2;
			}

			@Test
			void countIsLarge() {
				assertTrue(count > Integer.MAX_VALUE / 2);
			}

		}

	}

}
As you can see, @BeforeEach (and @AfterEach) work here as well. Although currently not documented the initializations are executed outside-in. This allows to incrementally build a context for the inner tests.
For nested tests to have access to the outer test class’ fields, the nested class must not be static. Unfortunately this forbids the use of static methods so @BeforeAll and @AfterAll can not be used in that scenario. (Or can they?)
Maybe you’re asking yourself what this is good for. I use nested test classes to inherit interface tests, others to keep their test classes small and focused. The latter is also demonstrated by the more elaborate example commonly given by the JUnit team, which tests a stack:
Testing A Stack With Nested Classes
aclass TestingAStack {

    Stack<Object> stack;
    boolean isRun = false;

    @Test
    void isInstantiatedWithNew() {
        new Stack<Object>();
    }

    @Nested
    class WhenNew {

        @BeforeEach
        void init() {
            stack = new Stack<Object>();
        }

        // some tests on 'stack', which is empty

        @Nested
        class AfterPushing {

            String anElement = "an element";

            @BeforeEach
            void init() {
                stack.push(anElement);
            }

            // some tests on 'stack', which has one element...

        }
    }
}
In this example the state is successively changed and a number of tests are executed for each scenario.
Naming Tests
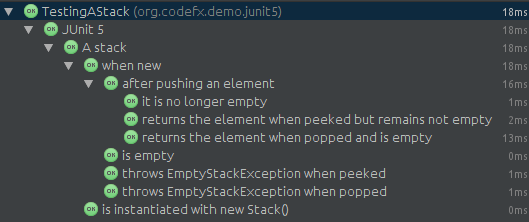
JUnit 5 comes with an annotation @DisplayName, which gives developers the possibility to give more easily readable names to their test classes and methods.
With it, the stack example from looks as follows:
@DisplayName("A stack")
class TestingAStack {

    @Test
    @DisplayName("is instantiated with new Stack()")
    void isInstantiatedWithNew() { /*...*/ }

    @Nested
    @DisplayName("when new")
    class WhenNew {

        @Test
        @DisplayName("is empty")
        void isEmpty() { /*...*/ }

        @Test
        @DisplayName("throws EmptyStackException when popped")
        void throwsExceptionWhenPopped() { /*...*/ }

        @Test
        @DisplayName("throws EmptyStackException when peeked")
        void throwsExceptionWhenPeeked() { /*...*/ }

        @Nested
        @DisplayName("after pushing an element")
        class AfterPushing {

            @Test
            @DisplayName("it is no longer empty")
            void isEmpty() { /*...*/ }

            @Test
            @DisplayName("returns the element when popped and is empty")
            void returnElementWhenPopped() { /*...*/ }

            @Test
            @DisplayName(
                    "returns the element when peeked but remains not empty")
            void returnElementWhenPeeked(){ /*...*/ }
        }
    }
}
This creates nicely readable output and should bring joy to the heart of BDD‘ers!
Reflection
That’s it, you made it! We rushed through the basics of how to use JUnit 5 and now you know all you need to write plain tests: How to annotate the lifecycle methods (with @[Before|After][All|Each]) and the test methods themselves ( @Test), how to nest ( @Nested) and name ( @DisplayName) tests and how assertions and assumptions work (much like before).
But wait, there’s more! We didn’t yet talk about conditional execution of tests methods, the very cool parameter injection, the extension mechanism, or the project’s architecture. And we won’t right now because we will take a short break from JUnit 5 and come back to it in about a month.
Stay tuned!
| Reference: | JUnit 5 – Basics from our JCG partner Nicolai Parlog at the CodeFx blog. |
