Docker Machine, Swarm and Compose for multi-container and multi-host applications with Couchbase and WildFly
This blog will explain how to create multi-container application deployed on multiple hosts using Docker. This will be achieved using Docker Machine, Swarm and Compose.
Yes, all three tools together makes this blog that much more interesting!
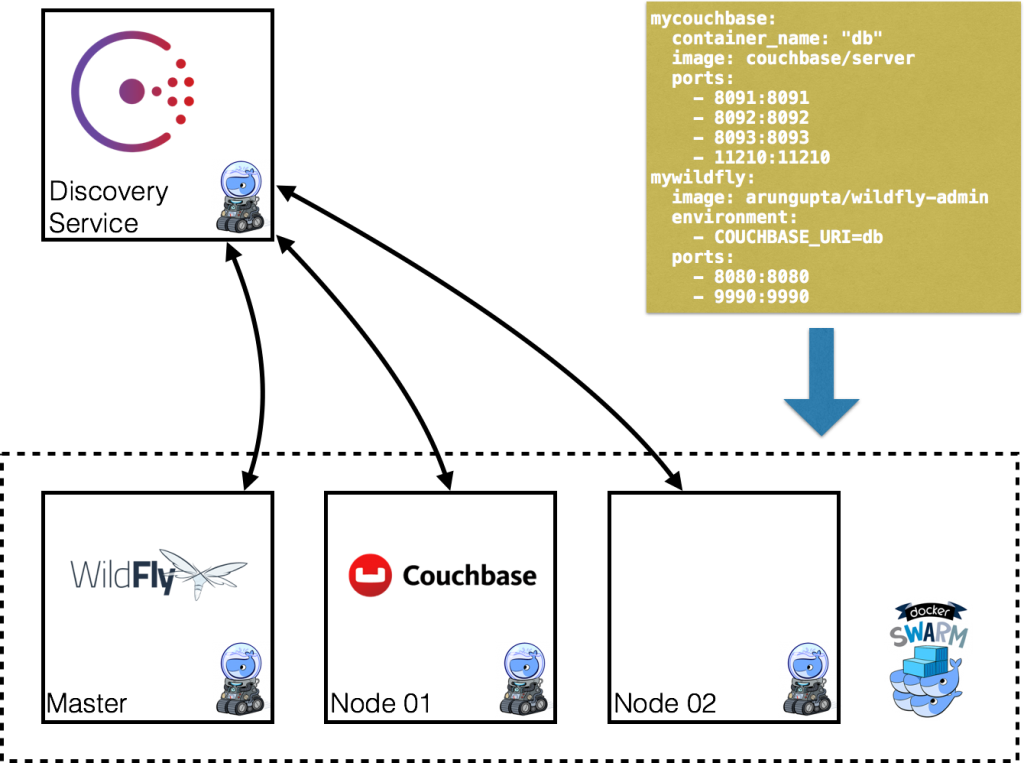
The diagram explains the key components:
- Docker Machine is used to provision multiple Docker hosts
- Docker Swarm will be used to create a multi-host cluster
- Each node in Docker Swarm cluster is registered/discovered using Consul
- Multi-container application will be deployed using Docker Compose
- WildFly and Couchbase are provisioned on different hosts
- Docker multi-host networking is used for WildFly and Couchbase to communicate
In addition, Maven is used to configure Couchbase and deploy application to WildFly.
- Latest instructions at Docker for Java Developers.
No story, just pure code, lets do it!
Create Discovery Service using Docker Machine
- Create a Machine that will host discovery service:
docker-machine create -d=virtualbox consul-machine
Running pre-create checks...
Creating machine...
Waiting for machine to be running, this may take a few minutes...
Machine is running, waiting for SSH to be available...
Detecting operating system of created instance...
Provisioning created instance...
Copying certs to the local machine directory...
Copying certs to the remote machine...
Setting Docker configuration on the remote daemon...
To see how to connect Docker to this machine, run: docker-machine env consul-machine
- Connect to this Machine:
eval $(docker-machine env consul-machine)
- Run Consul service using the following Compose file:
myconsul:
  image: progrium/consul
  restart: always
  hostname: consul
  ports:
    - 8500:8500
  command: "-server -bootstrap"
This Compose file is available at https://github.com/arun-gupta/docker-images/blob/master/consul/docker-compose.yml.
docker-compose up -d
Pulling myconsul (progrium/consul:latest)...
latest: Pulling from progrium/consul
3b4d28ce80e4: Pull complete
e5ab901dcf2d: Pull complete
30ad296c0ea0: Pull complete
3dba40dec256: Pull complete
f2ef4387b95e: Pull complete
53bc8dcc4791: Pull complete
75ed0b50ba1d: Pull complete
17c3a7ed5521: Pull complete
8aca9e0ecf68: Pull complete
4d1828359d36: Pull complete
46ed7df7f742: Pull complete
b5e8ce623ef8: Pull complete
049dca6ef253: Pull complete
bdb608bc4555: Pull complete
8b3d489cfb73: Pull complete
c74500bbce24: Pull complete
9f3e605442f6: Pull complete
d9125e9e799b: Pull complete
Digest: sha256:8cc8023462905929df9a79ff67ee435a36848ce7a10f18d6d0faba9306b97274
Status: Downloaded newer image for progrium/consul:latest
Creating consul_myconsul_1
Started container can be verified as:
docker ps
CONTAINER ID        IMAGE               COMMAND                  CREATED             STATUS              PORTS                                                                            NAMES
f05d8dd11e7f        progrium/consul     "/bin/start -server -"   30 seconds ago      Up 29 seconds       53/tcp, 53/udp, 8300-8302/tcp, 8400/tcp, 0.0.0.0:8500->8500/tcp, 8301-8302/udp   consul_myconsul_1
Create Docker Swarm Cluster using Docker Machine
Swarm is fully integrated with Machine, and so is the easiest way to get started.
- Create a Swarm Master and point to the Consul discovery service:
docker-machine create -d virtualbox --virtualbox-disk-size "5000" --swarm --swarm-master --swarm-discovery="consul://$(docker-machine ip consul-machine):8500" --engine-opt="cluster-store=consul://$(docker-machine ip consul-machine):8500" --engine-opt="cluster-advertise=eth1:2376" swarm-master
Running pre-create checks...
Creating machine...
Waiting for machine to be running, this may take a few minutes...
Machine is running, waiting for SSH to be available...
Detecting operating system of created instance...
Provisioning created instance...
Copying certs to the local machine directory...
Copying certs to the remote machine...
Setting Docker configuration on the remote daemon...
Configuring swarm...
To see how to connect Docker to this machine, run: docker-machine env swarm-master
Few options to look here:
--swarmconfigures the Machine with Swarm--swarm-masterconfigures the created Machine to be Swarm master--swarm-discoverydefines address of the discovery service--cluster-advertiseadvertise the machine on the network--cluster-storedesignate a distributed k/v storage backend for the cluster--virtualbox-disk-sizesets the disk size for the created Machine to 5GB. This is required so that WildFly and Couchbase image can be downloaded on any of the nodes.
- Find some information about this machine:
docker-machine inspect --format='{{json .Driver}}'  swarm-master
{"Boot2DockerImportVM":"","Boot2DockerURL":"","CPU":1,"DiskSize":5000,"HostOnlyCIDR":"192.168.99.1/24","HostOnlyNicType":"82540EM","HostOnlyPromiscMode":"deny","IPAddress":"192.168.99.102","MachineName":"swarm-master","Memory":1024,"NoShare":false,"SSHPort":51972,"SSHUser":"docker","StorePath":"/Users/arungupta/.docker/machine","SwarmDiscovery":"consul://192.168.99.100:8500","SwarmHost":"tcp://0.0.0.0:3376","SwarmMaster":true,"VBoxManager":{}}
Note that the disk size is 5GB.
- Connect to the master by using the command:
eval "$(docker-machine env --swarm swarm-master)"
- Find some information about the cluster:
docker info
Containers: 2
Images: 1
Role: primary
Strategy: spread
Filters: health, port, dependency, affinity, constraint
Nodes: 1
 swarm-master: 192.168.99.102:2376
  └ Containers: 2
  └ Reserved CPUs: 0 / 1
  └ Reserved Memory: 0 B / 1.021 GiB
  └ Labels: executiondriver=native-0.2, kernelversion=4.1.13-boot2docker, operatingsystem=Boot2Docker 1.9.1 (TCL 6.4.1); master : cef800b - Fri Nov 20 19:33:59 UTC 2015, provider=virtualbox, storagedriver=aufs
CPUs: 1
Total Memory: 1.021 GiB
Name: d074fd97682e
- Create a new Machine to join this cluster:
docker-machine create -d virtualbox --virtualbox-disk-size "5000" --swarm --swarm-discovery="consul://$(docker-machine ip consul-machine):8500" --engine-opt="cluster-store=consul://$(docker-machine ip consul-machine):8500" --engine-opt="cluster-advertise=eth1:2376" swarm-node-01
Running pre-create checks...
Creating machine...
Waiting for machine to be running, this may take a few minutes...
Machine is running, waiting for SSH to be available...
Detecting operating system of created instance...
Provisioning created instance...
Copying certs to the local machine directory...
Copying certs to the remote machine...
Setting Docker configuration on the remote daemon...
Configuring swarm...
To see how to connect Docker to this machine, run: docker-machine env swarm-node-01
Notice no
--swarm-masteris specified in this command. This ensure that the created Machines are worker nodes. - Create a second Swarm node to join this cluster:
docker-machine create -d virtualbox --virtualbox-disk-size "5000" --swarm --swarm-discovery="consul://$(docker-machine ip consul-machine):8500" --engine-opt="cluster-store=consul://$(docker-machine ip consul-machine):8500" --engine-opt="cluster-advertise=eth1:2376" swarm-node-02
Running pre-create checks...
Creating machine...
Waiting for machine to be running, this may take a few minutes...
Machine is running, waiting for SSH to be available...
Detecting operating system of created instance...
Provisioning created instance...
Copying certs to the local machine directory...
Copying certs to the remote machine...
Setting Docker configuration on the remote daemon...
Configuring swarm...
To see how to connect Docker to this machine, run: docker-machine env swarm-node-02
- List all the created Machines:
docker-machine ls
NAME             ACTIVE   DRIVER       STATE     URL                         SWARM
consul-machine   -        virtualbox   Running   tcp://192.168.99.100:2376
swarm-master     *        virtualbox   Running   tcp://192.168.99.101:2376   swarm-master (master)
swarm-node-01    -        virtualbox   Running   tcp://192.168.99.102:2376   swarm-master
swarm-node-02    -        virtualbox   Running   tcp://192.168.99.103:2376   swarm-master
The machines that are part of the cluster have cluster’s name in the SWARM column, blank otherwise. For example,
consul-machineis a standalone machine where as all other machines are part of theswarm-mastercluster. The Swarm master is also identified by (master) in the SWARM column. - Connect to the Swarm cluster and find some information about it:
eval "$(docker-machine env --swarm swarm-master)"
docker info
Note,
--swarmis specified to connect to the Swarm cluster. Otherwise the command will connect toswarm-masterMachine only.This shows the output as:
docker info
Containers: 4
Images: 3
Role: primary
Strategy: spread
Filters: health, port, dependency, affinity, constraint
Nodes: 3
 swarm-master: 192.168.99.102:2376
  └ Containers: 2
  └ Reserved CPUs: 0 / 1
  └ Reserved Memory: 0 B / 1.021 GiB
  └ Labels: executiondriver=native-0.2, kernelversion=4.1.13-boot2docker, operatingsystem=Boot2Docker 1.9.1 (TCL 6.4.1); master : cef800b - Fri Nov 20 19:33:59 UTC 2015, provider=virtualbox, storagedriver=aufs
 swarm-node-01: 192.168.99.103:2376
  └ Containers: 1
  └ Reserved CPUs: 0 / 1
  └ Reserved Memory: 0 B / 1.021 GiB
  └ Labels: executiondriver=native-0.2, kernelversion=4.1.13-boot2docker, operatingsystem=Boot2Docker 1.9.1 (TCL 6.4.1); master : cef800b - Fri Nov 20 19:33:59 UTC 2015, provider=virtualbox, storagedriver=aufs
 swarm-node-02: 192.168.99.104:2376
  └ Containers: 1
  └ Reserved CPUs: 0 / 1
  └ Reserved Memory: 0 B / 1.021 GiB
  └ Labels: executiondriver=native-0.2, kernelversion=4.1.13-boot2docker, operatingsystem=Boot2Docker 1.9.1 (TCL 6.4.1); master : cef800b - Fri Nov 20 19:33:59 UTC 2015, provider=virtualbox, storagedriver=aufs
CPUs: 3
Total Memory: 3.064 GiB
Name: d074fd97682e
There are 3 nodes – one Swarm master and 2 Swarm worker nodes. There is a total of 4 containers running in this cluster – one Swarm agent on master and each node, and there is an additional swarm-agent-master running on the master. This can be verified by connecting to the master and listing all the containers.
- List nodes in the cluster with the following command:
docker run swarm list consul://$(docker-machine ip consul-machine):8500
192.168.99.102:2376
192.168.99.103:2376
192.168.99.104:2376
Start Application Environment using Docker Compose
Make sure you are connected to the cluster by giving the command eval "$(docker-machine env --swarm swarm-master)".
- List all the networks created by Docker so far:
docker network ls
NETWORK ID          NAME                   DRIVER
33a619ddc5d2        swarm-node-02/bridge   bridge
e0b73c96ffec        swarm-node-02/none     null
b315e67f0363        swarm-node-02/host     host
879d6167be47        swarm-master/bridge    bridge
f771ddc7d957        swarm-node-01/none     null
e042754df336        swarm-node-01/host     host
d2f3b512f9dc        swarm-node-01/bridge   bridge
5b5bcf135d7b        swarm-master/none      null
fffc34eae907        swarm-master/host      host
Docker create three networks for each host automatically:
Network Name Purpose bridgeDefault network that containers connect to. This is docker0network in all Docker installations.noneContainer-specific networking stack hostAdds a container on hosts networking stack. Network configuration is identical to the host.
This explains a total of nine networks, three for each node, as shown in this Swarm cluster. - Use Compose file to start WildFly and Couchbase:
mycouchbase:
  container_name: "db"
  image: couchbase/server
  ports:
    - 8091:8091
    - 8092:8092
    - 8093:8093
    - 11210:11210
mywildfly:
  image: arungupta/wildfly-admin
  environment:
    - COUCHBASE_URI=db
  ports:
    - 8080:8080
    - 9990:9990
In this Compose file:
- Couchbase service has a custom container name defined by
container_name. This name is used when creating a new environment variableCOUCHBASE_URIduring WildFly startup. arungupta/wildfly-adminimage is used as it binds WildFly’s management to all network interfaces, and in addition also exposes port 9990. This enables WildFly Maven Plugin to be used to deploy the application.Source for this file is at https://github.com/arun-gupta/docker-images/blob/master/wildfly-couchbase-javaee7/docker-compose.yml.
This application environment can be started as:
docker-compose --x-networking up -d
Creating network "wildflycouchbasejavaee7" with driver "None"
Pulling mywildfly (arungupta/wildfly-admin:latest)...
swarm-node-02: Pulling arungupta/wildfly-admin:latest... : downloaded
swarm-master: Pulling arungupta/wildfly-admin:latest... : downloaded
swarm-node-01: Pulling arungupta/wildfly-admin:latest... : downloaded
Creating wildflycouchbasejavaee7_mywildfly_1
Pulling mycouchbase (couchbase/server:latest)...
swarm-node-02: Pulling couchbase/server:latest... : downloaded
swarm-master: Pulling couchbase/server:latest... : downloaded
swarm-node-01: Pulling couchbase/server:latest... : downloaded
Creating db
--x-networkingcreates an overlay network for the Swarm cluster. This can be verified by listing networks again:docker network ls NETWORK ID NAME DRIVER 5e93fc34b4d9 swarm-node-01/docker_gwbridge bridge 1c041242f51d wildflycouchbasejavaee7 overlay cc8697c6ce13 swarm-master/docker_gwbridge bridge f771ddc7d957 swarm-node-01/none null 879d6167be47 swarm-master/bridge bridge 5b5bcf135d7b swarm-master/none null fffc34eae907 swarm-master/host host e042754df336 swarm-node-01/host host d2f3b512f9dc swarm-node-01/bridge bridge 33a619ddc5d2 swarm-node-02/bridge bridge e0b73c96ffec swarm-node-02/none null b315e67f0363 swarm-node-02/host host
Three new networks are created:
- Containers connected to the multi-host network are automatically connected to the
docker_gwbridgenetwork. This network allows the containers to have external connectivity outside of their cluster, and is created on each worker node. - A new overlay network
wildflycouchbasejavaee7is created. Connect to different Swarm nodes and check that the overlay network exists on them.Lets begin with master:eval "$(docker-machine env swarm-master)" docker network ls NETWORK ID NAME DRIVER 1c041242f51d wildflycouchbasejavaee7 overlay 879d6167be47 bridge bridge 5b5bcf135d7b none null fffc34eae907 host host cc8697c6ce13 docker_gwbridge bridge
Next, with
swarm-node-01:eval "$(docker-machine env swarm-node-01)" docker network ls NETWORK ID NAME DRIVER 1c041242f51d wildflycouchbasejavaee7 overlay d2f3b512f9dc bridge bridge f771ddc7d957 none null e042754df336 host host 5e93fc34b4d9 docker_gwbridge bridge
Finally, with
swarm-node-02:eval "$(docker-machine env swarm-node-02)" docker network ls NETWORK ID NAME DRIVER 1c041242f51d wildflycouchbasejavaee7 overlay e0b73c96ffec none null b315e67f0363 host host 33a619ddc5d2 bridge bridge
As seen,
wildflycouchbasejavaee7overlay network exists on all Machines. This confirms that the overlay network created for Swarm cluster was added to each host in the cluster.docker_gwbridgeonly exists on Machines that have application containers running.Read more about Docker Networks.
- Couchbase service has a custom container name defined by
- Verify that WildFly and Couchbase are running:
docker ps
CONTAINER ID        IMAGE                     COMMAND                  CREATED             STATUS              PORTS                                                                                                             NAMES
23a581295a2b        couchbase/server          "/entrypoint.sh couch"   9 seconds ago       Up 8 seconds        192.168.99.102:8091-8093->8091-8093/tcp, 11207/tcp, 11211/tcp, 192.168.99.102:11210->11210/tcp, 18091-18092/tcp   swarm-master/db
7a8a885b23f3        arungupta/wildfly-admin   "/opt/jboss/wildfly/b"   9 seconds ago       Up 8 seconds        192.168.99.103:8080->8080/tcp, 192.168.99.103:9990->9990/tcp                                                      swarm-node-01/wildflycouchbasejavaee7_mywildfly_1
Configure Application and Database
- Clone https://github.com/arun-gupta/couchbase-javaee.git. This workspace contains a simple Java EE application that is deployed on WildFly and provides a REST API over
travel-samplebucket in Couchbase. - Couchbase server can be configured using REST API. The application contains a Maven profile that allows to configure Couchbase server with
travel-samplebucket. This can be invoked as:mvn install -Pcouchbase -Ddocker.host=$(docker-machine ip swarm-master) . . . * Server auth using Basic with user 'Administrator' > POST /sampleBuckets/install HTTP/1.1 > Authorization: Basic QWRtaW5pc3RyYXRvcjpwYXNzd29yZA== . . . } [data not shown] * upload completely sent off: 17 out of 17 bytes < HTTP/1.1 202 Accepted * Server Couchbase Server is not blacklisted < Server: Couchbase Server . . .
- Deploy the application to WildFly by specifying three parameters:
- Host IP address where WildFly is running
- Username of a user in WildFly’s administrative realm
- Password of the user specified in WildFly’s administrative realm
mvn install -Pwildfly -Dwildfly.hostname=$(docker-machine ip swarm-node-01) -Dwildfly.username=admin -Dwildfly.password=Admin#007

. . .

Nov 29, 2015 12:11:14 AM org.xnio.Xnio <clinit>
INFO: XNIO version 3.3.1.Final
Nov 29, 2015 12:11:14 AM org.xnio.nio.NioXnio <clinit>
INFO: XNIO NIO Implementation Version 3.3.1.Final
Nov 29, 2015 12:11:15 AM org.jboss.remoting3.EndpointImpl <clinit>
INFO: JBoss Remoting version 4.0.9.Final
[INFO] Authenticating against security realm: ManagementRealm
[INFO] ------------------------------------------------------------------------
[INFO] BUILD SUCCESS
[INFO] ------------------------------------------------------------------------

. . .
Access Application
Now that WildFly and Couchbase server have started, lets access the application. You need to specify IP address of the Machine where WildFly is running:
curl http://$(docker-machine ip swarm-node-01):8080/couchbase-javaee/resources/airline
[{"travel-sample":{"id":10123,"iata":"TQ","icao":"TXW","name":"Texas Wings","callsign":"TXW","type":"airline","country":"United States"}}, {"travel-sample":{"id":10642,"iata":null,"icao":"JRB","name":"Jc royal.britannica","callsign":null,"type":"airline","country":"United Kingdom"}}, {"travel-sample":{"id":112,"iata":"5W","icao":"AEU","name":"Astraeus","callsign":"FLYSTAR","type":"airline","country":"United Kingdom"}}, {"travel-sample":{"id":1355,"iata":"BA","icao":"BAW","name":"British Airways","callsign":"SPEEDBIRD","type":"airline","country":"United Kingdom"}}, {"travel-sample":{"id":10765,"iata":"K5","icao":"SQH","name":"SeaPort Airlines","callsign":"SASQUATCH","type":"airline","country":"United States"}}, {"travel-sample":{"id":13633,"iata":"WQ","icao":"PQW","name":"PanAm World Airways","callsign":null,"type":"airline","country":"United States"}}, {"travel-sample":{"id":139,"iata":"SB","icao":"ACI","name":"Air Caledonie International","callsign":"AIRCALIN","type":"airline","country":"France"}}, {"travel-sample":{"id":13391,"iata":"-+","icao":"--+","name":"U.S. Air","callsign":null,"type":"airline","country":"United States"}}, {"travel-sample":{"id":1191,"iata":"UU","icao":"REU","name":"Air Austral","callsign":"REUNION","type":"airline","country":"France"}}, {"travel-sample":{"id":1316,"iata":"FL","icao":"TRS","name":"AirTran Airways","callsign":"CITRUS","type":"airline","country":"United States"}}]- Complete set of REST API for this application is documented at github.com/arun-gupta/couchbase-javaee.
Latest instructions at Docker for Java Developers.
Enjoy!
| Reference: | Docker Machine, Swarm and Compose for multi-container and multi-host applications with Couchbase and WildFly from our JCG partner Arun Gupta at the Miles to go 2.0 … blog. |
