The geographical distribution & the continuously growing number of cloud services of Amazon Web Service has driven many startups & enterprises to host their applications on Amazon Instances distributed across different regions. However as development teams start to grow or as enterprises embark on new development projects, replicating consistent DEV/TEST environments for the quickly growing teams becomes a struggle on any cloud infrastructure.
DCHQ simplifies the containerization of enterprise applications and makes it possible to replicate very complex application environments on multiple hosts through a one-click deploy button. DCHQ does not just automate the application deployments, but it also integrates with AWS to automate the provisioning and auto-scaling of Weave-enabled clusters consisting of distributed Amazon Instances.
In this blog, we will go over the automated infrastructure provisioning on AWS as well as the automated deployment and lifecycle management of a 3-tier Java application deployed on clustered Tomcat servers and with Nginx and MySQL as the load balancer and database respectively.
https://www.youtube.com/watch?v=jIjyNFRGn_o
Automate the Provisioning and Auto-Scaling of Clusters on AWS
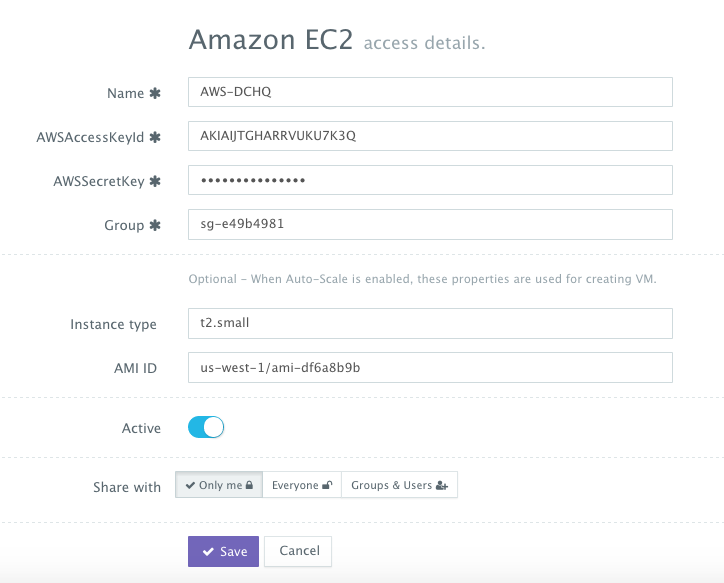
First, a user can register a Cloud Provider for AWS by navigating to Manage > Repo & Cloud Provider and then clicking on the + button to select AWS. The AWS Access Key and Secret Key need to be provided – which can be retrieved from the Security Credentials section of the AWS Console.
A user can then create a Weave-enabled cluster with an auto-scale policy to automatically spin up new Amazon Instances. The communication between servers in the Weave cluster is password protected – ensuring that no other Weave cluster is able to establish a communication with any of the running containers. This can be done by navigating to Manage > Data Center & Cluster page and then clicking on the + button. You can select a capacity-based placement policy and then Weave as the networking layer in order to facilitate cross-container communication across multiple hosts within a cluster. The Auto-Scale Policy in this example sets the maximum number of VM’s (or Amazon Instances) to 10.

A user can now provision a number of Amazon Instances on the newly created cluster by navigating to Manage > Bare-Metal Server & VM and then clicking on the + button to select AWS. Once the Cloud Provider is selected, a user can select the Region, Instance Type, and Image. DCHQ is certified with Red Hat Enterprise Linux, CentOS and Ubuntu – but a user should avoid selecting images that are in beta or alpha mode. The Ubuntu image that has recently been tested is us-west-1/ami-1fc03e5b (or ubuntu/images/ubuntu-trusty-14.04-amd64-server-20150812). A user needs to provide the Security Group name (e.g. default). The security group needs to have the following inbound ports opened: 32000-59000 for Docker, 6783 for Weave, and 5672 for RabbitMQ. A Data Center (or Cluster) is then selected and the number of Amazon Instances can be specified.

Model & Deploy Multi-Tier Docker-based Java Application (Nginx, Clustered Tomcat, and MySQL)
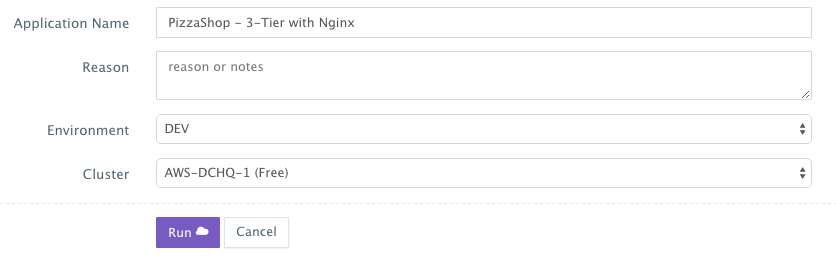
Once the Amazon Instances are provisioned, a user can deploy a multi-tier, Docker-based application on the new Amazon Instances. This can be done by navigating to the Self-Service Library and then clicking on Customize to request a multi-tier application.
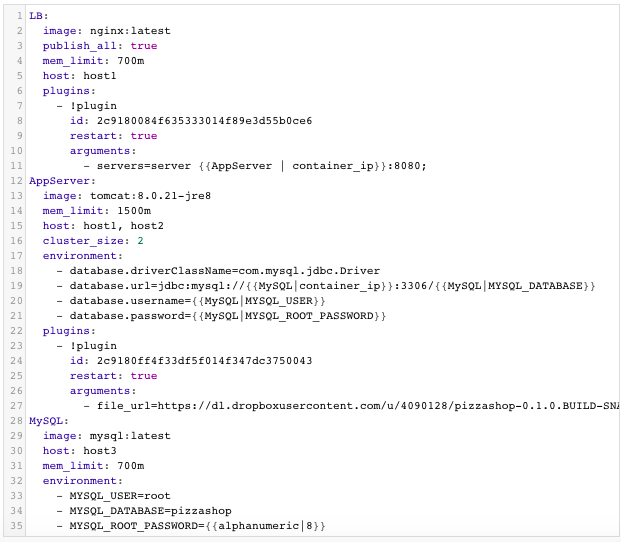
In this example, we have a multi-tier application consisting of Nginx (for load balancing), Tomcat (the clustered application server) and MySQL (as the database). You will notice Nginx is invoking a BASH script plug-in to add the container IP’s of the application servers in the default.conf file dynamically (or at request time). Tomcat is also invoking a BASH script plug-in to deploy a Java WAR file from a specified URL. You will notice that the cluster_size parameter allows you to specify the number of containers to launch (with the same application dependencies). The host parameter allows you to specify the host you would like to use for container deployments. Here are the values supported for the host parameter:
- host1, host2, host3, etc. – selects a host randomly within a data-center (or cluster) for container deployments
- <IP Address 1, IP Address 2, etc.> — allows a user to specify the actual IP addresses to use for container deployments
- <Hostname 1, Hostname 2, etc.> — allows a user to specify the actual hostnames to use for container deployments
- Wildcards (e.g. “db-*”, or “app-srv-*”) – to specify the wildcards to use within a hostname
Additionally, a user can create cross-image environment variable bindings by making a reference to another image’s environment variable. In this case, we have made several bindings – including database.url=jdbc:mysql://{{MySQL|container_ip}}:3306/{{MySQL|MYSQL_DATABASE}} – in which the database container IP and name are resolved dynamically at request time and are used to configure the database URL in the application servers.
Here is a list of supported environment variables:
- {{alphanumeric | 8}} – creates a random 8-character alphanumeric string. This is most useful for creating random passwords.
- {{<Image Name> | ip}} – allows you to enter the host IP address of a container as a value for an environment variable. This is most useful for allowing the middleware tier to establish a connection with the database.
- {{<Image Name> | container_ip}} – allows you to enter the internal IP of a container as a value for an environment variable. This is most useful for allowing the middleware tier to establish a secure connection with the database (without exposing the database port).
- {{<Image Name> | port _<Port Number>}} – allows you to enter the Port number of a container as a value for an environment variable. This is most useful for allowing the middleware tier to establish a connection with the database. In this case, the port number specified needs to be the internal port number – i.e. not the external port that is allocated to the container. For example, {{PostgreSQL | port_5432}} will be translated to the actual external port that will allow the middleware tier to establish a connection with the database.
- {{<Image Name> | <Environment Variable Name>}} – allows you to enter the value an image’s environment variable into another image’s environment variable. The use cases here are endless – as most multi-tier applications will have cross-image dependencies.
A user can select an Environment Tag (like DEV or QE) and the Data Center created for AWS before clicking on Run.
Monitor the CPU, Memory & I/O of the Running Containers
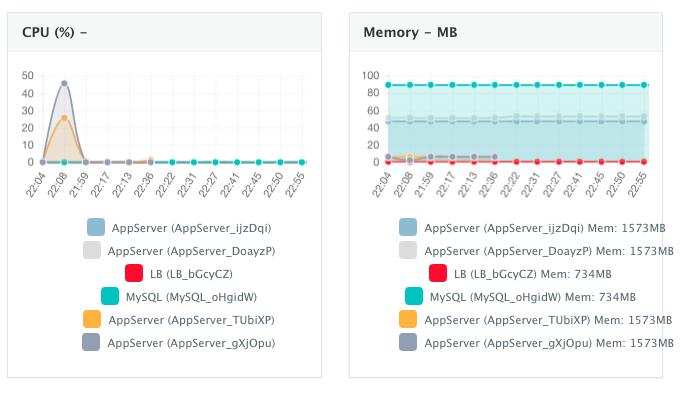
Once the application is up and running, a user can monitor the CPU, Memory, & I/O Utilization of the running containers and perform day-2 operations like Backup, Container Updates using BASH plug-ins, Scale In/Out and Continuous Delivery.
A user can perform historical monitoring analysis and correlate issues to container updates or build deployments. This can be done by clicking on the Actions menu of the running application and then on Monitoring. A custom date range can be selected to view CPU, Memory and I/O Utilization historically.

Scale out the Tomcat Application Server Cluster
If the running application becomes resource constrained, a user can to scale out the application to meet the increasing load. Moreover, a user can schedule the scale out during business hours and the scale in during weekends for example.
To scale out the cluster of Tomcat servers from 2 to 4, a user can click on the Actions menu of the running application and then select Scale Out. A user can then specify the new size for the cluster and then click on Run Now.
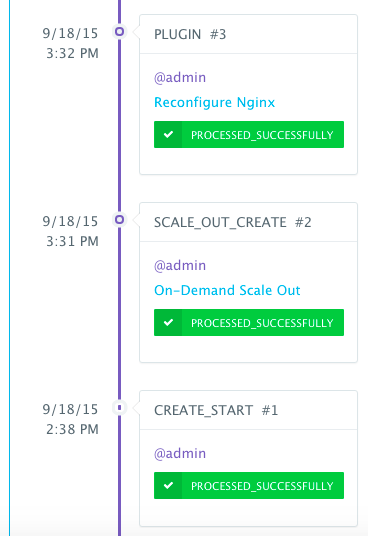
We then used the BASH script plug-in to update Nginx’s default.conf file so that it’s aware of the new application server added. The BASH script plug-ins can also be scheduled to accommodate use cases like cleaning up logs or updating configurations at defined frequencies. An application time-line is available to track every change made to the application for auditing and diagnostics.

Once the scale out is complete, a user can execute a BASH plug-in to update Nginx’s default.conf file so that it’s aware of the new application server added. The BASH script plug-ins can also be scheduled to accommodate use cases like cleaning up logs or updating configurations at defined frequencies.
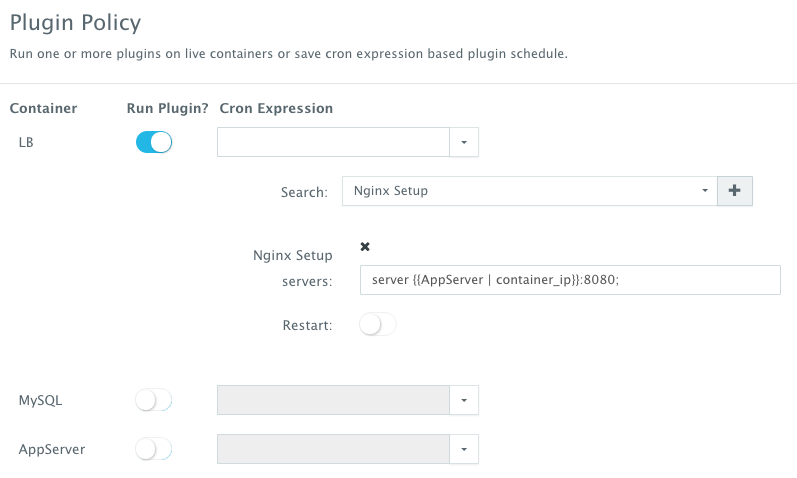
To execute a plug-in on a running container, a user can click on the Actions menu of the running application and then select Plug-ins. A user can then select the load balancer (Nginx) container, search for the plug-in that needs to be executed, enable container restart using the toggle button. The default argument for this plug-in will dynamically resolve all the container IP’s of the running Tomcat servers and add them as part of the default.conf file.
An application time-line is available to track every change made to the application for auditing and diagnostics. This can be accessed from the expandable menu at the bottom of the page of a running application.
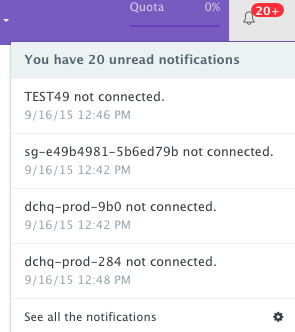
Alerts and notifications are available for when containers or hosts are down or when the CPU & Memory Utilization of either hosts or containers exceed a defined threshold.
Enable the Continuous Delivery Workflow with Jenkins to update the WAR file of the running application when a build is triggered
For developers wishing to follow the “immutable” containers model by rebuilding Docker images containing the application code and spinning up new containers with every application update, DCHQ provides an automated build feature that allows developers to automatically create Docker images from Dockerfiles or GitHub projects containing Dockerfiles.
However, many developers may wish to update the running application server containers with the latest Java WAR file instead. For that, DCHQ allows developers to enable a continuous delivery workflow with Jenkins. This can be done by clicking on the Actions menu of the running application and then selecting Continuous Delivery. A user can select a Jenkins instance that has already been registered with DCHQ, the actual Job on Jenkins that will produce the latest WAR file, and then a BASH script plug-in to grab this build and deploy it on a running application server. Once this policy is saved, DCHQ will grab the latest WAR file from Jenkins any time a build is triggered and deploy it on the running application server.

Conclusion
Containerizing enterprise Java applications is still a challenge mostly because existing application composition frameworks do not address complex dependencies, external integrations or auto-scaling workflows post-provision. Moreover, the ephemeral design of containers meant that developers had to spin up new containers and re-create the complex dependencies & external integrations with every version update.
DCHQ, available in hosted and on-premise versions, addresses all of these challenges and simplifies the containerization of enterprise Java applications through an advance application composition framework that facilitates cross-image environment variable bindings, extensible BASH script plug-ins that can be invoked at request time or post-provision, and application clustering for high availability across multiple hosts or regions with support for auto scaling.
Sign Up for FREE on http://DCHQ.io to get access to out-of-box multi-tier Java application templates along with application lifecycle management functionality like monitoring, container updates, scale in/out and continuous delivery.
| Reference: | End-to-End Automation for Docker-based 3-Tier Java Apps (Niginx, Tomcat and MySQL) on AWS from our JCG partner Amjad Afanah at the DCHQ.io blog. |
