
But I stumbled into another problem. How do I link the objects and the database. Data in objects are stored differently than in a relational database. Relational database doesn’t support many OOPs concepts that are so crucial for our Object Model. So I thought of brewing my own classes to transfer data from a database to Objects and back. But I faced a lot of difficulties and stumbling blocks. Then came the break! I came across the Java Persistence stuff that allowed me to persist or save object’s data beyond the lifetime of the program. What that means is, you can now store Objects into data stores like Relational database or a XML file etc. without having to write complex code to convert the formats and to manage CRUD operations.
This small article will introduce you to this wonderful feature and you will be in a position to start implementing Persistence in your projects. I don’t want to go into complex topics in this article. So I decided to use ObjectDB Database. The advantage of using ObjectDB is that it doesn’t need complex configuration and mapping files that JPA normally needs. And we are going to use the popular Eclipse IDE. I’ll provide a simple example program that will store and manipulate Employee details (Name and Salary). Alright, lets start………!
Persistence service is provided by many providers and we are going to use ObjectDB’s implementation. So download their DB and API files. Lets go through some basics now. And then we will see how to implement these to create a program…
I. The Entity Class:
To use persistence, you need the class whose objects you’re gonna store in a database. There classes are called as Entity classes and they are same as POJOs (Plain Old Java Objects) except for some extra annotations. You need to define the fields inside this class that must be persisted (saved in db). An Entity class must have a “@Entity” annotation above the class. Now define all the fields and methods of the class. Voila we got ourselves an Entity class! Now you can add extra features to your entity class. For example you can indicate which field to use as a Primary key using the “@Id” annotation above that field. You can also make ObjectDB generate primary key value for the objects that you persist into the database using “@GeneratedValue(strategy=GenerationType.AUTO)” annotation. There are many more annotations and features and constructs. But we need not see about them now. Here is the class that we will be using as the Entity Class….
package employeeDB;import javax.persistence.*;

@Entity
publicclass Employee {

    @Id String name;
    Double salary;

    public Employee()
    {

    }

    public Employee (String name, Double Salary)
    {
        this.name=name;
        this.salary=Salary;
    }

    publicvoid setSalary(Double Salary)
    {
        this.salary=Salary;
    }

    publicString toString()
    {
        return"Name: "+name+"\nSalary: "+salary ;
    }

}
As you can see we have the Entity class identified by @Entity annotation. Then we have employee name as the primary key. And you need to have a default constructor without parameters in you entity class.
In other JPA implementations you may have to provide details about the entity classes in a separate XML file. But ObjectDB doesn’t require that.
II. Connecting to the Database
In JPA a database connection is represented by the EntityManager interface. In order to access and work with an ObjectDB database we need an EntityManager instance. We can obtain an instance of EntityManager using the EntityManagerFactory instance that is created using the static createEntityManagerFactory method of EntityManagerFactory class. You need to specify where to store the database file as an argument to the createEntityManagerFactory method. Example:
EntityManagerFactory emf=Persistence.createEntityManagerFactory("empDB.odb");
EntityManager em=emf.createEntityManager();
Now we have got an EntityManager that will connect our application to the database. Generally several EntityManagers are created in a program but only one EntityManagerfactory instance is created. Most JPA implementations require the XML Mapping file called as the “Persistence Unit” as the argument for creating EntityManagerFactory Instance. But ObjectDB has provisions for accepting only the location of the database. If the database already exists, it will be opened or else a new db will be created for us.
EntityManagerFactory and EntityManager can be closed as follows,
em.close();
emf.close();
Its a good practice to have a seperate EntityManager for each Class (that’s responsible for some db activity) or each Thread incase of a Multi Threaded Application. Now lets see how to make transactions with the Database….
III. Performing Transactions
For doing any operation with or on a database we must first start a transaction. Any operation can be performed only after a Transaction is started using an EntityManager. We can start a transaction using following call.
em.getTransaction().begin();
And now we can perform various transactions like create a new Record (Object), remove, update and retrieve data from the database. Before we can perform any of the CRUD operations, we need to add data to our database. In JPA inserting an object into a database is called as ‘persisting’ the object. This can be performed using the em.persist(Object) method. Now this object becomes ‘managed’ but that EntityManager (em). That means any changes made to that object will be reflected in its copy in the database file. And to remove any object from a database, we can use the em.remove(Object) method. We can retrieve an object from the database using the primary key of the object using the em.find(Class,primaryKeyValue) method. You need to pass an Class instance of the Entity class and the primary key to this method and it will return an “Object” which must be casted to the Entity Class. Finally after performing the transactions we have to end the transaction by using,
em.getTransaction().commit();
Only when the transaction is committed the changes made to the Objects in memory will be reflected on the Objects in the database file. The following code persists an Employee Object and then it Searches for an Employee Object and modifies it.
Employee emp1=new Employee ("Gugan",50000);

em.getTransaction().begin();

//Persist (store) emp1 object into Database
em.persist(emp1);

//Search for Gugan
Employee gugan=(Employee) em.find(Employee.class,"Gugan");
gugan.setSalary(100000);

em.getTransaction().commit();
We can also use SQL like queries called as the JPQL to perform the CRUD operations.
There are two types of queries in JPA. Normal queries and TypedQueries. Normal Queries are non-type safe queries. (i.e) The query does not know the type of Object its gonna retrieve or work with. But a TypedQuery is a type-safe query. For creating a typed query you need to specify the Type of class that will be used and also pass Class instance of the Class as parameter along with the Query String. TypedQueries are the standard way of working with Databases and hence we will use them only. They can be created using following Syntax,
TypedQuery q=em.createQuery(queryString,EntityClass.class);
If your query will return only one Object or result, as in the case of finding number of Entries (count), then you can use the q.getSingleResult() method. On the other hand if your Query will return a collection of Objects, as in the case of retrieving a list of Employees from the database, you can use q.getResultList() method and it will return a List object of the type specified while creating the TypedQuery. The following piece of code will first find how many Employees are there and then it will retrieve all of the Employee objects from the database.
em.getTransaction().begin();

//find number of Employees
TypedQuery  count=em.createQuery("Select count(emp) from Employee emp",Employee.class);
System.out.println("\n"+count.getSingleResult()+" employee record(s) Available in Database!\n");

//Retrieve All Employee Objects in the database
TypedQuery  e=em.createQuery("Select emp from Employee emp", Employee.class);
List  employees=e.getResultList();

em.getTransaction().commit();
The JPQL is very similar to the SQL queries. The only difference is that you use Class names and Object names instead of the table names. JPQL also supports parameters in the queries. For eg. if you want to find the Employee with name “Steve” and if you know the name “Steve” only at runtime, you can use the following Query style.
String name=scannerObj.nextLine();
TypedQuery<employee> query = em.createQuery("SELECT e FROM Employee e WHERE e.name = :name", Employee.class);
query.setParameter("name", name);
Employee emp=query.getSingleResult();
This replaces the “:name” parameter with the given “name” variable. Apart from these Queries, there are a lot of other queries. For a full tutorial on JPQL you can read ObjectDB manual about JPQL.
IV. Using Eclipse for ObjectDB JPA Implementation
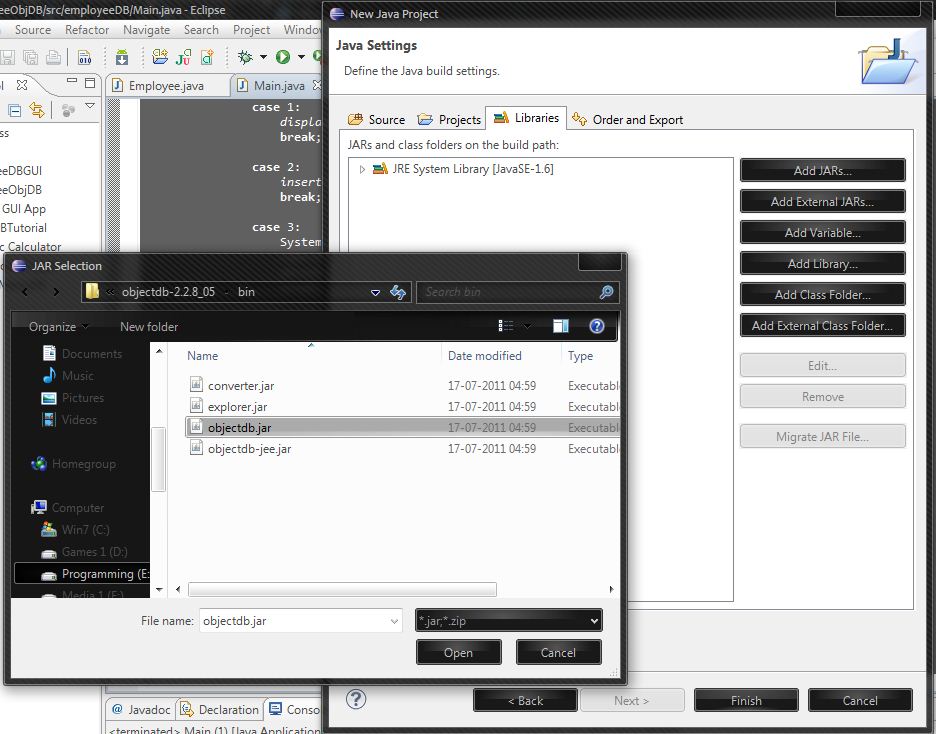
Eclipse is the best IDE for Java AFAIK. So I recommend using Eclipse for developing your applications. Download the latest Eclipse Indigo from here. If you already have Eclipse Indigo or an older edition, then its perfectly fine. Create a new Java Project using File Menu. And in the new Project Dialog, enter a project name for your Project and select the directory in which you want to store your project and select Next. After pressing next you will be provided several options and now in this window select Libraries tab. And then select “Add External Jars” button which will open a new dialog. Now browse to the location where you extracted the ObjectDB API files and go to the bin folder within it and select the “objectdb.jar” file. Press open and the library will be added. Now press finish to Create your Project.
Now that we have created our Project, we need to add classes to it. Now right click your project name on the Project Explorer pane on the left side of the Eclipse IDE window and select New -> Class. Now the New Class dialog will open up. In it, Enter the class name you want to create and then enter a package name as well. All other options need not be meddled with…! In our example program we are going to use two classes. One for the Employee Entity and the another one to house the main method and the key functionality of the application. Make sure that both classes are under same package. To view the created classes, expand your Project in the Project Explorer pane and from the list of nodes, expand src and youll see your package there. Expand it and you will see the classes.
V. Example Program
Now that you have some basic idea about JPA, Ill present an Example console application, that will store, modify and delete Employees from a Database… If you’ve read the above text, then you can easily follow the following program. I have provided comments wherever needed to make the program more clear.
Create a class called Employee using the method I told you in the above section, using employeeDB as your package name and paste the code of the Employee Entity class that I gave in section I of the tutorial.
Now create another class called Main under same package employeeDB and put following code in it.
package employeeDB;

import javax.persistence.*;
import java.util.*;
import java.io.BufferedReader;
import java.io.IOException;
import java.io.InputStreamReader;

public class Main {

    /**
     * Displays all Employees in the Database
     */
    private static void displayAll()
    {
        em.getTransaction().begin();
        TypedQuery  e=em.createQuery(displayAllQuery, Employee.class);
        List <Employee> employees=e.getResultList();
        if(employees.size()>0)
        {
            for(Employee temp:employees)
            {
                System.out.println(temp);
                System.out.println();
            }
            System.out.println(employees.size()+" Employee Records Available...!");
        }
        else
            System.out.println("Database is Empty!");
        em.getTransaction().commit();
    }

    /**
     * Insets an Employee into the Database.
     */
    private static void insert()
    {
            System.out.print("Enter the number of Employees to be inserted: ");
            n=input.nextInt();
            em.getTransaction().begin();
            for(int i=0;i<n;i++)
            {

                System.out.println("Enter the details of Employee "+(i+1)+": ");
                System.out.print("Name: ");

                //I use BufferedReader to read String and hence I need to
                // Catch the IOException that it may throw
                try
                {
                    name=bufferedReader.readLine();
                }
                catch (IOException e)
                {
                    e.printStackTrace();
                }

                System.out.print("Salary: ");
                Salary=input.nextDouble();

                Employee emp=new Employee(name,Salary);
                em.persist(emp);                                //Store emp into Database
            }

        em.getTransaction().commit();

        System.out.println("\n"+n+" employee record(s) Created!\n");

        TypedQuery  count=em.createQuery(countQuery,Employee.class);
        System.out.println("\n"+count.getSingleResult()+" employee record(s) Available in Database!\n");
    }

    /**
     * Deletes the specified Employee from the database
     *@param name
     */
    private static void delete(String name)
    {
        em.getTransaction().begin();

        Employee e=(Employee) em.find(Employee.class, name);         //Find Object to be deleted
        em.remove(e);                                                //Delete the Employee from database

        System.out.printf("Employee %s removed from Database....",e.name);

        em.getTransaction().commit();

        //Display Number of Employees left
        TypedQuery  count=em.createQuery(countQuery,Employee.class);
        System.out.println("\n"+count.getSingleResult()+" employee record(s) Available in Database!\n");
    }

    /**
     * Changes salary of the specified employee to passed salary
     *@param name
     *@param Salary
     */
    private static void modify(String name,Double Salary)
    {
        em.getTransaction().begin();
        Employee e=(Employee) em.find(Employee.class, name);  //Find Employee to be modified
        e.setSalary(Salary);                                  //Modify the salary
        em.getTransaction().commit();
        System.out.println("Modification Successful!\n");
    }

    public static void main(String arg[])
    {

        System.out.println("Welcome to the Employee Database System!\n\n");

        do{

            System.out.print("Menu: \n 1. View DB\n2. Insert \n3. Delete \n4. Modify\n5. Exit\nEnter Choice...");
            int ch=input.nextInt();

            try{

                switch(ch)
                {

                case 1:
                    displayAll();
                    break;

                case 2:
                    insert();
                    break;

                case 3:
                    System.out.print("Name of Employee to be Deleted2: ");
                    name=bufferedReader.readLine();
                    delete(name);
                    break;

                case 4:
                    System.out.print("Name of Employee to be Modified: ");
                    name=bufferedReader.readLine();
                    System.out.print("New Salary: ");
                    Salary=input.nextDouble();
                    modify(name,Salary);
                    break;

                case 5:
                    if(em!=null) em.close();        //Close EntityManager
                    if(emf!=null) emf.close();        //Close EntityManagerFactory
                    exit=true;
                    break;

                }
            }
            catch (IOException e)
            {
                e.printStackTrace();
            }

        }while(!exit);

    }

    static EntityManagerFactory emf=Persistence.createEntityManagerFactory("empDB.odb");
    static EntityManager em=emf.createEntityManager();

    static Scanner input=new Scanner(System.in);
    static BufferedReader bufferedReader = new BufferedReader(new InputStreamReader(System.in));

    static int n;
    static String name;
    static Double Salary;
    static boolean exit=false;

    //Query Repository
    static String countQuery="Select count(emp) from Employee emp";
    static String displayAllQuery="Select emp from Employee emp";

}
Now save your project and press the run button or press Ctrl+F11. Now the program should run and you can see output in the Console section present in the bottom pane. This is just a console application. I encourage you to develop a GUI for this!
VI. The ObjectDB explorer tool
Before we finish Id like to introduce you to a very useful tool provided by ObjectDB. Its called the ObjectDB Explorer and it can be used to see what the database files contain. (i.e) you can explore your database without writing code to access it. This can be pretty useful to understand your app and for debugging purposes. You can find the explorer inside the bin directory of Object DB (where you extracted the ObjectDB files). Run explorer.exe. Now you can open a db using the File->Open Local option. Open Remote is done when you are accessing a database stored in a server. Now browse and select the database and open it. Now double click your database shown in the “Persistence Capable Classes” pane in left side. Now the Object Browser will display your DB. You can expand each object in the db to view its contents. Pretty neat huh?
Heres how my database looks like after some insertions…

This explorer also provides many other options. Feel free to explore ‘em!
I guess you would have got a vivid idea about JPA. I have explained the mere basics of JPA using ObjectDB implementation. In order to understand more and to increase your knowledge you can refer the ObjectDB manual which provides an elaborate and comprehensive text about JPA with ObjectDB. This is a really useful feature of Java that will help you a lot. Helped me a lot! So try to learn more about it.
You can download the source code from here
Reference: Java Persistence API: a quick intro… from our JCG partner Steve Robinson at Footy ‘n’ Tech blog.

In first paragraph you have mention ” the Java Persistence stuff that allowed me to persist or save object’s data beyond the lifetime of the program. What that means is, you can now store Objects into data stores like Relational database or a XML file etc”, are you trying to imply that we can store object of employee entity class in our database and retrieve it out side scope of application though database?