There are many tutorials around the web that explain some stuff about web development in Java using servlets and JSP pages, however I have never found a concise, simple enough for beginers, tutorial. A tutorial like that should explain the whole process of creating a simple web app, including the frontend, the backend, and most importantly, the ways that someone can use to interact with both of them. It is not enough to show how to get information from the server, it is also important to kn0w how to differentiate between the information in a structured way, as well as to know how to make changes to the backend through the application environment.
What we want to achieve by this post here, is to guide through the whole process of creating a complete “toy” web application. It is a “toy” application in the sense that it does only two things and we are using no extra features to make the environment beautiful. The purpose of the application will be simple:
- Add a band name with a list of albums (separated by commas) and press the “Submit” button to add them to the database.
- Press the “Show bands!” button to get a list of the bands, or the “Show bands and albums!” button to get a list of bands with their albums.
The look of the app is as bare-bones as possible, but the code behind it is everything you need to start creating your own dynamic web applications, which are most commonly called CRUD applications (Create, Read, Update, Delete). They are called that way because all their functionality can be abstracted to these very basic commands.
Before we start creating the application step-by-step, let’s take a look at all the tools that we are going to work with in this example:
- Eclipse Luna
- Java 7
- Tomcat 7 (web application server)
- Gson 2.3 (Google Java library)
- JQuery 2.1.1 (Javascript library)
1. Frontend (JSP page)
There is not much to say here. If you have followed other examples, you will know how to easily create a Dynamic Web Project in Eclipse, and create an index.jsp page inside the folder WebContent. This will be the main page of our application, and we will not use any other page. Of course it always depends on the type of application that you need to create, but for our needs here one page is enough.
index.jsp
<%@ page language="java"
    contentType="text/html; charset=ISO-8859-1"
    pageEncoding="ISO-8859-1"%>
<!DOCTYPE html PUBLIC "-//W3C//DTD HTML 4.01 Transitional//EN" "http://www.w3.org/TR/html4/loose.dtd">

<html>
	<head>
	    <meta http-equiv="Content-Type" content="text/html; charset=ISO-8859-1">
	    <title>Ajax - Servlets Integration Example</title>

	    <!-- Load the scripts needed for the application. -->
	    <script type="text/javascript" src="resources/jquery-2.1.1.min.js"></script>
	    <script type="text/javascript" src="resources/buttonEventsInit.js"></script>
	    <script type="text/javascript" src="resources/resultsPrinter.js"></script>
	    <script type="text/javascript" src="resources/insertBandInfo.js"></script>
	</head>

	<body>
	    <h1>Ajax - Servlets Integration Example</h1>
	    <p>This is an example of how to use Ajax with a servlet backend.</p></br>

	    <h3>Select a button to get the relevant information.</h3>

	    <!-- Buttons that will call the servlet to retrieve the information. -->
	    <button id="bands" type="button">Show bands!</button>
	    <button id="bands-albums" type="button">Show bands and albums!</button>

	    <!-- We need to have some empty divs in order to add the retrieved information to them. -->
	    <div id="band-results"></div></br></br>
	    <div id="bands-albums-results"></div></br></br>


	    <h3>Add the band information and press submit!</h3>
	    <h4>Band name: </h4><input type="text" id="band-name-input" value=""><br>
        <h4>Albums: </h4><input type="text" id="album-input" value="">(Separated by commas)<br>
        <input type="submit" id="submit-band-info" value="Submit">
	</body>
</html>
So, pretty simple stuff as you can see. We load the javascript files that we are going to need, out of which only one is external, JQuery. JQuery is a Javascript library that is as well known, as it is powerful. It allows us to easily get information about various elements of our page, as well as bind events to these elements. Take this code snippet here for a simple example:
$("#my-button").click(function() {
    alert("My button was clicked!");
});
This snippet here means: “When the element with an id of “my-button” is clicked, I want to trigger a function which creates an alert pop-up saying “My button was clicked!” “. So we pass a whole function that does something, as an argument to the event binding. We will explain more about JQuery later on. You can download JQuery here.
There are some things to take into consideration here:
- We have given an id to all the important elements that we are going to use. So the buttons, the input boxes and the empty <div> elements all have a unique id.
- We created 2 empty <div> elements that will contain the results. This design pattern is often followed in cases you need a container for things and you need that container to be always there in a specific position. That way, we don’t need to check where we will put the information, as there is a position in the page reserved for that. Also, the second div (bands with albums) will always be under the first one (band names only). When we press the button for the bands only information, it will be added on top of the bands with albums.
2. Asking the server for data (frontend and backend)
2.1 Making a GET request using Ajax, from the frontend.
So, the first thing we need to do is find a way to ask the server for the data that we need, in this case Band names or Bands and Albums. We have already added two ids to the respective buttons (“bands” and “bands and albums”) so we need to bind an event to these in order to make a call to the server every time a button is pressed. We will use some Javascript for that, contained in the buttonEventsInit.js file.
NOTE: Every Javascipt file is saved under the directory WebContent/resources, in order to give access to the browser to get them.
buttonEventsInit.js
// When the page is fully loaded...
$(document).ready(function() {

	// Add an event that triggers when ANY button
	// on the page is clicked...
    $("button").click(function(event) {

    	// Get the button id, as we will pass it to the servlet
    	// using a GET request and it will be used to get different
    	// results (bands OR bands and albums).
    	var buttonID = event.target.id;

    	// Basic JQuery Ajax GET request. We need to pass 3 arguments:
    	// 		1. The servlet url that we will make the request to.
    	//		2. The GET data (in our case just the button ID).
    	//		3. A function that will be triggered as soon as the request is successful.
    	// Optionally, you can also chain a method that will handle the possibility
    	// of a failed request.
    	$.get('DBRetrievalServlet', {"button-id": buttonID},
            function(resp) { // on sucess
    			// We need 2 methods here due to the different ways of
    			// handling a JSON object.
    			if (buttonID === "bands")
    				printBands(resp);
    			else if (buttonID === "bands-albums")
    				printBandsAndAlbums(resp);
            })
            .fail(function() { // on failure
                alert("Request failed.");
            });
    });
});
Let’s explain what happens here. As soon as the page is loaded (we do this to be sure that all the elements are in place), we bind a click event to every button element in the page. From now on, every time a button is clicked, a GET request will be sent to the server with the information of which button was pressed. The server will send back the right response (in the form of a JSON object, we will explain later about that) and we will do different things to this object depending on the button that was pressed (because each button will receive a differently structured JSON object).
Check out the comments on the example above regarding the right way to make a GET request to the server. You will need to provide the URL (which can also be the URL of a servlet), the data, and the function that will be triggered, having as an argument the response (JSON object) of the server.
2.2 Processing the request and sending the data back to the client.
So, what happens to the server when we make a request? We are using a number of classes here, so let’s remember again that we are building an app that will contain two kinds of catalogues: Bands, and Bands with albums. So we are using:
- MusicDatabase.java: A class that uses the Singleton pattern in order to provide a persistent object that will contain the information that needs to be sent back to the client.
- DBRetrievalServlet.java: A servlet that will be used to process the GET request and using other classes, provide a response with the queried information.
- BandWithAlbums.java: A class that will be used to create new “data-holding objects”, in our cases containing a band name, and a list of albums.
So, let’s examine each of these classes and explain how they are used.
DBRetrievalServlet.java
package servlets;
import informationClasses.MusicDatabase;

import java.io.IOException;

import javax.servlet.ServletException;
import javax.servlet.annotation.WebServlet;
import javax.servlet.http.HttpServlet;
import javax.servlet.http.HttpServletRequest;
import javax.servlet.http.HttpServletResponse;

@WebServlet("/DBRetrievalServlet")
public class DBRetrievalServlet extends HttpServlet {

    @Override
    public void doGet(HttpServletRequest request, HttpServletResponse response)
            throws ServletException, IOException {

        // We set a specific return type and encoding
        // in order to take advantage of the browser capabilities.
        response.setContentType("application/json");
        response.setCharacterEncoding("UTF-8");


        // Depending on the GET parameters, passed from the Ajax call,
        // we are able to differentiate the requests and call the appropriate
        // method. We can always use more classes for more use-cases.

        // The response object returns the information (as a JSON object in String form)
        // to the browser.
        String buttonID = request.getParameter("button-id");
        switch (buttonID) {
            case "bands":
                response.getWriter().write(MusicDatabase
                        .getInstance()
                        .getBands());
                break;

            case "bands-albums":
                response.getWriter().write(MusicDatabase
                        .getInstance()
                        .getBandsAndAlbums());
                break;
        }
    }
}
We get the parameter “button-id”, which is contained inside the information sent from the client (in the request object), and depending on what kind of button we pressed , we need a different kind of information, by calling the MusicDatabase instance and calling a different method each time.
NOTE: The Singleton Pattern
About the MusicDatabase instance… We are using the Singleton pattern, which means that because we only want to have 1 instance of the class, we do not create a new instance by calling the new keyword ourselves. Instead, we are calling a method from the MusicDatabase class itself and we ask for an instance.
- If the instance has not been created yet, we create one and return it.
- If it has been created, we return the existing instance.
There is no access to the constructor externally, and no way to accidentally create another instance. You can find more information about the Singleton pattern online.
MusicDatabase.java
package informationClasses;

import java.util.ArrayList;
import java.util.List;

import jsonObjects.BandWithAlbums;

import com.google.gson.Gson;

public class MusicDatabase {

    private List bandNames;
    private List bandsAndAlbums;


    // Singleton methods
    private static MusicDatabase dbInstance = null;

    protected MusicDatabase() {
        bandNames = new ArrayList<>();
        bandsAndAlbums = new ArrayList<>();
    }

    public static MusicDatabase getInstance() {
       if(dbInstance == null) {
          dbInstance = new MusicDatabase();
       }

       return dbInstance;
    }


    public void setBandAndAlbums(String bandName, ArrayList bandAlbums) {
        bandNames.add(bandName);
        bandsAndAlbums.add(new BandWithAlbums(bandName, bandAlbums));
    }

    public String getBands() {
        return new Gson().toJson(bandNames);
    }

    public String getBandsAndAlbums() {
        return new Gson().toJson(bandsAndAlbums);
    }
}
The methods we are going to examine here are getBands() and getBandsAndAlbums(). We only need these 2 methods, and they are pretty simple, because we have some things that help us here:
- Gson is a Java library from Google, which enables us to create JSON objects easily from a Java object. That object can be anything, from a simple data structure, to an objects that contains information an other data structures etc. In our case, we have 2 such datastructures:
A List<String> bandNames, which contains only the band names in the form of Strings.A List<BandWithAlbums>, which contains objects, which in turn contain the band name and a list of their albums.
- The BandWithAlbums class, which enables us to hold more information about a band. It is a data-holding class, which contains the band name as a
Stringand a list of their bands as aList<String>. By returning this object, you return all the associated information as well.
All in all, The Gson library, using the command new Gson().toJson(Object obj), can transform most of the Objects and data structures into a JSON format, which the browser can easily use through Javascript.
NOTE: You need to add the Gson library to the classpath for this to work.
BandWithAlbums.java
package jsonObjects;

import java.util.ArrayList;

public class BandWithAlbums {

    String bandName;
    ArrayList bandAlbums;

    public BandWithAlbums(String bandName, ArrayList bandAlbums) {
        this.bandName = bandName;
        this.bandAlbums = bandAlbums;
    }
}
A simple data-holding class, as we already said before. It represents “a band”, in the sense that it contains the name as well as the albums of the band.
2.3 Presenting the data to the browser.
So, as soon as we have the data that we asked for, we can see in the file buttonEventsInit.js, that we have the choice of calling two different methods, depending on the id of the button that made the call. We are going to show what these two methods are doing, and how we are going to present the data back to the browser.
resultsPrinter.js
// Both those functions get a json object as an argument,
// which itself also holds other objects.

// 1. The first function is supposed to get an object
// 	containing just a list of band names.
// 2. The second function is supposed to get an object containing
// 	bands with albums, which essentially means a list of objects
// 	which hold (1) a band name and (2) a list of albums.

function printBands(json) {

	// First empty the <div> completely and add a title.
	$("#band-results").empty()
		.append("<h3>Band Names</h3>");

	// Then add every band name contained in the list.
	$.each(json, function(i, name) {
		$("#band-results").append(i + 1, ". " + name + " </br>");
	});
};

function printBandsAndAlbums(json) {

	// First empty the <div> completely and add a title.
	$("#bands-albums-results").empty()
		.append("<h3>Band Names and Albums</h3>");

	// Get each band object...
	$.each(json, function(i, bandObject) {

		// Add to the <div> every band name...
		$("#bands-albums-results").append(i + 1, ". " + bandObject.bandName + " </br>");
		// And then for every band add a list of their albums.
		$.each(bandObject.bandAlbums, function(i, album) {
			$("#bands-albums-results").append("--" + album + "</br>");
		});
	});
};
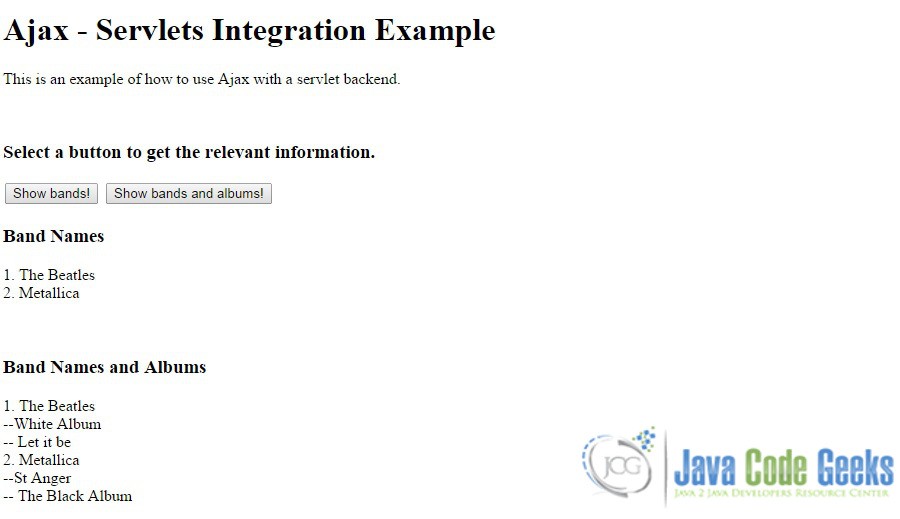
In order to understand how these functions work, we have to take a look at the response objects that the server returned to the client. In the first case, we are expecting just a list of band names, so the expected object will be just a list:
["The Beatles", "Metallica"]
On the other hand, in the second case we are expecting to receive the full band information, in which case the json object will look like this:
[
    {
        bandName: "The Beatles",
        bandAlbums: ["White Album", "Let it be"]
    },
    {
        bandName: "Metallica",
        bandAlbums: ["St Anger", "The Black Album"]
    }
]
So we need two different ways of handling the request. In each case however, we empty() the div that we are going to use, and add the information that we just got from the server using some very handy JQuery functions.
Thus, the first part of our application is complete. Take a look at the screenshots to see the results.
3. Updating the server from user input (frontend and backend)
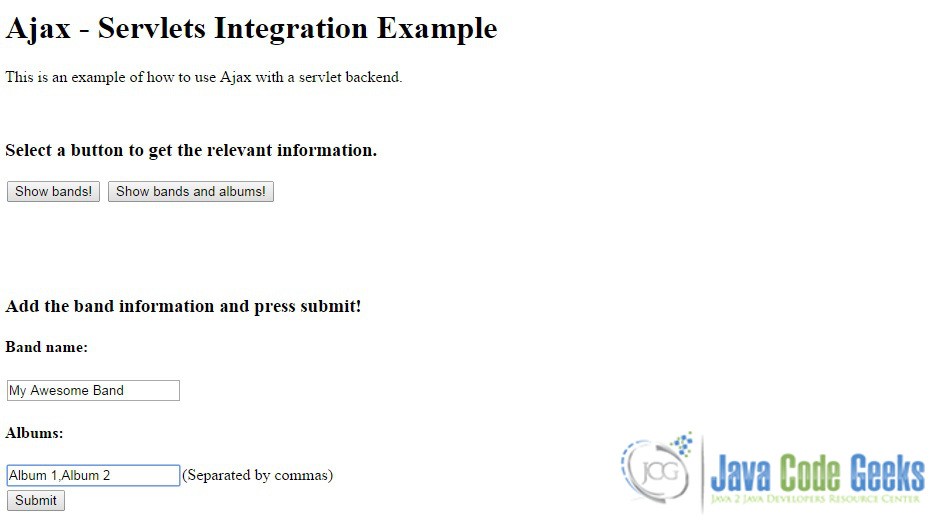
3.1 Making a POST request using Ajax.
In this part we are going to take a look on how to send data to the server. We already got a hint of how things work by processing the GET request on the previous part of the tutorial, and the steps here are not really that different, with the sole exception of allowing the user to provide the input for the application. Let’s take a look at the code we are using, and the functionality of each file.
insertBandInfo.js
$(document).ready(function() {

	// Add an event that triggers when the submit
	// button is pressed.
    $("#submit-band-info").click(function() {

    	// Get the text from the two inputs.
    	var bandName = $("#band-name-input").val();
    	var albumName = $("#album-input").val();

    	// Fail if one of the two inputs is empty, as we need
    	// both a band name and albums to make an insertion.
    	if (bandName === "" || albumName === "") {
    		alert("Not enough information for an insertion!");
    		return;
    	}

    	// Ajax POST request, similar to the GET request.
    	$.post('DBInsertionServlet',{"bandName": bandName, "albumName": albumName},
            function() { // on success
                alert("Insertion successful!");
            })
            .fail(function() { //on failure
                alert("Insertion failed.");
            });
    });
});
If you followed the previous part of the tutorial, it is really easy to understand what we are doing here. Another click event, now targeted only at the specific id of the Submit button, which, after checking that the two input boxes actually have input in them, makes a POST request (to a new servlet, specifically used for that reason) sending the data that we want (band name and list of albums).
3.2 Saving the user input in our “database”.
DBInsertionServlet.java
package servlets;

import informationClasses.MusicDatabase;

import java.io.IOException;
import java.util.ArrayList;
import java.util.Arrays;
import java.util.Map;

import javax.servlet.ServletException;
import javax.servlet.annotation.WebServlet;
import javax.servlet.http.HttpServlet;
import javax.servlet.http.HttpServletRequest;
import javax.servlet.http.HttpServletResponse;

@WebServlet("/DBInsertionServlet")
public class DBInsertionServlet extends HttpServlet {

    @Override
    public void doPost(HttpServletRequest request, HttpServletResponse response)
            throws ServletException, IOException {

        Map<String, String[]> bandInfo = request.getParameterMap();

        // In this case here we are not using the data sent to just do different things.
        // Instead we are using them as information to make changes to the server,
        // in this case, adding more bands and albums.
        String bandName = Arrays.asList(bandInfo.get("bandName")).get(0);
        String albums = Arrays.asList(bandInfo.get("albumName")).get(0);

        MusicDatabase.getInstance()
            .setBandAndAlbums(bandName, getAlbumNamesFromString(albums));

        // return success
        response.setStatus(200);
    }

    // Split the album String in order to get a list of albums.
    private ArrayList getAlbumNamesFromString(String albums) {
        return new ArrayList(Arrays.asList(albums.split(",")));
    }
}
When the servlet gets the request, it extracts the bandName from the request map, and a String containing the album names. We create a list of Albums by splitting the String into parts, when we find a comma. In the end we call the MusicDatabase instance where we add the band name and the album list, and if you check out the class definition from before, you can see that:
- We add the band name to the
bandNameslist. - We create a new Band object (using the name and the list of albums) and we add it to the
bandsWithalbumslist.
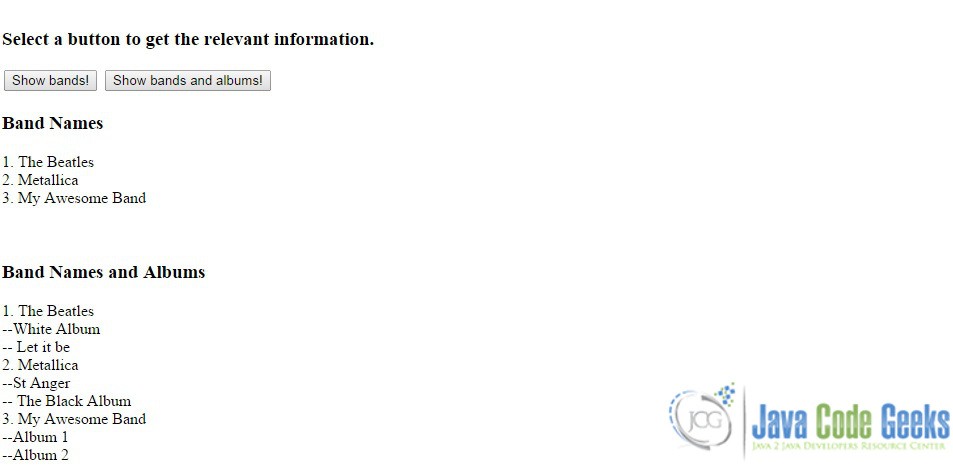
After that the servlet is done and it sends a SUCCESS status response back to the client. We have added everything to our lists and it is ready to be sent in a JSON format when we ask for it. Case in point, let’s see what happens if I add a new band myself.
4. Download the project
This was an example of Ajax – Servlets integration. I would like to think that I helped you gain a complete picture of how to implement every part of a web application (frontend-backend) and the simplest ways to attach the parts together in order to create software that allows user input and changes on the server, as well as on the client!
You can download the full source code of this example here : AjaxServletsIntegration

Hoooray! You’ve invented JAX-RS ;)
Cool tutorial. It is indeed not easy to find a good one.
why are you using iso8859 -1 in the html and utf-8 in json..could you please explain.
Thanks for this, it gives me insight on how to structure the Ajax mechanism. True that there are not a lot of complete web app tutorials : it’s just a gigantic puzzle with so many interchangeable pieces that you wonder how does this one fit with the rest. Gotta start with a simple example and yours does the job !
This is a really a best tutorial i haven’t seen before !!!!
Pretty Good!!!
Thanks a lot!!!
The beginers who want to know how the AJAX interaction with in JS and JAVA, and what the “keypoint” commands need to be used, how to learn such info quickly and correctly, i think this tutorial is the best one!!!!!
Thanks so much!!!
This is really awesome tutorial !! Thanks !
Great work Ilias! I was looking for a tutorial on how to handle AJAX with java servlets and I think that this is the best tutorial!
Cool tutorial. It is indeed not easy to find a good one.
I downloaded the project and imported it into eclipse. When I run it on the server the page loads up but the functionalities of adding and showing bands etc is absent. I havent modified or added anything to the code.
Shouldn’t there be a web.xml file to provide the servlet mapping etc?
How do I run this project?
Thanks
I did work. I was actually running the page in eclipse and it wasnt working properly. However, works as supposed to in the browser.
I still want to know why there is no web.xml file because from my limited research this file is required for mapping of servlets
The Servlet mapping is not required since the Servlet is annotated to provide the mapping in the Servlet itself as :
@WebServlet(“/DBRetrievalServlet”) .
Hi, I created a web project in eclipse. downloaded the project from this site, and copied the files in the respective directories. Now when I tried running the project it not working. 1. I mean the index does show, but after that when It try to input the band & album name , it says Request failed. same with Show bands and show Albums buttons. 2. I do not see any statement where you have mentioned the DB URL or something like that, it seems a different type of scenario. Could you please explain further if we need any DB… Read more »
Thank you so much for this! You’re a life saver!
Thanks a lot…