The app is available at google play. Download it and have fun. If you like my work you can donate to me using the app.
In this post you will find a complete tutorial explaining how to build an Android app. The goal of this post is creating a Weather App that will use Yahoo! Weather as data provider. This post covers the most important aspects, we should consider when building an app. It will explain how to use Yahoo! Weather API to retrieve XML weather data and how to parse it to extract the information.
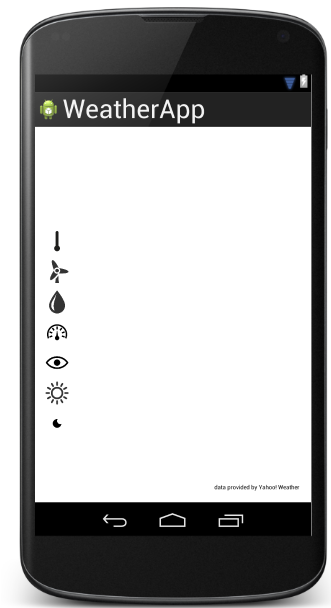
In the last post, we discovered how we can retrieve the woeid from the city name. This information is very important because we can use it to get weather data. At the end of this post you will create a full working app that looks like:
![android_weather_app[3]](https://www.javacodegeeks.com/wp-content/uploads/2014/03/android_weather_app31.png)
![android_weather_app_settings_1[3]](https://www.javacodegeeks.com/wp-content/uploads/2014/03/android_weather_app_settings_131.png)
![android_weather_app_settings[3]](https://www.javacodegeeks.com/wp-content/uploads/2014/03/android_weather_app_settings31.png) and is published on the market so that you can download it and play with it.
and is published on the market so that you can download it and play with it.
App structure
We want to create an app with two different areas:
- Weather information
- App Settings
The first area is where the app shows the current weather information retrieved using Yahoo! Weather API, while the second area, called App Settings, is where we can configure our app, find the city woeid and the system measure unit. The pictures below show how the settings area should be:
![android_weather_app_settings_1[7]](https://www.javacodegeeks.com/wp-content/uploads/2014/03/android_weather_app_settings_17.png)
As first step, we will create a preference activity, where an user can configure the weather app. In this case we can create a class, called WeatherPreferenceActivity that extends PreferenceActivity, and set preference layout:
public class WeatherPreferenceActivity extends PreferenceActivity  {
   @Override
    public void onCreate(Bundle Bundle) {
        super.onCreate(Bundle);
        getActionBar().setDisplayHomeAsUpEnabled(true);
        String action = getIntent().getAction();

        addPreferencesFromResource(R.xml.weather_prefs);
...
}
To create the preference layout, we can use an XML file under /res/xml and we call it weather_prefs.xml. It looks like the XML shown below:
<PreferenceScreen  xmlns:android="http://schemas.android.com/apk/res/android">
  <PreferenceCategory android:title="@string/loc_title">
      <Preference android:title="@string/pref_location_title"
                  android:key="swa_loc">
          <intent android:targetPackage="com.survivingwithandroid.weather"
                android:targetClass="com.survivingwithandroid.weather.settings.CityFinderActivity"
                  />
      </Preference>
  </PreferenceCategory>

    <PreferenceCategory android:title="@string/pref_unit_title">
        <ListPreference android:key="swa_temp_unit"
            android:title="@string/temp_title"
            android:entryValues="@array/unit_values"
            android:entries="@array/unit_names"
            android:defaultValue="c" />

    </PreferenceCategory>

</PreferenceScreen>
You can notice we dived the setting screen in two different sections (there are two PreferenceScreen tag). At the line 2 to 7 we start another Activity as the user select this option because we have to give to the user the chance to select the city name and resolve it in the woeid that we will use later. To start another activity inside a PreferenceCategory we use an Intent, passing the package name and class name. The second section is used to select the measure unit system, if the user uses °C that the system will be the metric system. It is a good practice to show to the user the current values, so that in the onCreate method of WeatherPreferenceActivity we add these lines of code:
SharedPreferences prefs = PreferenceManager.getDefaultSharedPreferences(this);
        // We set the current values in the description
        Preference prefLocation = getPreferenceScreen().findPreference("swa_loc");
        Preference prefTemp = getPreferenceScreen().findPreference("swa_temp_unit");

        prefLocation.setSummary(getResources().getText(R.string.summary_loc) + " " + prefs.getString("cityName", null) + "," + prefs.getString("country", null));

        String unit =  prefs.getString("swa_temp_unit", null) != null ? "°" + prefs.getString("swa_temp_unit", null).toUpperCase() : "";
        prefTemp.setSummary(getResources().getText(R.string.summary_temp) + " " + unit);
We used at line 1 the SharedPreference class to hold the app settings.
Yahoo! Weather client
Now we have built the activity that enables users to configure the app, we can focus our attention on how to build the client that retrieve the weather information using Yahoo! Weather client. We create a new class called YahooClient where we will implement the logic to connect the remote server and retrieve the data.
The first step is creating the class structure that will hold the information we retrieve from XML received from the remote server. This class structure maps somehow the XML received from the server, so we can suppose we have something like the pic shown below:
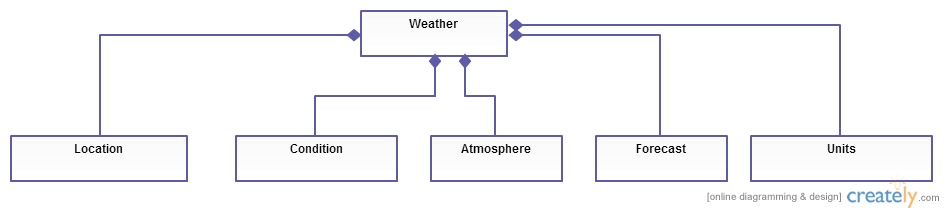
The Weather class, is the class that will be returned and passed back to activity to display the information. We can create a static method called getWeather that uses Volley lib to connect to the remote server. We have to create the url that will be called:
http://weather.yahooapis.com/forecastrss?w=woeid&u=unit
Now we have the url we can implement the client:
public static void getWeather(String woeid, String unit, RequestQueue rq, final WeatherClientListener listener) {
        String url2Call = makeWeatherURL(woeid, unit);
        Log.d("SwA", "Weather URL ["+url2Call+"]");
        final Weather result = new Weather();
        StringRequest req = new StringRequest(Request.Method.GET, url2Call, new Response.Listener<String>() {
            @Override
            public void onResponse(String s) {
                parseResponse(s, result);
                listener.onWeatherResponse(result);
            }
        }, new Response.ErrorListener() {
            @Override
            public void onErrorResponse(VolleyError volleyError) {

            }
        });

        rq.add(req);
    }
At line 5 we create the HTTP request, using GET method, and wait for response. As you already know (if not look at this post explaining how to use Volley) we have two listener to implement one that handles the incoming response and another one that handles errors that may occur. At the moment we want just to handle the response (see line 8,9), where first we parse the XML and then we notify the result the caller (line 9). We define our listener:
public static interface WeatherClientListener {
        public void onWeatherResponse(Weather weather);
    }
Finally, at line 18 we add the request to the queue.
Parsing XML is very simple, we have in input a String, that holds the XML, and we look for the tag we are interested on, and create the our pojo ( Weather) . The parser is shown below:
private static Weather parseResponse (String resp, Weather result) {
    Log.d("SwA", "Response ["+resp+"]");
    try {
        XmlPullParser parser = XmlPullParserFactory.newInstance().newPullParser();
        parser.setInput(new StringReader(resp));

        String tagName = null;
        String currentTag = null;

        int event = parser.getEventType();
        boolean isFirstDayForecast = true;
        while (event != XmlPullParser.END_DOCUMENT) {
            tagName = parser.getName();

            if (event == XmlPullParser.START_TAG) {
                if (tagName.equals("yweather:wind")) {
                    ...
                }
                else if (tagName.equals("yweather:atmosphere")) {
                    ...
                }
                else if (tagName.equals("yweather:forecast")) {
                    ...
                }
                else if (tagName.equals("yweather:condition")) {
                    ...
               }
                else if (tagName.equals("yweather:units")) {
                   ...
                }
                else if (tagName.equals("yweather:location")) {
                    ...
                }
                else if (tagName.equals("image"))
                    currentTag = "image";
                else if (tagName.equals("url")) {
                    if (currentTag == null) {
                        result.imageUrl = parser.getAttributeValue(null, "src");
                    }
                }
                else if (tagName.equals("lastBuildDate")) {
                   currentTag="update";
                }
                else if (tagName.equals("yweather:astronomy")) {
                ...
             }

            }
            else if (event == XmlPullParser.END_TAG) {
                if ("image".equals(currentTag)) {
                   currentTag = null;
                }
            }
            else if (event == XmlPullParser.TEXT) {
                if ("update".equals(currentTag))
                    result.lastUpdate = parser.getText();
            }
            event = parser.next();
        }

    }
    catch(Throwable t) {
        t.printStackTrace();
    }

    return result;
}
App navigation and ActionBar
The next step is building the app navigation structure. We already know we have two activities: one that shows current weather condition and another one used for app settings. We can use the well-know actionbar pattern to handle navigation between these activities. We can create (if not exist) under /res/menu a file called main.xml. This file will contain all the menu item we want to show to the user:
<menu xmlns:android="http://schemas.android.com/apk/res/android"
    xmlns:app="http://schemas.android.com/apk/res-auto"
    xmlns:tools="http://schemas.android.com/tools"
    tools:context="com.survivingwithandroid.weather.MainActivity" >

    <item android:id="@+id/action_donate"
        android:title="@string/action_donate"
        android:orderInCategory="100"
        app:showAsAction="never"
        android:icon="@android:drawable/ic_menu_manage"/>

    <item android:id="@+id/action_settings"
        android:title="@string/action_settings"
        android:orderInCategory="100"
        app:showAsAction="never"
        android:icon="@android:drawable/ic_menu_manage"/>

    <item android:id="@+id/action_refresh"
        android:title="@string/action_refresh"
        android:orderInCategory="50"
        android:icon="@drawable/ic_menu_refresh"
        android:showAsAction="ifRoom"/>

    <item android:id="@+id/action_share"
        android:title="@string/action_share"
        android:orderInCategory="50"
        android:icon="@android:drawable/ic_menu_share"
        android:showAsAction="ifRoom"/>


</menu>
As result we have:
![android_actionbar_menu_item[5]](https://www.javacodegeeks.com/wp-content/uploads/2014/03/android_actionbar_menu_item5.png)
and in the MainActivity.java we have:
@Override
public boolean onCreateOptionsMenu(Menu menu) {
    // Inflate the menu; this adds items to the action bar if it is present.
    getMenuInflater().inflate(R.menu.main, menu);
    return true;
}

@Override
public boolean onOptionsItemSelected(MenuItem item) {

    int id = item.getItemId();
    if (id == R.id.action_settings) {
        Intent i = new Intent();
        i.setClass(this, WeatherPreferenceActivity.class);
        startActivity(i);
    }
    else if (id == R.id.action_refresh) {
        refreshItem = item;
        refreshData();
    }
    else if (id == R.id.action_share) {
        String playStoreLink = "https://play.google.com/store/apps/details?id=" +
                getPackageName();

        String msg = getResources().getString(R.string.share_msg) + playStoreLink;
        Intent sendIntent = new Intent();
        sendIntent.setAction(Intent.ACTION_SEND);
        sendIntent.putExtra(Intent.EXTRA_TEXT, msg);
        sendIntent.setType("text/plain");
        startActivity(sendIntent);
    }
    else if (id == R.id.action_donate) {
        SwABillingUtil.showDonateDialog(this, mHelper, this);
    }
    return super.onOptionsItemSelected(item);
}
To provide Up Navigation, we add this line of code to onCreate method of WeatherPreferenceActivity:
getActionBar().setDisplayHomeAsUpEnabled(true);
At the same time, we want that when user selects a city in CityFinderActivity we come back to the preference screens so we add :
NavUtils.navigateUpFromSameTask(CityFinderActivity.this);
MainActivity and App layout
The last step is setting up the layout of the MainActivity showing all the information we retrieved from remote server. In this case we can define a simple layout that looks like the one shown below:
<RelativeLayout xmlns:android="http://schemas.android.com/apk/res/android"
    xmlns:tools="http://schemas.android.com/tools"
    android:layout_width="match_parent"
    android:layout_height="match_parent"
    android:paddingLeft="@dimen/activity_horizontal_margin"
    android:paddingRight="@dimen/activity_horizontal_margin"
    android:paddingTop="@dimen/activity_vertical_margin"
    android:paddingBottom="@dimen/activity_vertical_margin"
   tools:context="com.survivingwithandroid.weather.MainActivity$PlaceholderFragment">

    <TextView
        android:layout_width="wrap_content"
        android:layout_height="wrap_content"
        android:id="@+id/location"/>

    <RelativeLayout
        android:layout_width="wrap_content"
        android:layout_height="wrap_content"
        android:id="@+id/tempLyt"
        android:layout_below="@id/location"
        android:layout_centerHorizontal="true">

        <TextView
            android:layout_width="wrap_content"
            android:layout_height="wrap_content"
            style="@style/textBig"
            android:id="@+id/temp"
            />
        <TextView
            android:layout_width="wrap_content"
            android:layout_height="3dp"
            android:layout_alignLeft="@id/temp"
            android:layout_alignRight="@id/temp"
            android:id="@+id/lineTxt"
            android:layout_below="@id/temp"
            android:layout_marginTop="0dp" />

        <ImageView
            android:layout_width="48dp"
            android:layout_height="48dp"
            android:layout_marginLeft="10dp"
            android:id="@+id/imgWeather"
            android:layout_toRightOf="@id/temp"
            android:layout_alignTop="@id/temp"
            />

        <TextView
            android:layout_width="wrap_content"
            android:layout_height="wrap_content"
            android:id="@+id/tempUnit"
            android:layout_alignBaseline="@id/temp"
            android:layout_toRightOf="@id/temp"
            android:layout_alignStart="@id/imgWeather"
            style="@style/textSmall"/>

        <TextView
            android:layout_width="wrap_content"
            android:layout_height="wrap_content"
            android:id="@+id/descrWeather"
            android:layout_below="@id/imgWeather"
            android:layout_toRightOf="@id/temp"
            android:layout_alignStart="@id/tempUnit"
            style="@style/textSmall"/>


    </RelativeLayout>


    <!-- Here the current weather data -->

    <!-- Temperature data -->
    <ImageView
        android:layout_width="32dp"
        android:layout_height="32dp"
        android:id="@+id/tempIcon"
        android:src="@drawable/temperature"
        android:layout_below="@id/tempLyt"
        android:layout_marginTop="10dp"/>
    <TextView
        android:layout_width="wrap_content"
        android:layout_height="wrap_content"
        android:id="@+id/tempMin"
        android:layout_toRightOf="@id/tempIcon"
        android:layout_alignTop="@id/tempIcon"
        android:layout_marginTop="12dp"
        android:layout_marginLeft="10dp"/>
    <TextView
        android:layout_width="wrap_content"
        android:layout_height="wrap_content"
        android:id="@+id/tempMax"
        android:layout_toRightOf="@id/tempMin"
        android:layout_alignBaseline="@id/tempMin"
        android:layout_marginLeft="10dp"/>
    <!-- End temp Data -->

    <!-- Wind data -->
    <ImageView
        android:layout_width="32dp"
        android:layout_height="32dp"
        android:id="@+id/windIcon"
        android:src="@drawable/wind"
        android:layout_below="@id/tempIcon"
        android:layout_marginTop="10dp"/>
    <TextView
        android:layout_width="wrap_content"
        android:layout_height="wrap_content"
        android:id="@+id/windSpeed"
        android:layout_toRightOf="@id/windIcon"
        android:layout_alignTop="@id/windIcon"
        android:layout_marginTop="12dp"
        android:layout_alignStart="@id/tempMin"
        android:layout_marginLeft="10dp"/>
    <TextView
        android:layout_width="wrap_content"
        android:layout_height="wrap_content"
        android:id="@+id/windDeg"
        android:layout_toRightOf="@id/windSpeed"
        android:layout_alignBaseline="@id/windSpeed"
        android:layout_marginLeft="10dp"/>
    <!-- End wind Data -->

   <!-- Humidity -->
    <ImageView
        android:layout_width="32dp"
        android:layout_height="32dp"
        android:id="@+id/humidityIcon"
        android:src="@drawable/humidity"
        android:layout_below="@id/windIcon"
        android:layout_marginTop="10dp"/>
    <TextView
        android:layout_width="wrap_content"
        android:layout_height="wrap_content"
        android:id="@+id/humidity"
        android:layout_toRightOf="@id/humidityIcon"
        android:layout_alignTop="@id/humidityIcon"
        android:layout_marginTop="12dp"
        android:layout_alignStart="@id/tempMin"
        android:layout_marginLeft="10dp"/>
    <!-- End Humidity Data -->

    <!-- Pressure data -->
    <ImageView
        android:layout_width="32dp"
        android:layout_height="32dp"
        android:id="@+id/pressureIcon"
        android:src="@drawable/pressure"
        android:layout_below="@id/humidityIcon"
        android:layout_marginTop="10dp"/>
    <TextView
        android:layout_width="wrap_content"
        android:layout_height="wrap_content"
        android:id="@+id/pressure"
        android:layout_toRightOf="@id/pressureIcon"
        android:layout_alignTop="@id/pressureIcon"
        android:layout_marginTop="12dp"
        android:layout_alignStart="@id/tempMin"
        android:layout_marginLeft="10dp"/>
    <TextView
        android:layout_width="wrap_content"
        android:layout_height="wrap_content"
        android:id="@+id/pressureStat"
        android:layout_toRightOf="@id/pressure"
        android:layout_alignBaseline="@id/pressure"
        android:layout_marginLeft="10dp"/>
    <!-- End Pressure data -->

    <!-- Visibility -->
    <ImageView
        android:layout_width="32dp"
        android:layout_height="32dp"
        android:id="@+id/visibilityIcon"
        android:src="@drawable/eye"
        android:layout_below="@id/pressureIcon"
        android:layout_marginTop="10dp"/>
    <TextView
        android:layout_width="wrap_content"
        android:layout_height="wrap_content"
        android:id="@+id/visibility"
        android:layout_toRightOf="@id/visibilityIcon"
        android:layout_alignTop="@id/visibilityIcon"
        android:layout_marginTop="12dp"
        android:layout_alignStart="@id/tempMin"
        android:layout_marginLeft="10dp"/>
    <!-- End visibility -->

    <!-- Astronomy -->
    <ImageView
        android:layout_width="32dp"
        android:layout_height="32dp"
        android:id="@+id/sunIcon"
        android:src="@drawable/sun"
        android:layout_below="@id/visibilityIcon"
        android:layout_marginTop="10dp"/>
    <TextView
        android:layout_width="wrap_content"
        android:layout_height="wrap_content"
        android:id="@+id/sunrise"
        android:layout_toRightOf="@id/sunIcon"
        android:layout_alignTop="@id/sunIcon"
        android:layout_marginTop="12dp"
        android:layout_alignStart="@id/tempMin"
        android:layout_marginLeft="10dp"/>
    <ImageView
        android:layout_width="32dp"
        android:layout_height="32dp"
        android:id="@+id/moonIcon"
        android:src="@drawable/moon"
        android:layout_below="@id/sunIcon"
        android:layout_marginTop="10dp"/>
    <TextView
        android:layout_width="wrap_content"
        android:layout_height="wrap_content"
        android:id="@+id/sunset"
        android:layout_toRightOf="@id/moonIcon"
        android:layout_alignTop="@id/moonIcon"
        android:layout_marginTop="12dp"
        android:layout_alignStart="@id/tempMin"
        android:layout_marginLeft="10dp"/>

    <!-- End astronomy -->
    <TextView
        android:layout_width="wrap_content"
        android:layout_height="wrap_content"
        android:layout_alignParentBottom="true"
        android:layout_alignParentRight="true"
        android:text="@string/provider"
        style="@style/textVerySmall"
        />
</RelativeLayout>
The layout structure is shown below:
This layout will be filled, at runtime, with the data extracted from XML.
Now in the MainActivity we simply call the YahooClient to retrieve data and coordinate the activities:
protected void onCreate(Bundle savedInstanceState) {
 ...
 refreshData();
}

private void refreshData() {

    if (prefs == null)
        return ;

    String woeid = prefs.getString("woeid", null);

    if (woeid != null) {
        String loc = prefs.getString("cityName", null) + "," + prefs.getString("country", null);
        String unit = prefs.getString("swa_temp_unit", null);
        handleProgressBar(true);

        YahooClient.getWeather(woeid, unit, requestQueue, new YahooClient.WeatherClientListener() {
            @Override
            public void onWeatherResponse(Weather weather) {
                // We update the view
                ..
                // We retrieve the image
                IWeatherImageProvider provider = new WeatherImageProvider();
                provider.getImage(code, requestQueue, new IWeatherImageProvider.WeatherImageListener() {
                    @Override
                    public void onImageReady(Bitmap image) {
                        weatherImage.setImageBitmap(image);
                    }
                });
                handleProgressBar(false);
            }
        });


    }
}
In refreshData method we simply retrieve the app setting stored in SharedPreferences (see line 11,14,15) and at line 18 we invoke the YahooClient method getWeather to retrieve the data. We have to remember that we call the HTTP URL in a background thread to avoid ANR problem, so we wait for the response using a listener (see line 20). When we get the response we update the view. Finally at line 25, we retrieve the image related to the weather condition.
- Source code available @ github
