This time around, I thought I’ll share with you what I recently learnt of JSF 2.2 features. To do that, I decided to create a simple ajax, scrollable, lazy-loading data table.
Note that in NO WAY this is comparable to major libraries such as Primefaces, Richfaces or ICEFaces. This is only to show you what I have learnt. (Of course, no one can stop you from using it if you so wish to).
The Concept
Allow me to first tell you the concept, or the scenario if you like to call it so. It is actually very simple.
We have a list of Customer entity, and basically we are going to implement a data table, which is scrollable, lazy-loads the list and makes use of ajax.
Note: I assume you are comfortable with JPA and EJB, so while I might mention them here and there, I shall not discuss them in this post.
Using template
Just like any JSF application, I also started by using template. It is very easy to use template with Netbeans. Just select the option Facelets Template and choose your layout.
Notice that Netbeans also generate the two stylesheets, cssLayout.css and default.css. Also notice that in the newly generated template, they are located using the file location, as follows:
<h:head>
    <meta http-equiv="Content-Type" content="text/html; charset=UTF-8" />
    <link href="./../resources/css/default.css" rel="stylesheet" type="text/css" />
    <link href="./../resources/css/cssLayout.css" rel="stylesheet" type="text/css" />
    <title>Facelets Template</title>
</h:head>
I made a number of modifications to the default template.
Firstly, I encountered an issue when I started the application server, that the stylesheets were not loaded properly. So, to fix that, I use JSF Resource Locator (Lubke 2008).
I also create each of the sub pages, i.e. header, menu, and footer. They act as the default if none is specified.
So, the collection of my pages are as follows:
template.xhtml
<?xml version='1.0' encoding='UTF-8' ?>
<!DOCTYPE html PUBLIC "-//W3C//DTD XHTML 1.0 Transitional//EN" "http://www.w3.org/TR/xhtml1/DTD/xhtml1-transitional.dtd">
<html xmlns="http://www.w3.org/1999/xhtml"
      xmlns:ui="http://java.sun.com/jsf/facelets"
      xmlns:h="http://java.sun.com/jsf/html">
    <h:head>
        <meta http-equiv="Content-Type" content="text/html; charset=UTF-8" />
        <h:outputStylesheet library="css" name="default.css" />
        <h:outputStylesheet library="css" name="cssLayout.css" />
        <title>Facelets Template</title>
    </h:head>
    <h:body>
        <div id="top">
            <ui:insert name="header">
                <ui:include src="header.xhtml" />
            </ui:insert>
        </div>
        <div>
            <div id="left">
                <ui:insert name="menu">
                    <ui:include src="menu.xhtml" />
                </ui:insert>
            </div>
            <div id="content" class="left_content">
                <ui:insert name="content">
                    <!-- empty content goes here -->
                </ui:insert>
            </div>
        </div>
        <div id="bottom">
            <ui:insert name="bottom">
                <ui:include src="footer.xhtml" />
            </ui:insert>
        </div>
    </h:body>
</html>
Notice that instead of using the file locator ./../resources/css/default.css, i use h:outputStylesheet. With this approach, just put all your resources in the resources directory and point it by referring to the folder containing your resource via the attribute library. So, for example <h:outputStylesheet library="css" name="default.css" /> is really looking at the file at the location resources/css/default.css.
header.xhtml, footer.xhtml, menu.xhtml
<?xml version="1.0" encoding="UTF-8"?>
<!DOCTYPE html PUBLIC "-//W3C//DTD XHTML 1.0 Transitional//EN" "http://www.w3.org/TR/xhtml1/DTD/xhtml1-transitional.dtd">
<html xmlns="http://www.w3.org/1999/xhtml"
xmlns:ui="http://java.sun.com/jsf/facelets">
<body>
<ui:composition>
<!--
I created each file for header, footer and menu, but I simply list
them here just to show you
-->
<h1>Default Header</h1>
<!-- h1>Default Menu</h1 -->
<!-- h1>Default Footer</h1 -->
</ui:composition>
</body>
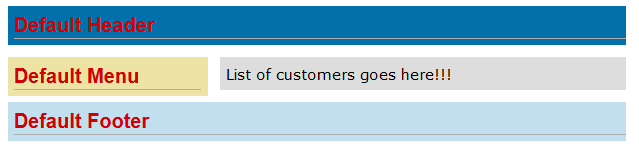
</html>Next, is using the template. So, let’s create a file called customers.xhtml to use it.
customers.xhtml
<?xml version='1.0' encoding='UTF-8' ?>
<!DOCTYPE html PUBLIC "-//W3C//DTD XHTML 1.0 Transitional//EN" "http://www.w3.org/TR/xhtml1/DTD/xhtml1-transitional.dtd">
<html xmlns="http://www.w3.org/1999/xhtml"
      xmlns:ui="http://java.sun.com/jsf/facelets"
      xmlns:h="http://java.sun.com/jsf/html">
    <body>
        <ui:composition template="./common/template.xhtml">
            <ui:define name="content">
                <h:outputText value="List of customers goes here!!!" />
            </ui:define>
        </ui:composition>
    </body>
</html>
You can then run the application server and accessed the page via http://<the path to your application>/customers.jsf. The output should look like the following illustration.
Add the facility to create a customer
Firstly, in a template, let us add a facility to add customers in the customers.xhtml. We can simply use JSF ManagedBean to do this. However, Core Javaserver Faces, 3rd recommends:
It is a historical accident that there are two separate mechanisms, CDI beans and JSF managed beans, for beans that can be used in JSF pages. We suggest that you use CDI beans unless your application must work on a plain servlet runner such as Tomcat.
(Geary, Horstmann 2010)
Going along with the suggestion, I will use CDI beans from now on.
In real application, I am sure there are a lot more data to capture. In this example, however, let us only capture the customer’s name.
Basically we need a Model and a Controller. So, let us first create these classes.
CustomerData.java
package id.co.dwuysan.customer;

import javax.enterprise.inject.Model;
import javax.validation.constraints.NotNull;
import javax.validation.constraints.Size;

@Model
public class CustomerData {

    @NotNull
    @Size(min = 1, max = 50)
    private String name;

    public String getName() {
        return name;
    }

    public void setName(String name) {
        this.name = name;
    }

    void clear() {
        setName(null);
    }
}
CustomerData.java
package id.co.dwuysan.customer;

import id.co.dwuysan.service.CustomerService;
import javax.ejb.EJBException;
import javax.faces.application.FacesMessage;
import javax.faces.context.FacesContext;
import javax.faces.event.AbortProcessingException;
import javax.faces.event.ActionEvent;
import javax.inject.Inject;
import javax.inject.Named;
import javax.validation.ConstraintViolation;
import javax.validation.ConstraintViolationException;

@Named
public class CustomerRegistationAction {

    @Inject
    private CustomerData customer;

    @Inject
    private CustomerService customerService;

    public void register(ActionEvent event) {
        try {
            // calls EJB and do registration here
        } catch (EJBException e) {
            FacesContext.getCurrentInstance().addMessage(event.getComponent().getClientId(), new FacesMessage(e.getMessage()));
            throw new AbortProcessingException(e.getMessage());
        }
        this.customer.clear();
    }
}
Notice that in this case we use @Named annotation. Since we did not give it any scope annotation, it defaults to @RequestScoped (BalusC 2011a).
The next step is to modify our customers.xhtml to make use of these classes so that we can register customers.
customers.xhtml
<?xml version='1.0' encoding='UTF-8' ?>
<!DOCTYPE html PUBLIC "-//W3C//DTD XHTML 1.0 Transitional//EN" "http://www.w3.org/TR/xhtml1/DTD/xhtml1-transitional.dtd">
<html xmlns="http://www.w3.org/1999/xhtml"
xmlns:ui="http://java.sun.com/jsf/facelets"
xmlns:f="http://java.sun.com/jsf/core"
xmlns:h="http://java.sun.com/jsf/html"
xmlns:ez="http://java.sun.com/jsf/composite/ezcomp">
<body>
<ui:composition template="./common/template.xhtml">
<ui:define name="content">
<f:view transient="true">
<h:form>
<h:panelGrid columns="3">
<h:outputLabel for="txtCustomerName" value="Customer name" />
<h:inputText id="txtCustomerName" value="#{customerData.name}" />
<h:message for="txtCustomerName" styleClass="error" />
<div />
<h:commandButton id="cmdRegisterCustomer" value="Submit" action="customers" actionListener="#{customerRegistationAction.register}" />
<h:message for="cmdRegisterCustomer" styleClass="error" />
</h:panelGrid>
</h:form>
</f:view>
</ui:define>
</ui:composition>
</body>
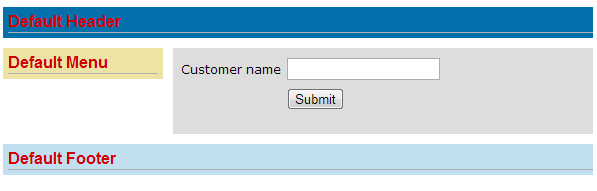
</html>Okay, once that’s done, you can register the customer. The screen should look like this.
Define the ‘Contract’
This part is the real deal. What I refer to the ‘contract’ is not the actual contract per-se. Rather I am referring to how we start by designing the Facelet xhtml first, which will drive the actual backing bean class.
So let’s first outline out requirement:
- The records should be paginated in a table, lazy-loaded from the database
- The user should be able to select how many records to be displayed in a page
- The user should be able to see what the current page is, total pages and records
- The user should be able to scroll through records, next and previous
- Use AJAX
In an application, there bound to be a lot of listing. Therefore, the best way to move forward is to create a component which we can reuse easily. Since the component itself is comprised of a number of other components, I believe this feature is officially referred as composite component. In the era of JSF 1.x, this was quite painful. A developer needs to write a lot of classes/files. With JSF 2.x, this is very easy (and quite elegant, I must say).
Let us start by creating the component.
Creating composite component
I am going to name this component as paginator.
I am sure you can find a lot of explanation on how to do this, so I shall skip the ‘explanation’ part and simply show you what I did.
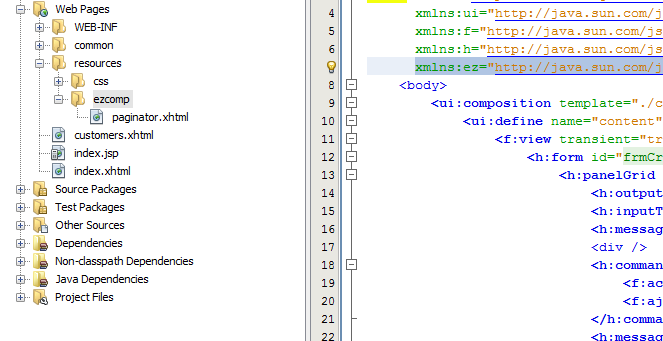
I created a file paginator.xhtml under the directory resources/ezcomp. Hence, I refer to this component later on with namespace xmlns:ez="http://java.sun.com/jsf/composite/ezcomp.
Let us move on to the actual implementation of the paginator.xhtml. Please refer to the following source, and then I will take you through step-by-step.
paginator.xhtml
<?xml version='1.0' encoding='UTF-8' ?>
<!DOCTYPE html PUBLIC "-//W3C//DTD XHTML 1.0 Transitional//EN" "http://www.w3.org/TR/xhtml1/DTD/xhtml1-transitional.dtd">
<html xmlns="http://www.w3.org/1999/xhtml"
      xmlns:cc="http://java.sun.com/jsf/composite"
      xmlns:h="http://java.sun.com/jsf/html"
      xmlns:f="http://java.sun.com/jsf/core">

    <!-- INTERFACE -->
    <cc:interface>
        <cc:attribute name="paginateModel" /> <!-- 01 -->
    </cc:interface>

    <!-- IMPLEMENTATION -->
    <cc:implementation>
        <!-- 02 -->
        <h:inputHidden value="#{cc.attrs.paginateModel.sortField}" />
        <h:inputHidden value="#{cc.attrs.paginateModel.ascending}" />
        <h:inputHidden value="#{cc.attrs.paginateModel.page}" />

        <!-- 03 -->
        <h:panelGrid columns="2" cellpadding="5" cellspacing="5">
            <h:outputLabel value="Rows-per-page" />
            <h:selectOneRadio value="#{cc.attrs.paginateModel.rowsPerPage}">
                <f:selectItem itemValue="5" itemLabel="5" />
                <f:selectItem itemValue="10" itemLabel="10" />
                <f:selectItem itemValue="20" itemLabel="20" />
                <f:selectItem itemValue="100" itemLabel="100" />
                <f:ajax execute="@form" render="@form" listener="#{cc.attrs.paginateModel.updateRowsPerPage}" />
            </h:selectOneRadio>
        </h:panelGrid>

        <!-- pagination -->
        <h:panelGrid columns="3" cellpadding="5" cellspacing="5">
            <!-- 04 -->
            <h:commandLink value="<<" actionListener="#{cc.attrs.paginateModel.navigatePage(false)}" style="display: #{cc.attrs.paginateModel.page gt 1 ? 'block' : 'none'}">
                <f:ajax execute="@form" render="@form" />
            </h:commandLink>
            <!-- 05 -->
            <h:outputLabel value="#{cc.attrs.paginateModel.page} ⁄ #{cc.attrs.paginateModel.totalPages} " />
            <!-- 06 -->
            <h:commandLink value=">>" actionListener="#{cc.attrs.paginateModel.navigatePage(true)}" style="display: #{cc.attrs.paginateModel.page lt cc.attrs.paginateModel.totalPages ? 'block' : 'none'}">
                <f:ajax execute="@form" render="@form" />
            </h:commandLink>
        </h:panelGrid>
        <cc:insertChildren /><!-- 07 -->
        <br />
        <!-- 08 -->
        <h:outputFormat value="There are {0} record(s).">
            <f:param value="#{cc.attrs.paginateModel.recordCount}" />
        </h:outputFormat>
    </cc:implementation>
</html>
The following section explains each numbered point I have made in the customers.xhtml.
01. cc:attribute and paginatedModel
This part is the 'interface' between the implementation in this xhtml as well as the client/user of this component later. To put it in the plain words, think of it as a param that must be supplied when using this component.
02. Hidden parameters
Now this part has a lot of explanation.
Firstly, I need to fast-forward a little bit to tell you that I am using RequestScoped bean to backed the record listing. Another important thing to notice that I actually use the <f:view transient="true">, which is the feature available in JSF 2.2 and therefore making this page stateless. If you open-source in your browser, the state is now:
<input type="hidden" name="javax.faces.ViewState" id="j_id1:javax.faces.ViewState:0" value="stateless" autocomplete="off" />
Because this page is stateless, you need to manage your own state, between invocations (Riem 2013). Hence the use of hidden parameters. So imagine, suppose you were displaying page 4 of the 100 pages, and the user decided to navigate to the next page, since it is stateless, you would need to know what page is now, whether the current display is being listed ascending or descending and by what it is currently sorted.
03. Rows-per-page selection
This part is quite self-explanatory, except one part. Basically, we are listing the choice for the user to select on how many records to be displayed per page. When the user selects though, we need to re-execute the query and update the page, using AJAX. Hence, the use of this section:
<f:ajax execute="@form" render="@form" listener="#{cc.attrs.paginateModel.updateRowsPerPage}" />What this section is saying is basically on user selection, execute the method updateRowsPerPage and update this form. The 'execute' also implies that we are taking into account all of the params in this form, as mentioned in section 02.
04/06. Navigate ‘back’ and ‘forward’
I will explain part 04 and 06 together in this section because they are quite similar.
Let us start with part 04. This will basically render a link to allow the user to navigate 'Back'. I simply play around with the display attribute to conditional render only if the current page is not the first page (otherwise, it would not be possible to navigate back on the first page, would it?). Part 06 is quite similar, with condition to only render if the current page is not the last one.
The next part I would like to explain is the actionListener on clicking that page. Basically we know at the moment what the current page is because of h:inputHidden (See section 02). So, with the two command links in part 04 and 06, we need to flag what kind of navigation is that. For that I simply use boolean value.
Last, because we want to do the navigation using AJAX, we also need to use the <f:ajax>. Also, the same reason as previous sections regarding the execute and render on @form.
05 Current page and total pages
This part is simply rendering what the current page is and the total pages available. Quite self-explanatory
06 See section 04
See section 04
07 insertChildren
Whilst we can re-use the paginator, I thought it would be very difficult to create a component that would auto-render your data model into a table. At the very least, the page designer would need to determine what columns to render (I am sure there must be a magical way to auto-render everything in a tabular manner. Maybe Oracle ADF Faces does that for you. In any case, I couldn’t be bother finding out about it).
When using this tag, basically later on when we use <ezcomp:paginator>...</ezcomp:paginator>, whatever we put in between will be rendered on part 07. Think about it a little bit like <ui:decorate>.
08 Displaying the total records
For this section we simply display the total records. Quite self-explanatory.
Using the composite component
Now we basically need to use this composite component. So we need to modify our customers.xhtml as follows:
customers.xhtml
<?xml version='1.0' encoding='UTF-8' ?>
<!DOCTYPE html PUBLIC "-//W3C//DTD XHTML 1.0 Transitional//EN" "http://www.w3.org/TR/xhtml1/DTD/xhtml1-transitional.dtd">
<html xmlns="http://www.w3.org/1999/xhtml"
      xmlns:ui="http://java.sun.com/jsf/facelets"
      xmlns:f="http://java.sun.com/jsf/core"
      xmlns:h="http://java.sun.com/jsf/html"
      xmlns:ez="http://java.sun.com/jsf/composite/ezcomp"> <!-- 01 -->
    <body>
        <ui:composition template="./common/template.xhtml">
            <ui:define name="content">
                <f:view transient="true">
                    <h:form id="frmCreateCustomer">
                        <h:panelGrid columns="3">
                            <h:outputLabel for="txtCustomerName" value="Customer name" />
                            <h:inputText id="txtCustomerName" value="#{customerData.name}" />
                            <h:message for="txtCustomerName" styleClass="error" />
                            <div />
                            <h:commandButton id="cmdRegisterCustomer" value="Submit" action="customers" actionListener="#{customerRegistationAction.register}">
                                <f:actionListener binding="#{listCustomers.sortByDefault}" />
                                <f:ajax execute="@form" render="@form :frmListCustomers" /> <!-- 03 -->
                            </h:commandButton>
                            <h:message for="cmdRegisterCustomer" styleClass="error" />
                        </h:panelGrid>
                    </h:form>
                    <br />
                    <h:form id="frmListCustomers"> <!-- 02 -->
                        <ez:paginator paginateModel="#{listCustomers}"> <!-- 04 -->
                            <h:dataTable value="#{listCustomers.data}" var="cust"> <!-- 05 -->
                                <h:column>
                                    <f:facet name="header">
                                        <h:commandLink value="Name" actionListener="#{listCustomers.sort('name')}">
                                            <f:ajax execute="@form" render="@form" /> <!-- 06-->
                                        </h:commandLink>
                                    </f:facet>
                                    <h:outputText value="#{cust.name}" />
                                </h:column>
                            </h:dataTable>
                        </ez:paginator>
                    </h:form>
                </f:view>
            </ui:define>
        </ui:composition>
    </body>
</html>
Again, I shall walk you through one-by-one:
01 The namespace
As mentioned previously, since we put our paginator on resources/ezcomp/paginator.xhtml, JSF allows us to refer to it by using the namespace http://java.sun.com/jsf/composite/ezcomp. So later on (as shown in 04), you can use the newly created paginator by using ezcomp:paginator.
02 The list table in its own form
Let us jump a little bit further to part 02. Part 02 shows that in this customers.xhtml, we use two forms. Mainly because I want to the interaction you are doing in with the table, you don’t want it affects or be affected by another form, which in this case the Create Customer section.
Let us say, suppose we only use one form for the entire customers.xhtml. On clicking the button to sort (part 06), the validation on the create text box may be trigger, e.g. the customer name cannot be empty. We don’t want that.
We also need to give this form a name, for reason outlined in section 03.
03 Re-render another form
The intention here is to be able to refresh the table whenever one adds a new customer. Notice that the naming container (in relation to section 02) is the second h:form. Consequently, because the Create customer and the table are residing on different naming container, let us just refresh the entire second form, and this is done by using the correct ‘Search Expression’. By using ‘:’ at the start, it means that JSF will search the tree from the root of the document (BalusC, 2011b).
04 Using our newly created composite component
This is simply the way to use our newly created paginator component, i.e. by passing the appropriate param into it (later on this).
See also the paginator.xhtml and its explanation for more details.
05 The actual data table
This is the actual data table. As I said previously, whilst we can make a generic paginator, I thought it would be very difficult to make a generic table rendering. So, in this case, I simply want to show you the case where we determine what column to render.
One thing to note though that we called the listCustomers.data to supply the javax.faces.DataModel for our data table. This ‘data’ should be the correct data, based on the page, the size, the sorting, etc. If you still don’t understand, please do not worry. Next section, it will become clearer.
06 The sorting
As per requirements above, we need to implement the sorting. This one is quite self-explanatory, and the use of f:ajax is of the same reasons as previously mentioned.
Create the class to support pagination
Okay, we have created the ‘contract/requirement’, with the paginator.xhtml and then use it on customers.xhtml. What we need now, is to implement a class that support the functionality.
What I am going to do, is to go through customers.xhtml and paginator.xhtml. You can also do that, so that you can easily understand each of the points listed below:
- Firstly, looking at
customers.xhtmlthe class is called ‘listCustomers’. Since we are using CDI, we need to use@Namedto expose the bean to JSF environment. We can create aListCustomers.java, or populate thevaluein the@Namedannotation. - In the past, I would use
@ViewScopedfor this bean. However, since we use the JSF ‘stateless’ feature withf:view transient="true", we can no longer use@ViewScoped. These kinds of beans are tied to views being managed by the JSF framework. But with this stateless feature, the view is always recreated, and so are the beans on this scope (Busscher 2013). So, the best scope to use is@RequestScoped. - It needs to have
getData()which returnjavax.faces.DataModel<T>. This should return the list ofCustomerto be displayed. - It needs to support
public void sort(final String sortField)to support header sorting. - Accessor for
String getSortField(),boolean isAscending(),int getPage(), AND their corresponding mutators/setters. These are required, related to our hidden inputs. - Accessor/mutator for
rowsPerPageto support our rows-per-page selection. - It needs to support
public void updateRowsPerPage(AjaxBehaviorEvent event), so that we can update the listing based on user’s rows-per-page selection. - It needs to support
public void navigatePage(final boolean forward). - Accessor for
recordCount
Anyway, you should be able to implement the class now.
The way I implement it, however, is to split it into two parts. If you think about it, let us say in the future there are multiple lists in your application, e.g. List of Orders, Persons, Invoices and so on. They willl be implemented in a same way. I thought it would be a better idea to create a base class and then extend it later with actual entities.
First, the base class.
DataListingSupport.java
package id.co.dwuysan.util;

import java.io.Serializable;
import javax.faces.event.AjaxBehaviorEvent;
import javax.faces.model.DataModel;

public abstract class DataListingSupport<T extends Serializable> implements Serializable {
    private int recordCount = 0;
    private int totalPages = 0;
    private DataModel<T> data;

    private int page = 1;
    private Integer rowsPerPage = null;
    private boolean ascending = true;
    private String sortField;

    public void navigatePage(final boolean forward) {
        setPage((forward) ? ++page : --page);
        refresh();
    }

    public void sort(final String sortField) {
        setSortField(sortField);
        setAscending(getSortField().equals(sortField) ? !isAscending() : true);
        refresh();
    }

    public void updateRowsPerPage(final AjaxBehaviorEvent event) {
        setPage(1); // page must reset to the first one
        refresh();
    }

    public void refresh() {
        // hook to populate count and data
        populateCountAndData();
        // compute total pages
        setTotalPages(countTotalPages(getRecordCount(), getRowsPerPage()));
    }

    /**
     * The concreate implementation of this class must perform data retrieval
     * based on the current information available (accessible via methods such
     * as {@link #getSortField()}, {@link #isAscending()}, etc.
     * <p>
     * The implementation is responsible in populating the values for {@link #setRecordCount(int)}
     * and {@link #setData(javax.faces.model.DataModel)}
     */
    protected abstract void populateCountAndData();

    /************************************************************** HELPER(S) */

    private static int countTotalPages(int totalRecord, int rowsPerPage) {
        int pageCounter = 0;
        for (int pageCountTracker = 0; pageCountTracker < totalRecord; ++pageCounter) {
            pageCountTracker += rowsPerPage;
        }
        return pageCounter;
    }

    /************************************************* ACCESSORS AND MUTATORS */

    public int getPage() {
        return page;
    }

    public void setPage(int page) {
        this.page = page;
    }

    public boolean isAscending() {
        return ascending;
    }

    public void setAscending(boolean ascending) {
        this.ascending = ascending;
    }

    public Integer getRowsPerPage() {
        return rowsPerPage;
    }

    public void setRowsPerPage(Integer rowsPerPage) {
        this.rowsPerPage = rowsPerPage;
    }

    public DataModel<T> getData() {
        return data;
    }

    public void setData(DataModel<T> data) {
        this.data = data;
    }

    public String getSortField() {
        return sortField;
    }

    public void setSortField(String sortField) {
        this.sortField = sortField;
    }

    public int getRecordCount() {
        return recordCount;
    }

    public void setRecordCount(int recordCount) {
        this.recordCount = recordCount;
    }

    public int getTotalPages() {
        return totalPages;
    }

    public void setTotalPages(int totalPages) {
        this.totalPages = totalPages;
    }
}
The next is how we extends that class to create our backing bean to support listing of Customer.
DataListingSupport.java
package id.co.dwuysan.customer;

import id.co.dwuysan.entity.Customer;
import id.co.dwuysan.service.CustomerService;
import id.co.dwuysan.util.DataListingSupport;
import javax.enterprise.context.RequestScoped;
import javax.faces.model.ListDataModel;
import javax.inject.Inject;
import javax.inject.Named;

@RequestScoped
@Named
public class ListCustomers extends DataListingSupport<Customer> {

    @Inject
    private CustomerService customerService;

    public ListCustomers() {
        setSortField("name");
        setRowsPerPage(10);
    }

    @Override
    protected void populateCountAndData() {
        /*
         * This is where we call an EJB (or whatever service layer you have)
         * to perform data retrieval.
         *
         * You need to make sure to retrieve the result (paginated, sorted), and
         * also the total number of records.
         */
        setRecordCount(result.getCount());
        setData(new ListDataModel<>(result.getResult()));
    }
}
So you see, using this approach, should I need another kind of listings, i.e. lists of orders, we can easily extend DataListingSupport<>.
The Result
Before I show you the full result, one thing we might want to add, is an action to load all the current customers from the database, on display of the page. JSF 2.2 adds a feature, called View Action, which makes this very very easy (McGinn 2011).
All you need to do, is to add this f:viewAction after the f:view as follows:
customers.xhtml
<?xml version='1.0' encoding='UTF-8' ?>
<!DOCTYPE html PUBLIC "-//W3C//DTD XHTML 1.0 Transitional//EN" "http://www.w3.org/TR/xhtml1/DTD/xhtml1-transitional.dtd">
<html xmlns="http://www.w3.org/1999/xhtml"
      xmlns:ui="http://java.sun.com/jsf/facelets"
      xmlns:f="http://java.sun.com/jsf/core"
      xmlns:h="http://java.sun.com/jsf/html"
      xmlns:ez="http://java.sun.com/jsf/composite/ezcomp"> <!-- 01 -->
    <body>
        <ui:composition template="./common/template.xhtml">
            <ui:define name="content">
                <f:view transient="true">
                    <!-- to load on display of the page -->
                    <f:metadata>
                        <f:viewAction transient="true" action="#{listCustomers.refresh}"/>
                    </f:metadata>
                    <h:form id="frmCreateCustomer">
                        <!-- the rest of the code remains unchanged -->
                    </h:form>
                </f:view>
            </ui:define>
        </ui:composition>
    </body>
</html>
Notice that we simply call DataListingSupport<>#refresh(). The viewAction actually analysis the String return to perform the implicit navigation. In this case, our refresh() method actually returns void, so no navigation is performed (McGinn 2011).
The result should be like this:
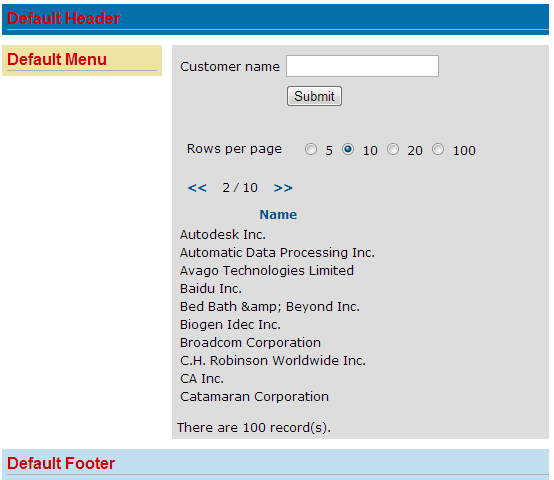
I took the list of the customers from NASDAQ 100.
So, there you go, now you have the an AJAX, scrollable, lazy-loading data table.
References
- BalusC, 2011a, ‘What is the default Managed Bean Scope in a JSF 2 application in netbeans?’, Stack Overflow, accessed on 06 November 2013
- BalusC, 2011b, ‘How to reference components in JSF ajax? Cannot find component with identifier “foo” in view’, Stack Overflow, accessed on 11 November 2013
- Busscher, R, 2013, ‘JSF 2.2 Stateless views explained’, JSF Corner, accessed on 12 November 2013
- Geary, D, Horstmann, C, 2010, ‘Core JavaServer Faces (3rd Edition)’, 3rd edn, Prentice Hall, California USA
- Lubke, R, 2008, ‘JSF 2.0 New Feature Preview Series (Part 4) Resource Re-location’, Oracle.com, accessed on 07 October 2013
- McGinn, T, 2011, ‘New JavaServer Faces 2.2 Feature: The viewAction Component’, Oracle.com, accessed on 17 November 2013
- Oracle, 2013, ‘Composite Component’, Oracle.com, accessed on 07 November 2013
- Riem, M, 2013, ‘JSF Tip #26 – JSF is going Stateless’, Java.net, accessed on 09 November 2013

Interesting and concise read, however, could you share the customerservice.java? The term “service” is so overhyped and I would like to compare what it does when I look at my own code.
Thanks for the extra effort.
Hello Mathias, I will cover the content of the CustomerService.java perhaps some other time, since I imagine the post would be around JPA 2.1, Criteria API, etc. The idea however is that in a single ‘transaction’, we need to get a Value Object, containing information such as paginated result set and the total count. In regards to the term ‘Service’. I agree that it is overused, and of course this post is not really focusing on that, so we can call it anything we like ;). Having said that, it really depends on the API designer as to what convention… Read more »
Excelent tutorial thank you very much, how do I mange to get incoming items as first on the list? I would like the table to be lasti item create at the top.
Thank you very much.
Excelent tutorial!!!
Thank you
Good stuff!
I was wondering, is there a way to implement “Load More” (just like what they do on twitter) button using JSF 2.2?
Excellent! How would one put the search input in the header template?
Q. Any examples of placing a search box in the header template section to produce the filter AJAX results on body template section of the JSF Facelets Template web app page?
Any suggestions greatly appreciated.