I’m working with Git now for about two years but only for my personal projects and those I have on GitHub. At work we still use TFS and SVN (as of now). Recently Paolo Perrotta came to our company to hold a course about Agile planning and since Git was quite new to most of my mates, he also quickly explained Git in the context of refactoring. I really liked his approach of explaining it and that’s why I’d like to replicate his explanation here.
Just before we start..
How is Git different from other VCS (Version Control Systems)? Probably the most obvious difference is that Git is distributed (unlike SVN or TFS for instance). This
means, you’ll have a local repository which lives inside a special folder named .git and you’ll normally (but not necessarily) have a remote, central repository where different collaborators may contribute their code. Note that each of those contributors has an exact clone of the repository on their local workstation.
Git itself can be imagined as something that sits on top of your file system and manipulates files. Even better, you can imagine Git as a tree structure where each commit creates a new node in that tree. Nearly all Git commands actually serve to navigate on this tree and to manipulate it accordingly. As such in this tutorial I’d like to take a look at how Git works by viewing a Git repository from the point of view of the tree it constructs. To do so I walk through some common use cases like
- adding/modifying a new file
- creating and merging a branch with and without merge conflicts
- Viewing the history/changelog
- Performing a rollback to a certain commit
- Sharing/synching your code to a remote/central repository
Terminology
Here’s the git terminology:
- master – the repository’s main branch. Depending on the work flow it is the one people work on or the one where the integration happens
- clone – copies an existing git repository, normally from some remote location to your local environment.
- commit – submitting files to the repository (the local one); in other VCS it is often referred to as “checkin”
- fetch or pull – is like “update” or “get latest” in other VCS. The difference between fetch and pull is that pull combines both, fetching the latest code from a remote repo as well as performs the merging.
- push – is used to submit the code to a remote repository
- remote – these are “remote” locations of your repository, normally on some central server.
- SHA – every commit or node in the Git tree is identified by a unique SHA key. You can use them in various commands in order to manipulate a specific node.
- head – is a reference to the node to which our working space of the repository currently points.
- branch – is just like in other VCS with the difference that a branch in Git is actually nothing more special than a particular label on a given node. It is not a physical copy of the files as in other popular VCS.
Workstation Setup
I do not want to go into the details of setting up your workstation as there are numerous tools which partly vary on the different platforms. For this post I perform all of the operations on the command line. Even if you’re not the shell-guy you should give it a try (it never hurts). To setup command line Git access simply go to git-scm.com/downloads where you’ll find the required downloads for your OS. More detailed information can be found here as well. After everything is set up and you have “git” in your PATH environment variable, then the first thing you have to do is to config git with your name and email:
$ git config --global user.name "Juri Strumpflohner"
$ git config --global user.email "myemail@gmail.com"
Lets get started: Create a new Git Repository
Before starting, lets create a new directory where the git repository will live and cd into it:
$ mkdir mygitrepo
$ cd mygitrepo
Now we’re ready to initialize a brand new git repository.
$ git init
Initialized empty Git repository in c:/projects/mystuff/temprepos/mygitrepo/.git/
We can check for the current status of the git repository by using
$ git status
# On branch master
#
# Initial commit
#
nothing to commit (create/copy files and use "git add" to track)
Create and commit a new file
The next step is to create a new file and add some content to it.
$ touch hallo.txt
$ echo Hello, world! > hallo.txt
Again, checking for the status now reveals the following
$ git status
# On branch master
#
# Initial commit
#
# Untracked files:
#   (use "git add <file>..." to include in what will be committed)
#
#       hallo.txt
nothing added to commit but untracked files present (use "git add" to track)
To “register” the file for committing we need to add it to git using
$ git add hallo.txt
Checking for the status now indicates that the file is ready to be committed:
$ git status
# On branch master
#
# Initial commit
#
# Changes to be committed:
#   (use "git rm --cached <file>..." to unstage)
#
#       new file:   hallo.txt
#
We can now commit it to the repository
$ git commit -m "Add my first file"
  1 file changed, 1 insertion(+)
  create mode 100644 hallo.txt
It is common practice to use the “presence” in commit messages. So rather than writing “added my first file” we write “add my first file”. So if we now step back for a second and take a look at the tree we would have the following.
There is one node where the “label” master points to.
Add another file
Lets add another file:
$ echo "Hi, I'm another file" > anotherfile.txt
$ git add .
$ git commit -m "add another file with some other content"
  1 file changed, 1 insertion(+)
  create mode 100644 anotherfile.txt
Btw, note that this time I used git add . which adds all files in the current directory (.). From the point of view of the tree we now have another node and master has moved on to that one.
![]()
Create a (feature)branch
Branching and merging is what makes Git so powerful and for what it has been optimized, being a distributed version control system (VCS). Indeed, feature branches are quite popular to be used with Git. Feature branches are created for every new kind of functionality you’re going to add to your system and they are normally deleted afterwards once the feature is merged back into the main integration branch (normally the master branch). The advantage is that you can experiment with new functionality in a separated, isolated “playground” and quickly switch back and forth to the original “master” branch when needed. Moreover, it can be easily discarded again (in case it is not needed) by simply dropping the feature branch. But lets get started. First of all I create the new feature branch:
$ git branch my-feature-branch
Executing
$ git branch
* master
  my-feature-branch
we get a list of branches. The * in front of master indicates that we’re currently on that branch. Lets switch to my-feature-branch instead:
$ git checkout my-feature-branch
Switched to branch 'my-feature-branch'
Again
$ git branch
  master
* my-feature-branch
Note you can directly use the command git checkout -b my-feature-branch to create and checkout a new branch in one step. What’s different to other VCS is that there is only one working directory. All of your branches live in the same one and there is not a separate folder for each branch you create. Instead, when you switch between branches, Git will replace the content of your working directory to reflect the one in the branch you’re switching to. Lets modify one of our existing files
$ echo "Hi" >> hallo.txt
$ cat hallo.txt
Hello, world!
Hi
…and then commit it to our new branch
$ git commit -a -m "modify file adding hi"
2fa266a] modify file adding hi
1 file changed, 1 insertion(+)
Note, this time I used the git commit -a -m to add and commit a modification in one step. This works only on files that have already been added to the git repo before. New files won’t be added this way and need an explicit git add as seen before. What about our tree?
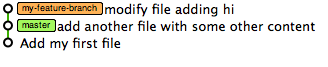
So far everything seems pretty normal and we still have a straight line in the tree, but note that now master remained where it was and we moved forward with my-feature-branch. Lets switch back to master and modify the same file there as well.
$ git checkout master
Switched to branch 'master'
As expected, hallo.txt is unmodified:
$ cat hallo.txt
Hello, world!
Lets change and commit it on master as well (this will generate a nice conflict later).
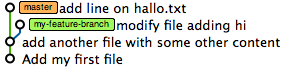
$ echo "Hi I was changed in master" >> hallo.txt
$ git commit -a -m "add line on hallo.txt"
c8616db] add line on hallo.txt
1 file changed, 1 insertion(+)
Our tree now visualizes the branch:
Merge and resolve conflicts
The next step would be to merge our feature branch back into master. This is done by using the merge command
$ git merge my-feature-branch
Auto-merging hallo.txt
CONFLICT (content): Merge conflict in hallo.txt
Automatic merge failed; fix conflicts and then commit the result.
As expected, we have a merge conflict in hallo.txt.
Hello, world!
<<<<<<< HEAD
Hi I was changed in master
=======
Hi
>>>>>>> my-feature-branch
Lets resolve it:
Hello, world!
Hi I was changed in master
Hi
..and then commit it
$ git commit -a -m "resolve merge conflicts"
[master 6834fb2] resolve merge conflicts
The tree reflects our merge.
Jump to a certain commit
Lets assume we want to jump back to a given commit. We can use the git log command to get all the SHA identifiers that uniquely identify each node in the tree.
$ git log
commit 6834fb2b38d4ed12f5486ebcb6c1699fe9039e8e
Merge: c8616db 2fa266a
Author: = <juri.strumpflohner@gmail.com>
Date:   Mon Apr 22 23:19:32 2013 +0200

    resolve merge conflicts

commit c8616db8097e926c64bfcac4a09306839b008dc6
Author: Juri <juri.strumpflohner@gmail.com>
Date:   Mon Apr 22 09:39:57 2013 +0200

    add line on hallo.txt

commit 2fa266aaaa61c51bd77334516139597a727d4af1
Author: Juri <juri.strumpflohner@gmail.com>
Date:   Mon Apr 22 09:24:00 2013 +0200

    modify file adding hi

commit 03883808a04a268309b9b9f5c7ace651fc4f3f4b
Author: Juri <juri.strumpflohner@gmail.com>
Date:   Mon Apr 22 09:13:49 2013 +0200

    add another file with some other content

commit aad15dea687e46e9104db55103919d21e9be8916
Author: Juri <juri.strumpflohner@gmail.com>
Date:   Mon Apr 22 08:58:51 2013 +0200

    Add my first file
Take one of the identifiers (also if it isn’t the whole one, it doesn’t matter) and jump to that node by using the checkout command
$ git checkout c8616db
Note: checking out 'c8616db'.

You are in 'detached HEAD' state. You can look around, make experimental
changes and commit them, and you can discard any commits you make in this
state without impacting any branches by performing another checkout.

If you want to create a new branch to retain commits you create, you may
do so (now or later) by using -b with the checkout command again. Example:

  git checkout -b new_branch_name

HEAD is now at c8616db... add line on hallo.txt
Note the comment git prints out. What does that mean? Detached head means “head” is no more pointing to a branch “label” but instead to a specific commit in the tree. You can think of the HEAD as the “current branch”. When you switch branches with git checkout, the HEAD revision changes to point to the tip of the new branch. … It is possible for HEAD to refer to a specific revision that is not associated with a branch name. This situation is called a detached HEAD. Stackoverflow Post Basically when I now change hallo.txt and commit the change, the tree looks as follows: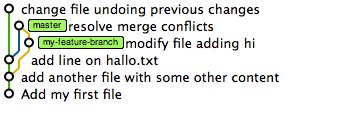
As you can see, the newly created node has no label on it. The only reference that currently points towards it is head. However, if we now switch to master again then the previous commit will be lost as we have no way of jumping back to that tree node.
$ git checkout master
Warning: you are leaving 1 commit behind, not connected to
any of your branches:

  576bcb8 change file undoing previous changes

If you want to keep them by creating a new branch, this may be a good time
to do so with:

 git branch new_branch_name 576bcb8239e0ef49d3a6d5a227ff2d1eb73eee55

Switched to branch 'master'
And in fact, git is so kind to remind us about this fact. The tree looks now again as in figure 6.
Rollback
Jumping back is nice, but what if we want to undo everything back to the state before the merge of the feature branch? It is as easy as
$ git reset --hard c8616db
HEAD is now at c8616db add line on hallo.txt

The generic syntax here is git reset --hard <tag/branch/commit id>.
Sharing/Synching your Repository
Ultimately we want to share our code, normally by synching it to a central repository. For doing so, we have to add a remote.
$ git remote add origin git@github.com:juristr/intro.js.git
To see whether I succeeded, simply type:
$ git remote -v
which lists all of the added remotes. Now we need to publish our local branch master to the remote repository. This is done like
$ git push -u origin master
And we’re done. The real powerful thing is that you can add multiple different remotes. This is often used in combination with cloud hosting solutions for deploying your code on your server. For instance, you could add a remote named “deploy” which points to some cloud hosting server repository, like
$ git remote add deploy git@somecloudserver.com:juristr/myproject
and then whenever you want to publish your branch you execute a
$ git push deploy
Cloning
Similarly it works if you’d like to start from an existing remote repository. The first step that needs to be done is to “checkout” the source code which is called cloning in Git terminology. So we would do something like
$ git clone git@github.com:juristr/intro.js.git
Cloning into 'intro.js'...
remote: Counting objects: 430, done.
remote: Compressing objects: 100% (293/293), done.
remote: Total 430 (delta 184), reused 363 (delta 128)
Receiving objects: 100% (430/430), 419.70 KiB | 102 KiB/s, done.
Resolving deltas: 100% (184/184), done.
This will create a folder (in this case) named “intro.js” and if we enter it
$ cd intro.js/
and check for the remotes we see that the according tracking information of the remote repository is already set up
$ git remote -v
origin  git@github.com:juristr/intro.js.git (fetch)
origin  git@github.com:juristr/intro.js.git (push)
We can now start the commit/branch/push cycle just normally.
Resources and Links
The scenarios above were the simples, but at the same time probably also the most used ones. But there’s a lot more Git is capable of. To get more details you may want to consult the links below.
- http://gitready.com/
- Book: Pro Git by Scott Chacon
- Try Git in 15 minutes
- Introduction to Git with Scott Chacon of GitHub
- My personal Git Cheat Sheet where I continuously add stuff I want to remember

This article really help me understand git much better, thanks and good job!
Nice tutorial. But lots of things that a beginner should know about git are missing. This tutorial (https://www.cloudways.com/blog/git-tutorial-for-beginners-version-control/ ) has some more points about Git that a beginner should understand, like understanding what version control is.
Hi olivedev. Thanks for your feedback. Right, I made some assumptions in my article in that users know already what a version control system is, but are beginners to “Git” :)
But thanks, I may integrate some sections in the beginning and/or add some further links on my original article over here: https://juristr.com/blog/2013/04/git-explained/