In this tutorial we shall show you how to create and use a ConversationScoped Bean in a web application. In CDI, a bean is a source of contextual objects that define application state and/or logic. A Java EE component is a bean if the lifecycle of its instances may be managed by the container according to the lifecycle context model defined in the CDI specification.
The ConversationScoped Bean is a bean whose scope describes a user’s interaction with a JavaServer Faces application, within explicit developer-controlled boundaries that extend the scope across multiple invocations of the JavaServer Faces lifecycle. All long-running conversations are scoped to a particular HTTP servlet session and may not cross session boundaries.
With ConversationScoped beans we can achieve the same functionality we need from a ViewScoped JSF bean. In addition, with the ConversationScoped beans we can maintain the same conversation – or state – between distinct page requests. But when we leave a conversation without it, the managed bean will stay active until it times out.
Here we will create a JFS web application that uses a ConversationScoped bean so as to achieve a conversation between a client and a server. The client will make multiple requests to the server, by navigating to distinct pages, so as to show how the bean is able to maintain a state.
Our preferred development environment is Eclipse. We are using Eclipse Juno (4.2) version, along with Maven Integration plugin version 3.1.0. You can download Eclipse from here and Maven Plugin for Eclipse from here. The installation of Maven plugin for Eclipse is out of the scope of this tutorial and will not be discussed. Tomcat 7 is the application server used.
Let’s begin,
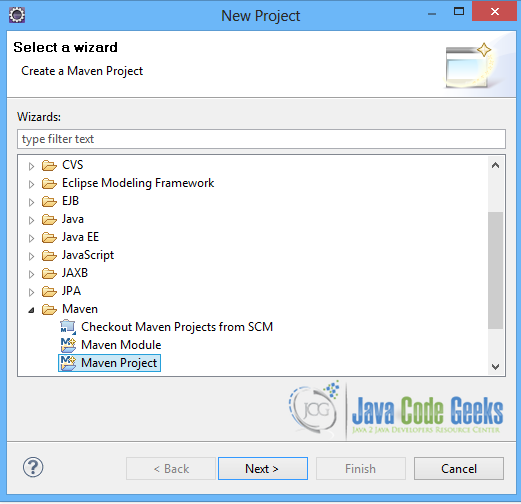
1. Create a new Maven project
Go to File -> Project ->Maven -> Maven Project.
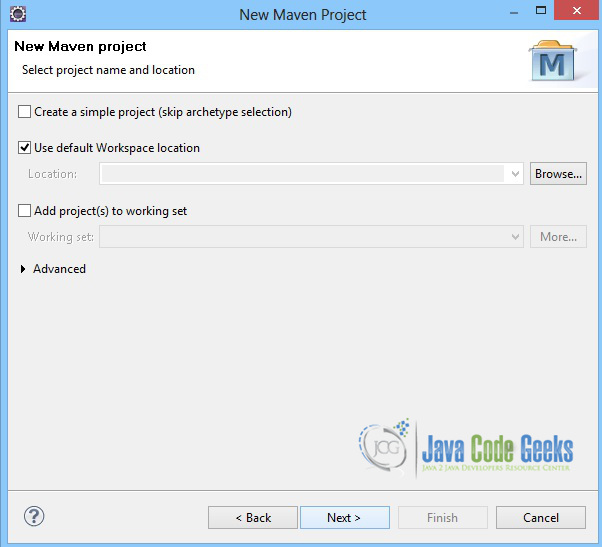
In the “Select project name and location” page of the wizard, make sure that “Create a simple project (skip archetype selection)” option is unchecked, hit “Next” to continue with default values.
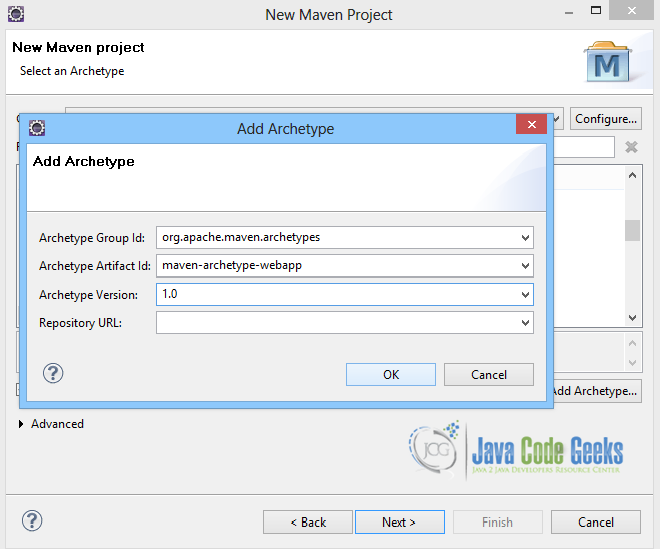
Here the maven archetype for creating a web application must be added. Click on “Add Archetype” and add the archetype. Set the “Archetype Group Id” variable to "org.apache.maven.archetypes", the “Archetype artifact Id” variable to "maven-archetype-webapp" and the “Archetype Version” to "1.0". Click on “OK” to continue.
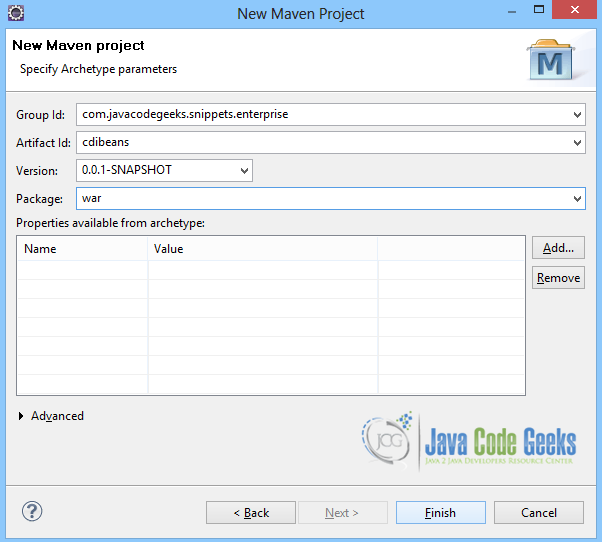
In the “Enter an artifact id” page of the wizard, you can define the name and main package of your project. Set the “Group Id” variable to "com.javacodegeeks.snippets.enterprise" and the “Artifact Id” variable to "cdibeans". The aforementioned selections compose the main project package as "com.javacodegeeks.snippets.enterprise.cdibeans" and the project name as "cdibeans". Set the “Package” variable to "war", so that a war file will be created to be deployed to tomcat server. Hit “Finish” to exit the wizard and to create your project.
The Maven project structure is shown below:
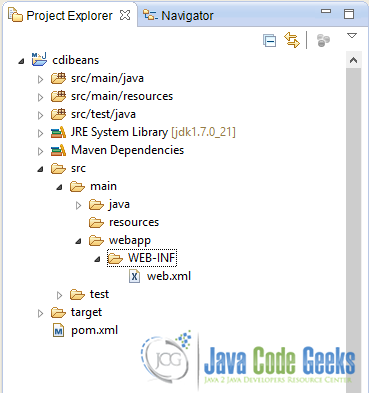
- It consists of the following folders:
- /src/main/java folder, that contains source files for the dynamic content of the application,
- /src/test/java folder contains all source files for unit tests,
- /src/main/resources folder contains configurations files,
- /target folder contains the compiled and packaged deliverables,
- /src/main/resources/webapp/WEB-INF folder contains the deployment descriptors for the Web application ,
- the pom.xml is the project object model (POM) file. The single file that contains all project related configuration.
2. Add all the necessary dependencies
You can add the dependencies in Maven’s pom.xml file, by editing it at the “Pom.xml” page of the POM editor, as shown below:
pom.xml:
<project xmlns="http://maven.apache.org/POM/4.0.0" xmlns:xsi="http://www.w3.org/2001/XMLSchema-instance"
	xsi:schemaLocation="http://maven.apache.org/POM/4.0.0 http://maven.apache.org/maven-v4_0_0.xsd">
	<modelVersion>4.0.0</modelVersion>
	<groupId>com.javacodegeeks.snippets.enterprise.cdi</groupId>
	<artifactId>cdibeans</artifactId>
	<packaging>war</packaging>
	<version>0.0.1-SNAPSHOT</version>
	<name>cdibeans Maven Webapp</name>
	<url>http://maven.apache.org</url>
	<dependencies>
		<dependency>
			<groupId>org.jboss.weld.servlet</groupId>
			<artifactId>weld-servlet</artifactId>
			<version>1.1.10.Final</version>
		</dependency>
		<dependency>
			<groupId>javax.servlet</groupId>
			<artifactId>jstl</artifactId>
			<version>1.2</version>
		</dependency>
		<dependency>
			<groupId>javax.servlet</groupId>
			<artifactId>javax.servlet-api</artifactId>
			<version>3.0.1</version>
			<scope>provided</scope>
		</dependency>
		<dependency>
			<groupId>org.glassfish</groupId>
			<artifactId>javax.faces</artifactId>
			<version>2.1.7</version>
		</dependency>
	</dependencies>

	<build>
		<finalName>cdibeans</finalName>
	</build>
</project>
As you can see Maven manages library dependencies declaratively. A local repository is created (by default under {user_home}/.m2 folder) and all required libraries are downloaded and placed there from public repositories. Furthermore intra – library dependencies are automatically resolved and manipulated.
3. Create the ConversationScoped Bean
The CDIConversationScopedBean.java class is a ConversationScoped Bean, annotated as @ConversationScoped. It is given the cDIConversationScopedBean name in the container, with the @Named annotation. First of all, the class must implement the Serializable interface, so as to be a ConversationScoped managed bean. It must also use the Conversation interface, which is injected in the bean, with the @Inject annotation. A Conversation instance is injected in the bean so as to allow the application to manage the conversation context by marking the current conversation as transient or long-running and specifying a conversation identifier (the unique identifier of the conversation).
The class has a String property, called message, and getter and setter methods for the property. The init() method, annotated with the @PostConstruct annotation is the method called when the bean is created and it initializes the message property.
The initConversation() and endConversation() are the ones to begin and end the conversation. The initConversation() method marks the transient conversation as long-running, whereas the endConversation() method marks the long-running conversation as transient, returning to the initial page of the application. If the conversation is in the transient state at the end of a JSF request, it is destroyed, and the conversation context is also destroyed. If the conversation is in the long-running state at the end of a JSF request, it is not destroyed. Instead, it may be propagated to other requests. All long-running conversations have a string-valued unique identifier.
The class has another two methods that are invoked by the client through the pages, as will be shown later.
CDIConversationScopedBean.java
package com.javacodegeeks.snippets.enterprise.cdibeans;

import java.io.Serializable;
import java.util.Random;

import javax.annotation.PostConstruct;
import javax.enterprise.context.Conversation;
import javax.enterprise.context.ConversationScoped;
import javax.faces.context.FacesContext;
import javax.inject.Inject;
import javax.inject.Named;

@Named(value="cDIConversationScopedBean")
@ConversationScoped
public class CDIConversationScopedBean implements Serializable {

	private static final long serialVersionUID = -6541718762358561835L;

	@Inject
    private Conversation conversation;

	private String message;

	private String[] words = {"Hello!!","Have a nice day!!","Goodbye..","Hi!","Goodmorning!","Bye..","Good evening.."};

	public String getMessage() {
		return message;
	}

	public void setMessage(String message) {
		this.message = message;
	}

	public Conversation getConversation() {
		return conversation;
	}

	@PostConstruct
	public void init(){
		message = "Hello from the JavaCodeGeeks..";
	}

	public void initConversation(){
		if (!FacesContext.getCurrentInstance().isPostback()
			&& conversation.isTransient()) {

			conversation.begin();
		}
	}

	public void sendMessage(){
		message = words[new Random().nextInt(7)];
	}

	public String next(){
		return "secondpage?faces-redirect=true";
	}

	public String endConversation(){
		if(!conversation.isTransient()){
			conversation.end();
		}
		return "firstpage?faces-redirect=true";
	}

}
4. Create the pages
The first page is the initial page which will be invoked by a client to begin the conversation. It sets the PreRenderViewEvent, that is fired before the page is displayed. The PreRenderViewEvent invokes the initConversation() method of the bean to mark the conversation as long-running. The page shows the message property of the bean, and every time the “Get your message” button is clicked the message is changed. By clicking the “Continue with this message” commandLink the next() method of the bean is invoked and the client is redirected to the second page.
firstPage.xhtml
<!DOCTYPE html>
<html xmlns="http://www.w3.org/1999/xhtml"
	xmlns:h="http://java.sun.com/jsf/html"
	xmlns:f="http://java.sun.com/jsf/core">
<f:event listener="#{cDIConversationScopedBean.initConversation}"
	type="preRenderView"></f:event>
<h:head>
	<title>JCG conversation 1</title>
</h:head>
<h:body>
	<h:outputText value="Starting conversation"></h:outputText>
	<br />
	<br />
	<h:form>
		<h:outputText value="#{cDIConversationScopedBean.message}"></h:outputText>
		<br />
		<h:commandButton value="Get your message" type="submit">
			<f:ajax execute="@form"
				listener="#{cDIConversationScopedBean.sendMessage}" render="@form" />
		</h:commandButton>
		<br />
		<br />
		<h:commandLink action="#{cDIConversationScopedBean.next}"
			value="Continue with this message" />
	</h:form>
</h:body>
</html>
The second page displays again the message value, which is the one selected in the previous page by the client. By clicking on the “Let’s end the conversation” link, the client is now redirected to the third page.
secondPage.xhtml
<!DOCTYPE html>
<html xmlns="http://www.w3.org/1999/xhtml"
	xmlns:h="http://java.sun.com/jsf/html"
	xmlns:f="http://java.sun.com/jsf/core">
<h:head>
	<title>JCG conversation 2</title>
</h:head>
<h:body>
	<h:outputText value="Continuing.."></h:outputText>
	<br />
	<br />
	<h:outputText value="#{cDIConversationScopedBean.message}"></h:outputText>
	<br />
	<br />
	<h:link outcome="/thirdpage.xhtml" value="Let's end the converation">
		<f:param name="cid" value="#{cDIConversationScopedBean.conversation.id}" />
	</h:link>
</h:body>
</html>
The third page displays again the message value. By clicking on the “End conversation” commandLink, the endConversation() method of the bean is invoked that redirects the client to the first page, setting the conversation to transient.
thirdPage.xhtml
<!DOCTYPE html>
<html xmlns="http://www.w3.org/1999/xhtml"
	xmlns:h="http://java.sun.com/jsf/html"
	xmlns:f="http://java.sun.com/jsf/core">
<h:head>
	<title>JCG conversation 3</title>
</h:head>
<h:body>
	<h:outputText value="Ending conversation"></h:outputText>
	<br />
	<br />
	<h:outputText value="#{cDIConversationScopedBean.message}"></h:outputText>
	<br />
	<br />
	<h:form>
		<h:commandLink action="#{cDIConversationScopedBean.endConversation}"
			value="End conversation" />
	</h:form>
</h:body>
</html>
5. Configure web.xml
In a web application the web.xml file is the file that defines everything about the application that a server needs to know. Servlets and other components like filters or listeners, initialization parameters, container-managed security constraints, resources, welcome pages, etc are set here. In a JFS application we need to define in web.xml file the javax.faces.webapp.FacesServlet, that is the class responsible for handling JSF applications. FacesServlet is the central controller for the JSF application. It receives all requests for the JSF application and initializes the JSF components before the JSP is displayed. So, web.xml file has an entry that defines the FacesServlet. It is the servlet entry. It also has a servlet-mapping entry in order to map all requests whose URL ends with .xhtml to be handled by the servlet. Here, we also specify the servlet listener (used to boot Weld, and control its interaction with requests).
web.xml
<?xml version="1.0" encoding="UTF-8"?>
<web-app xmlns:xsi="http://www.w3.org/2001/XMLSchema-instance"
	xmlns="http://java.sun.com/xml/ns/javaee" xmlns:web="http://java.sun.com/xml/ns/javaee/web-app_2_5.xsd"
	xsi:schemaLocation="http://java.sun.com/xml/ns/javaee
	http://java.sun.com/xml/ns/javaee/web-app_3_0.xsd"
	id="WebApp_ID" version="3.0">

	<display-name>CDI Web Application</display-name>

	<listener>
		<listener-class>org.jboss.weld.environment.servlet.Listener</listener-class>
	</listener>
	<servlet>
		<servlet-name>faces</servlet-name>
		<servlet-class>javax.faces.webapp.FacesServlet</servlet-class>
		<load-on-startup>1</load-on-startup>
	</servlet>
	<servlet-mapping>
		<servlet-name>faces</servlet-name>
		<url-pattern>*.xhtml</url-pattern>
	</servlet-mapping>

</web-app>
6. Run the application
In order to run the application we need to build the project with Maven. The war file produced must be placed in webapps folder of tomcat. Then, we can hit on :
localhost:8080/cdibeans/firstpage.xhtml
on a browser and the result is the one shown below:
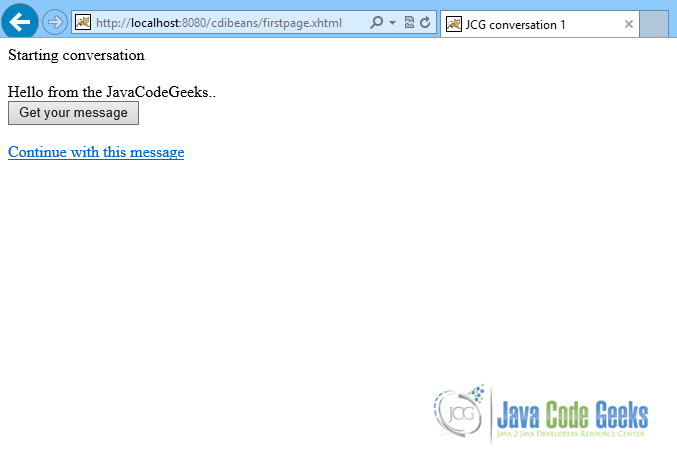
By clicking on the “Get your message” button we can change the message, as shown below:

By clicking on the “Continue with this message” link we move on to the next page, carrying along the message value.

By clicking on the “Let’s end the conversation” link we move on to the next page, and still the message value is kept.
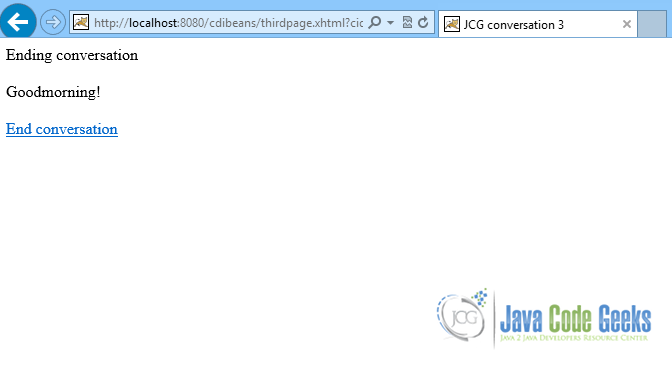
Now if we click on the “End conversation” link, the conversation is closed and the first page is shown again, starting a new conversation.
This was a tutorial of a Java EE CDI ConversationScoped Bean.
Download the source code of this tutorial: CDIConversationScopedBeansExample.zip

I had a problem. On your second page, I put one form where it was submited the Entity’s properties (Person.class) by a button. During the “persist” of entity, some Entity’s properties of Person.class become null (properties that are complex object like a person’s City, with its own properties).
Would you help me about it? :)
Bye.
use @sessionscoped