Tomcat Clustering Series Part 1 : Simple Load Balancer
I am going to start new series of posts about Tomcat clustering. In this post we will see what is the problem in normal deployment on a single machine, what is clustering and why is it necessary and how to setup a simple load balancer with Apache httpd web server + Tomcat server cluster.
Why need Clustering? (Tomcat Clustering)
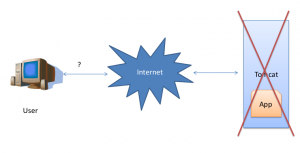
In normal production, servers are running on a single machine. If that machine fails due to crash, hardware defects or OutOfMemory exceptions, then our web site can’t be accessed by anybody.
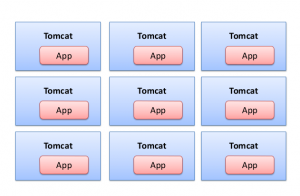
So, how do we solve this problem? By adding more Tomcat instances to collectively (group/cluster) run as one production server ( as opposed to a single Tomcat instance). Each Tomcat instance will deploy the same web application. So any Tomcat instance can process the client request. If one Tomcat instance is fails, then another Tomcat in the cluster is going to proceeds the request.
But there is one big problem with that approach. Each tomcat instance is either running on a dedicated physical machine or many tomcat instances are running in single machine (Check my post about Running multiple tomcat instances in single machine). So each Tomcat is running on a different port and maybe, on a different IP.
The problem is in client perspective, as to which tomcat we need to make the request. Because there are lots of Tomcat instances as parts of the cluster. For each Tomcat we need to make IP and Port combination. Like
http://192.168.56.190:8080/ or http://192.168.56.191:8181/
So how do we Solve this problem?
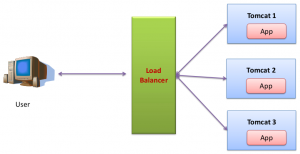
By adding one server in front of all Tomcat instances, in order to accept all the request and distribute them to the cluster. And that server acts as a load balancer. There are lots of servers available with load balancing capabilities. Here we are going to use Apache httpd web server as a load balancer with mod_jk module.
So now all clients will access the load balancer (Apache httpd web server) and won’t bother about Tomcat instances. So now our URL is http://ramkitech.com/ (Apache runs on port 80).
Apache httpd Web Server
Here we are going to use Apache httpd web server as a Load Balancer. To use the load balancing capabilities of Apache httpd server we need to include either mod_proxy module or mod_jk module. Here we are using mod_jk module.
Before continuing , check my old post (Virtual Host Apache httpd server) about how to install the Apache httpd server and mod_jk module, and how to configure the mod_jk.
How to setup the Simple Load Balancer
For simplicity, I am going to run 3 Tomcat instances on a single machine(we can run them on dedicated machines as well) with Apache httpd web server. And the same web application is deployed in all tomcat instances.
Here we use mod_jk module as the load balancer. By default it uses the round robin algorithm to distribute the requests. Now we need to configure the workers.properties file like virtual host concept in Apache httpd server.
worker.list=tomcat1,tomcat2,tomcat3

worker.tomcat1.type=ajp13

worker.tomcat1.port=8009

worker.tomcat1.host=localhost

worker.tomcat2.type=ajp13

worker.tomcat2.port=8010

worker.tomcat2.host=localhost

worker.tomcat3.type=ajp13

worker.tomcat3.port=8011

worker.tomcat3.host=localhost
Here, I configured the 3 Tomcat instances in workers.properties file.So, type is ajp13 and port is the ajp port (not http connector port) and host is the IP address of our machine.
There are a couple of special workers we need to add into workers.properties file.
First one is the load balancer worker, here the name is balancer (you can put any name you want).
worker.balancer.type=lb
worker.balancer.balance_workers=tomcat1,tomcat2,tomcat3
Here this worker’s type is lb, ie load balancer. its special type provide by load balancer. And another property is balance_workers, used in order to specify all tomcat instances like tomcat1,tomcat2,tomcat3 (comma separated)
Second one, is the status worker. Its optional, but from this worker we can get statistics of the load balancer.
worker.stat.type=status
Here we use special type status.
Now we modify the worker.list property.
worker.list=balancer,stat
So from the outside, there are 2 workers that are visible (balancer and stat). So all requests are going to the balancer. Then balancer worker manages all the Tomcat instances.
workers.properties
worker.list=balancer,stat

worker.tomcat1.type=ajp13
worker.tomcat1.port=8009
worker.tomcat1.host=localhost

worker.tomcat2.type=ajp13
worker.tomcat2.port=8010
worker.tomcat2.host=localhost

worker.tomcat3.type=ajp13
worker.tomcat3.port=8011
worker.tomcat3.host=localhost

worker.balancer.type=lb
worker.balancer.balance_workers=tomcat1,tomcat2,tomcat3

worker.stat.type=status
Now workers.properties confiuration is finished. Next, we need to send all the requests to the balancer worker.
So we need to modify the httpd.conf file of Apache httpd server
LoadModule    jk_module  modules/mod_jk.so

JkWorkersFile conf/workers.properties

JkLogFile     logs/mod_jk.log
JkLogLevel    emerg
JkLogStampFormat '[%a %b %d %H:%M:%S %Y] '
JkOptions     +ForwardKeySize +ForwardURICompat -ForwardDirectories
JkRequestLogFormat     '%w %V %T'

JkMount  /status  stat
JkMount  /  balancer
The above code is just boiler plate code. The 1st line loads the mod_jk module, the 2nd line is specifing the worker file (workers.properties file). All others are just for logging purposes.
But the last 2 lines are very important.
JkMount /status stat means that any request that matches the /status, then that request is forwarded to the stat worker. It’s the status type worker, so its shows the status of the load balancer.
JkMount / balancer. This line matches all the request, so all request is forward to the balancer worker. The balancer worker uses the round robin algorithm to distribute the requests to the Tomcat instances.
That’s it.
Now access the load balancer from the browser. Each and every request is distributed to 3 tomcat instances. If one of the Tomcat instances fails, then the load balancer dynamically understands it and stops forwarding the requests to that failed tomcat instances. The other tomcat instances continue to work. If the failed tomcat is recovers, from failed state to normal state then load balancer adds it to the cluster and forwards the request to that tomcat as well. (check the video)
Here the big question is How the Load balancer knows when a Tomcat instance fails or when a Tomcat has just recovered from failed state?
Answer : When one tomcat instance fails, the load balancer doesn’t know that this instance failed. So it will try to forward the request to all Tomcat instances. If the load balancer tries to forward the request to the failed Tomcat instance, its will not get a response. So the load balancer will markethe state of this instance as a failed, and will forward the same request to another Tomcat instance. So from the client perspective we don’t feel that one Tomcat instance has failed.
When a Tomcat recovers from failed state, again ,the load balancer doesn’t know that the Tomcat is ready for processing. It’s still marked as failed. In periodic intervals, the load balancer checks the health status of all Tomcat instances (by default 60 sec). After checking the health status, the load balancer updates the status of that instance to OK.
please share ur thoughts through comments.
Video :
http://www.youtube.com/watch?feature=player_embedded&v=9gtpyqhd-NI
Reference: Tomcat Clustering Series Part 1 : Simple Load Balancer from our JCG partner Rama Krishnan at the Ramki Java Blog blog.


This is an interesting article for 2015. For at least the last 10 -12 years if not more this is the exact configuration (Different versions)
That seems to be common place for Jave Web Applications.
It is very nice to see the current write up.
At my current company they have been using JBoss (Currently Jboss 7) for the production servers.
And using this configuration will get you going with Jboss as well.
Gary