Introduction to SmartGWT
I recently started working with SmartGWT, a framework based on GWT that provides a comprehensive widget library for your application UI as well as assistance for server-side for data management. You can take look at its pretty functionality at the SmartGWT showcase. I have prepared a short “getting started” guide on how to integrate the library with your GWT project (I assume you have already installed the GWT SDK and the Google plugin for Eclipse). Note that Smart GWT is compatible with GWT 1.5.3 , GWT 1.6.4, GWT 1.7.x and GWT 2.0.x.
Creating the GWT project
First step is to download the library from the downloads section. The version I will be using for this tutorial is 2.1 (download directly from here). Extract the ZIP file and in the new directory you will find the framework’s documentation, some samples, “Hello World” examples and of course the necessary JAR files. Open the JavaDocs in a new browser tab.
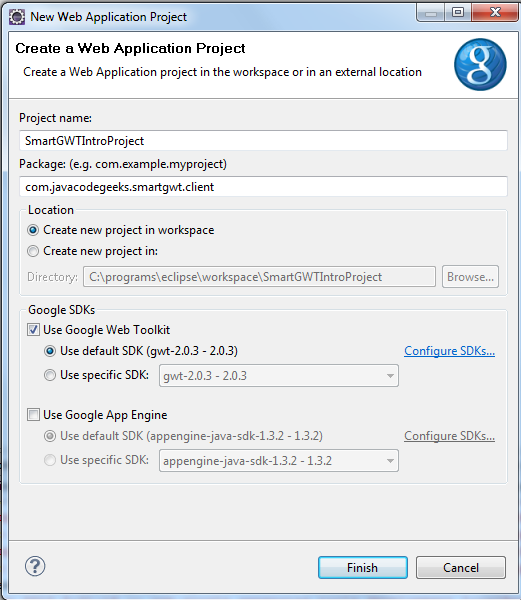
Next we create a new “Web Application Project” in Eclipse. Choose the profound name “SmartGWTIntroProject” for the project and the appropriate packaging. Make sure that the “Use Google Web Toolkt” checkbox is checked (Google’s App Engine is not needed, so do not select that). The wizard will look something like this:
Adding the SmartGWT library
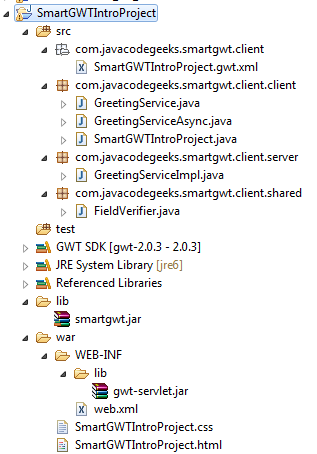
After the project skeleton is created, browse through your filesystem to the project’s location and create a new folder named “lib”. Copy the “smartgwt.jar” file from the extracted ZIP to the newly created folder and refresh the project in Eclipse, so that the new file appears there. Then configure your project’s classpath to include the JAR file (Project ? Properties ? Java Build Path ? Add JARs…). Standard stuff so far. The expanded project in Eclipse should look like this:
Then edit the module xml file (named “SmartGWTIntroProject.gwt.xml”) and add the following line after the standard “inherits” declarations:
<inherits name="com.smartgwt.SmartGwt"/>
The module xml file will be:
<?xml version="1.0" encoding="UTF-8"?>
<module rename-to='smartgwtintroproject'>
<!-- Inherit the core Web Toolkit stuff.                        -->
<inherits name='com.google.gwt.user.User'/>

<!-- Inherit the default GWT style sheet.  You can change       -->
<!-- the theme of your GWT application by uncommenting          -->
<!-- any one of the following lines.                            -->
<!-- <inherits name='com.google.gwt.user.theme.standard.Standard'/> -->
<!-- <inherits name='com.google.gwt.user.theme.chrome.Chrome'/> -->
<!-- <inherits name='com.google.gwt.user.theme.dark.Dark'/>     -->

<!-- Other module inherits                                      -->

<inherits name="com.smartgwt.SmartGwt"/>

<!-- Specify the app entry point class.                         -->
<entry-point class='com.javacodegeeks.smartgwt.client.client.SmartGWTIntroProject'/>

<!-- Specify the paths for translatable code                    -->
<source path='client'/>
<source path='shared'/>

</module>
This allows GWT to know that your application will be using the SmartGWT library.
UPDATE: The ‘com.google.gwt.user.theme.standard.Standard’ declaration should be removed or commented out like above, since it conflicts with certain SmartGWT styles.
After this, locate the main HTML inside the “war” folder. Edit that and add the following line before the compiled module declaration :
<script>var isomorphicDir="smartgwtintroproject/sc/";</script>
UPDATE: From version 2.2, there is no longer need to define the isomorpihcDir value. Check the Release Notes for Smart GWT 2.2. However, for this tutorial (version 2.1 used) the declaration is needed.
In the same file, scroll down and find the following lines:
<td id="nameFieldContainer"></td>
<td id="sendButtonContainer"></td>
Replace those with the following:
<td id="formContainer"></td>
<td id="buttonContainer"></td>
Those are the HTML elements that will hold the text item and the button that we will add later.
The full HTML file follows:
<!doctype html>
<!-- The DOCTYPE declaration above will set the    -->
<!-- browser's rendering engine into               -->
<!-- "Standards Mode". Replacing this declaration  -->
<!-- with a "Quirks Mode" doctype may lead to some -->
<!-- differences in layout.                        -->

<html>
<head>
<meta http-equiv="content-type" content="text/html; charset=UTF-8">

<!--                                                               -->
<!-- Consider inlining CSS to reduce the number of requested files -->
<!--                                                               -->
<link type="text/css" rel="stylesheet" href="SmartGWTIntroProject.css">

<!--                                           -->
<!-- Any title is fine                         -->
<!--                                           -->
<title>Web Application Starter Project</title>

<!--                                           -->
<!-- This script loads your compiled module.   -->
<!-- If you add any GWT meta tags, they must   -->
<!-- be added before this line.                -->
<!--                                           -->
<script>var isomorphicDir="smartgwtintroproject/sc/";</script>
<script type="text/javascript" language="javascript" src="smartgwtintroproject/smartgwtintroproject.nocache.js"></script>
</head>

<!--                                           -->
<!-- The body can have arbitrary html, or      -->
<!-- you can leave the body empty if you want  -->
<!-- to create a completely dynamic UI.        -->
<!--                                           -->
<body>

<!-- OPTIONAL: include this if you want history support -->
<iframe src="javascript:''" id="__gwt_historyFrame" tabIndex='-1' style="position:absolute;width:0;height:0;border:0"></iframe>

<!-- RECOMMENDED if your web app will not function without JavaScript enabled -->
<noscript>
<div style="width: 22em; position: absolute; left: 50%; margin-left: -11em; color: red; background-color: white; border: 1px solid red; padding: 4px; font-family: sans-serif">

Your web browser must have JavaScript enabled
in order for this application to display correctly.
</div>

</noscript>

<h1>
Web Application Starter Project</h1>

<table align="center">
<tr>
<td colspan="2" style="font-weight:bold;">Please enter your name:</td>
</tr>

<tr>
<td id="formContainer"></td>
<td id="buttonContainer"></td>
</tr>

<tr>
<td colspan="2" style="color:red;" id="errorLabelContainer"></td>
</tr>

</table>

</body>
</html>
Creating the application entrypoint
When a GWT is created via Eclipse, a lot of auto-generated files are created. One of those is the main Java file in the “client” package, which works as the application’s entrypoint. So, remove the generated code and add the following:
package com.javacodegeeks.smartgwt.client.client;

import com.google.gwt.core.client.EntryPoint;
import com.google.gwt.user.client.ui.RootPanel;
import com.smartgwt.client.util.SC;
import com.smartgwt.client.widgets.IButton;
import com.smartgwt.client.widgets.events.ClickEvent;
import com.smartgwt.client.widgets.events.ClickHandler;
import com.smartgwt.client.widgets.form.DynamicForm;
import com.smartgwt.client.widgets.form.fields.TextItem;

public class SmartGWTIntroProject implements EntryPoint {

    public void onModuleLoad() {

        final DynamicForm form = new DynamicForm();
        final TextItem textItem = new TextItem();
        textItem.setTitle("Name");
        form.setFields(textItem);
        final IButton button = new IButton("Hello");

        button.addClickHandler(new ClickHandler() {
            public void onClick(ClickEvent event) {
                String name = textItem.getValue().toString();
                SC.say("Hello " + name);
            }
        });

        RootPanel.get("formContainer").add(form);
        RootPanel.get("buttonContainer").add(button);

    }

}
Make sure that the imported packages are as shown above, because SmartGWT uses classes with names same with those of the core GWT framework.
Launching the application
Next, we are ready to launch our application. Choose Run ? Run As ? Web Application and use your favourite browser to access the provided URL:
http://127.0.0.1:8888/SmartGWTIntroProject.html?gwt.codesvr=127.0.0.1:9997
You should be able to see the following:
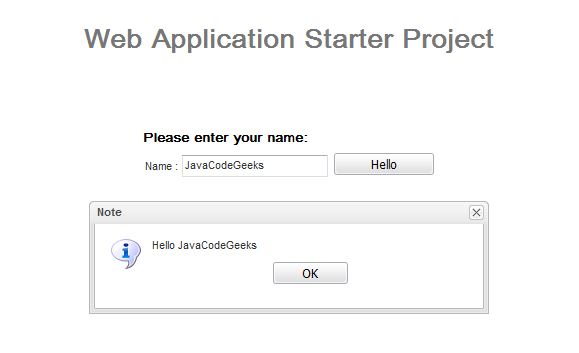
That’s it. Now you are ready to create some cool applications, powered by SmartGWT. You can find the Eclipse project here (some files have been removed from the project).
This was just a short guide on how to add SmartGWT to your project. In the following posts I am going to create a full application based on SmartGWT in order to show you some of its wonderful capabilities. Stay tuned.
- Advanced SmartGWT Tutorial, Part 1
- Adding CAPTCHA to your GWT application
- Securing GWT apps with Spring Security
- GWT 2 Spring 3 JPA 2 Hibernate 3.5 Tutorial – Eclipse and Maven 2 showcase
- Building your own GWT Spring Maven Archetype
- GWT EJB3 Maven JBoss 5.1 integration tutorial

Checked with Eclipse Juno SR1 and GWT 2.5.0 and SmartGWT 3.1. Works out fine.
You have to check “generate example code” in the “Create web application Project” to let Eclipse generate the java, xml and html files.
How can I fix this error?
22:30:52.495 [ERROR] [samplesmartgwp] The Cross-Site-Iframe linker does not support tags in the gwt.xml files, but the gwt.xml file (or the gwt.xml files which it includes) contains the following script tags:
sc/modules/ISC_Core.js
sc/modules/ISC_Foundation.js
sc/modules/ISC_Containers.js
sc/modules/ISC_Grids.js
sc/modules/ISC_Forms.js
sc/modules/ISC_RichTextEditor.js
sc/modules/ISC_Calendar.js
sc/modules/ISC_DataBinding.js
sc/skins/Enterprise/load_skin.js
In order for your application to run correctly, you will need to include these tags in your host page directly. In order to avoid this error, you will need to remove the script tags from the gwt.xml file, or add this property to the gwt.xml file:
@Ranma
Use the code in the gwt.xml ., would resolve your errors
Hi karteek, I got the same error with Ranma , could you tell me how to use those code in the gwt.xml ?
generates an exception if it does not put anything in the text field
with this check it will get better:
button.addClickHandler(new ClickHandler() {
public void onClick(ClickEvent event) {
if(textItem.getValue() !=null){
String name = textItem.getValue().toString();
SC.say(“Hello ” + name);
}else{
SC.say(“Please enter your name”);
}
}
});
Hi, I have created smartgwt sample project using your code sample. After launching the application with the generated URL, I am not able to view the buttons, only html content is displayed. Please let me know what can be done on this issue. My project name is sampleSGWTProj My .html is like below::: Web Application Starter Project var isomorphicDir=”smartgwtintroproject/sc/”; Your web browser must have JavaScript enabled in order for this application to display correctly. Web Application Starter Project Please enter your name: ————————————————————————— My .gwt.xml file is :::: <!– –> <!– –> <!– –> ———————————————————————— my .java file is ::::… Read more »
seems i can’t import smartgwt.. i try 2.1 and latest version.both unsuccessful.