Introduction
Are you a mobile app tester struggling with the complexities of managing diverse platforms, various OS versions, and a multitude of devices? Testing mobile apps can be challenging due to this diversity, making it difficult to write and execute test cases seamlessly for all these OS and platforms. This is where Appium comes into play, as it makes mobile app testers’ lives easier by providing a central platform where testers can write test cases once and execute them on multiple platforms and OS versions.
Appium allows testers to interact with the app automatically by triggering user behaviors with the components available in the UI (buttons, lists, forms, labels, etc.).
This cheat sheet is your go-to resource for learning and exploring Appium. Whether you’re a fresher looking for a comprehensive guide or an experienced tester seeking to brush up on your Appium skills, this cheat sheet is designed to cater to your needs. It will navigate you through the essentials of Appium, from understanding its architecture to performing touch actions, utilizing cloud-based testing, and exploring its features and limitations.
What is Appium?
Appium is an open-source UI automation testing framework designed to test native, hybrid, and web mobile apps for Android, iOS, and Windows platforms.
Selenium WebDriver greatly inspires Appium and exhibits a cross-platform nature, implying that testers can use the same code for Android written for iOS.
Through Appium drivers, Appium can seamlessly connect with native mobile automation tools, providing a versatile solution for testing cross-platform mobile applications rather than operating as a stand-alone tool. XCUITest for iOS and Espresso for Android are examples of native mobile automation tools that Appium uses.
Like Selenium, Appium supports multiple programming languages like Python, Java, JavaScript, PHP, C#, Ruby, Perl, etc.
Appium Architecture
With the introduction of Appium 2.0, a client-server architecture (W3C WebDriver Protocol) was also introduced, replacing the previously used JSON Wire protocol. In this architecture, Appium Clients send automation instructions to the Appium Server, which converts them to platform-specific instructions and executes them on the devices.
Appium Client
The Appium client contains automation testing scripts in popular programming languages like Python, Java, C#, JavaScript, Ruby, etc. These scripts include the configuration instructions for the device and application and logical commands to run the test cases. It sends these instructions in JSON-formatted commands to the Appium Server.
Appium Server
Appium Server is an HTTP server based on Node.js that receives the JSON-formatted commands from the client. It executes these instructions on the connected end emulators or simulators.
End Device
The end device is a simulator, emulator, or physical device connected to the Appium server. This acts as the real device where tests are executed.
Appium Installation
Appium is a lightweight Node.js package and does not have significant RAM or disk space requirements. However, a few prerequisites for installing Appium Server are:
- A Windows, macOS, or Linux operating system
- Node.js version in the Semantic Versioning range
^14.17.0 || ^16.13.0 || >=18.0.0 - NPM version >= 8.0
Appium’s officially released versions can be installed in two ways: via the command line using NPM or by downloading Appium Desktop.
Install Appium From the Command Line
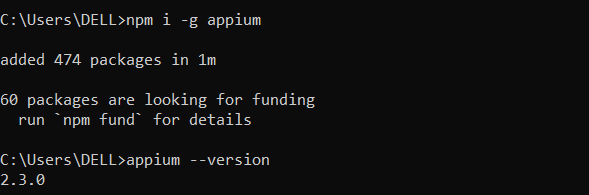
Run the following command to download and install Appium using npm:
npm install -g appium
To verify your downloaded version, you may execute the below command:
appium --version
Install Appium Desktop
Appium offers a graphical front end with useful features like inspector tools. To install the Appium desktop, follow the steps below:
- Download the Appium Desktop.
- Launch the Installer for your platform and follow the setup wizard.
- Run the Appium Desktop installed on the PC, automatically launching the Appium Server.
Install the Appium Driver and its Dependencies
Appium offers app automation on multiple platforms, including Android, iOS, and Windows. Each platform is backed by one or more “drivers” that are responsible for automating that platform. All drivers have been segregated from the Appium server app since version 2.0 and can be maintained independently with the appium driver command line interface.
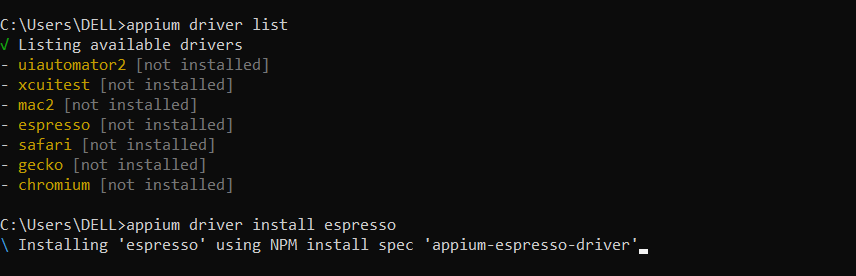
To get a list of all the available drivers for your system, run the below command:
appium driver list
We can install the Appium drivers with the following commands:
# To install a new driver
appium driver install <plugin name>

# To install a new driver from npm
appium driver install --source=npm <plugin name>[@<version>]

# To install a driver from a local folder (useful for developers)
appium driver install --source=local /Users/me/sources/<plugin name>

# To install a new driver from github (hm, maybe it's time to publish it to NPM?)
appium driver install --source=github --package=<plugin name> appium/<plugin name>

# To list already installed drivers
appium driver list --installed

# To update a driver (it must be already installed)
appium driver update xcuitest

# To uninstall a driver (it won't last forever, wouldn't it?)
appium driver uninstall xcuitest
Example Output:
Install Plugins for Appium
The concept of plugins is relatively new and included exclusively in Appium 2.0. Plugins allow us to extend server functionality and features without changing the server code. Plugins can also be managed similarly to drivers.
To get a list of all the available plugins for your system, run the below command:
appium plugin list
Commands to manage plugins are as follows:
# To install an officially supported plugin
appium plugin install <plugin-name>

# To install a plugin from a local folder (useful for developers)
appium plugin install --source=local /Users/me/sources/<plugin name>

# To install a new plugin from npm
appium plugin install --source=npm <plugin name>

# To list already installed plugins
appium plugin list --installed

# To update a plugins (it must be already installed)
appium plugin update <plugin name>

# To uninstall a plugin
appium plugin uninstall <plugin name>
Appium Doctor
Appium Doctor is a command-line testing and development tool for mobile applications. Its primary function is to diagnose and resolve issues connected to installing and configuring the Appium on your system.
To install Appium Doctor on your system, run the following command on your terminal:
npm install appium-doctor -g
Running Appium Doctor is straightforward using the command terminal or PowerShell. The following command can be used to run Appium Doctor. It will list all the issues with the configurations and setup of the Appium.
appium-doctor –-<platform name>
We can specify the <plaftform name> as Android or ios to get the details about the setup for that particular platform as shown in the below console output.
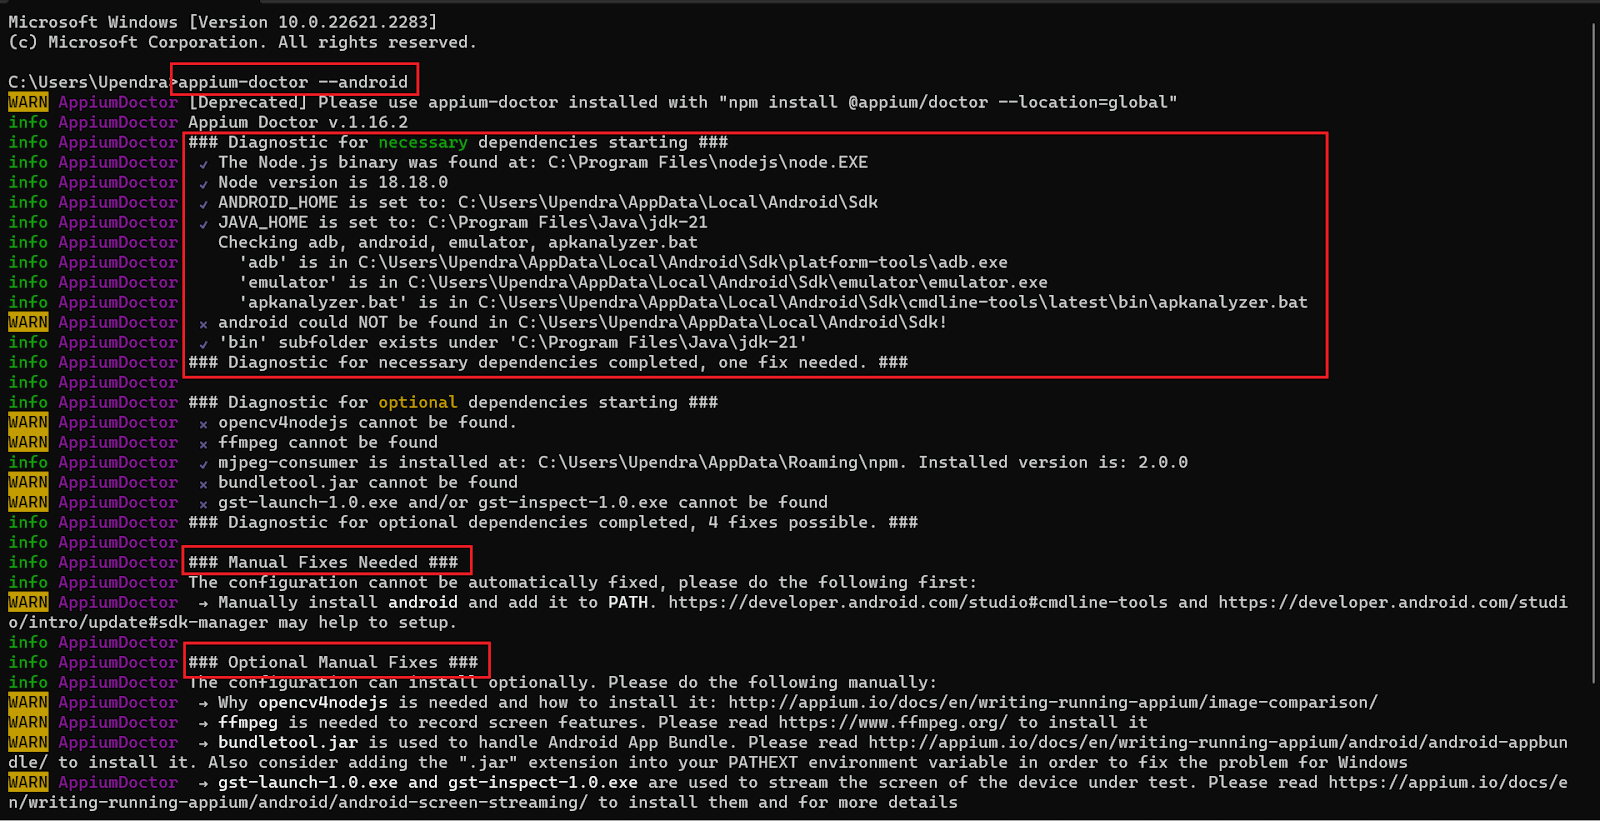
Let’s have a look at how this can help us address and resolve the error.

We can notice that a cross mark denotes the missing dependencies. In our case, we must address and install these missing dependencies. Let’s try to install one of the missing packages i.e. mjpeg-consumer, with the below command.
npm i -g <package name>

After installing the missing mjpeg-consumer, we see that Appium Doctor does not show any error related to the mjpeg-consumer.

Similarly, we can install all the missing packages and resolve the errors.
Appium Inspector
Appium Inspector is a GUI inspector for native, hybrid, and web mobile apps powered by (installed independently) an Appium server.
Appium Inspector is an Appium client with a graphical user interface. It has options to specify which capabilities to set and which Appium server to use. It can interact with elements of the mobile app and other Appium commands once we start a session.
It allows visual debugging of automated mobile app tests and can be especially useful for beginners.
Appium Inspector can be installed and executed in two ways:
- As a desktop app for Windows, Linux, and macOS. To install the latest version of Appium Inspector, we can visit the official Releases page and install the appropriate executable file for your OS.
- As a web application hosted on the web. It does not require additional installation or setup.
Because both apps have the same functions, accessing the web version is easier and saves storage space (plus, we can keep numerous tabs open at once!).
How to Test an App Using Appium?
This section will teach us to test an Android app using Appium. We will consider a real example to test an Android application’s UI interface and its working. For this example, we will use Python to write automation testing scripts.
Some prerequisites to start with the example are:
- Python 3.x.
- Appium is installed on the PC.
- Visual Studio Code is used to write the automation script for Appium testing.
- Android Studio (to manage app installation and running using ADB for Android apps)
- XCode (to manage apps on iOS devices, only available on Mac)
For this example we will execute our test on a Slot Machine Android app.
Step 1: Install the Appium Client for Python
Install the Appium Client for Python (Appium-Python-Client) by running the below command in your terminal or PowerShell.
pip install Appium-Python-Client
This will start the installation of the Appium Python Client library on your PC, as shown in the image below.

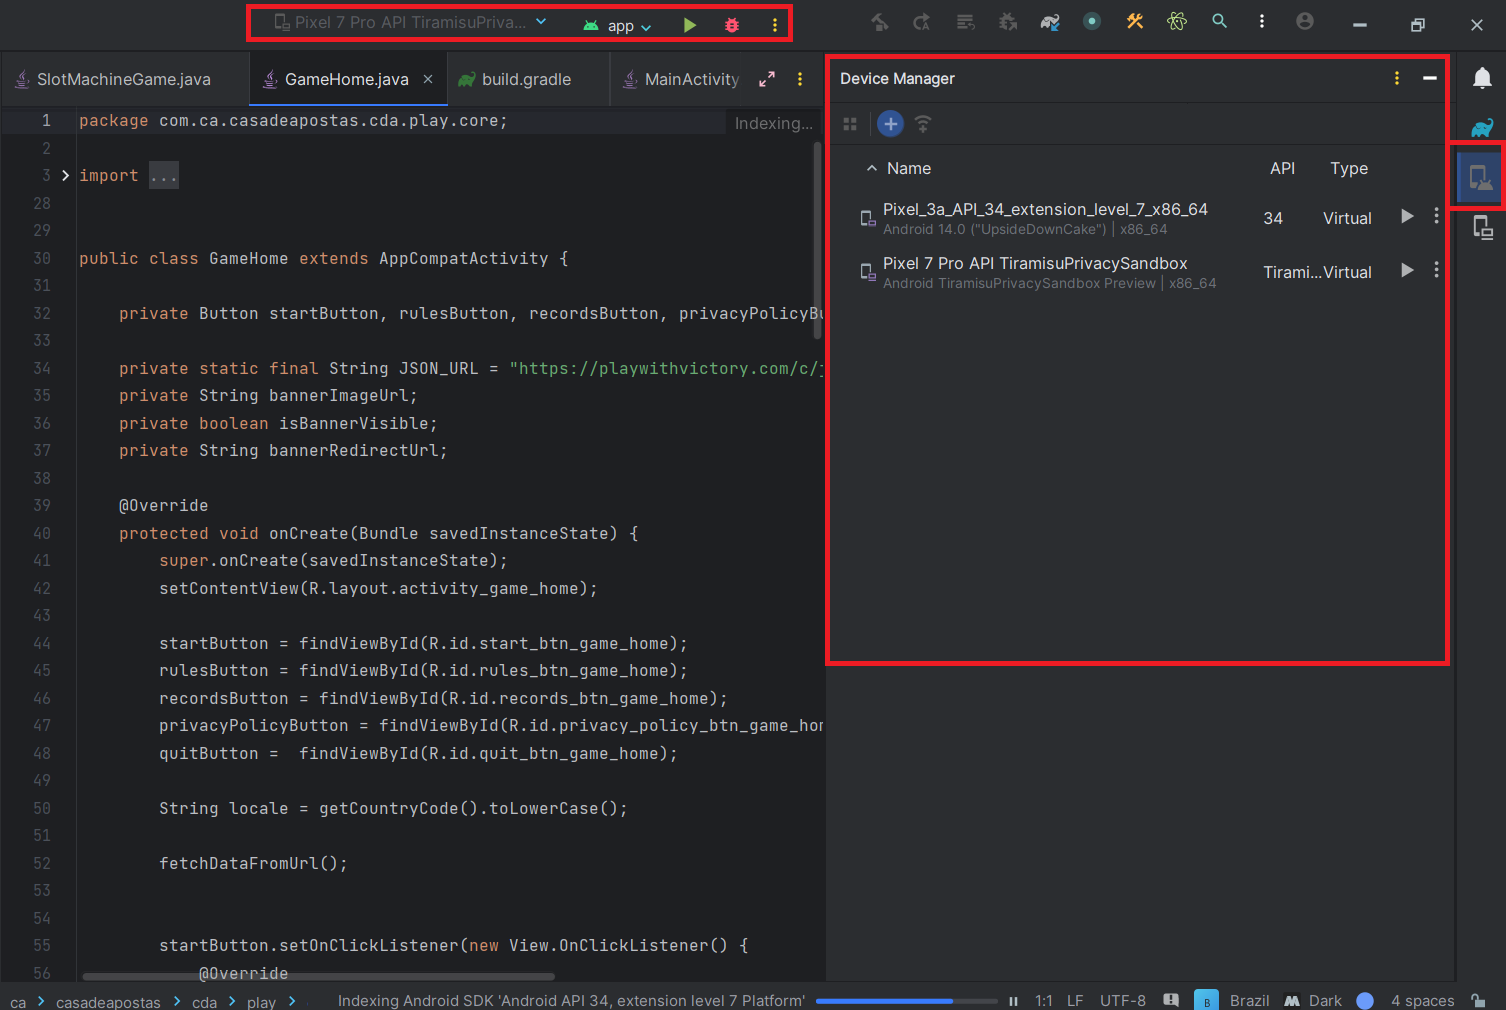
Step 2: Connect the end device using Android Studio
Next, we need to connect the end device using the ADB provided by Android Studio. We can configure an end device in two ways:
- Connect a real Android device using a USB debugger. To enable this option on your Android device, navigate to developer options -> USB debugging and toggle it ON. If you don’t find the developer option, enable it by tapping the build number option multiple times in the About Phone settings.
- Connect a virtual Android device (emulator) by navigating to the device manager section in the Android Studio.
Step 3: Generate Desired Capabilities for Appium
Desired Capabilities are key and value pairs encoded in JSON format. Appium clients send this to the server to start a new automation session. These capabilities tell the Appium drivers all the important configuration instructions for testing the app.
For our testing purpose, we will use the following desired capabilities:
desired_caps = {
    'platformName': 'Android',
    'platformVersion': '13',
    'deviceName': 'Google Pixel 7pro',
    'app': '/apk/com.slot.spin.game.play.apk',
    'appPackage': 'com.slot.spin.game.play',
    'appActivity': 'com.slot.spin.game.play.MainActivity',
    'automationName': 'UiAutomator2'  # Use UiAutomator2 for Android
}
Here, deviceName, platformName, and platformVersion represent the device and Android version where the test will be executed. The app key represents the path to the APK file that needs to be tested. The appPackage and appActivity contain the name of the package for the Android app and the name of the launcher activity. While the automationName describes the automation tool or the driver to be used for automating the app.
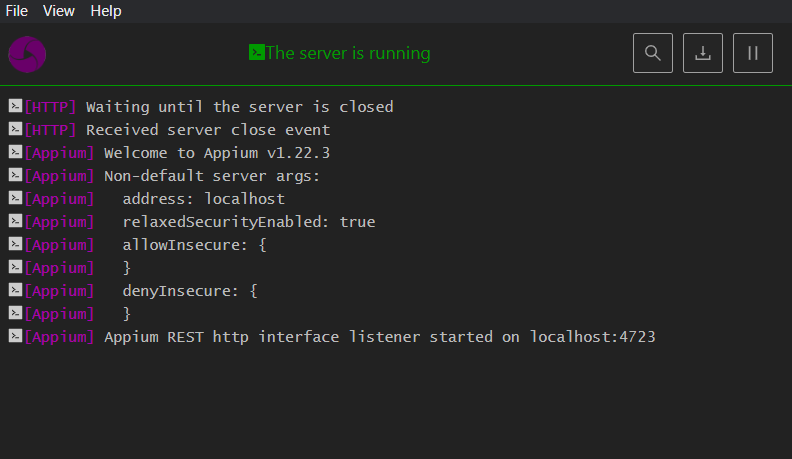
Step 4: Start the Appium server
To start the Appium server, open the desktop Appium app on your PC and configure the host and port to be used by the Appium server.
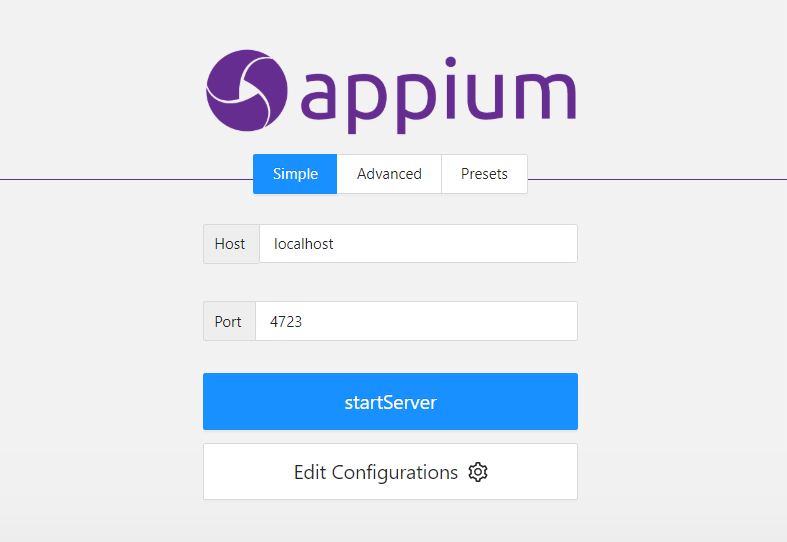
Next, click the startServer button to start the Appium server on the configured host and port.
Step 5: Select Element ID in the app
To interact with any app’s component, it is necessary to get the ID of that particular element. Getting ID for mobile app elements is difficult, unlike a web application where we can simply inspect the elements using the browser.
Appium Inspector inspects the app and gets the elements’ ID. For this example, we will use the web app version of the Appium inspector.
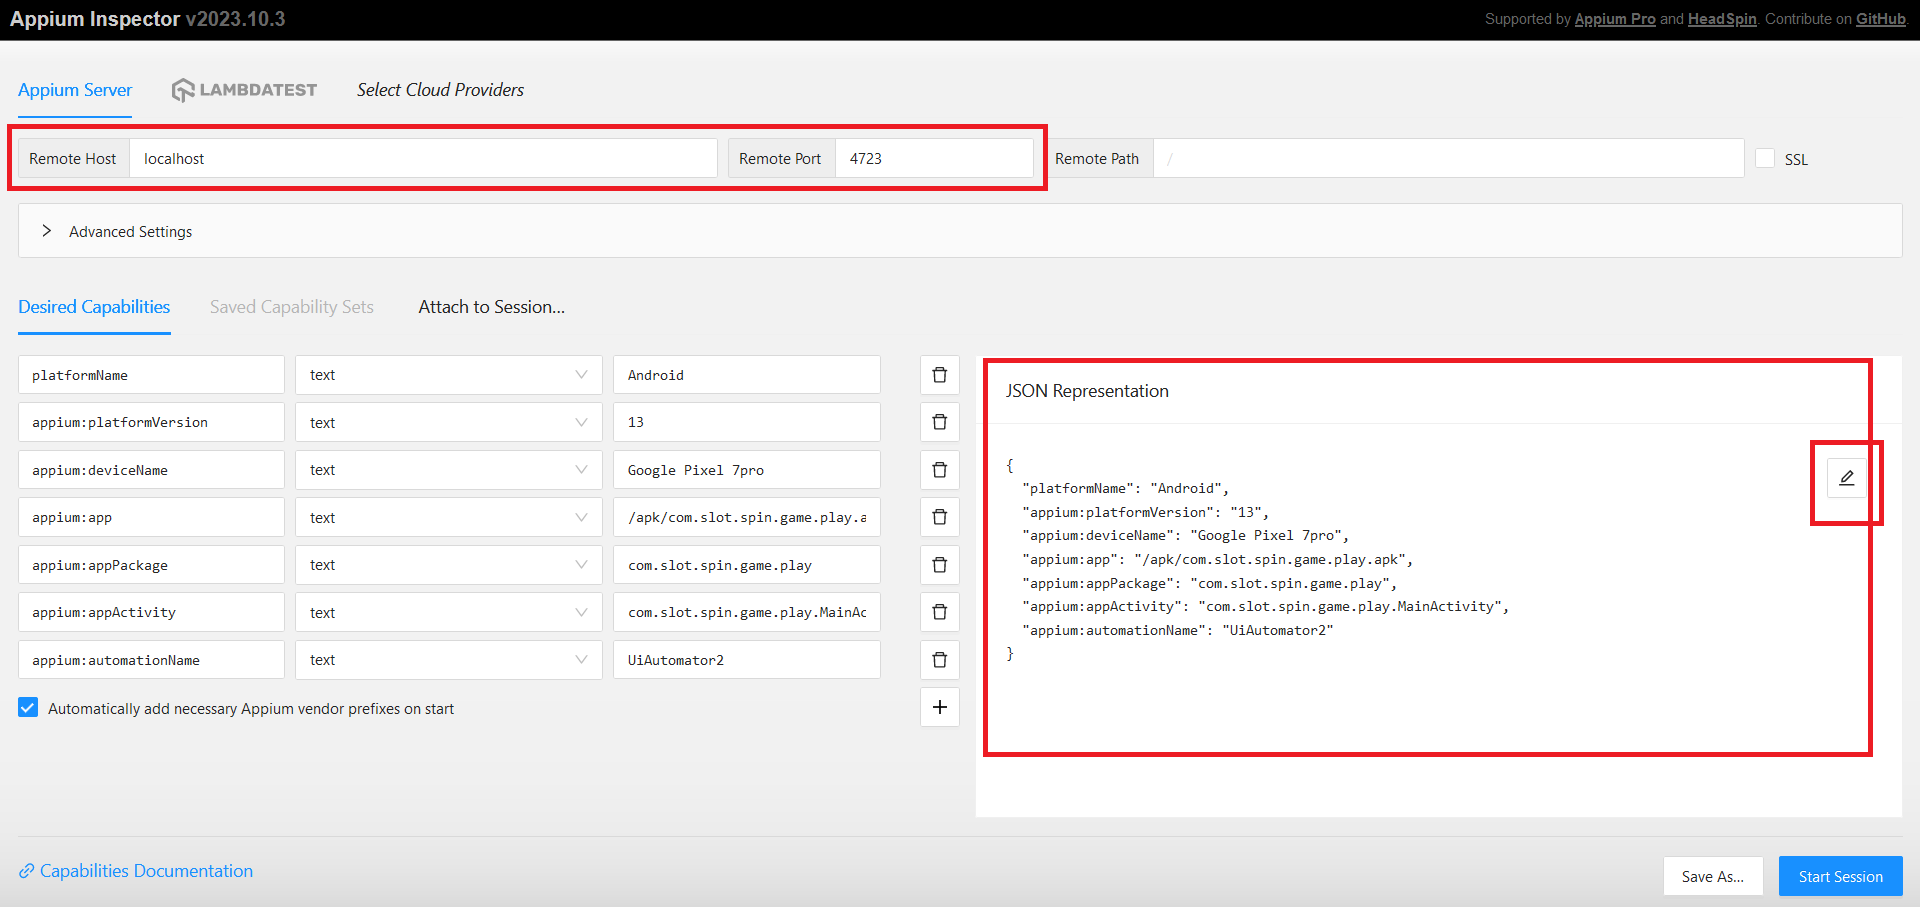
Here, we must enter the Remote Host (host where the Appium server is running), Remote Port (port number where the Appium server is running), and the Desired Capabilities in JSON format, as shown in the above image.
Next, click the Start Session button to instruct the Appium server to start the session based on your desired capabilities. The selected app will then be installed on the emulator or device selected, as shown in the image below. The App that we are testing is a simple slot machine game.

Here, we can simply inspect the element just like we inspect web pages in the browser by hovering over and clicking on the element’s ID. The hierarchy tree for the selected element will be visible on the right panel.
In this example, we will select the “Spin Now” button ID i.e. com.slot.spin.game.play:id/playBtn so that we can click on this button to start the game.
Step 6: Write an automation script
The next and most important step is to write the automation testing script containing the instructions for executing tests on the app. In our example, we will simply write a test script to click the “Spin Now” button to start the game. Here, we are using Python to write test scripts.
from appium import webdriver
from appium.webdriver.common.by import By
from appium.webdriver.common.touch_action import TouchAction
import time

# Host and Port where Appium is running
HOST = "localhost"
PORT = "4723"

# Desired capabilities
desired_caps = {
    'platformName': 'Android',
    'platformVersion': '13',
    'deviceName': 'Google Pixel 7pro',
    'app': '/apk/com.slot.spin.game.play.apk',
    'appPackage': 'com.slot.spin.game.play',
    'appActivity': 'com.slot.spin.game.play.MainActivity',
    'automationName': 'UiAutomator2'  # Use UiAutomator2 for Android
}

# Appium server URL
appium_server_url = 'http://' + HOST + ':' + PORT + 'wd/hub'

# Initialize driver
driver = webdriver.Remote(appium_server_url, desired_caps)

try:
    # Wait for the app to load (adjust the time as needed)
    time.sleep(5)

    # Locate the "Spin now" button by ID
    spin_now_button = driver.find_element(By.ID, 'com.slot.spin.game.play:id/playBtn')

    # Tap the "Spin now" button using TouchAction
    touch_action = TouchAction(driver)
    touch_action.tap(spin_now_button).perform()

    # Wait for a moment to see the game result
    time.sleep(5)

finally:
    # Quit the driver after the test
    driver.quit()
In the above code, webdriver.Remote establishes a connection to the Appium server with specified capabilities. driver.find_element(By.ID, '...') locates an element on the mobile app using its ID. TouchAction(driver) allows touch gestures and perform() executes them. In the provided code, touch_action.tap(spin_now_button) performs a tap action to click the “Spin now” button (identified by its ID), interacting with the app. This sequence helps automate testing by mimicking user interactions with the Android app, making it a concise Appium test script.
Now run this test script to test your first mobile app using Appium and Python.

Understanding FindElements in Appium
Interacting with elements on the user interface of Appium is a must for automating any app using Appium. Appium supports the findElement and findElements method to locate elements of the app screen.
Both the findElement and findElements methods take a locator or query object called By. Below is a format to use findElement and findElements commands.

Locator Strategy: It represents the type of selectors to look for to find the element.
Selector: It represents the address for that particular element or class of elements in the given selector types.
Some popular element selection methods used in Appium are:
By Name
It is used to get the first element in the user interface of the app screen with the name attribute matching the value location. Example command to find element by name:
driver.find_element(AppiumBy.name("Employee byDepartment")).click();
//or
driver.find_element_by_name("Employee byDepartment").click();
By Class Name
It is used to locate an element by the value of its class attribute like Button, TextView, ImageView, etc. However, since a class usually has more than one element, this strategy becomes fairly generic. It is not the best way to find a single unique element.
driver.find_element(AppiumBy.class_name("Employee byDepartment")).click();
//or
driver.find_element_by_class_name("Employee byDepartment").click();
By ID
It is used to locate elements based on the ID attribute of the UI elements. This is the best strategy if you need to select individual unique elements.
driver.find_element(AppiumBy.id("Employee byDepartment")).click();
//or
driver.find_element_by_id("Employee byDepartment").click();
By Xpath
When you use Appium findElement by XPath, the computer analyzes the app’s XML structure and locates a certain element relative to other components. This method was originally designed to browse XML data to discover unique UI elements.
Note: XPath selectors are not cross-platform because they use an XML tree to navigate through the elements only present in Android native apps.
driver.find_element(AppiumBy.XPATH("/hierarchy/com.android.package.example/com.android.package.example.MainActivity.LinearLayout")).click();
//or
driver.find_element_by_xpath("/hierarchy/com.android.package.example/com.android.package.example.MainActivity.LinearLayout").click();
To get the XPath of an element, you can use the Appium Inspector.
Perform Touch Actions Using Appium
After locating the desired elements, you may need to perform touch actions like tap, long press, swipe, pinch zoom, etc. Appium driver has multiple methods to perform these actions. Here are some popular touch actions to be performed on Appium.
Single Tap
Tap and click are the most commonly used touch actions while automating mobile apps. It simulates a normal screen touch by a user. The following method can be used to simulate a tap or click option.
# Create an object for the TouchAction class
touchActions = TouchAction(driver)

# Call the tap() method and pass the element arguments.
touchActions.tap(element).perform()
Long Press
To simulate a long press behavior in Appium, we can use the long_press() method provided by Appium as shown below.
# Create an object for the TouchAction class
touchActions = TouchAction(driver)

# Call the long_press() method and pass the element arguments.
touchActions.long_press(element).perform()
Swipe
To perform a swipe action we can use the long_press() method along with the move_to() method. Using this strategy, we will press somewhere on the app and then move to another coordinate, and post move, we will release the touch. This way, we can perform a swipe.
# *********** Left to Right Swipe ************* #
swipe_left_to_right_start_x = screenWidth * 8/9
swipe_left_to_right_end_x = screenWidth / 9
swipe_left_to_right_start_y = screenHeight / 2
swipe_left_to_right_end_y = screenHeight / 2

# *********** Right to Left Swipe ************* #
swipe_right_to_left_start_x = screenWidth / 9
swipe_right_to_left_end_x = screenWidth * 8/9
swipe_right_to_left_start_y = screenHeight / 2
swipe_right_to_left_end_y = screenHeight / 2

actions = TouchAction(driver)

# Perform the action: Swipe from Left to Right
actions.long_press(None, swipe_left_to_right_start_x, swipe_left_to_right_start_y).move_to(None, swipe_left_to_right_end_x, swipe_left_to_right_end_y).release().perform()

# Perform the action: Swipe from Right to Left
actions.long_press(None, swipe_right_to_left_start_x, swipe_right_to_left_start_y).move_to(None, swipe_right_to_left_end_x, swipe_right_to_left_end_y).release().perform()
Pinch zoom in
To make any web page and image clearer and more visible to the user, the zoom in and out operation is used to maximize and minimize the window. We will use multi touch actions to simulate a pinch zoom in action. The code to perform a zoom in operation is:
# Find the device width and height
device_width = driver.get_window_size()['width']
device_height = driver.get_window_size()['height']
center_x = device_width / 2
center_y = device_height / 2

# Perform zoom-in
zoom_in_action_1 = TouchAction(driver)
zoom_in_action_2 = TouchAction(driver)
zoom_in_multi_action = MultiAction(driver)

# Zoom In
zoom_in_action_1.long_press(x=center_x, y=center_y).move_to(x=0, y=50).wait(500).release()
zoom_in_action_2.long_press(x=center_x, y=center_y).move_to(x=0, y=-50).wait(500).release()

# Add both zoom-in actions to the multi-action
zoom_in_multi_action.add(zoom_in_action_1, zoom_in_action_2)

# Execute the zoom-in multi-action
zoom_in_multi_action.perform()
Drag and Drop
Moving an element from one location to a specific or defined location necessitates the employment of both drag and drop actions.
Throughout the drag and drop action, an element’s location, or its X and Y coordinates, changes and is placed in an alternate position with new X and Y coordinates.
Appium provides a set of instructions for performing drag-and-drop actions within mobile applications. The TouchAction Class’s move_to() method assists in dragging an element to its target location based on the coordinates of the x and y axes by long-pressing the component that needs to be dragged.
# Create a TouchAction instance
touchAction = TouchAction(driver)

# Press, move, and release to perform a drag-and-drop action
touchAction.press(drag_ele).move_to(drop_ele, offset_x, offset_y).release().perform()
Appium Page Object Modeling (POM)
Page Object Model is a popularly used Design Pattern in Appium test automation that reduces code duplication and enhances test maintenance by keeping test cases and locators separate from each other.
Tests performed using Appium use the methods provided by the page object class to interact with the UI of the mobile app. Even if the app’s UI changes, the tests need not be modified; only the code inside the page object needs to be modified. All the modifications that support the new UI are kept in one place. Hence, test scripts and locators are stored independently.
The page object model approach is ideal for applications with multiple UI screens and dynamic UI components as it reduces the chance of test failure, and even if a test fails, the whole code need not be updated; instead, updating the page object class will fix the error.
Page Factory
Page Factory is an optimized Page Object Model (POM) concept. It is used in frameworks for automation testing like Data Driven, Keyword Driven, Behavior Driven, etc. By incorporating Page Factory and POM with the test case model, testers can focus more on how the automation script is structured to gain the most benefits.
Page Factory includes many predefined characteristics and notations in addition to POM, which makes it easier for automation testers to declare and initiate elements more reliably and uniformly. Page Factory uses the annotation @FindBy to declare elements on the UI. It is an easy way of loading elements with AjaxElementLocatorFactory.
Appium Features
Appium provides features and capabilities that enhance the automated mobile testing experience. Some popular features of Appium include:
- Cross-platform support: Appium makes cross-platform testing easy by allowing testers to create tests in a single language (such as Java, Python, or JavaScript) and execute them on iOS and Android devices.
- Support for native apps: Appium facilitates the automation of native and hybrid mobile apps and mobile web applications. The same WebDriver API can conduct activities and communicate with native app elements.
- Built-in gestures and interactions: Swiping, touching, and scrolling are common smartphone motions that Appium natively supports. You can easily use these motions to mimic user interactions in your test scripts.
- Integration with cloud-based testing services: Testers may perform mobile app testing on various real devices hosted in the cloud by integrating Appium with cloud-based testing providers. This eliminates physical device requirements and allows you to cover a wider range of devices and configurations.
No doubt Appium is one of the best mobile app testing tools; however, there are a few limitations and considerations for mobile app testing using the Appium framework.
- Learning Curve: Appium may have a steep learning curve, especially for beginners, requiring time and effort to understand the setup, configuration, and scripting.
- Platform-specific Setup: Setting up Appium for iOS and Android involves different configurations, adding complexity to the setup process.
- Dependency on Appium Server: Appium relies on a server that needs to be managed, and compatibility issues may arise with different app versions.
- Performance Issues: Some users have reported performance issues, such as slow execution speed and occasional instability, particularly with larger test suites or resource-intensive applications. Using cloud based automation testing tools with Appium can solve this issue.
Resources
- Appium Official Documentation:
- Website: Appium Documentation
- A comprehensive guide that covers the basics and advanced features of Appium.
- Appium GitHub Repository:
- GitHub: Appium GitHub
- The official repository provides access to the latest source code, issues, and releases.
- Appium Desired Capabilities:
- Documentation: Desired Capabilities
- Understand the various capabilities used to configure and control the behavior of Appium sessions.
- Appium Online Capabilities Generator:
- Website: Capabilities Generator
- You may generate desired capabilities manually; however, there is an easy way to generate them online.
- Appium Inspector and UIAutomatorViewer:
- Documentation: Appium Desktop
- Learn about Appium Desktop, which includes the Appium Inspector for inspecting elements.
- XPath and Accessibility ID:
- Tutorial: XPath and Accessibility ID in Appium
- Understand how to locate elements using XPath and Accessibility ID.
- Appium Commands Cheat Sheet:
- Article: Appium Commands Cheat Sheet
- A concise reference for common Appium commands and usage.
- Appium Server Flags:
- Documentation: Appium Server Flags
- Learn about the various command-line options and server flags for configuring Appium.
- Appium Best Practices:
- Article: Appium Best Practices
- Discover best practices for efficient and reliable mobile automation with Appium.
- Mobile Automation Community Forums:
- Forum: Appium Discuss
- Engage with the Appium community, ask questions, and share insights.
- Cloud Based Mobile App Testing Using Appium:
- Website: Cloud Based Appium Testing
- LambdaTest is an AI-powered test orchestration and execution platform that lets you run manual and automated tests at scale on over 3000 real devices, browsers, and OS combinations.

