Building AI applications no longer requires powerful backend infrastructure or specialised hardware. With advances in browser technologies, developers can now run machine learning models directly on the client-side, delivering fast, interactive, and privacy-preserving experiences.
Libraries like TensorFlow.js make it possible to execute and even train models in JavaScript, while modern GPU acceleration through WebGPU unlocks a new level of performance previously unavailable on the web. This shift is redefining how AI-powered applications are designed, moving intelligence closer to the user, reducing latency, and enabling real-time interactions entirely within the browser.
In this article, we explore how to build and run machine learning models directly in the browser using TensorFlow.js, with support for modern acceleration technologies like WebGPU.
1. Understanding Web AI and Why It Matters
Web AI refers to the practice of running artificial intelligence models directly within web environments such as browsers, without relying entirely on backend servers. Using tools like TensorFlow.js, developers can build applications where machine learning models execute in JavaScript, enabling real-time predictions, interactions, and data processing on the client side. This approach transforms the browser from a simple rendering layer into a capable runtime for intelligent applications.
Running AI in the browser offers several practical advantages that align well with modern application needs. One of the most significant benefits is reduced latency, since computations happen locally without the need to send data to a remote server and wait for a response.
This is important for real-time use cases such as image recognition, voice processing, or interactive interfaces. In addition, browser-based AI enhances user privacy by keeping sensitive data on-device, which is increasingly important in applications that handle personal or confidential information.
Another key advantage is scalability. Instead of relying on centralized infrastructure to handle AI workloads, computation is distributed across user devices, reducing backend costs and improving system resilience. With the emergence of GPU acceleration via WebGPU, the performance gap between browser-based and server-side AI is rapidly closing, enabling more complex models to run efficiently in the browser.
2. Getting Started: Setting Up the Environment
Before building AI applications with WebGPU, it’s important to confirm that the user’s browser and device support it. WebGPU is still evolving, and availability depends on the browser version, operating system, and hardware.
Checking support upfront helps prevent runtime errors when unsupported devices attempt to initialize it, while also allowing you to implement smooth fallbacks to alternatives such as WebGL or CPU backends in TensorFlow.js. This improves overall user experience by enabling your application to adapt or notify users early when full GPU acceleration isn’t available.
To get started quickly, you can use a simple HTML setup with a CDN and include a built-in WebGPU support check before initializing TensorFlow.js:
<!DOCTYPE html>
<html>
    <head>
        <title>Web AI App</title>
        <meta charset="UTF-8">
        <meta name="viewport" content="width=device-width, initial-scale=1.0">
        <script src="https://cdn.jsdelivr.net/npm/@tensorflow/tfjs@latest/dist/tf.min.js"></script>
        <script src="https://cdn.jsdelivr.net/npm/@tensorflow/tfjs-backend-webgpu"></script>
    </head>
    <body>
        <h1>TensorFlow.js with WebGPU</h1>

        <script>
            async function init() {
                let backend = 'webgl'; // default fallback

                if (navigator.gpu) {
                    const adapter = await navigator.gpu.requestAdapter();
                    if (adapter) {
                        backend = 'webgpu';
                        console.log("WebGPU is supported!");
                    } else {
                        console.log("WebGPU not available, falling back.");
                    }
                } else {
                    console.log("WebGPU is not supported in this browser.");
                }

                await tf.setBackend(backend);
                await tf.ready();

                console.log('Using backend:', tf.getBackend());
            }

            init();
        </script>
    </body>
</html>
This setup allows you to both verify WebGPU compatibility and initialise your AI environment. If WebGPU is available, your application will automatically use GPU acceleration; otherwise, it gracefully falls back to a supported backend so you can continue running models in the browser without breaking functionality.
Enabling WebGPU in Chrome for Development
While WebGPU is becoming more widely supported, you may still need to manually enable it in some versions of Chrome during development.
To do this:
- Open Chrome and navigate to:
chrome://flags/#enable-unsafe-webgpu - Locate the “Unsafe WebGPU Support” flag
- Set it to Enabled
- Restart your browser
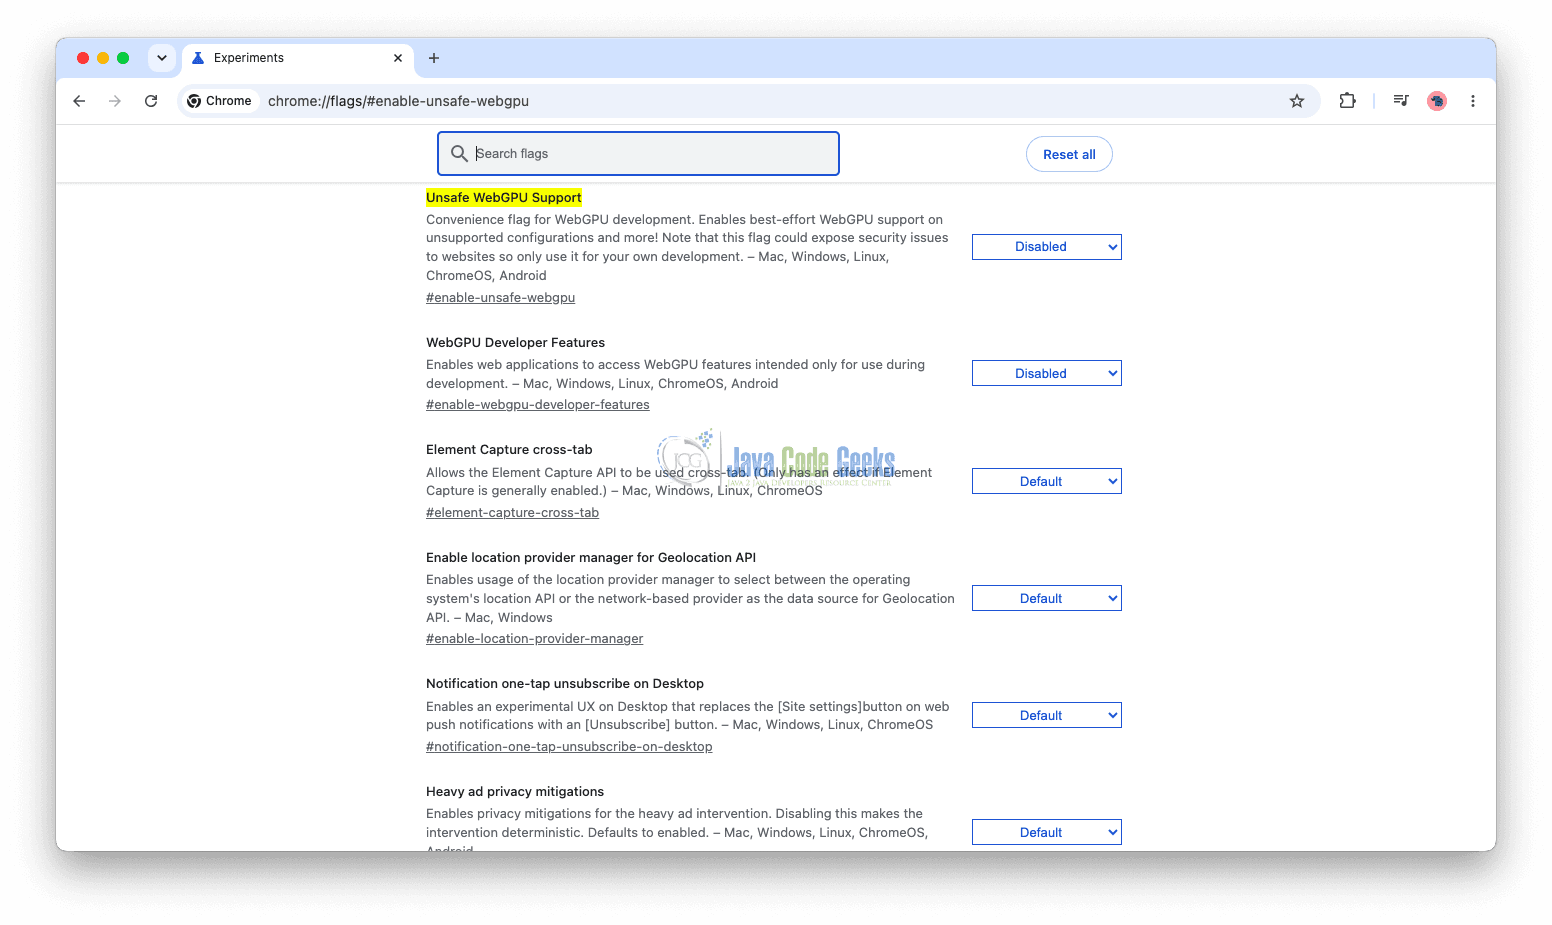
This enables experimental WebGPU support, allowing you to test GPU-accelerated AI features locally.
This setting is intended for development purposes and may not be required (or recommended) in stable production environments as browser support continues to mature.
3. Understanding Tensors in TensorFlow.js and Preparing Your Model
Before loading and running any model with TensorFlow.js, it’s important to understand the core data structure it uses: tensors. A tensor is simply a multidimensional array used to represent data. Think of it as a generalisation of scalars and arrays:
- Scalar (0D tensor): a single number:
5 - Vector (1D tensor): a list:
[1, 2, 3] - Matrix (2D tensor): rows and columns:
[[1, 2], [3, 4]] - Higher dimensions (3D+): used for images, video, etc.
[255, 0, 0], [0, 255, 0]
In TensorFlow.js, tensors are created like this:
const tensor = tf.tensor([1, 2, 3, 4]);
tensor.print();
Tensors are the inputs, outputs, and intermediate data used by machine learning models.
If you don’t want to build or train a model from scratch, tools like Teachable Machine make it easy to create machine learning models directly in your browser without writing code. You can train a model (e.g., an image classifier), export it as a TensorFlow.js model, and use it directly in your web app. It’s useful for beginners who want to train image, audio, or pose models and export them for use with TensorFlow.js.
To get started with it, visit: Teachable Machine Get Started Guide
In this article, however, we’ll take a simpler and more foundational approach by using a linear regression model to predict values. This helps you understand how models work internally before moving on to more complex architectures.
4. Loading and Running a Simple Model in TensorFlow.js
Below is an example of a simple linear regression model built and executed directly in the browser:
<!DOCTYPE html>
<html lang="">
    <head>
        <title>TensorFlow.js Linear Regression with WebGPU</title>
        <!-- TensorFlow.js core -->
        <script src="https://cdn.jsdelivr.net/npm/@tensorflow/tfjs"></script>
        <!-- WebGPU backend -->
        <script src="https://cdn.jsdelivr.net/npm/@tensorflow/tfjs-backend-webgpu"></script>

        <style>
    body {
      margin: 0;
      height: 100vh;
      display: flex;
      justify-content: center;  /* horizontal center */
      align-items: center;      /* vertical center */
      font-family: Arial, sans-serif;
      background-color: #f5f5f5;
    }

    .container {
      text-align: center;
      background: white;
      padding: 30px 40px;
      border-radius: 10px;
      box-shadow: 0 4px 10px rgba(0,0,0,0.1);
    }

    #output {
      margin-top: 10px;
      font-size: 20px;
      font-weight: bold;
      color: #333;
    }
  </style>
    </head>
    <body>
        <div class="container">
        <h2>Prediction Result:</h2>
        <div id="output">Checking WebGPU support...</div>
        </div>
        <script>
            async function setupBackend() {
                const output = document.getElementById('output');

                // Check if browser supports WebGPU
                if (!navigator.gpu) {
                    output.innerText = "WebGPU not supported in this browser. Falling back to CPU.";
                    await tf.setBackend('cpu');
                    return 'cpu';
                }

                try {
                    // Try to use WebGPU backend
                    await tf.setBackend('webgpu');
                    await tf.ready();

                    output.innerText = "WebGPU is enabled. Running model...";
                    return 'webgpu';
                } catch (error) {
                    output.innerText = "WebGPU failed. Falling back to CPU.";
                    await tf.setBackend('cpu');
                    return 'cpu';
                }
            }

            async function run() {
                const backend = await setupBackend();

                // Create a simple sequential model
                const model = tf.sequential();

                // Linear regression layer
                model.add(tf.layers.dense({units: 1, inputShape: [1]}));

                // Compile the model
                model.compile({
                    optimizer: 'sgd',
                    loss: 'meanSquaredError'
                });

                // Training data (y = 3x + 6)
                const xs = tf.tensor2d([-2, -1, 0, 1, 2, 3], [6, 1]);
                const ys = tf.tensor2d([0, 3, 6, 9, 12, 15], [6, 1]);

                // Train the model
                await model.fit(xs, ys, {epochs: 500});

                // Predict for X = 12
                const input = tf.tensor2d([12], [1, 1]);
                const prediction = model.predict(input);

                const result = prediction.dataSync()[0];

                document.getElementById('output').innerText =
                        `Backend: ${backend}\nPredicted Y for X = 12 is approximately: ${result.toFixed(2)}`;
            }

            run();
        </script>

    </body>
</html>
Now let’s walk through what’s happening. Think of this example as teaching a computer to learn the relationship defined by the equation Y = 3X + 6. If you plug in values for X, you get pairs like (-2, 0), (-1, 3), (0, 6), (1, 9), (2, 12), and (3, 15). Instead of giving the browser this formula directly, we provide these examples and let the model figure out the pattern on its own.
The first part of the code focuses on preparing the environment. The setupBackend function checks whether the browser supports WebGPU. If WebGPU is not available, the code gracefully falls back to the CPU so the model can still run.
If it is available, TensorFlow.js switches to the WebGPU backend, which allows computations to run on the GPU for better performance. This step ensures your application works across different browsers while taking advantage of hardware acceleration when possible.
Main Execution Function
async function run() {
    const backend = await setupBackend();
The run function is the entry point of the application. It begins by calling setupBackend, ensuring that the correct computation backend (WebGPU or CPU) is selected before any machine learning operations start. Because backend setup is asynchronous, we use await to make sure it completes before continuing.
Creating the Model
    const model = tf.sequential();
    model.add(tf.layers.dense({units: 1, inputShape: [1]}));
Here, we define a simple neural network. Since the problem involves predicting one value from one input (X → Y), the model consists of a single dense layer with one unit. This is essentially the simplest form of a neural network and is well-suited for learning a straight-line relationship like Y = 3X + 6.
Compiling the Model
    model.compile({
        optimizer: 'sgd',
        loss: 'meanSquaredError'
    });
Before training, the model needs to be compiled. This step defines how the model learns. The loss function, meanSquaredError, measures how far the predictions are from the actual values. The optimizer, sgd (stochastic gradient descent), is the algorithm that adjusts the model’s internal parameters (weight and bias) to reduce that error over time.
Preparing Training Data
    // Training data (y = 3x + 6)
    const xs = tf.tensor2d([-2, -1, 0, 1, 2, 3], [6, 1]);
    const ys = tf.tensor2d([0, 3, 6, 9, 12, 15], [6, 1]);
This is where we provide examples of the relationship we want the model to learn. These values come from the equation Y = 3X + 6, giving pairs like (-2, 0), (-1, 3), and so on. Instead of telling the model the formula directly, we give it these input-output pairs and let it infer the pattern. Each tensor has a shape of 6 rows and 1 column, meaning there are six data points with one feature each.
Training the Model
await model.fit(xs, ys, {epochs: 500});
Training is done using the fit method. The model goes through the dataset multiple times (500 epochs), gradually adjusting its internal weight and bias to better match the data. Because training is asynchronous, we use await to ensure it completes before moving on. After this step, the model should have learned an approximation of the original equation.
Making a Prediction
    // Predict for X = 12
    const input = tf.tensor2d([12], [1, 1]);
    const prediction = model.predict(input);

    const result = prediction.dataSync()[0];
Once trained, the model can make predictions on new data. Here, we test it with X = 12. The input must still be provided as a tensor, in this case with shape [1, 1]. The model outputs a prediction tensor, and we extract the numeric value using dataSync().
Displaying the Result
document.getElementById('output').innerText =
        `Backend: ${backend}\nPredicted Y for X = 12 is approximately: ${result.toFixed(2)}`;
}
Finally, the result is displayed on the web page. Formatting the result to two decimal places makes it easier to read. This last line simply invokes the run function, kicking off the entire process. From here, the browser handles everything: selecting the backend, training the model, and showing the prediction.
If training was successful, the result should be close to 42, since 3 × 12 + 6 = 42.

To display the exact raw prediction value (without rounding to two decimal places), you can directly assign the model’s output tensor to the page:
document.getElementById('output').innerText = model.predict(input);
Instead of formatting the result (e.g., using .dataSync()[0].toFixed(2)), this line prints the full tensor object returned by model.predict(). This includes the precise numerical value as computed by TensorFlow.js, along with its tensor structure.
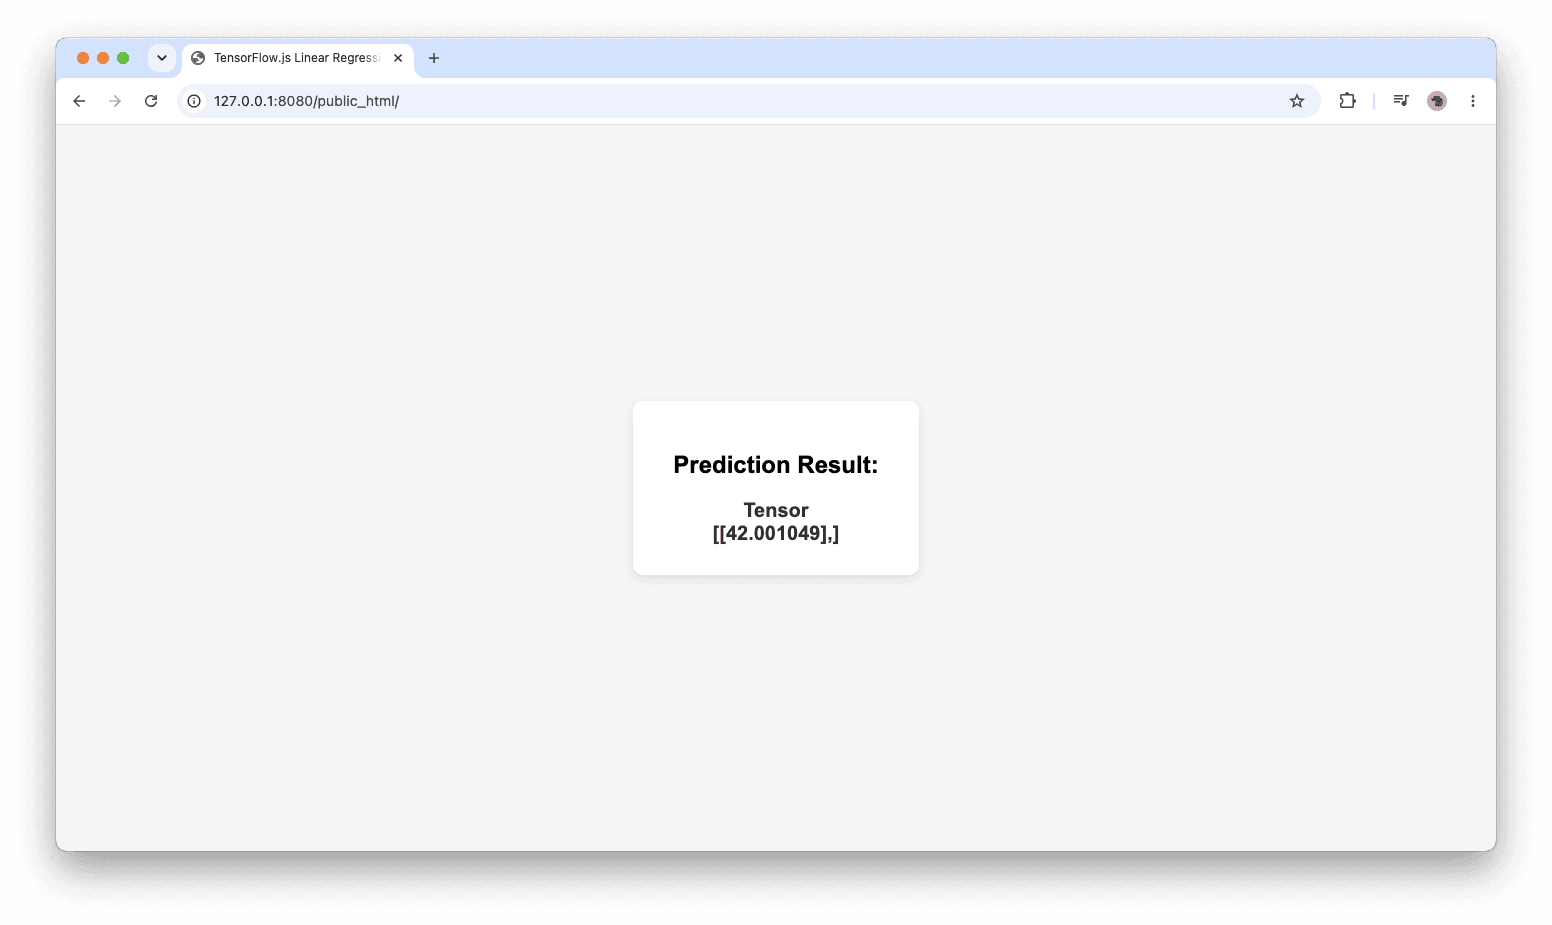
This is useful when you want to inspect the model’s true prediction value, rather than a shortened, human-friendly version.
5. Conclusion
In this article, we explored how to build and run machine learning models directly in the browser using TensorFlow.js. We started by understanding what tensors are and how they serve as the foundational data structure for numerical computations. We then walked through how to load, train, and run a simple linear regression model, including how to make predictions for new input values.
We also examined how TensorFlow.js returns predictions as tensors and how to display both formatted and raw outputs in the browser. This highlights an important concept: machine learning models often produce approximate results due to training processes, which is why predictions may not exactly match expected mathematical values.
By combining TensorFlow.js with modern browser technologies like WebGPU, developers can build powerful, interactive AI applications without needing a backend. This opens the door to fast, privacy-friendly, and highly accessible machine learning experiences on the web.
6. Download the Source Code
You can download the full source code of this example here: build ai apps in the browser with tensorflow js and webgpu
