If your application contains multiple services interacting with each other the need for distributed tracing is increasing. You have a call towards one application that also calls another application, in certain cases the application to be accessed next might be a different one. You need to trace the request end to end and identify what happened to the call.
Zipkin is a Distributed Tracing system. Essentially by using Zipkin on our system we can track how a call spans across various Microservices.

ZipKin comes with Various database options. In our case we shall use Elasticsearch.
We will setup out ZipKin server using Compose
Let’s start with our Compose file:
services:
  redis:
    image: redis
    ports:
      - 6379:6379
  elasticsearch:
    image: elasticsearch:7.17.7
    ports:
      - 9200:9200
      - 9300:9300
    healthcheck:
      test: ["CMD", "curl", "-f", "http://localhost:9200/_cat/health"]
      interval: 20s
      timeout: 10s
      retries: 5
      start_period: 5s
    environment:
      - discovery.type=single-node
    restart: always
  zipkin:
    image: openzipkin/zipkin-slim
    ports:
      - 9411:9411
    environment:
      - STORAGE_TYPE=elasticsearch
      - ES_HOSTS=http://elasticsearch:9200
      - JAVA_OPTS=-Xms1G -Xmx1G -XX:+ExitOnOutOfMemoryError
    depends_on:
      - elasticsearch
    restart: always
We can run the above using
docker compose up
You can find more on Compose on the Developers Essential Guide to Docker Compose.
Let’s build our applications, our applications will be servlet based
We shall use a service for locations, this service essentially will persist locations on a Redis database using the GeoHash data structure.
You can find the service implementation on a previous blog.
We would like to add some extra dependencies so that Zipkin integration is possible.
...
    <dependencyManagement>
        <dependencies>
            <dependency>
                <groupId>org.springframework.cloud</groupId>
                <artifactId>spring-cloud-dependencies</artifactId>
                <version>2021.0.5</version>
                <type>pom</type>
                <scope>import</scope>
            </dependency>
        </dependencies>
    </dependencyManagement>
...
        <dependency>
            <groupId>org.springframework.cloud</groupId>
            <artifactId>spring-cloud-starter-sleuth</artifactId>
        </dependency>
        <dependency>
            <groupId>org.springframework.cloud</groupId>
            <artifactId>spring-cloud-sleuth-zipkin</artifactId>
        </dependency>
...
Spring Sleuth provides distributed tracing to our Spring application. By using spring Sleuth tracing data are generated. In case of a servlet filter or a rest template tracing data will also be generated. Provided the Zipkin binary is included the data generated will be dispatched to the Zipkin collector specified using
spring.zipkin.baseUrl.
Let’s also make our entry point application. This application will execute requests towards the location service we implemented previously.
The dependencies will be the following.
<?xml version="1.0" encoding="UTF-8"?>
<project xmlns="http://maven.apache.org/POM/4.0.0"
         xmlns:xsi="http://www.w3.org/2001/XMLSchema-instance"
         xsi:schemaLocation="http://maven.apache.org/POM/4.0.0 http://maven.apache.org/xsd/maven-4.0.0.xsd">
    <groupId>org.example</groupId>
    <version>1.0-SNAPSHOT</version>
    <modelVersion>4.0.0</modelVersion>

    <artifactId>european-venue</artifactId>

    <properties>
        <maven.compiler.source>11</maven.compiler.source>
        <maven.compiler.target>11</maven.compiler.target>
        <project.build.sourceEncoding>UTF-8</project.build.sourceEncoding>
    </properties>

    <dependencyManagement>
        <dependencies>
            <dependency>
                <groupId>org.springframework.cloud</groupId>
                <artifactId>spring-cloud-dependencies</artifactId>
                <version>2021.0.5</version>
                <type>pom</type>
                <scope>import</scope>
            </dependency>
        </dependencies>
    </dependencyManagement>

    <dependencies>
        <dependency>
            <groupId>org.springframework.boot</groupId>
            <artifactId>spring-boot-starter-web</artifactId>
            <version>2.7.5</version>
        </dependency>
        <dependency>
            <groupId>io.projectreactor</groupId>
            <artifactId>reactor-core</artifactId>
            <version>3.5.0</version>
        </dependency>
        <dependency>
            <groupId>org.projectlombok</groupId>
            <artifactId>lombok</artifactId>
            <version>1.18.24</version>
            <scope>provided</scope>
        </dependency>
        <dependency>
            <groupId>org.springframework.cloud</groupId>
            <artifactId>spring-cloud-starter-sleuth</artifactId>
        </dependency>
        <dependency>
            <groupId>org.springframework.cloud</groupId>
            <artifactId>spring-cloud-sleuth-zipkin</artifactId>
        </dependency>
    </dependencies>

</project>
We shall create a service interacting with the location service.
The location model shall be the same:
package org.landing;

import lombok.Data;

@Data
public class Location {

    private String name;
    private Double lat;
    private Double lng;

}
And the service:
package org.landing;

import org.springframework.beans.factory.annotation.Autowired;
import org.springframework.beans.factory.annotation.Value;
import org.springframework.stereotype.Service;
import org.springframework.web.client.RestTemplate;


@Service
public class LocationService {

    @Autowired
    private RestTemplate restTemplate;

    @Value("${location.endpoint}")
    private String locationEndpoint;

    public void checkIn(Location location) {
        restTemplate.postForLocation(locationEndpoint, location);
    }

}
Following we will add the controller:
package org.landing;

import org.springframework.http.ResponseEntity;
import org.springframework.web.bind.annotation.PostMapping;
import org.springframework.web.bind.annotation.RequestBody;
import org.springframework.web.bind.annotation.RestController;

import lombok.AllArgsConstructor;

@RestController
@AllArgsConstructor
public class CheckinController {

    private final LocationService locationService;

    @PostMapping("/checkIn")
    public ResponseEntity<String> checkIn(@RequestBody Location location) {
        locationService.checkIn(location);
        return ResponseEntity.ok("Success");
    }

}
We need also RestTemplate to be configured:
package org.landing;

import org.springframework.context.annotation.Bean;
import org.springframework.context.annotation.Configuration;
import org.springframework.web.client.RestTemplate;

@Configuration
public class RestTemplateConfiguration {

    @Bean
    public RestTemplate restTemplate() {
        return new RestTemplate();
    }

}
Last but not least the main method:
package org.location;

import org.springframework.boot.SpringApplication;
import org.springframework.boot.autoconfigure.SpringBootApplication;

@SpringBootApplication
public class LocationApplication {

    public static void main(String[] args) {
        SpringApplication.run(LocationApplication.class);
    }

}
Now that everything is up and running let’s put this into action
curl --location --request POST 'localhost:8081/checkIn/' \
--header 'Content-Type: application/json' \
--data-raw '{
	"name":"Liverpool Street",
	"lat": 51.517336,
	"lng": -0.082966
}'
> Success
Let’s navigate now to the Zipkin Dashboard and search traces for the european-venue.
By expanding the calls we shall end up to a call like this.
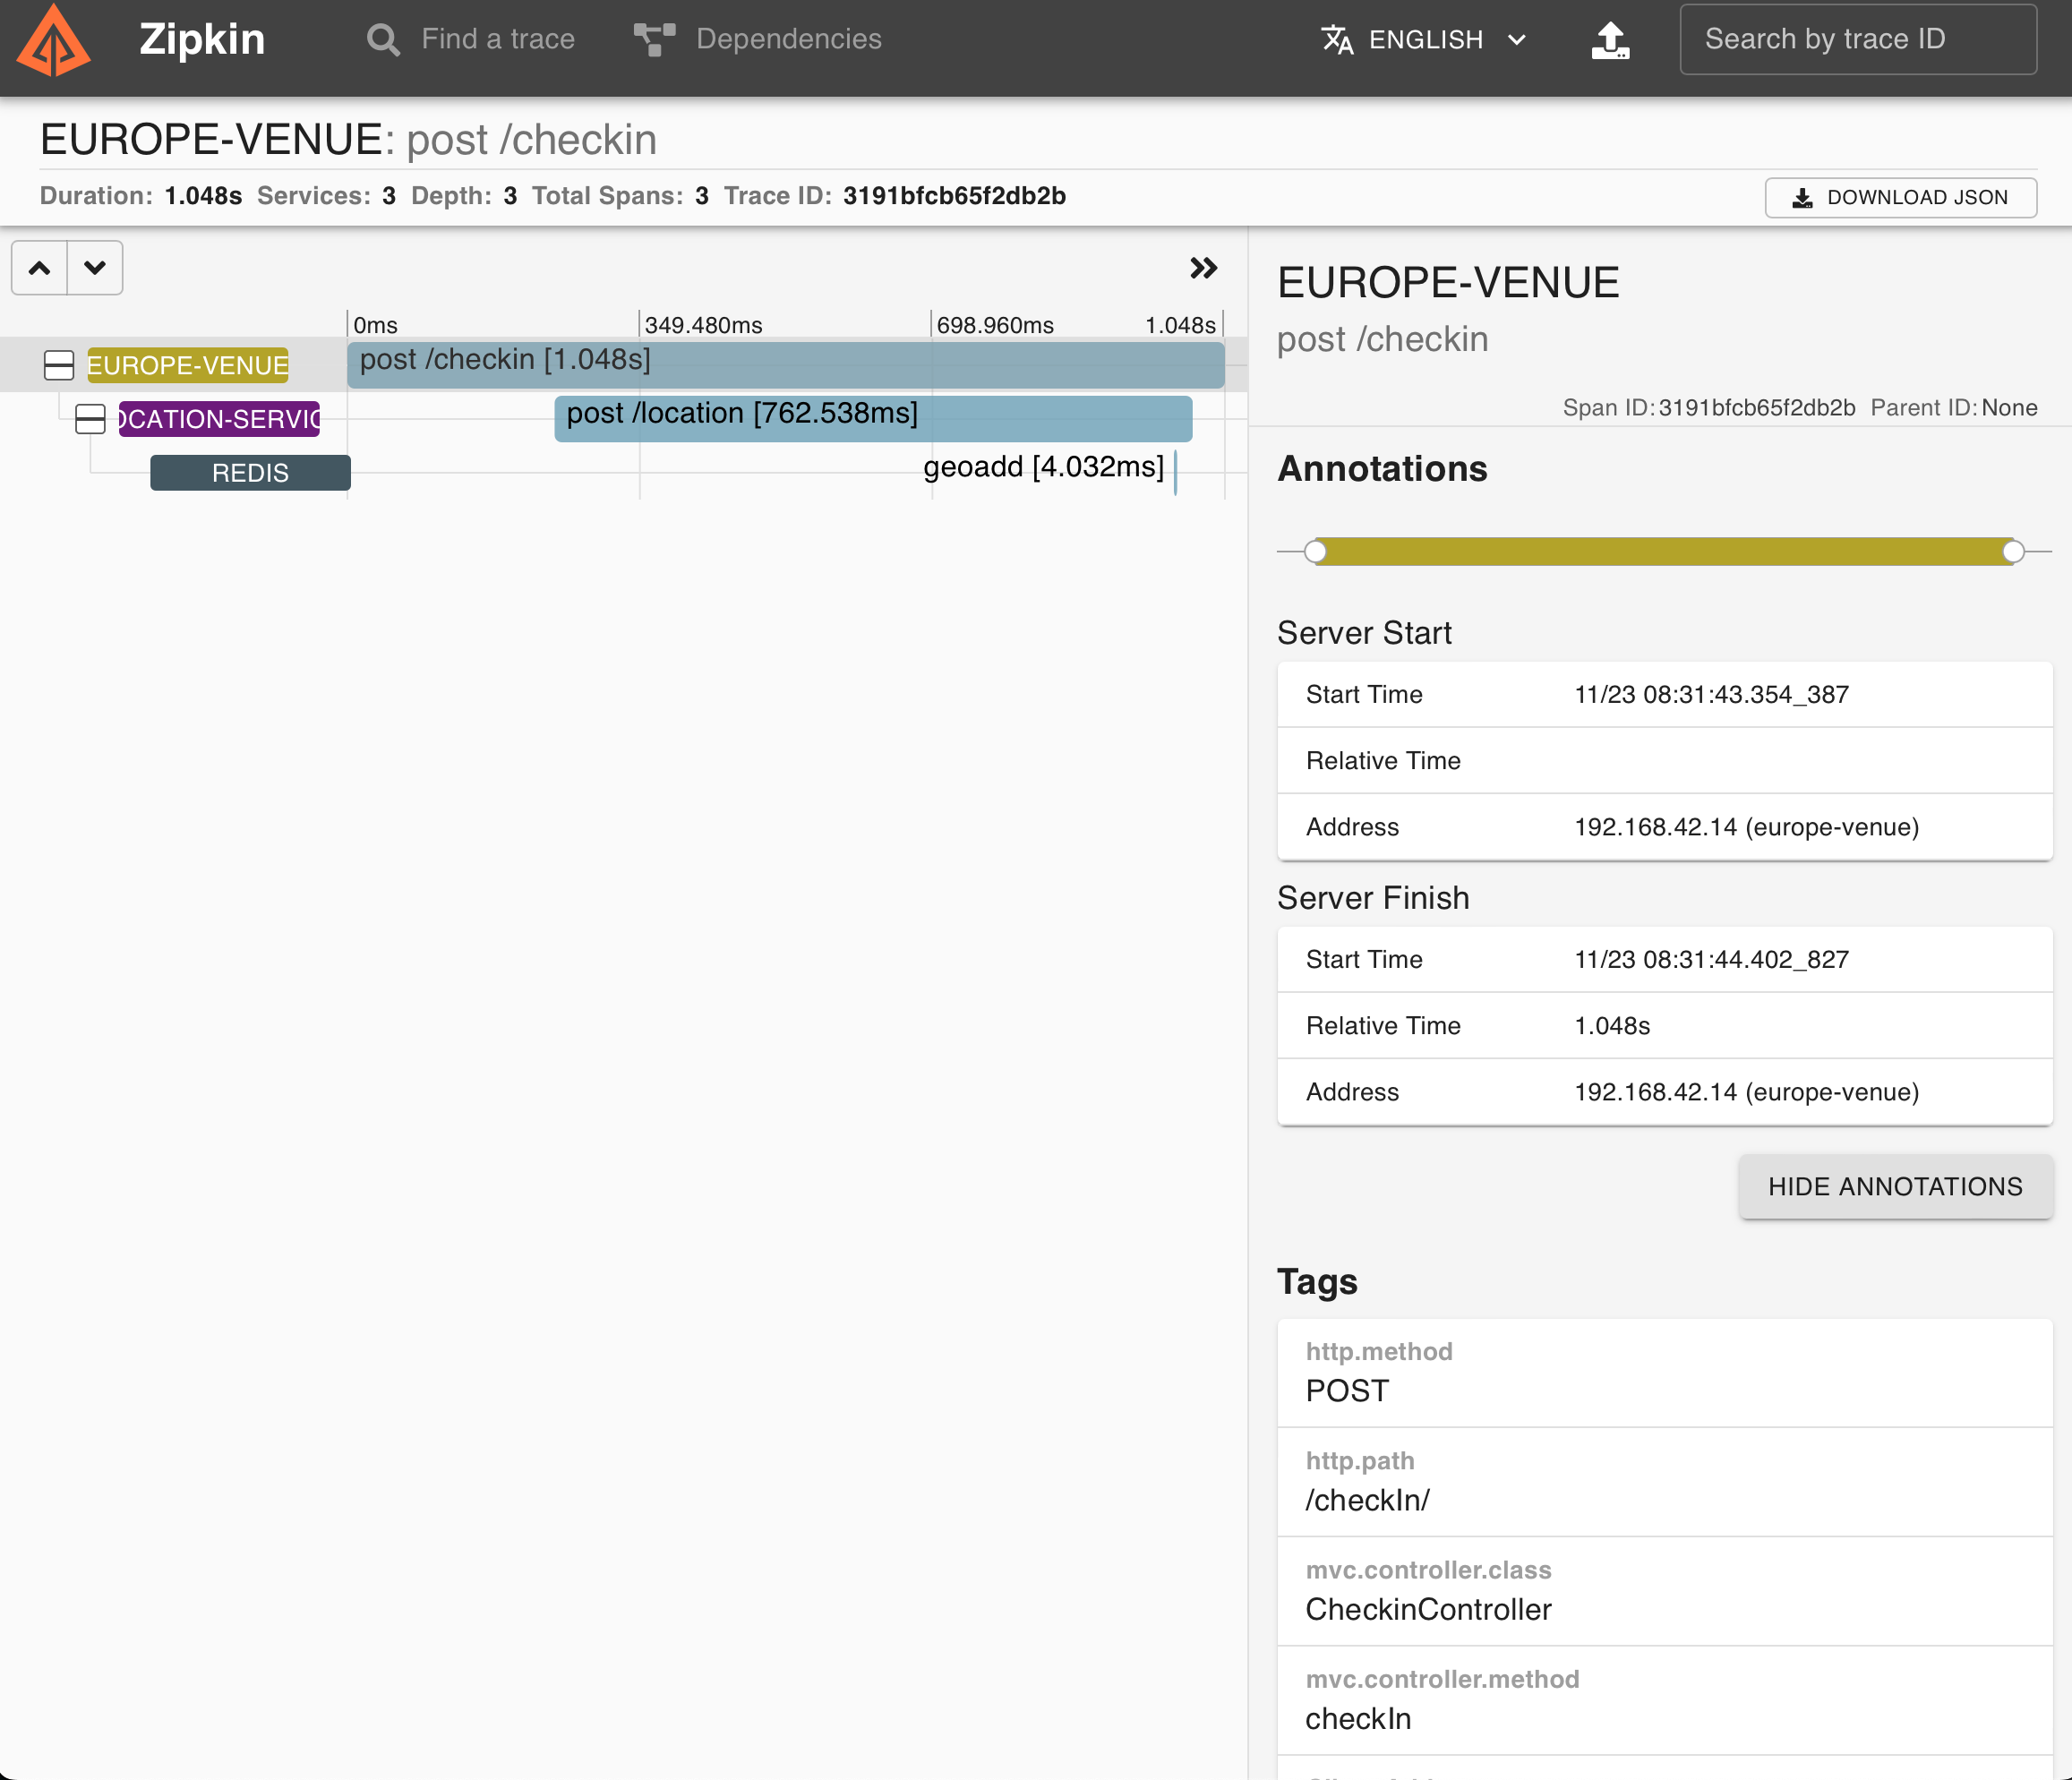
Essentially we have an end to end tracing for our applications. We can see the entry point which is the european-venue checkin endpoint.
Also because the location service is called we have data points for the call received. However we also see data points for the call towards the redis database.
Essentially by adding sleuth to our application, beans that are ingress and egress points are being wrapped so that trace data can be reported.
You can find the code on GitHub.
Published on Java Code Geeks with permission by Emmanouil Gkatziouras, partner at our JCG program. See the original article here: Add ZipKin to your Spring application Opinions expressed by Java Code Geeks contributors are their own. |
