WASI: how to run WebAssembly code outside of your browser? WebAssembly started as a technology for writing applications running in the browser without using JavaScript. Now it can also be used to run applications outside of the browser, thanks to WASI. In this article, we are going to see what this is useful for, how we can write and run WebAssembly applications outside the browser and discuss which opportunities this opens for cross-platform applications.
We will create a simple library to create lexers, and then we will show how we can create a Console application using that library on the desktop. The code of this tutorial is available on GitHub at: https://github.com/Strumenta/wasi-tutorial.
What are lexers? Lexers are components that process texts and split it out in single elements called “tokens” such as identifiers, operators, parenthesis, etc. They are typically used for implementing syntax highlighting and they are the first stage in parsers. Our library will permit you to create your own lexer, specifying which kind of tokens your lexer will recognize.
What is WebAssembly?
WebAssembly is a binary instruction format. In other words, it is a format to define instructions that an appropriate interpreter can efficiently execute. The important thing to notice is that a WebAssembly interpreter is shipped with all modern web browsers. This means that WebAssembly permits to create applications running in a browser in a language different from JavaScript. It is indeed possible to create compilers for existing or new programming languages which produce WebAssembly files, instead of machine code and then run such code in the browser.
Running WebAssembly outside the browser
WebAssembly is starting to get adopted for creating web applications, but eventually someone wondered, why restricting WebAssembly to the browser? Wouldn’t it be cool to be able to write a program, compile it to WebAssembly and run it everywhere: both in the browser and outside the browser? People reflected on this and concluded that yes, that would have been cool.
To achieve this we would just need WebAssembly interpreters running outside of the browser, right? Well, not exactly. Things get more complicated because yes, to execute code one needs an interpreter. Or a Virtual Machine (VM), as we tend to call interpreters of binary formats. But an interpreter is not enough: one also needs some System APIs to interact with the system. Sure, WebAssembly defines how to perform a calculation or how to call a function, but so far it is expected to be executed in the browser where it can communicate results to the user by operating on the DOM to draw something or react to user events happening on the page displayed by the browser. If we run WebAssembly code outside the browser we need to interface with the system differently. We need to read and write files, to write on a console, to react to user events, etc.
How could we do that? By defining some System APIs we could expect our Wasm VM to provide. We may then have multiple Wasm VM implementations all provide the same System APIs and so we could expect our WebAssembly code to run unchanged on all those Wasm VMs. This set of System APIs exist and it is called WebAssembly System Interface or WASI.
What does WASI specify? At the moment not that much.
There is a list of WASI proposals that are currently being worked on:
https://github.com/WebAssembly/wasi-io/blob/main/docs/Proposals.md
While the System APIs exposed are not many, the most useful ones are there, so one can read and write on the console and read and write files.
Why is it useful to have WebAssembly running everywhere?
There are situations in which we want to reuse some piece of code on different platforms. Cross-platform portability for applications is an old goal that we developers had for a very long time and a ton of different solutions were found. However, there are some challenges when someone wants to run the same piece of code in the browser and on the desktop.
For example, we may want to create a parser for the C# language. That means a parser that can recognize C# code but it does not mean that the parser itself should be written in C#. For example, you may want to use that parser in a web-based editor, like Monaco, which is a TypeScript application, so you may want to be able to use your parser from TypeScript. We may then want to use the same C# parser in a desktop application generating some diagrams from our C# code. You may prefer to write that desktop application in Python or Java and in that application you may want to call the very same parser. If we want to write this C# parser just once, in which language should we write it so that we can call it from TypeScript (in the browser), Python and Java (on the desktop)?
The problem is that the browsers so far were only able to run applications written in JavaScript. So if someone wanted to run the same piece of code on the browser and the desktop they had basically two choices:
- Transpile code in a certain language to JavaScript, so that it could be run in the browser and find a compiler for that language that produced an executable running on the desktop
- Write the code in JavaScript. It would run easily on the browser, and one could use a JavaScript engine to run it on the desktop. Node.JS is an example of a possible JavaScript engine
With WebAssembly instead, we can use every language we want, provided we are able to build a compiler producing WebAssembly bytecode. Given WebAssembly is a low-level instruction format, it is much easier to write efficient compilers, with respect to writing transpilers producing JavaScript code.
Executing WebAssembly
There are many ways to execute WebAssembly code. There are interpreters, compilers, and libraries to execute wasm files from within other applications. You can find a list here: https://github.com/appcypher/awesome-wasm-runtimes
Some of the most relevant are:
- https://github.com/wasm3/wasm3
- https://github.com/wasmerio/wasmer
- https://github.com/bytecodealliance/wasmtime
- https://github.com/WAVM/WAVM
They permit to do two different things:
- Run on the Desktop console applications consisting only of WASM assembly files
- Run WASM modules inside larger applications, written in languages such as Java, Python or JavaScript (in this latter case, also running in the browser)
They vary in performance, support for versions of WASI, and availability as libraries for more or fewer languages. For example, at this time Wasm3 can be used as a library for Python, Rust, C/C++, Go, Swift, .NET, and a couple of other platforms. Wasmer seems to support a few more, including PHP and Ruby. Based on these differences you may want to pick one VM or the other, but in principle, they should all provide a very similar environment.
Our example: a simple lexer
There are many ways to write WebAssembly code. These are some:
- We could write WAT, a textual format that can be compiled to the WASM binary format. In this format one specifies single instructions for the WASM VM. The WASM VM is a stack-based machine, in principle similar to the JVM, but it offers less instructions and they tend to be more basic.
- We could directly produce WASM binary files. The level of abstraction is the same we have when using WAT, but we would need to produce these binary files, so there would be a few extra complications.
- We could use Rust, which has good support for compilation to WASM
- We could use AssemblyScript, a dialect of TypeScript which can be compiled to WASM
In our example, we will use AssemblyScript, as it is basically TypeScript, a language that is already familiar to many developers. Rust would also be a good choice, but we are not familiar with it. Writing WAT or WASM files manually would instead require a very significant effort. It could be interesting to write compilers generating WAT or WASM directly, but that is beyond the goals of this article.
To get started with AssemblyScript you can look into the official Quick Start guide to AssemblyScript.
In essence, you can create a Node.js project with these few commands:
npm init
npm install --save @assemblyscript/loader
npm install --save-dev assemblyscript
npx asinit .
The application per se resembles a normal TypeScript application.
The original package.json specifies these scripts:
"scripts": {
    "test": "node tests",
    "asbuild:untouched": "asc assembly/index.ts --target debug",
    "asbuild:optimized": "asc assembly/index.ts --target release",
    "asbuild": "npm run asbuild:untouched && npm run asbuild:optimized"
  },
We can change them to specify:
- The application is compiled using asc (task build). This generates wasm files
- The application is run using wasmtime, our chosen wasm interpreter. This executes wasm files
- We can also generate only the library, without including the tasks which are specific to the console application (task compilelib). While in this tutorial we will only execute the Console application we may want to generate the library in lexer.wasm and use that library from Python, JavaScript or any other language supported by our WASM VM of choice
We could also specify a couple of extra dependencies. The resulting package.json will look like this:
{
 "scripts": {
   "build": "asc assembly/index.ts -b build/index.wasm -t build/index.wat",
   "run": "wasmtime --dir . build/index.wasm",
   "compilelib": "asc assembly/lexer.ts -b build/lexer.wasm -t build/lexer.wat"
 },
 "dependencies": {
   "@assemblyscript/loader": "^0.19.12",
   "as-wasi": "^0.4.6",
   "source-map-support": "^0.5.20"
 },
 "devDependencies": {
   "assemblyscript": "^0.19.12"
 }
}
Our example would be about creating a library to describe simple lexers. Our lexers will recognize different types of tokens. It is based on a need we have: running lexers (and parsers) both on the web and on the desktop.
The users of our library will instantiate instances of our Lexer class. We will be able to specify which keywords our lexer recognizes. We will then be able to provide an input string to our lexer and get back a “recognition” object. A Recognition object tells us which piece of the input was recognized and which type of token it is. For example, if our language recognizes the keywords “hello” and “world” and we call the lexer with the input “helloworld”, we will get back a first Recognition instance telling us that “hello” was recognized as a token of type “keyword hello”. We would then be able to call the lexer on the remaining string.
Now, we will build only a few core functionalities of our Lexer library, as creating a complete lexer library is well beyond the goals of this article. Consider it just as an example and please forgive some simplifications we made in the implementation.
Internally our lexer will use an Automaton. If you want to learn more about them then we are going to explain here you can check out this entry on finite-state machines.
The lexer will start in the initial state, and as it receives input characters it will move at different states. Some states will be associated with recognizing a certain token type.
For example, this could be an automaton that recognizes the keyword “bar”:
And this would be an automaton that can recognize either the keyword “bar” or the keyword “baz’:
Our code will need to define states:
class State {
   automaton: Automaton
   name: string
   transitions: Transition[]
   epsilonTransitions: State[] = []
   …
}
States know which Automaton they are part of, have a name, and then have a series of transitions. Transitions can be normal transitions, requiring a symbol to be consumed, or special transitions called epsilon transitions. Epsilon transitions are useful to indicate that we could move to another state without consuming a character. Suppose we want to recognize a token composed of one or more digits. We could do that with this automaton:
Once we get a first digit we can either keep receiving digits or at any time we can declare we recognized the number and stop consuming more characters.
Another usage of epsilon transitions is for going back to the initial state, after recognizing tokens. In this way we can recognize a sequence of tokens.
A Transition will basically tells us which symbol it consumes and to which State it points:
class Transition {
   symbol: string
   destination: State
   constructor(symbol: string, destination: State) {
       this.symbol = symbol
       this.destination = destination
   }
}
A State will be able to process symbols to decide which should be the next state:
class State {
…
tryToProcessSymbol(symbol: string) : State | null {
   let foundTransition : Transition | null = null
   for (let i=0;i<this.transitions.length && foundTransition == null;i++) {
       const t = this.transitions[i]
       if (t.symbol == symbol) {
           foundTransition = t
       }
   }
   if (foundTransition == null) {
       return null
   }
   return foundTransition.destination
}

processSymbol(symbol: string) : State {
   let nextState = this.tryToProcessSymbol(symbol)
   if (nextState == null) {
       throw new Error(`no transition from ${this.name} on symbol ${symbol}`)
   }
   return nextState as State
}
…
} // class State
Let’s now look at our Automaton class:
class Automaton {
   states: State[]
   currentState: State | null

   constructor() {
       this.states = []
   }

   clone(startState: State) : Automaton { … }
   createState(name: string | null = null) : State { … }
   processSymbols(symbols: string[]) : void { … }
   processSymbol(symbol: string) : void { … }
   tryToProcessSymbol(symbol: string) : State | null { … }
   processString(string: string) : void { … }
}
Initially the Automaton has no states. We can create an empty state, specifying its name or having the name generated (createState). We can also clone the Automaton, changing only the currentState. An Automaton processes symbols and we can see a string as a sequence of symbols. So processString and processSymbols just call processSymbol for each single symbol/character. ProcessSymbol in turn just calls the method with the same name on the currentState. If the symbol cannot be consumed (because there is no valid transition) an error is returned, otherwise the new currentState is returned.
How is this code used by the lexer?
We can process an input using “nextToken”. In this code we explore different branches, and at the end we will decide which one to keep. Why is that?
Consider we have a language with various keywords, including “bar” and “barrumba”. When we process an input starting with “bar” we could either stop and tells the user we recognized “bar” or continue processing looking to complete “barrumba”. In principles we would need to look ahead to the next 5 characters in this case to take a decision. In our code we will instead explore the two possibilities and decide later. So we will have two branches.
- We start with one single branch.
- For each branch, we try to process the next character, getting the updated version for all branches. Some branches will die out, as they are unable to process the next character
- We look at the updated branches and see if any branch is in a state corresponding to a recognized token. If that is the case we add a candidate recognition to the list “recognized”
- At the end we look at all the candidate recognitions and we pick the longest one. If there are different candidates with the same maximum length we throw an error as we have an ambiguous case
To process the whole input we keep calling nextToken, until we get valid tokens. We then remove the recognized piece of input and call nextToken on the remaining input.
In the case of a lexer recognizing the keyword “bar” and “barrumba”, if we pass the input “barrumba”, we will reach “bar” and add it to our list of recognized tokens. We will then proceed until “barrumba” is recognized. Eventually we will have recognized both “bar” and “barrumba” and so we will return “barrumba” as it is longer.
Suppose we pass “barbar” to our lexer instead. We will first recognize “bar”. We will then proceed to see if it can recognize “barrumba”, however it will not get the right character so the automaton will not know how to proceed and the branch will terminate. We will therefore have recognized only “bar” and we will return that. We will then call nextToken again to consume the remaining characters.
In a real lexer we may also want to add rules for whitespace and identifiers, so the examples presented here are obviously simplifications.
Usage 1: Running the lexer as a Console Application
We can now use this very simple library to create a console application that we could start on our computer. The application will ask us to insert an input. The input will be processed by the lexer which will print the recognized tokens and then ask us for more input. When we insert an empty input the application will terminate.
import {Console} from "as-wasi";
import {Lexer, Recognition} from "./lexer";

function createLexer() : Lexer {
 const lexer = new Lexer();
 lexer.recognizeKeyword("foo")
 lexer.recognizeKeyword("bar")
 lexer.recognizeKeyword("barrumba")
 lexer.recognizeKeyword("zum")
 return lexer
}

function processText(lexer: Lexer, text: string, start: boolean = true) : void {
 if (start) {
   Console.log(`\nProcessing "${text}"`)
 }
 let nextToken = lexer.nextToken(text)
 if (nextToken == null) {
   Console.error(` - No token recognized at "${text}"`)
   Console.log("")
   return
 }
 const r = nextToken as Recognition
 Console.log(`  - Token recognized: ${r.describe()}`)
 if (text.length == r.text.length) {
   // end of text reached
   Console.log("")
 } else {
   this.processText(lexer, text.substr(r.text.length), false)
 }
}

let lexer = createLexer()
let done = false
while (!done) {
 Console.log("insert input to process:")
 let input = Console.readLine();
 if (input != null && (input as string).length > 0) {
   processText(lexer, input as string)
 } else {
   Console.log("no input specified, terminating")
   done = true
 }
}
The code of our application is reasonably simple as the complex functionalities are wrapped in a library. In this example we see how to use the library from a console application compiled in WASM in running into a WASM VM using WASI, but the same library could be reused in the browser or in desktop application using Java, Python, Ruby, and many other languages having one or more WASM VMs available.
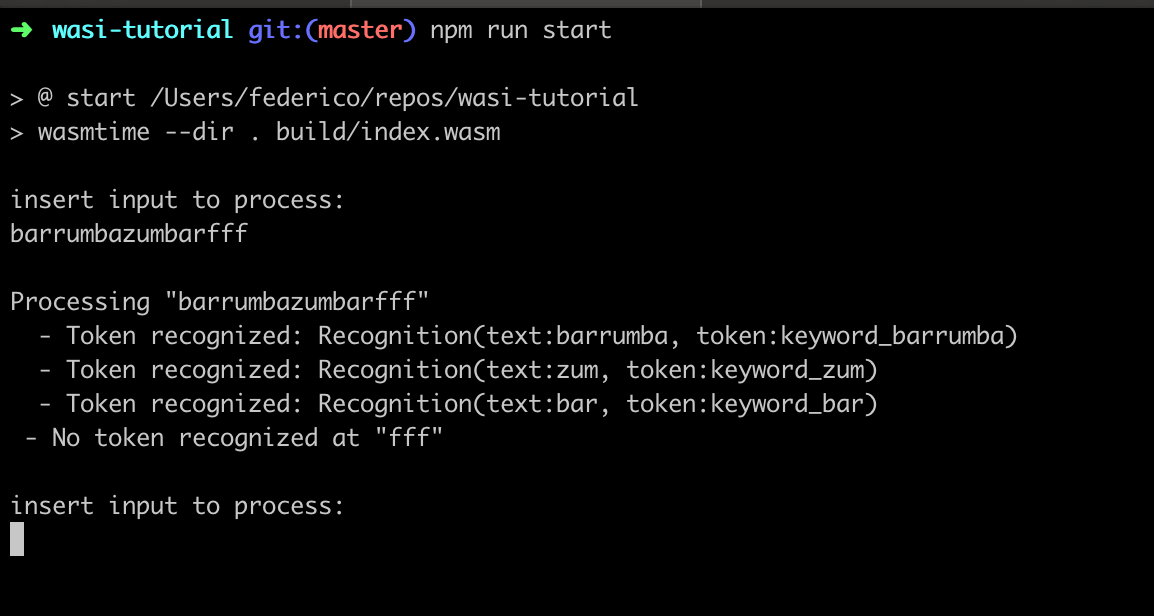
This is an example of the application running.
Next steps
The next steps will be taking a look at how to use our lexer library from within the browser and in larger Desktop applications written in languages such as Python or Java. There are WASM libraries we can use for that but passing and receiving values is not so easy as WASM supports directly only basic number types, while all the other types are passed by reference in ways that are not obvious. Maybe we could look into that in future articles.
Hopefully, this integration will become easier over time.
Summary
WebAssembly is progressing beyond the borders of the browser and it is becoming a very interesting option to write libraries we may want to use both from the browser and in desktop applications. As of now, it is getting easier to create libraries compiled to WASM, but using them seems still a bit awkward. We hope to see progress soon on that, as it seems the only obstacle that’s keeping WebAssembly from being an amazing option for cross platform applications.
Published on Java Code Geeks with permission by Federico Tomassetti, partner at our JCG program. See the original article here: WASI: how to run WebAssembly code outside of your browser Opinions expressed by Java Code Geeks contributors are their own. |
