Java/Spring: How to Generate an Entire Swagger Documented CRUD REST API With Speedment
As developers, one of the most cumbersome tasks we often face in our day-to-day lives is writing good and understandable documentation. It doesn’t matter if our documentation is only a few lines long explaining the core functionality of a feature or if it’s a full-blown essay demonstrating the ins and outs of a system. What matters is that the message we’re trying to convey through our documentation is precise and understandable.
In our previous article, we covered the topic of automatic REST API generation. More precisely, we demonstrated how to generate an entire CRUD REST API for your database using Speedment’s revamped Spring Integration plugin.
Today, we’ll be taking this knowledge a step further and demonstrate how to generate interactive documentation for your REST API in a single click.
If you didn’t get a chance to use the Speedment Spring plugin, we highly suggest you read our previous article as it contains the information necessary to follow this guide.
Do You Like Java Streams?
If the answer to this question is either ‘Yes!’, ‘Absolutely!’ or perhaps ‘Heck yeah!’, then Speedment is the right tool for you. Speedment is a Java ORM toolkit and runtime which uses pure Java Streams as an interface between your application and the database.
Alongside the already familiar Streams API, Speedment provides end-users with a graphical tool in order to generate a Java representation of your database in a matter of seconds, allowing them to completely stay in a Java-only environment.
If you’re interested in learning more about Speedment, head over to
the documentation page where you’ll find a bunch of guides and examples. For the remainder of this article, we’ll be focusing on the new update to Speedment’s Spring plugin.
Before we Begin
In order to generate the REST API documentation, Speedment uses a combination of the OpenAPI specification and Swagger UI.
The preparation steps will differ depending on if you’re starting from scratch or not, but the end result will be the same regardless of your starting point.
If you have followed the guide in our previous article, where we explain how to generate a REST API using Speedment, you’ll only need to add a couple of dependencies to your project’s pom.xml file:
01 02 03 04 05 06 07 08 09 10 11 12 13 14 15 | <dependencies> ... <dependency> <groupId>io.springfox</groupId> <artifactId>springfox-swagger2</artifactId> <version>2.9.2</version> </dependency> <dependency> <groupId>io.springfox</groupId> <artifactId>springfox-swagger-ui</artifactId> <version>2.9.2</version> </dependency> ...</dependencies> |
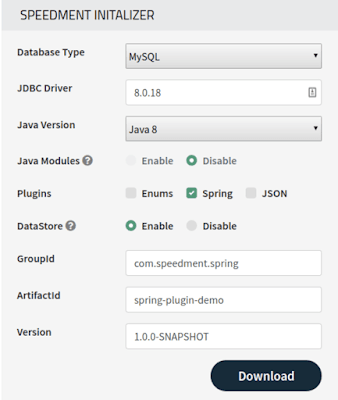
On the other hand, if you’re starting from scratch, head over to the Initializer where you’ll be able to generate a Speedment project with Spring support. Once you reach the Initializer, you’ll be presented with plenty of options to configure your project. One configuration option that is particularly important is the Plugins section of the Initializer.
To enable Spring support in your new Speedment project, tick the checkbox next to the “Spring” option. Once you’re happy with your project configuration, go ahead and click the Download button at the bottom of the Initializer.
When you’re ready, you can launch the Speedment Tool by executing the following command from the root folder of your project template:
1 | mvn speedment:tool |
If you’ve installed the plugin correctly, you’ll see some Spring Boot specific options which can be used to configure your REST API and documentation.
If this is your first time using Speedment, you may want to familiarize yourself with the workflow by following the “Hello Speedment” quick start guide.
Swagger Automata
For the following example, we’ll be using Sakila, a MySQL Sample Database. You can download it as a standalone instance or as a Docker container.
When you open the Speedment Tool and successfully connect to your database, you will be presented with a user interface containing the metadata information about your database and some options that you can configure:
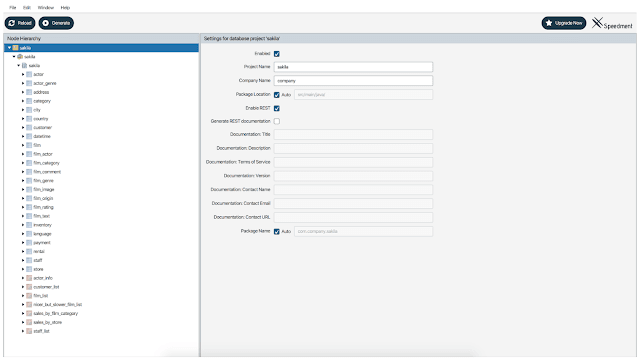
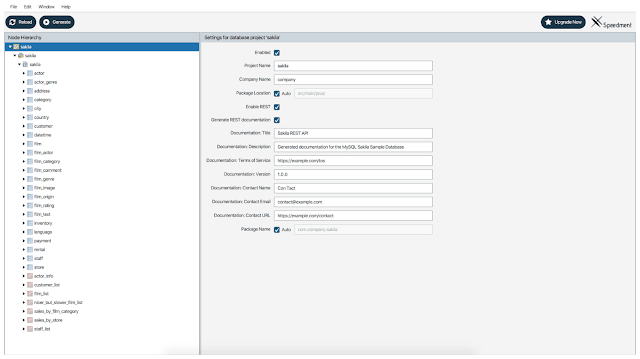
If you click the “Generate” button found in the top banner, a Java representation of your database will get generated. To generate the documentation for your REST API, you must enable the “Generate REST documentation” option found in the project view (which is accessed by selecting the top node in the tree).
Once enabled, additional configuration options will become available allowing you to further customize your generated documentation:
The next time you regenerate your Spring project, some OpenAPI specific configurations will get generated. In order to see and use the generated documentation, you’ll need to run your Spring application. To do so, execute the following command:
1 | mvn spring-boot:run |
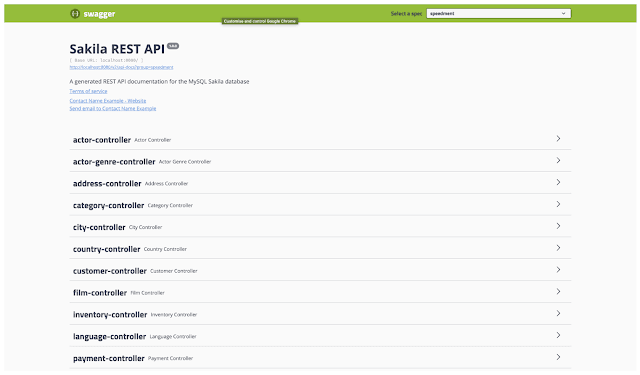
Once your Spring application is up and running, you can find your generated Swagger documentation at the following endpoint http://localhost:8080/swagger-ui.html
Depending on how you configured your project, you might see different results in the generated documentation. For instance, if you disable REST API generation for a certain table, the next time you regenerate your project, the endpoint for that table will not be available in the documentation.
With the generated Swagger documentation, you’re able to instantly learn what REST endpoints your application has registered, what HTTP methods are available for each endpoint and execute HTTP requests for those endpoints directly from the Swagger UI:
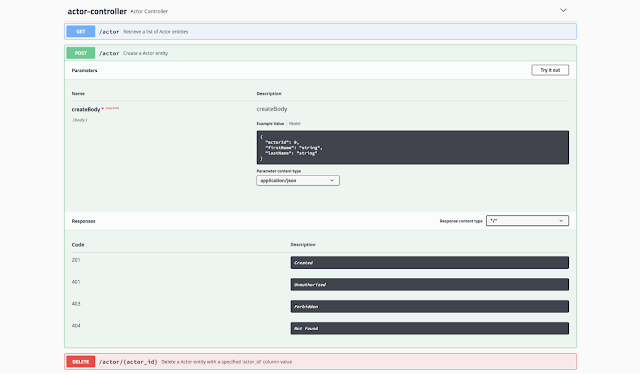
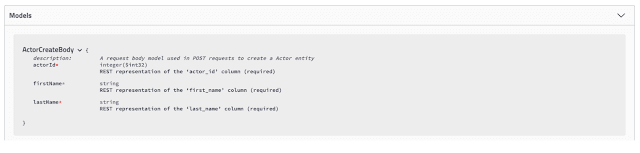
If you’re not sure what is required in the request body, you can find the request body models at the bottom of the documentation, under the “Models” section:
Note: When connecting to the Swagger endpoint, if you get presented with the following prompt, make sure your Spring entry point is in the correct package (must be above or in the same package that the Swagger configuration is located in):
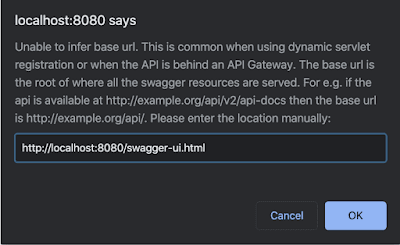
This is usually a sign that your Swagger configuration was not scanned by Spring.
Summary
Writing good and understandable documentation can be a long and tedious process. With the new update to Speedment’s Spring Boot plugin, users are able to generate interactive documentation for their REST API in a matter of seconds.
Resources
Article“How to Generate an Entire Database CRUD REST API with Speedment”
The Speedment Initializer capable of generating project templates
Authors
Per Minborg
Mislav Miličević
Published on Java Code Geeks with permission by Per Minborg, partner at our JCG program. See the original article here: Java/Spring: How to Generate an Entire Swagger Documented CRUD REST API With Speedment Opinions expressed by Java Code Geeks contributors are their own. |
