Websockets are full duplex (persistent) connections between client and server such that both can share information with each other without the need for repeatedly establishing a new connection. This removes the need for repeated polling from the client to get updates from the server.
Not all browsers support Websockets and hence we make use of SockJS javascript library to create WebSocket connections. SockJS acts as an abstraction layer which first checks if there is native support for WebSockets, if there is no support it will try to mimic WebSocket like behavior using the protocols supported by the browser.
Spring provides support for Websocket using STOMP protocol, hence we will using the STOMP.js, a javascript implementation for STOMP protocol, for interaction with the server.
In this post, client will establish a websocket connection with the server and invoke the websocket endpoints registered in the server application to recevie some messags. In addition to this the server will send some realtime messages to the client from the background activities triggered in the server.
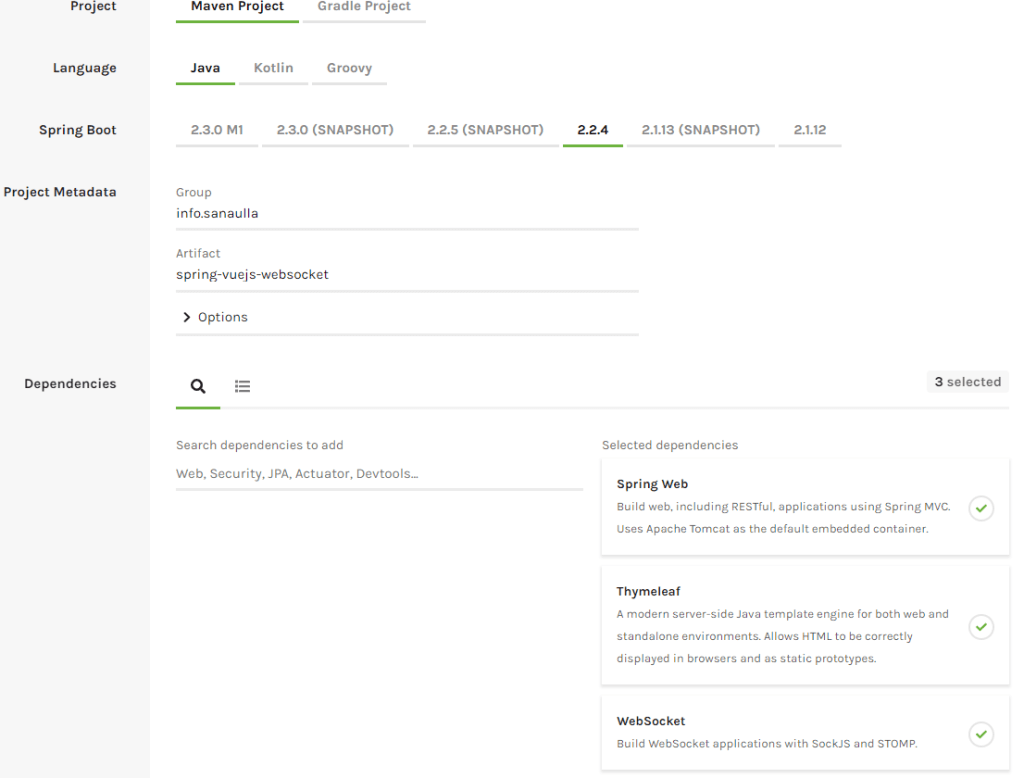
Let’s first configure the server. First head to start.spring.io and create a new spring boot project using the following settings:
Configuring Websocket
Basic websocket configuration involves:
- creating a topic address for posting messages (
/topic/messages) - optional prefix for URLs used by the client to call WebSocket endpoints in server (
/ws) - defining the URL used by the client for setting up the WebSocket connection with the server. (
/connect)
01 02 03 04 05 06 07 08 09 10 11 12 13 14 | @Configuration@EnableWebSocketMessageBrokerpublic class WebsocketConfiguration implements WebSocketMessageBrokerConfigurer { @Override public void registerStompEndpoints(StompEndpointRegistry registry) { registry.addEndpoint("/connect").withSockJS(); } @Override public void configureMessageBroker(MessageBrokerRegistry registry) { registry.enableSimpleBroker("/topic/messages"); registry.setApplicationDestinationPrefixes("/ws"); }} |
Creating Websocket Endpoints
We will create a Spring controller which will have two WebSocket endpoints as shown below. One of those endpoints will create an infinitely running task sending messages to the client and the other endpoint will cancel the running task.
01 02 03 04 05 06 07 08 09 10 11 12 13 14 15 16 17 18 19 20 21 22 23 24 25 26 27 28 29 30 31 32 33 34 35 36 37 38 39 40 41 42 43 44 45 | @Controllerpublic class WebsocketController { @Autowired SimpMessagingTemplate simpMessagingTemplate; String destination = "/topic/messages"; ExecutorService executorService = Executors.newFixedThreadPool(1); Future<?> submittedTask; @MessageMapping("/start") public void startTask(){ if ( submittedTask != null ){ simpMessagingTemplate.convertAndSend(destination, "Task already started"); return; } simpMessagingTemplate.convertAndSend(destination, "Started task"); submittedTask = executorService.submit(() -> { while(true){ simpMessagingTemplate.convertAndSend(destination, LocalDateTime.now().toString() +": doing some work"); Thread.sleep(10000); } }); } @MessageMapping("/stop") @SendTo("/topic/messages") public String stopTask(){ if ( submittedTask == null ){ return "Task not running"; } try { submittedTask.cancel(true); }catch (Exception ex){ ex.printStackTrace(); return "Error occurred while stopping task due to: " + ex.getMessage(); } return "Stopped task"; }} |
I have used two approaches above to send the message to the topic URL defined in our configuration:
- by return value of the method annotated as
@MessageMapping - using the
SimpMessagingTemplate
Spring boot configures an instance of SimpMessagingTemplate which we can make use of to send messages to the topic.
The websocket endpoints are annotated using @MessageMapping by passing the endpoint URL just like the way we define REST API endpoints or view endpoints.
Creating the Websocket Client in Javascript
We will first create an HTML page which contains the buttons to initiate the connection and then invoke the websocket endpoints we defined as shown below:
01 02 03 04 05 06 07 08 09 10 11 12 13 14 15 16 17 18 19 20 21 22 | <div class="content" id="websocket"> <div> </div> <div class="row" > <div class="col"> <button class="btn btn-sm btn-info" @click="connect">Create connection</button> <button class="btn btn-sm btn-success" @click="startTask">Start Task</button> <button class="btn btn-sm btn-danger" @click="stopTask">Stop Task</button> <button class="btn btn-sm btn-primary" @click="disconnect">Close connection</button> </div> </div> <div> </div> <div class="row"> <div class="col"> <ul class="list-group" style="height: 500px; overflow:scroll;"> <li class="list-group-item d-flex justify-content-between align-items-center" v-for="(m,idx) in messages" :key="'m-'+idx"> {{m}} </li> </ul> </div> </div></div> |
Important to take note of the sockjs and STOMP js libraries linked in the HTML above.
All of the work happens in the Javascript code as shown below:
01 02 03 04 05 06 07 08 09 10 11 12 13 14 15 16 17 18 19 20 21 22 23 24 25 26 27 28 29 30 31 32 33 34 35 36 37 38 39 40 41 42 43 44 45 46 47 | var stompClient = null;$(function(){ new Vue({ el: "#websocket", data: { messages: [] }, methods: { connect: function(){ var socket = new SockJS('/connect'); stompClient = Stomp.over(socket); var that = this; stompClient.connect({}, function(frame) { that.handleMessageReceipt("Connected"); stompClient.subscribe('/topic/messages', function(messageOutput) { that.handleMessageReceipt(messageOutput.body); }); }); }, disconnect: function(){ if(stompClient != null) { stompClient.disconnect(); } this.handleMessageReceipt("Disconnected"); }, startTask: function(){ if ( stompClient != null ){ stompClient.send("/ws/start"); }else{ alert("Please connect first"); } }, stopTask: function(){ if ( stompClient != null ){ stompClient.send("/ws/stop"); }else{ alert("Please connect first"); } }, handleMessageReceipt: function (messageOutput) { this.messages.push(messageOutput); } } });}); |
The connect method initiates the websocket connection using the /connect endpoint. The start task and stop task methods call the two websocket endpoints we had defined in WebsocketController
The messages received by the stompClient are handed by `handleMessageReceipt` method.
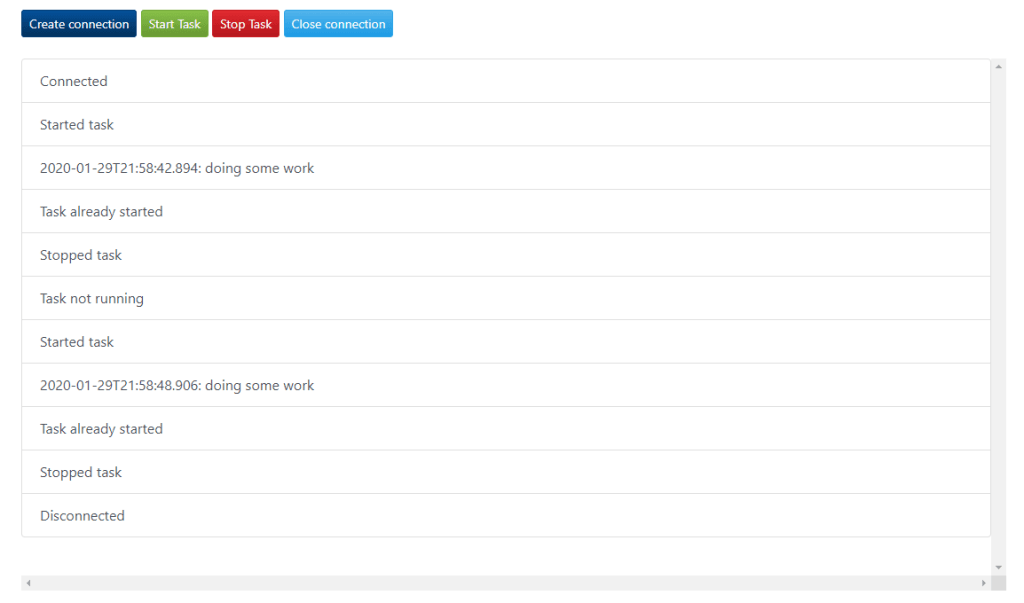
After you have the app running, you can create connection, start task, stop task and get messages printed as shown below:
The code for the complete application can be found here.
Published on Java Code Geeks with permission by Mohamed Sanaulla, partner at our JCG program. See the original article here: Using Websocket with Spring Framework and Vuejs Opinions expressed by Java Code Geeks contributors are their own. |
