Easily deploy your app with Okta’s identity management platform Use Okta’s API to authenticate, manage, and secure users in any app within minutes. Try Okta today.
Jetty is a small, highly-scalable Java-based web server and servlet engine. It supports HTTP/2, WebSockets, and many other protocols. It powers websites and frameworks, both large and small, such as Google AppEngine. Because it is an Eclipse project, its open source project is called Eclipse Jetty. it is standards compliant and open source, as well as commercially usable. It is the main alternative to Tomcat when hosting Java applications. Like you can with Tomcat, you can use Jetty both embedded and stand-alone.
By default, Spring Boot creates applications with embedded web servers, which means that the server is embedded within the application code itself, so you don’t have to run a separate web server to publish Java web applications. However, with a little configuration, you can also publish a WAR file to a separate Jetty or Tomcat servlet container (old-school application server style). Spring also uses Tomcat by default, but you can easily change this, as you’ll see.
In this tutorial, you will build a simple web service with Jetty embedded. After that, you will build the same web service in Spring Boot and Jetty. Finally, you’ll add JWT (JSON Web Token) authentication and authorization to the web service using method-level security with Okta as the OAuth/OIDC provider.
Install the Project Dependencies
You’ll need to install a few things before you get started.
Java 11: This project uses Java 11. If you don’t have Java 11, you can install OpenJDK. You can also install OpenJDK using Homebrew. SDKMAN is another great option for installing and managing Java SDKs.
HTTPie: This is a simple command-line utility for making HTTP requests. You’ll use this to test the REST application. Check out the installation instructions on their website.
Okta Developer Account: You’ll use Okta as an OAuth/OIDC provider to add JWT authentication and authorization to the application. Go to their website and sign up for one of their free developer accounts, if you haven’t already.
Gradle: This is an optional install. If you download the project for this tutorial from the repo, you can run the project using the Gradle wrapper and don’t need to install Gradle. . If you want to build the project from scratch, you’ll need to install Gradle.
Build a Simple Web Service With Java and Jetty
The first step in this tutorial is to build a simple web service using Java and Gradle. To accomplish this, you’ll be using the Gretty plugin for Gradle. Gretty makes it super easy to run web apps on embedded servlet containers using Gradle and supports both Tomcat and Jetty.
If you choose to download the project for this tutorial from the GitHub repo, just follow along for the next few steps while I explain how to build the project from scratch.
git clone https://github.com/oktadeveloper/okta-spring-boot-jetty-example.git
First, open a shell and navigate to an appropriate directory (or create one) where you’d like the project to reside. Initialize the project using the Gradle CLI.
mkdir jetty
cd jetty
gradle init --type=basic --dsl=groovy --project-name=JettyEmbedded
Edit the build.gradle file in the project root directory:
plugins {
    id 'java'
    id 'war'
    id 'org.gretty' version '2.3.1'
}

repositories {
    jcenter()
}

dependencies {
    providedCompile 'javax.servlet:javax.servlet-api:3.1.0'
}

gretty {
    contextPath = '/'
}
I want to point out a few things here. Notice the org.gretty plugin in the plugins block. Also, notice the javax.servlet:javax.servlet-api dependency you added using providedCompile. This adds it to the compile classpath but doesn’t add it to the packaged war file, since this will be provided by the servlet container when it’s deployed. Finally, notice that the context path for the embedded servlet container has been set to root in the gretty block.
Now make the root directory for the Java files (src/main/java is the standard Java root folder, plus the com.okta.jettyembedded package):
mkdir -p src/main/java/com/okta/jettyembedded
Create a simple servlet:
src/main/java/com/okta/jettyembedded/Hello.java
package com.okta.jettyembedded;

import javax.servlet.ServletException;
import javax.servlet.annotation.WebServlet;
import javax.servlet.http.HttpServlet;
import javax.servlet.http.HttpServletRequest;
import javax.servlet.http.HttpServletResponse;
import java.io.IOException;

@WebServlet(name = "HelloServlet", urlPatterns = {"hello"}, loadOnStartup = 1)
public class Hello extends HttpServlet {

    protected void doGet(HttpServletRequest request, HttpServletResponse response)
        throws ServletException, IOException {
        response.getWriter().print("Howdy");
    }

}
Now you can run the app:
gradlew apprun
To test it, open another shell window and use HTTPie:
http :8080/hello
HTTP/1.1 200 OK
Content-Length: 5
Date: Fri, 06 Sep 2019 20:23:40 GMT
Server: Jetty(9.2.26.v20180806)

Howdy
You’ve built a super simple web servlet. It doesn’t do much yet, but it works (hopefully). Notice the @WebServlet annotation in the Hello.java class. Here you can configure some of the servlet parameters, rather than in a web.xml file. Moving this configuration into the code makes it easier to build and maintain some of the servlet configuration.
Next, you’ll take a look at a more fully-featured web servlet.
Improve the Java Servlet with Add and Delete
Now, you will create a web application to track a list of hikes. It will demonstrate how to support POST and DELETE operations, as well as simple GETs and some simple error handling.
Create a new Java file:
src/main/java/com/okta/jettyembedded/HikesTodoServlet.java
package com.okta.jettyembedded;

import java.io.IOException;
import javax.servlet.annotation.WebServlet;
import javax.servlet.http.HttpServlet;
import javax.servlet.http.HttpServletRequest;
import javax.servlet.http.HttpServletResponse;
import java.util.ArrayList;
import java.util.Arrays;
import java.util.List;

@WebServlet(name = "HikesTodoServlet", urlPatterns = {"hikes"}, loadOnStartup = 1)
public class HikesTodoServlet extends HttpServlet {

    // Not synchronized
   private List<String> hikes = new ArrayList<>(Arrays.asList(
            "Wonderland Trail", "South Maroon Peak", "Tour du Mont Blanc",
            "Teton Crest Trail", "Everest Base Camp via Cho La Pass", "Kesugi Ridge"
    ));

    protected void doGet(HttpServletRequest request, HttpServletResponse response)
        throws IOException {
        response.getWriter().print(String.join("\n", this.hikes));
    }

    protected void doPost(HttpServletRequest request, HttpServletResponse response)
        throws IOException {
        String hike = request.getParameter("hike");
        if (hike == null) {
            response.setStatus(400);
            response.getWriter().print("Param 'hike' cannot be null.");
        }
        else if (this.hikes.contains(hike)) {
            response.setStatus(400);
            response.getWriter().print("The hike '"+hike+"' already exists.");
        }
        else {
            this.hikes.add(hike);
            response.getWriter().print(String.join("\n", this.hikes));
        }
    }

    protected void doDelete(HttpServletRequest request, HttpServletResponse response)
        throws IOException {
        String hike = request.getParameter("hike");
        if (hike == null) {
            response.setStatus(400);
            response.getWriter().print("Param 'hike' cannot be null.");
        }
        else {
            this.hikes.remove(hike);
            response.getWriter().print(String.join("\n", this.hikes));
        }
    }

}
Use Control-C to stop the server and restart it with gradle apprun.
GET the list of hikes:
http :8080/hikes
HTTP/1.1 200 OK
...

Wonderland Trail
South Maroon Peak
Tour du Mont Blanc
Teton Crest Trail
Everest Base Camp via Cho La Pass
Kesugi Ridge
POST a new hike:
http -f POST :8080/hikes hike="Pear Lake"
HTTP/1.1 200 OK
...

Wonderland Trail
South Maroon Peak
Tour du Mont Blanc
Teton Crest Trail
Everest Base Camp via Cho La Pass
Kesugi Ridge
Pear Lake
DELETE a hike:
http DELETE :8080/hikes hike=="South Maroon Peak"
HTTP/1.1 200 OK
...

Wonderland Trail
Tour du Mont Blanc
Teton Crest Trail
Everest Base Camp via Cho La Pass
Kesugi Ridge
Pear Lake
Now try to delete a hike that doesn’t exist, or send an empty value:
http DELETE :8080/hikes
HTTP/1.1 400 Bad Request
...

Param 'hike' cannot be null.
To deploy this to a live server, you could just deploy the project as is, using gradle apprun to run the app using the embedded Jetty server. You could also deploy it to an external Jetty server by building the war file using gradle war and copying the war file (found in build/libs) to your server.
NOTE: this is a very naive implementation of a REST service. It uses an in-memory
ArrayListas a data source, which is not synchronized (and thus would run into threading problems in a real web servlet). For anything beyond the scope of this tutorial, you’d need to implement a database backend of some kind. For help on how to do this, see the example blog posts listed at the end of the tutorial. You would typically also add a PUT endpoint and assign each item an ID to use as an index so data can be updated, but that is beyond the scope of this tutorial.
So far things are going pretty great. In the next section, you will recreate the same Hikes ToDo app using Spring Boot, withJWT token auth to the app using Okta as an OAuth/OIDC provider.
Create an OIDC Application
Now let’s take a little field trip over to Okta and set things up for OAuth/OpenID Connect (OIDC). Together, they are a set of open standards for implementing secure authorization and authentication. In this tutorial, Okta will act as the identity provider, and your Spring Boot app will be the client.
You should have already signed up for a free developer account with Okta. Navigate to the developer dashboard at https://developer.okta.com. If this is your first time logging in, you may need to click the Admin button.
To configure JWT authentication and authorization, you need to create an OIDC application.
From the top menu, click on the Application button. Click the Add Application button.
Select application type Web.
Click Next.
Give the app a name. I named mine “Spring Boot Jetty”.
Under Login redirect URIs, add two new URIs:
https://oidcdebugger.com/debughttp://localhost:8080/login/oauth2/code/okta
Under Grant types allowed, check Implicit (Hybrid).
The rest of the default values will work.
Click Done.
Leave the page open or take note of the Client ID. You’ll need it in a bit when you generate a token.
NOTE: You will use the oidcdebugger.com redirect URI and implicit grant type to create an access token you can use from the command line with HTTPie. The second URI is the default redirect URI that Spring Security uses for Okta when using its OAuth login feature.
Create a Spring Boot Project with Jetty
To create the Spring Boot project, you will use Spring Initializr. Check out its GitHub project to see its code. Initializr has a nice web form for configuring and downloading Spring Boot starter projects, but for this project, you will use its REST API.
From a shell, execute the following command to download a zip file of the configured starter project.
http https://start.spring.io/starter.zip \
  javaVersion==11 \
  dependencies==web \
  language==java \
  type==gradle-project \
  name==SpringBootJetty \
  groupId==com.okta.springbootjetty \
  artifactId==SpringBootJetty \
  packageName==com.okta.springbootjetty -o SpringBootJetty.zip
Unzip the downloaded file and open the directory in the IDE of your choice.
First, modify the build.gradle file so the project uses a Jetty-embedded container, instead of the default Tomcat. Add the spring-boot-starter-jetty dependency and exclude the spring-boot-starter-tomcat dependency.
Change the build.gradle file to match the following:
plugins {
    id 'org.springframework.boot' version '2.2.0.RELEASE'
    id 'io.spring.dependency-management' version '1.0.8.RELEASE'
    id 'java'
}

group = 'com.okta.springbootjetty'
version = '0.0.1-SNAPSHOT'
sourceCompatibility = '11'

repositories {
    mavenCentral()
}

dependencies {
    implementation 'org.springframework.boot:spring-boot-starter-web'
    implementation 'org.springframework.boot:spring-boot-starter-jetty'
    testImplementation('org.springframework.boot:spring-boot-starter-test') {
        exclude group: 'org.junit.vintage', module: 'junit-vintage-engine'
    }
}

test {
    useJUnitPlatform()
}


configurations {
   compile.exclude module: "spring-boot-starter-tomcat"
}
Now add a WebController.java file.
src/main/java/com/okta/springbootjetty/WebController.java
package com.okta.springbootjetty;

import org.springframework.stereotype.Controller;
import org.springframework.web.bind.annotation.*;

import javax.servlet.http.HttpServletResponse;
import java.util.ArrayList;
import java.util.Arrays;
import java.util.List;

@Controller
public class WebController {

   private List<String> hikes = new ArrayList<>(Arrays.asList(
            "Wonderland Trail", "South Maroon Peak", "Tour du Mont Blanc",
            "Teton Crest Trail", "Everest Base Camp via Cho La Pass", "Kesugi Ridge"
    ));

    @GetMapping("/")
    @ResponseBody
    public String indexGet() {
        return String.join("\n", this.hikes);
    }

    @PostMapping("/")
    @ResponseBody
    public String indexPost(@RequestParam String hike, HttpServletResponse response) {
        if (hike == null) {
            response.setStatus(400);
            return "Param 'hike' cannot be null.";
        }
        else if (this.hikes.contains(hike)) {
            response.setStatus(400);
            return "The hike '"+hike+"' already exists.";
        }
        else {
            this.hikes.add(hike);
            return String.join("\n", this.hikes);
        }
    }

    @DeleteMapping("/")
    @ResponseBody
    public String indexDelete(@RequestParam String hike, HttpServletResponse response) {
        if (hike == null) {
            response.setStatus(400);
            return "Param 'hike' cannot be null.";
        }
        else {
            this.hikes.remove(hike);
            return String.join("\n", this.hikes);
        }
    }

}
This controller recreates the same functionality found in the first Jetty Hikes ToDo app, but now with Spring Boot. You’ll notice Spring simplified some of the syntax. The @ResponseBody annotation tells Spring Boot the controller is returning the response body directly (as opposed to returning a template name). Also, notice the code uses dependency injection to get the HttpServletResponse as well as the request params.
Run the Spring Boot REST service (make sure your other service is stopped or you’ll get a port conflict error):
gradle bootRun
From a second shell window, GET the list of hikes (notice that there’s no /hikes path below).
http :8080
Also, try adding and deleting a new hike.
POST a new hike:
http -f POST :8080 hike="Pear Lake"
DELETE a hike:
http DELETE :8080 hike=="South Maroon Peak"
Deploy the Spring Boot Project
You now have a Spring Boot application that runs on an embedded Jetty container. To deploy it to a production server, build an executable jar file using gradle bootJar, copy this jar file to the server, and run it using java -jar <your jar file name>.jar. There’s no need for a separate web server since this jar contains an embedded Jetty web server.
NOTE: For a more old-school deployment to an application server with multiple separate applications on the same server, you need to build a war file. The Spring docs on how to do this are a great resource. Essentially you need to do two things: 1) add the
warplugin to the project dependencies, and 2) change the Jetty or Tomcat dependency toprovidedRuntimeso it’s not included in the packaged war. Then you build a war file and deploy it to the servlet web app path on the server.
Add OAuth/OIDC Login to the Spring Boot App
You signed up for Okta and created the OIDC application. Now it’s time to configure the Spring Boot app to use OAuth/OIDC for authentication and authorization.
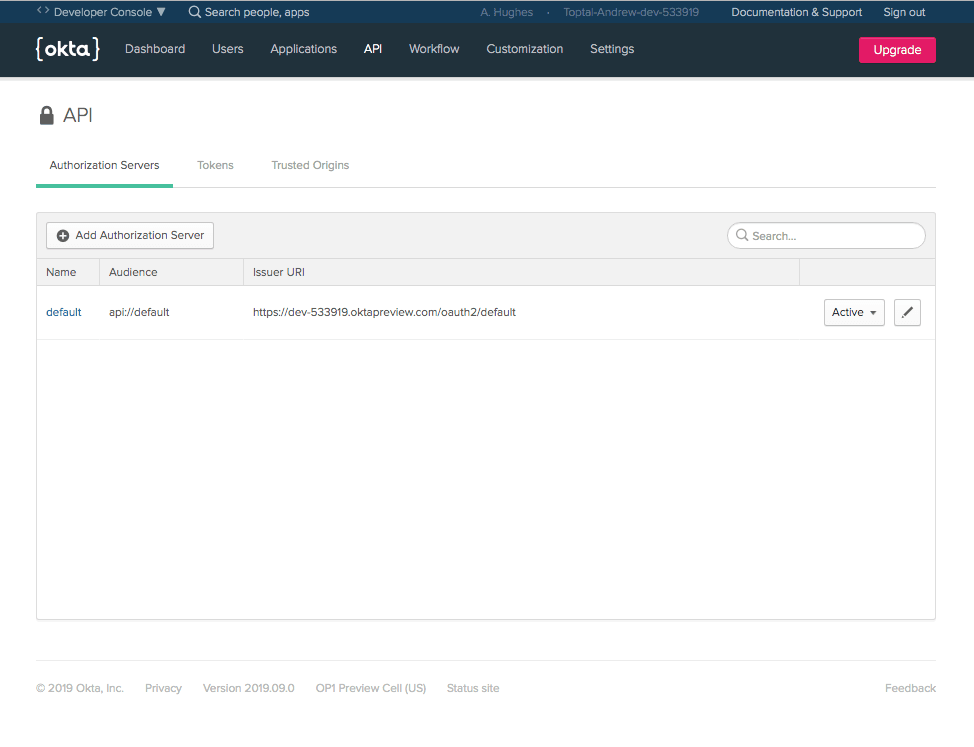
First, add your Issuer URI to the src/main/resources/application.properties file. You need to replace {yourOktaUrl} with your actual Okta URL. If you go to https://developer.okta.com and navigate to API and Authorization Servers, you’ll see the Issuer URI for the default authorization server.
okta.oauth2.issuer=https://{yourOktaUrl}/oauth2/default
While you’re in that file, add the client ID and client secret from the “Spring Boot Jetty” app you created earlier.
okta.oauth2.clientId={clientId}
okta.oauth2.clientSecret={clientSecret}
Next, you need to add the following dependency to your build.gradle file in the dependencies {} block.
implementation 'com.okta.spring:okta-spring-boot-starter:1.3.0'
This includes the Okta Spring Boot Starter, a nice project that simplifies the use of Okta authentication and authorization with Spring Boot. Take a look at the project page for more info.
You also need to update the SpringBootJettyApplication class to match the following:
package com.okta.springbootjetty;

import org.springframework.boot.SpringApplication;
import org.springframework.boot.autoconfigure.SpringBootApplication;
import org.springframework.security.config.annotation.web.builders.HttpSecurity;
import org.springframework.security.config.annotation.web.configuration.WebSecurityConfigurerAdapter;

@SpringBootApplication
public class SpringBootJettyApplication extends WebSecurityConfigurerAdapter {

    public static void main(String[] args) {
        SpringApplication.run(SpringBootJettyApplication.class, args);
    }

    @Override
    public void configure(HttpSecurity http) throws Exception {
        http
            .authorizeRequests()
                .anyRequest().permitAll()
                .and()
            .oauth2Login()
                .and()
            .oauth2ResourceServer().jwt();
    }

}
Protect Your DELETE and POST Endpoints
The configure(HttpSecurity http) method configures your Spring Boot app with OAuth 2.0 login, as an OAuth 2.0 resource server, and to permit all requests by default. You’ll use method-level security via the @PreAuthorize annotation to protect the DELETE and POST endpoints below.
Finally, add the @PreAuthorize("isAuthenticated") annotation to the indexPost() and indexDelete() methods of the WebController class.
package com.okta.springbootjetty;

import org.springframework.security.access.prepost.PreAuthorize;
import org.springframework.stereotype.Controller;
import org.springframework.web.bind.annotation.*;

import javax.servlet.http.HttpServletResponse;
import java.util.ArrayList;
import java.util.Arrays;
import java.util.List;

@Controller
public class WebController {

   private List<String> hikes = new ArrayList<>(Arrays.asList(
            "Wonderland Trail", "South Maroon Peak", "Tour du Mont Blanc",
            "Teton Crest Trail", "Everest Base Camp via Cho La Pass", "Kesugi Ridge"
    ));

    @GetMapping("/")
    @ResponseBody
    public String indexGet() {
        return String.join("\n", this.hikes);
    }

    @PreAuthorize("isAuthenticated")  // <- ***ADDED***
    @PostMapping("/")
    @ResponseBody
    public String indexPost(@RequestParam String hike, HttpServletResponse response) {
        if (hike == null) {
            response.setStatus(400);
            return "Param 'hike' cannot be null.";
        }
        else if (this.hikes.contains(hike)) {
            response.setStatus(400);
            return "The hike '"+hike+"' already exists.";
        }
        else {
            this.hikes.add(hike);
            return String.join("\n", this.hikes);
        }
    }

    @PreAuthorize("isAuthenticated")  // <- ***ADDED***
    @DeleteMapping("/")
    @ResponseBody
    public String indexDelete(@RequestParam String hike, HttpServletResponse response) {
        if (hike == null) {
            response.setStatus(400);
            return "Param 'hike' cannot be null.";
        }
        else {
            this.hikes.remove(hike);
            return String.join("\n", this.hikes);
        }
    }

}
You now have a protected web service. You can make GET requests, but you won’t be able to POST or DELETE. Restart your server and verify this with the following HTTPie commands.
http :8080
HTTP/1.1 200 OK
...

Wonderland Trail
South Maroon Peak
Tour du Mont Blanc
Teton Crest Trail
Everest Base Camp via Cho La Pass
Kesugi Ridge
http -f POST :8080 hike="Pear Lake"
HTTP/1.1 403 Forbidden
...

{
    "error": "Forbidden",
    "message": "Forbidden",
    "path": "/",
    "status": 403,
    "timestamp": "2019-09-07T16:13:59.474+0000"
}
Generate a JWT Using the OIDC Debugger
To access the protected endpoints, you need to generate a JWT. To do this, you can use the OIDC Debugger. You’ll need the Client ID from the OIDC app you created earlier, as well as your base Okta URI (the same as the base URI in the Issuer URI).
Open the OIDC Debugger.
Update the Authorization URI to: https://{yourOktaUri}/oauth2/default/v1/authorize
Update the Client ID to the Client ID from your OIDC application.
Put something in the State field. For the purposes of this tutorial, this can be anything. This value is used to help protect against cross-site forgery requests.
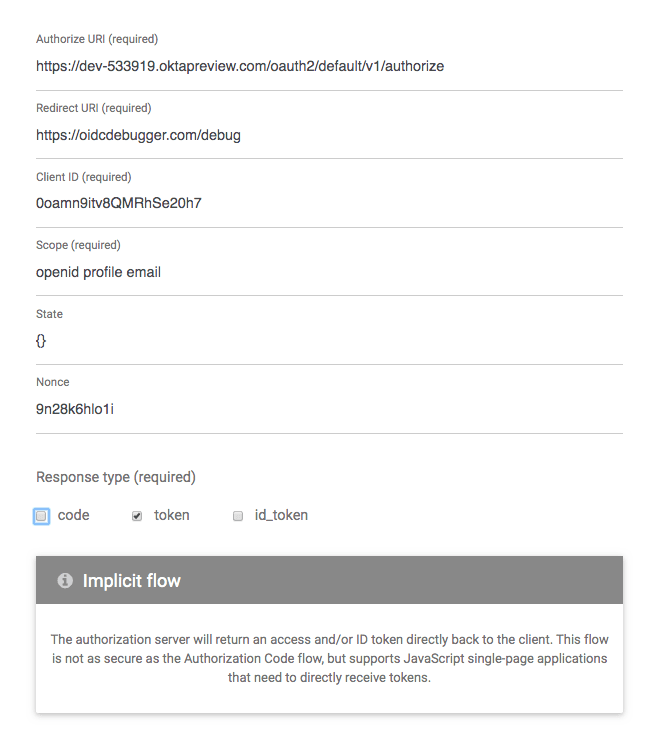
Scroll down and click Send Request.
Copy the token to your clipboard and store it in a shell variable in the shell window you’re using to make requests.
TOKEN=eyJraWQiOiJIb05xb01mNE9jREltWnBGRnBINjZGTkFOM0J...
Now try and POST a new hike and then remove it.
http -f POST :8080 hike="Pear Lake" "Authorization: Bearer $TOKEN"
HTTP/1.1 200 OK
...

Wonderland Trail
South Maroon Peak
Tour du Mont Blanc
Teton Crest Trail
Everest Base Camp via Cho La Pass
Kesugi Ridge
Pear Lake
http DELETE :8080 hike=="South Maroon Peak" "Authorization: Bearer $TOKEN"
HTTP/1.1 200 OK
...

Wonderland Trail
Tour du Mont Blanc
Teton Crest Trail
Everest Base Camp via Cho La Pass
Kesugi Ridge
Pear Lake
You configured this app to use Spring Security’s oauth2Login() as well. This means you can go to http://localhost:8080/login, click your issuer URL, and log in that way too.
Learn More about Java, Spring Boot, and Spring Security
That’s that. In this tutorial, you saw how to make a simple Java servlet service and run it with Jetty. You also saw how to recreate the same service in Spring Boot, configure it to use Jetty, and simplify your Java code. Finally, you saw how to use a free developer account from Okta to add OAuth/OIDC security to your Spring Boot app.
You can find the code for this tutorial on GitHub at oktadeveloper/okta-spring-boot-jetty-example.
Here are some related blog posts:
- Simple Token Authentication for Java Apps
- Build a Web App with Spring Boot and Spring Security in 15 Minutes
- Create a Secure Spring REST API
- Build a Simple CRUD App with Spring Boot and Vue.js
If you have any questions about this post, please add a comment below. For more awesome content, follow @oktadev on Twitter, like us on Facebook, or subscribe to our YouTube channel.
Easily deploy your app with Okta’s identity management platform Use Okta’s API to authenticate, manage, and secure users in any app within minutes. Try Okta today.


gradle init –type=basic –dsl=groovy –project-name=JettyEmbedded
–dsl not recognized