This is a tutorial on creating a browser-based editor for a new language we are going to define.
We are going to use two components:
- Monaco: it is a great browser-based editor (or a web editor: as you prefer to call it)
- ANTLR: it is the parser generator we love to use to build all sorts of parsers
We will build an editor for a simple language to perform calculations. The result will be this:

All the code is available online: calc-monaco-editor.
Some time ago we wrote an article on building a simple web editor using ANTLR in the browser. We build on this work at the next step, adapting it to use NPM and WebPack to make easier building the application.
Why using Monaco?
Monaco is derived from Visual Studio Code (VSCode, for its friends). VSCode is a lightweight editor which is getting more and more users. Monaco is basically VSCode repackaged to run in the browser. It is a great editor, with tons of interesting features, it is well maintained and it is released under a permissive open-source license (The MIT License).
Why using ANTLR?
ANTLR is a tool that given a grammar can generate a corresponding parser in multiple target languages. Among others Java, C#, Python, and Javascript are supported. Another added value is that there are several grammars available for ANTLR. So if you learn how to combine Monaco and ANTLR you can easily get support in Monaco for any language for which you can find an ANTLR grammar. We have extensive material on ANTLR, from our free ANTLR Mega Tutorial to a video course to learn ANTLR Like a Professional.
Our sample project
Let’s revise how we are going to organize our project:
- In this project we are going to use NPM to download dependencies, such as the ANTLR runtime
- We will use gradle to invoke the ANTLR tool, which will generate the Javascript parser for our language from the grammar definition
- We are going to write our code in TypeScript. Our code will wire ANTLR into Monaco
- We will package the Javascript in a single file using WebPack
- We will write unit tests using mocha
- We will write a simpler server using Kotlin and the ktor framework. This could be replaced by any server, it is just that I prefer working with Kotlin, whenever I get a chance.
Our simple calculation language
Our language will be very simple. It will just permit to perform very simple calculations. This is intentional, but the same approach can be used with very complex languages.
We will be able to write code like this:
input a
b = a * 2
c = (a - b) / 3
output c
In practice our language will permit to define:
- inputs: they are values to be received by the calculator
- calculations: new values can be calculated and stored in variables. They can be calculated from inputs or other variables
- outputs: we identify the variables that we want to return as a result of our calculations
Writing the parser
First of all we will start by defining the grammars of the lexer and the parser.
We will create the directory src/main/antlr and inside that directory we will define the files CalcLexer.g4 and CalcParser.g4 .
We will not explain from scratch how to write ANTLR grammars. If you are not familiar with ANTLR, the ANTLR Mega Tutorial is a good place where to start. However we have a few comments specific to this use case, in particular on the lexer.
- We should not skip whitespace but we should instead insert those tokens into a specific channel because all tokens will be relevant for syntax highlighting.
- Also, the lexer should attribute every single character to a token, this is why we add a special rule at the end of the lexer to catch any character that was not captured by other lexer rules.
- For the sake of simplicity we should avoid tokens spanning multiple lines or using lexical modes because they would make the integration with Monaco harder for syntax highlighting. These are problems we can solve (and we solve for Clients’ projects) but we do not want to tackle them in this tutorial as they would make harder understanding the basics
This is our lexer grammar (CalcLexer.g4):
lexer grammar CalcLexer;
channels { WS_CHANNEL }
WS: [ \t]+ -> channel(WS_CHANNEL);
NL: ('\r\n' | '\r' | '\n') -> channel(WS_CHANNEL);
INPUT_KW : 'input' ;
OUTPUT_KW : 'output' ;
NUMBER_LIT : ('0'|[1-9][0-9]*)('.'[0-9]+)?;
ID: [a-zA-Z][a-zA-Z0-9_]* ;
LPAREN : '(' ;
RPAREN : ')' ;
EQUAL : '=' ;
MINUS : '-' ;
PLUS : '+' ;
MUL : '*' ;
DIV : '/' ;
UNRECOGNIZED : . ;
And this is our parser grammar (CalcParser.g4):
parser grammar CalcParser;
options { tokenVocab=CalcLexer; }
compilationUnit:
    (inputs+=input)*
    (calcs+=calc)*
    (outputs+=output)*
    EOF
    ;
input:
   INPUT_KW ID
    ;
output:
    OUTPUT_KW ID
    ;
calc:
   target=ID EQUAL value=expression
   ;
expression:
   NUMBER_LIT
   | ID
   | LPAREN expression RPAREN
   | expression operator=(MUL|DIV) expression
   | expression operator=(MINUS|PLUS) expression
   | MINUS expression
   ;
Now that we have the grammars we need to generate the Javascript lexer parser from them. For this we will need to use the ANTLR tool. The easiest approach for me is using gradle to download ANTLR and the dependencies, and define tasks in gradle to invoke ANTLR.
We will install the gradle wrapper by running:
gradle wrapper --gradle-version=5.6.1 --distribution-type=bin
The build.gradle script will look like this:
apply plugin: 'java'
repositories {
    jcenter()
}
dependencies {
    runtime 'org.antlr:antlr4:4.7.2'
}
task generateLexer(type:JavaExec) {
  def lexerName = "CalcLexer"
  inputs.file("$ANTLR_SRC/${lexerName}.g4")
  outputs.file("$GEN_JS_SRC/${lexerName}.js")
  outputs.file("$GEN_JS_SRC/${lexerName}.interp")
  outputs.file("$GEN_JS_SRC/${lexerName}.tokens")
  main = 'org.antlr.v4.Tool'
  classpath = sourceSets.main.runtimeClasspath
  args = ['-Dlanguage=JavaScript', "${lexerName}.g4", '-o', '../../main-generated/javascript']
  workingDir = ANTLR_SRC
}
task generateParser(type:JavaExec) {
  dependsOn generateLexer
  def lexerName = "CalcLexer"
  def parserName = "CalcParser"
  inputs.file("$ANTLR_SRC/${parserName}.g4")
  inputs.file("$GEN_JS_SRC/${lexerName}.tokens")
  outputs.file("$GEN_JS_SRC/${parserName}.js")
  outputs.file("$GEN_JS_SRC/${parserName}.interp")
  outputs.file("$GEN_JS_SRC/${parserName}.tokens")
  main = 'org.antlr.v4.Tool'
  classpath = sourceSets.main.runtimeClasspath
  args = ['-Dlanguage=JavaScript', "${parserName}.g4", '-no-listener', '-no-visitor', '-o', '../../main-generated/javascript']
  workingDir = ANTLR_SRC
}
It uses some properties defined in the gradle.properties file:
ANTLR_SRC = src/main/antlr
GEN_JS_SRC = src/main-generated/javascript
In practice this will use the grammars under src/main/antlr to generate the lexer and parser under src/main-generated/javascript.
We can run ANTLR:
./gradlew generateParser
This will also generate the lexer, as the task generateParser task has a dependency on the task generateLexer.
After running this command you should have these files under src/main-generated/javascript:
- CalcLexer.interp
- CalcLexer.js
- CalcLexer.tokens
- CalcParser.interp
- CalcParser.js
- CalcParser.tokens
Using NPM to manage dependencies
In order to run our lexer and parser we will need two things: the generated Javascript code and the ANTLR runtime. To get the ANTLR runtime we are going to use NPM. NPM will be also used to download Monaco. So we are not going to run Node.JS for our project, we will just use it to obtain dependencies and to run tests.
We will assume you have installed npm on your system. If you did not, well, time to hit google and figure out how to install it.
Once we have npm installed we need to provide to it a project configuration by filling our package.json file:
{
  "name": "calc-monaco-editor",
  "version": "0.0.1",
  "author": "Strumenta",
  "license": "Apache-2.0",
  "repository": "https://github.com/Strumenta/calc-monaco-editor",
  "dependencies": {
    "antlr4": "^4.7.2",
    "webpack": "^4.39.2",
    "webpack-cli": "^3.3.7"
  },
  "devDependencies": {
    "mocha": "^6.2.0",
    "monaco-editor": "^0.17.1"
  },
  "scripts": {
    "test": "mocha"
  }
}
At this point we can install everything we need simply by running npm install.
Now you should have obtained the ANTLR 4 runtime under node_modules, together with a few other things. Yes, there is a lot of stuff. Yes, you would not like having to download that stuff manually, so thank you npm!
Compiling TypeScript
Let’s now write some code using our generated lexer and parser.
We will create the directory src/main/typescript and we will start writing a file named ParserFacade.ts. In this file we will write some code to invoke and generated lexer and parser and get a list of tokens. Later we will look also into obtaining a parse tree.
/// <reference path="../../../node_modules/monaco-editor/monaco.d.ts" />
import {InputStream, Token} from '../../../node_modules/antlr4/index.js'
import {CalcLexer} from "../../main-generated/javascript/CalcLexer.js"
function createLexer(input: String) {
    const chars = new InputStream(input);
    const lexer = new CalcLexer(chars);
    lexer.strictMode = false;
    return lexer;
}
export function getTokens(input: String) : Token[] {
    return createLexer(input).getAllTokens()
}
We will then need to generate the Javascript code from Typescript. We will generate it under src/main-generated/javascript using the tsc tool. To configure it we will need to create the tsconfig.json file.
{
  "compilerOptions": {
    "module": "CommonJS",
    "target": "es5",
    "sourceMap": true,
    "outDir": "src/main-generated/javascript"
  },
  "exclude": [
    "node_modules"
  ],
  "include" : [
    "src/main/typescript"
  ]
}
At this point we can simply run:
tsc
Under src/main-generated/javascript we should also see these files:
- ParserFacade.js
- ParserFacade.js.map
How do we ensure our code works? With unit tests, of course!
Writing unit tests
We will configure mocha by creating test/mocha.opts with this content:
src/test/javascript
--recursive
Now we are ready to write our tests. Under src/test/javascript we will create lexingTest.js:
let assert = require('assert');
let parserFacade = require('../../main-generated/javascript/ParserFacade.js');
let CalcLexer = require('../../main-generated/javascript/CalcLexer.js').CalcLexer;
function checkToken(tokens, index, typeName, column, text) {
    it('should have ' + typeName + ' in position ' + index, function () {
        assert.equal(tokens[index].type, CalcLexer[typeName]);
        assert.equal(tokens[index].column, column);
        assert.equal(tokens[index].text, text);
    });
}
describe('Basic lexing without spaces', function () {
    let tokens = parserFacade.getTokens("a=5");
    it('should return 3 tokens', function() {
      assert.equal(tokens.length, 3);
    });
    checkToken(tokens, 0, 'ID', 0, "a");
    checkToken(tokens, 1, 'EQUAL', 1, "=");
    checkToken(tokens, 2, 'NUMBER_LIT', 2, "5");
});
We can run the tests with:
tsc && npm test
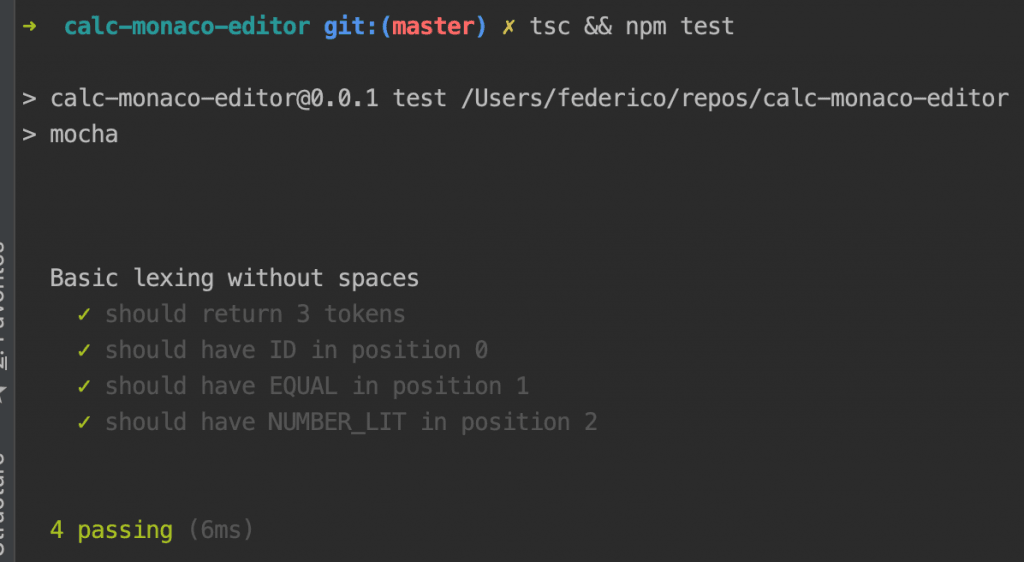
Good, our project is starting to go somewhere and we have a mean to check the sanity of our code. Life is good.
Now, that we have put these basis in place we can write more code in ParserFacade.
Let’s complete ParserFacade
We are now going to complete ParserFacade. In particular we will expose a simple function to get a string representation of the parse tree. This will be useful to test our parser.
/// <reference path="../../../node_modules/monaco-editor/monaco.d.ts" />
import {CommonTokenStream, InputStream, Token, error} from '../../../node_modules/antlr4/index.js'
import {CalcLexer} from "../../main-generated/javascript/CalcLexer.js"
import {CalcParser} from "../../main-generated/javascript/CalcParser.js"
class MyErrorListener extends error.ErrorListener {
    syntaxError(recognizer, offendingSymbol, line, column, msg, e) {
        console.log("ERROR " + msg);
    }
}
function createLexer(input: String) {
    const chars = new InputStream(input);
    const lexer = new CalcLexer(chars);
    lexer.strictMode = false;
    return lexer;
}
export function getTokens(input: String) : Token[] {
    return createLexer(input).getAllTokens()
}
function createParser(input) {
    const lexer = createLexer(input);
    return createParserFromLexer(lexer);
}
function createParserFromLexer(lexer) {
    const tokens = new CommonTokenStream(lexer);
    return new CalcParser(tokens);
}
function parseTree(input) {
    const parser = createParser(input);
    return parser.compilationUnit();
}
export function parseTreeStr(input) {
    const lexer = createLexer(input);
    lexer.removeErrorListeners();
    lexer.addErrorListener(new MyErrorListener());
    const parser = createParserFromLexer(lexer);
    parser.removeErrorListeners();
    parser.addErrorListener(new MyErrorListener());
    const tree = parser.compilationUnit();
    return tree.toStringTree(parser.ruleNames);
}
Let’s now see how we can test our parser. We create parsingTest.js under src/test/javascript:
let assert = require('assert');
let parserFacade = require('../../main-generated/javascript/ParserFacade.js');
function checkToken(tokens, index, typeName, column, text) {
    it('should have ' + typeName + ' in position ' + index, function () {
        assert.equal(tokens[index].type, CalcLexer[typeName]);
        assert.equal(tokens[index].column, column);
        assert.equal(tokens[index].text, text);
    });
}
describe('Basic parsing of empty file', function () {
    assert.equal(parserFacade.parseTreeStr(""), "(compilationUnit <EOF>)")
});
describe('Basic parsing of single input definition', function () {
    assert.equal(parserFacade.parseTreeStr("input a"), "(compilationUnit (input input a) <EOF>)")
});
describe('Basic parsing of single output definition', function () {
    assert.equal(parserFacade.parseTreeStr("output a"), "(compilationUnit (output output a) <EOF>)")
});
describe('Basic parsing of single calculation', function () {
    assert.equal(parserFacade.parseTreeStr("a = b + 1"), "(compilationUnit (calc a = (expression (expression b) + (expression 1))) <EOF>)")
});
describe('Basic parsing of simple script', function () {
    assert.equal(parserFacade.parseTreeStr("input i\no = i + 1\noutput o"), "(compilationUnit (input input i) (calc o = (expression (expression i) + (expression 1))) (output output o) <EOF>)")
});
And hurray! Our tests pass.
Ok, we have a lexer and we have a parser. Both seems to work decently enough.
Now the point is: how can we now use this stuff in combination with Monaco? Let’s find out.
Integrate in Monaco
We will now create a simple HTML page which will host our Monaco editor:
<!DOCTYPE html>
<html>
<head>
   <title>Calc Editor</title>
   <meta http-equiv="X-UA-Compatible" content="IE=edge" />
   <meta http-equiv="Content-Type" content="text/html;charset=utf-8" >
</head>
<body>
<h2>Calc Editor</h2>
<div id="container" style="width:800px;height:600px;border:1px solid grey"></div>
<script src="node_modules/monaco-editor/min/vs/loader.js"></script>
<script src="js/main.js"></script>
<script>
   require.config({ paths: { 'vs': 'node_modules/monaco-editor/min/vs' }});
   require(['vs/editor/editor.main'], function() {
      monaco.languages.register({ id: 'calc' });
      let editor = monaco.editor.create(document.getElementById('container'), {
         value: [
            'input a',
            'b = a * 2',
            'c = (a - b) / 3',
            'output c',
            ''
         ].join('\n'),
         language: 'calc'
      });
   });
</script>
</body>
This page will need to:
- load the Monaco code
- load the code we will write to integrate ANTLR into Monaco
Now, we want to package the code we will write into a single Javascript file, to make faster and easier to load the Javascript code into the browser. To do that we are going to use webpack: it will examine an entry file, find all dependencies and pack them into a single file.
Also webpack wants its own configuration, in a file named webpack.config.js:
module.exports = {
    entry: './src/main/javascript/index.js',
    output: {
        filename: 'main.js',
    },
    module: {
        rules: [{
            test: /\.tsx?$/,
            use: 'ts-loader',
            exclude: /node_modules/
        }]
    },
    resolve: {
        modules: ['node_modules'],
        extensions: [ '.tsx', '.ts', '.js' ]
    },
    mode: 'production',
    node: {
        fs: 'empty',
        global: true,
        crypto: 'empty',
        tls: 'empty',
        net: 'empty',
        process: true,
        module: false,
        clearImmediate: false,
        setImmediate: false
    }
}
We also need to define the entry point Javascript file. We will create it under src/main/javascript/index.js. For now we will leave it empty.
Now running webpack we can generate the dist/main.js file that we load into the HTML page.
Serving files: our simple server written in Kotlin
At this point we are going to setup a very simple web server using Kotlin. This part is not so important and you may want to choose a different approach to server your files.
We will create a subdirectory named server with this build.gradle file:
buildscript {
    ext.kotlin_version = '1.3.41'
    repositories { jcenter() }

    dependencies {
        classpath "org.jetbrains.kotlin:kotlin-gradle-plugin:$kotlin_version"
        classpath "org.jetbrains.kotlin:kotlin-serialization:$kotlin_version"
    }
}

plugins {
    id 'org.jetbrains.kotlin.jvm' version '1.3.41'
}

apply plugin: 'kotlin'
apply plugin: 'kotlinx-serialization'

repositories {
    mavenCentral()
    jcenter()
}

ext.ktor_version = "1.2.3"

dependencies {
    implementation "org.jetbrains.kotlin:kotlin-stdlib-jdk8"

    compile "io.ktor:ktor-server-core:$ktor_version"
    compile "io.ktor:ktor-server-netty:$ktor_version"
    implementation "io.ktor:ktor-websockets:$ktor_version"
    implementation 'com.google.code.gson:gson:2.8.5'
    implementation 'org.jetbrains.kotlin:kotlin-test'
    implementation 'org.jetbrains.kotlin:kotlin-test-junit'
    compile "org.jetbrains.kotlin:kotlin-stdlib:$kotlin_version"
    compile "org.jetbrains.kotlinx:kotlinx-serialization-runtime:0.11.1"
}

compileKotlin {
    kotlinOptions {
        jvmTarget = "1.8"
    }
}

compileTestKotlin {
    kotlinOptions {
        jvmTarget = "1.8"
    }
}

task runServer(type:JavaExec) {
    main = 'com.strumenta.simpleserver.MainKt'
    classpath = sourceSets.main.runtimeClasspath
    args = ['8888']
}
This script specifies the dependencies and add a task to run the server from the command line.
The code of the server is quite simple:
package com.strumenta.simpleserver

import io.ktor.application.call
import io.ktor.http.ContentType
import io.ktor.http.content.files
import io.ktor.http.content.static
import io.ktor.response.respondText
import io.ktor.routing.get
import io.ktor.routing.routing
import io.ktor.server.engine.embeddedServer
import io.ktor.server.netty.Netty
import java.io.File

fun main(args: Array) {
    val port = if (args.isEmpty()) 8080 else args[0].toInt()
    val server = embeddedServer(Netty, port = port) {
        routing {
            static("css") {
                files("../src/main/css")
            }
            static("js") {
                files("../dist")
            }
            static("node_modules") {
                files("../node_modules")
            }
            get("/") {
                try {
                    val text = File("../src/main/html/index.html").readText(Charsets.UTF_8)
                    call.respondText(text, ContentType.Text.Html)
                } catch (e: Exception) {
                    e.printStackTrace()
                }
            }
        }
    }
    server.start(wait = false)
}
At this point we can simply run the server from the server directory by running:
../gradlew runServer
Note that the gradle wrapper is installed under the root directory so we run it with ../gradlew instead of the usual ./gradlew.
Now if we open the browser at localhost:8888 we see this:
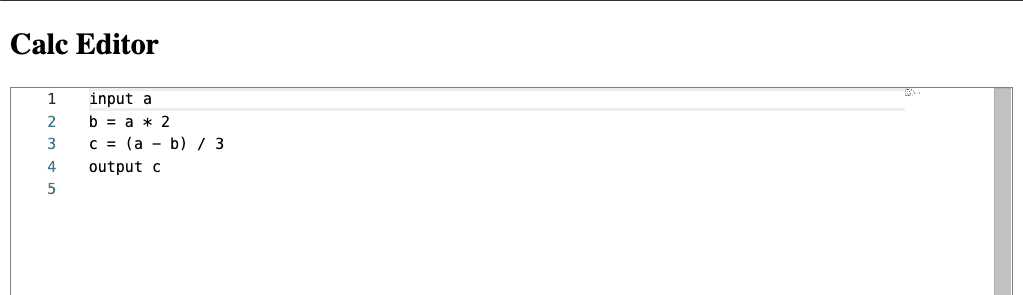
Pretty basic, right? Let’s see how we can improve it.
Syntax highlighting
The first thing we need to add is syntax highlighting, i.e., we want to present the different tokens in different ways, so that keywords can be distinguished from identifiers, literals can be distinguished from operators, and so on. As basic as this feature is, it is something useful to provide feedback as we type our code. When we have syntax highlighting we can take a glance at the code and understand it much more quickly. And it is a nice touch.
To add support for syntax highlighting we will need to change a few files:
- We will need to write the necessary TypeScript code
- We will need to include that code in
index.js - We will need to invoke the new code in
index.htmland do the necessary wiring with Monaco
Let’s get started.
In ParserFacade.ts we will only change one thing: export createLexer.
export function createLexer(input: String) {
   ...
}
We will also add another TypeScript file, named CalcTokensProvider.ts:
/// <reference path="../../../node_modules/monaco-editor/monaco.d.ts" />
import {createLexer} from './ParserFacade'
import {CommonTokenStream, error, InputStream} from '../../../node_modules/antlr4/index.js'
import ILineTokens = monaco.languages.ILineTokens;
import IToken = monaco.languages.IToken;

export class CalcState implements monaco.languages.IState {
    clone(): monaco.languages.IState {
        return new CalcState();
    }

    equals(other: monaco.languages.IState): boolean {
        return true;
    }

}

export class CalcTokensProvider implements monaco.languages.TokensProvider {
    getInitialState(): monaco.languages.IState {
        return new CalcState();
    }

    tokenize(line: string, state: monaco.languages.IState): monaco.languages.ILineTokens {
        // So far we ignore the state, which is not great for performance reasons
        return tokensForLine(line);
    }

}

const EOF = -1;

class CalcToken implements IToken {
    scopes: string;
    startIndex: number;

    constructor(ruleName: String, startIndex: number) {
        this.scopes = ruleName.toLowerCase() + ".calc";
        this.startIndex = startIndex;
    }
}

class CalcLineTokens implements ILineTokens {
    endState: monaco.languages.IState;
    tokens: monaco.languages.IToken[];

    constructor(tokens: monaco.languages.IToken[]) {
        this.endState = new CalcState();
        this.tokens = tokens;
    }
}

export function tokensForLine(input: string): monaco.languages.ILineTokens {
    var errorStartingPoints : number[] = []

    class ErrorCollectorListener extends error.ErrorListener {
        syntaxError(recognizer, offendingSymbol, line, column, msg, e) {
            errorStartingPoints.push(column)
        }
    }

    const lexer = createLexer(input);
    lexer.removeErrorListeners();
    let errorListener = new ErrorCollectorListener();
    lexer.addErrorListener(errorListener);
    let done = false;
    let myTokens: monaco.languages.IToken[] = [];
    do {
        let token = lexer.nextToken();
        if (token == null) {
            done = true
        } else {
            // We exclude EOF
            if (token.type == EOF) {
                done = true;
            } else {
                let tokenTypeName = lexer.symbolicNames[token.type];
                let myToken = new CalcToken(tokenTypeName, token.column);
                myTokens.push(myToken);
            }
        }
    } while (!done);

    // Add all errors
    for (let e of errorStartingPoints) {
        myTokens.push(new CalcToken("error.calc", e));
    }
    myTokens.sort((a, b) => (a.startIndex > b.startIndex) ? 1 : -1)

    return new CalcLineTokens(myTokens);
}
Regarding index.js we basically need to import stuff and expose it in a way we can access it from the HTML page. How? Simple, we will add the necessary element into the window object, if it is present (and it is present only when accessing the code from within the browser).
const CalcTokensProvider = require('../../main-generated/javascript/CalcTokensProvider.js');

if (typeof window === 'undefined') {

} else {
    window.CalcTokensProvider = CalcTokensProvider;
}
At this point all that remains to do is to make Monaco aware of our new CalcTokensProvider. Well, that and setup some styling, so that we can actually see the different types of tokens in the editor:
<script>
   require.config({ paths: { 'vs': 'node_modules/monaco-editor/min/vs' }});

   require(['vs/editor/editor.main'], function() {
      monaco.languages.register({ id: 'calc' });

      monaco.languages.setTokensProvider('calc', new CalcTokensProvider.CalcTokensProvider());

      let literalFg = '3b8737';
      let idFg = '344482';
      let symbolsFg = '000000';
      let keywordFg = '7132a8';
      let errorFg = 'ff0000';

      monaco.editor.defineTheme('myCoolTheme', {
         base: 'vs',
         inherit: false,
         rules: [
            { token: 'number_lit.calc',   foreground: literalFg },

            { token: 'id.calc',           foreground: idFg,       fontStyle: 'italic' },

            { token: 'lparen.calc',       foreground: symbolsFg },
            { token: 'rparen.calc',       foreground: symbolsFg },

            { token: 'equal.calc',        foreground: symbolsFg },
            { token: 'minus.calc',        foreground: symbolsFg },
            { token: 'plus.calc',         foreground: symbolsFg },
            { token: 'div.calc',          foreground: symbolsFg },
            { token: 'mul.calc',          foreground: symbolsFg },

            { token: 'input_kw.calc',     foreground: keywordFg,  fontStyle: 'bold' },
            { token: 'output_kw.calc',    foreground: keywordFg,  fontStyle: 'bold' },

            { token: 'unrecognized.calc', foreground: errorFg }
         ]
      });

      let editor = monaco.editor.create(document.getElementById('container'), {
         value: [
            'input a',
            'b = a * 2',
            'c = (a - b) / 3',
            'output c',
            ''
         ].join('\n'),
         language: 'calc',
         theme: 'myCoolTheme'
      });

   });
</script>
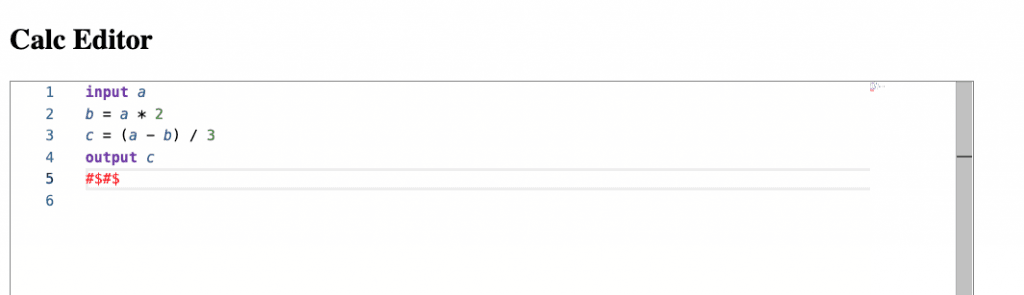
Now we are ready to go. We just need to run tsc && webpack and we should see that:

If we type some tokens that ANTLR does not recognize we should get them in red:
And here you go: we combined our ANTLR lexer with Monaco! So we have the first piece of our own browser-based editor for our little new language!
I am a little excited, are you?
Error reporting
Another crucial feature is error reporting: we want to point out errors as the user write code.
Now, there are different types of possible errors:
- lexical errors: when some text cannot be recognized as belonging to any type of token
- syntactical errors: when the structure of the code is not correct
- semantic errors: they depend on the nature of the language. Example of semantic errors are usages of undeclared variables, or operations involving incompatible types.
In our case:
- we do not have lexical errors as our lexer catch all sort of characters. We do that by adding a special token definition:
unrecognized. Now a token of typeunrecognizedcannot be used in any statement, so it will always lead to syntactic errors - we have syntactic errors and we are going to show them
- we are not going to consider semantic errors in the context of this tutorial as they require some advanced processing of the parse tree. For example, we should perform symbol resolution to verify all values used where declared before being used. In any case they can be displayed in Monaco in the same way we are going to display the syntactic errors, they have just to be calculated differently and how to calculate them is beside the scope of this tutorial
We will now look into reporting syntactic errors in the editor. We want to obtain something like this:
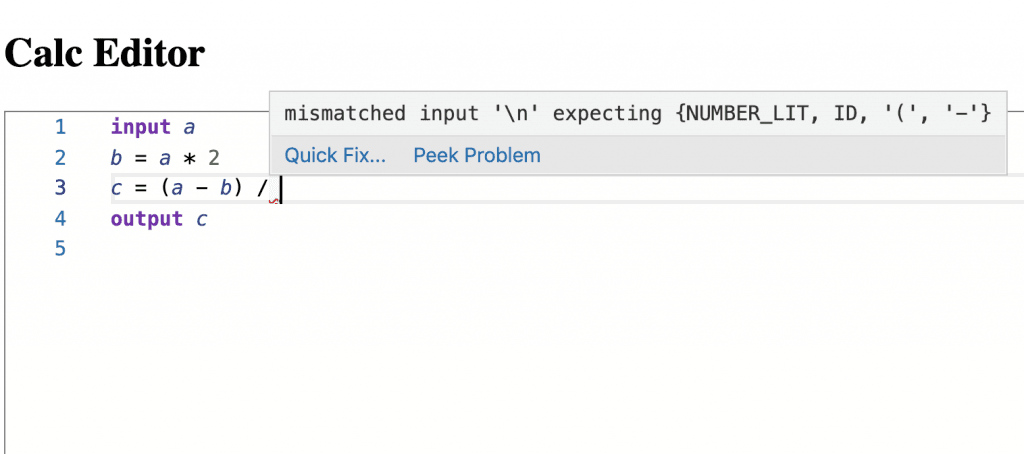
Now, we have basically to wire the errors produced by ANTLR with Monaco. However before doing that we want to refactor our grammar a little bit. Why? Because we want to enforce the different statements to stay on one line. In this way syntactic errors will be found at positions that are more intuitive.
Consider this example:
a = 1 +
b = 3
Currently ANTLR would report an error on the second line. Why? Because the line a = 1 + seems correct per se, it just lacks another element to be completed. So ANTLR takes from the second line, building the expression a = 1 + b, which is correct. At that point it meets the = token and report an error on the = token. Which can be confusing for poor, simple users of our DSL. We want to make things more intuitive by making ANTLR report an error at the end of line 1, suggesting that the line is not complete.
So to achieve this we start by tweaking a little bit our grammars to make the newline meaningful.
In the Lexer grammar we change the NL definition, removing the action of sending the token to the WS channel:
NL: ('\r\n' | '\r' | '\n');
Now we have to consider NL in our parser grammar:
We basically force every statement to end with a NL token.
eol:
    NL
    ;

input:
   INPUT_KW ID eol
    ;

output:
    OUTPUT_KW ID eol
    ;

calc:
   target=ID EQUAL value=expression eol
   ;
Ok. This is good. Now let’s see how we can start collecting errors from ANTLR. We will first create a class to represent errors and then add an ANTLR ErrorListener to get the errors reported by ANTLR and use them to create Error instances.
export class Error {
    startLine: number;
    endLine: number;
    startCol: number;
    endCol: number;
    message: string;

    constructor(startLine: number, endLine: number, startCol: number, endCol: number, message: string) {
        this.startLine = startLine;
        this.endLine = endLine;
        this.startCol = startCol;
        this.endCol = endCol;
        this.message = message;
    }

}

class CollectorErrorListener extends error.ErrorListener {

    private errors : Error[] = []

    constructor(errors: Error[]) {
        super()
        this.errors = errors
    }

    syntaxError(recognizer, offendingSymbol, line, column, msg, e) {
        var endColumn = column + 1;
        if (offendingSymbol._text !== null) {
            endColumn = column + offendingSymbol._text.length;
        }
        this.errors.push(new Error(line, line, column, endColumn, msg));
    }

}
At this point we could add a new function called validate . That function would try to parse an input, and record every error obtained while parsing, just for reporting them. We could later show these errors in the editor.
export function validate(input) : Error[] {
    let errors : Error[] = []

    const lexer = createLexer(input);
    lexer.removeErrorListeners();
    lexer.addErrorListener(new ConsoleErrorListener());

    const parser = createParserFromLexer(lexer);
    parser.removeErrorListeners();
    parser.addErrorListener(new CollectorErrorListener(errors));
    parser._errHandler = new CalcErrorStrategy();

    const tree = parser.compilationUnit();
    return errors;
}
We are almost there but there is a caveat. The fact is that ANTLR by default try to add or remove tokens to prosecute parsing after finding an error. This works reasonably well in general but in our case we do not want ANTLR trying to remove a new line. Let’s see how ANTLR would parse our example:
a = 1 +
b = 3
ANTLR would recognize there is an error on Line 1, but in its opinion the problem would be an extra newline. So it would report the newline at the end of line 1 as an error, and then it would continue parsing pretending it is not there. This behavior is governed by an error strategy, that is to say how ANTLR reacts to parsing errors. It would then recognize the assignment a = 1 + b and report an error on the equal sign on line 2. We want to avoid that and tweak how ANTLR try to fix input fo keep parsing. We do that by implementing our ErrorStrategy.
class CalcErrorStrategy extends DefaultErrorStrategy {

     reportUnwantedToken(recognizer: Parser) {
         return super.reportUnwantedToken(recognizer);
     }

    singleTokenDeletion(recognizer: Parser) {
        var nextTokenType = recognizer.getTokenStream().LA(2);
        if (recognizer.getTokenStream().LA(1) == CalcParser.NL) {
            return null;
        }
        var expecting = this.getExpectedTokens(recognizer);
        if (expecting.contains(nextTokenType)) {
            this.reportUnwantedToken(recognizer);
            // print("recoverFromMismatchedToken deleting " \
            // + str(recognizer.getTokenStream().LT(1)) \
            // + " since " + str(recognizer.getTokenStream().LT(2)) \
            // + " is what we want", file=sys.stderr)
            recognizer.consume(); // simply delete extra token
            // we want to return the token we're actually matching
            var matchedSymbol = recognizer.getCurrentToken();
            this.reportMatch(recognizer); // we know current token is correct
            return matchedSymbol;
        } else {
            return null;
        }
    }
    getExpectedTokens = function(recognizer) {
        return recognizer.getExpectedTokens();
    };

    reportMatch = function(recognizer) {
        this.endErrorCondition(recognizer);
    };

}
In practice we are just saying to not try to pretend newlines are not there. That’s it.
At this point we can write some tests:
function checkError(actualError, expectedError) {
    it('should have startLine ' + expectedError.startLine, function () {
        assert.equal(actualError.startLine, expectedError.startLine);
    });
    it('should have endLine ' + expectedError.endLine, function () {
        assert.equal(actualError.endLine, expectedError.endLine);
    });
    it('should have startCol ' + expectedError.startCol, function () {
        assert.equal(actualError.startCol, expectedError.startCol);
    });
    it('should have endCol ' + expectedError.endCol, function () {
        assert.equal(actualError.endCol, expectedError.endCol);
    });
    it('should have message ' + expectedError.message, function () {
        assert.equal(actualError.message, expectedError.message);
    });
}

function checkErrors(actualErrors, expectedErrors) {
    it('should have ' + expectedErrors.length  + ' error(s)', function (){
        assert.equal(actualErrors.length, expectedErrors.length);
    });
    var i;
    for (i = 0; i < expectedErrors.length; i++) {
        checkError(actualErrors[i], expectedErrors[i]);
    }
}

function parseAndCheckErrors(input, expectedErrors) {
    let errors = parserFacade.validate(input);
    checkErrors(errors, expectedErrors);
}

describe('Validation of simple errors on single lines', function () {
    describe('should have recognize missing operand', function () {
        parseAndCheckErrors("o = i + \n", [
            new parserFacade.Error(1, 1, 8, 9, "mismatched input '\\n' expecting {NUMBER_LIT, ID, '(', '-'}")
        ]);
    });
    describe('should have recognize extra operator', function () {
        parseAndCheckErrors("o = i +* 2 \n", [
            new parserFacade.Error(1, 1, 7, 8, "extraneous input '*' expecting {NUMBER_LIT, ID, '(', '-'}")
        ]);
    });
});

describe('Validation of simple errors in small scripts', function () {
    describe('should have recognize missing operand', function () {
        let input = "input i\no = i + \noutput o\n";
        parseAndCheckErrors(input, [
            new parserFacade.Error(2, 2, 8, 9, "mismatched input '\\n' expecting {NUMBER_LIT, ID, '(', '-'}")
        ]);
    });
    describe('should have recognize extra operator', function () {
        let input = "input i\no = i +* 2 \noutput o\n";
        parseAndCheckErrors(input, [
            new parserFacade.Error(2, 2, 7, 8, "extraneous input '*' expecting {NUMBER_LIT, ID, '(', '-'}")
        ]);
    });
});

describe('Validation of examples being edited', function () {
    describe('deleting number from division', function () {
        let input = "input a\n" +
            "b = a * 2\n" +
            "c = (a - b) / \n" +
            "output c\n";
        parseAndCheckErrors(input, [
            new parserFacade.Error(3, 3, 14, 15, "mismatched input '\\n' expecting {NUMBER_LIT, ID, '(', '-'}")
        ]);
    });
    describe('deleting number from multiplication', function () {
        let input = "input a\n" +
            "b = a * \n" +
            "c = (a - b) / 3\n" +
            "output c\n";
        parseAndCheckErrors(input, [
            new parserFacade.Error(2, 2, 8, 9, "mismatched input '\\n' expecting {NUMBER_LIT, ID, '(', '-'}")
        ]);
    });
    describe('adding plus to expression', function () {
        let input = "input a\n" +
            "b = a * 2 +\n" +
            "c = (a - b) / 3\n" +
            "output c\n";
        parseAndCheckErrors(input, [
            new parserFacade.Error(2, 2, 11, 12, "mismatched input '\\n' expecting {NUMBER_LIT, ID, '(', '-'}")
        ]);
    });
});
In production we may want to take a more advanced approach to avoid doing costly calculation at every key stroke. However this approach will work well for small documents.
And that’s it! We have a simple but nice integration between ANTLR and Monaco. We can start from here to build a great editor for our users.
Summary
More and more applications are moving to the web. While professionals using specific tools may want to install such tools as desktop applications there are a number of casual users, or not-so-technically-suited users, for which providing a web tool makes a lot of sense.
We have seen that we can build Domain Specific Languages (or DSLs) which permit to domain experts to write rich and important applications. By building high level languages we can make approachable for them writing code on their own. Still, they can be resistant to use tools with complex UIs and for organizations is sometimes an issue delivering IDEs on their machines. For this users browser based editors could be a great solution.
In this tutorial we have seen how we can write a grammar for a textual language and integrate it into Monaco getting syntax highlighting and error reporting. These are solid basis to write an editor but from there we should look into more things like:
- semantic validation
- autocompletion
- providing a way to execute the code
- support some form of versioning (depending on the type of users we may want something not as complicate as git!)
So there is still work to do but we think Monaco could be a great solution.
P.S. If you find any error or anything is not clear, please write to me . Also, I am always eager to hear your thoughts on Monaco, ANTLR, or other tools. Feel free to reach me at any time!
Published on Java Code Geeks with permission by Federico Tomassetti, partner at our JCG program. See the original article here: Writing a browser based editor using Monaco and ANTLR: Parsing with Ease Opinions expressed by Java Code Geeks contributors are their own. |
