Friends don’t let friends write user auth. Tired of managing your own users? Try Okta’s API and Java SDKs today. Authenticate, manage, and secure users in any application within minutes.
Nearly all applications rely on authentication. Developers, and the companies that employ them, want to confirm who is making the request and are they who they say they are. And, this needs to happen fast enough for a good user experience. Fortunately, there are great tools to help.
Spring Boot with Spring Security is a fantastic solution for Java-based web development. With relatively little code, developers can implement, test, update, and expand authentication schemes easily and securely.
In this tutorial, you will build a very simple “Hello World” app in Spring Boot with OAuth 2.0 / OpenID Connect and Okta as the OAuth provider. It will use AWS as the cloud provider, deploying through AWS Elastic Beanstalk.
Why AWS Elastic Beanstalk?
When it comes to cloud infrastructure providers, AWS has always been the market leader and their services make it fast and easy to deploy a cloud application. Elastic Beanstalk is a deployment and provisioning service that allows you to deploy an entire infrastructure with a few clicks by automating the process of getting applications set up on AWS infrastructure. Additionally, it helps manage the resource utilization of your app with automatic Provisioning, load balancing, autoscaling, and health monitoring.
Create a Spring Boot Application
Before you start a cloud deployment, you’ll need the app itself. The first version of your app will have a simple page, which will show Hello, {user}! if you input a user’s name, or it will show Hello, World! otherwise. You’re going to use Spring MVC and Thymeleaf to do the task.
Thymeleaf is a server-side template engine. It allows you to pass server arguments to your HTML before rendering it in the client’s web browser.
Could you create a project from scratch? Sure, but you don’t need to. You can use Spring Initializr instead. It will help you generate your project with all the dependencies you need.
Go to the Spring Initializr website, and type the following information:
- Project: Maven Project
- Language: Java
- Group: com.okta
- Artifact: hello-world
- Dependencies: Spring Web Starter, Thymeleaf
You can choose either to generate the project using Maven or Gradle. This tutorial shows the steps using Maven, but you can easily follow it on Gradle.
After you provide the information, click on Generate the project. The site will generate a zip file you can download and extract. Open the project in your favorite IDE, and you’re good to go!
Create The Web Page
With Spring MVC, you need to create a Controller to represent the web page. It will map to the endpoint /hello, and also to /, which represents the homepage. It returns the hello-world template as a response.
Create the class HelloWorldController:
@Controller
public class HelloWorldController {

    @GetMapping({"/", "hello"})
    public String helloWorld(@RequestParam(required = false, defaultValue = "World") String name, Model model) {
        model.addAttribute("name", name);
        return "hello-world";
    }
}
So far, so good. Next, you create the html template. What is this template, though? Why do you need it?
The template is an HTML page Spring MVC uses to render the information in the user’s browser.
You define a Thymeleaf HTML page to receive all attributes defined in the model object.
Inside src\main\resources\templates, create the file hello-world.html:
<!DOCTYPE html>
<html xmlns:th="http://www.thymeleaf.org">
    <body>
        <h1 th:text="'Hello, ' + ${name} + '!'"></h1>
    </body>
</html>
This creates an HTML page that displays a <h1> tag in the body, with a greeting message. The ${name} attribute is not native HTML, it is part of Thymeleaf and receives the value from the model object to render the information before sending it to the browser.
Now you have created both the controller and the template, you can run it, and see if it works! Open the HelloWorldApplication class and execute the main method.
Or, from the command line, execute:
./mvnw spring-boot:run
If you go to http://localhost:8080/ in your web browser, you will see the following message:
Hello, World!
If you want a custom message, you can add the name parameter. For instance, http://localhost:8080/?name=Daniel will return:
Hello, Daniel
Add Spring Security
When it comes to SaaS, developers want to make sure their application is secure. Users shouldn’t be able to see user data from other users.
Spring Security handles authentication, authorization, and other security aspects. To add it in your project, go to the pom.xml file, and add the following code inside the <dependencies> tag:
<dependency>
    <groupId>org.springframework.boot</groupId>
    <artifactId>spring-boot-starter-security</artifactId>
</dependency>
That’s it! When you add Spring Security as a dependency, it enables security by default. When you try to access your endpoints, you’ll have to log in before continuing.
Let’s test it. Run the application, then go to http://localhost:8080/. You will see the following result:
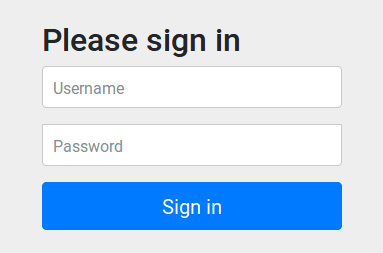
As expected, now it redirects you to the login page, which will ask for a username and password. You must be asking yourself right now: which username and password should I use?
The default username is user. Instead of setting a default password, Spring changes it every time the application starts. You can see the current one by looking at the applications logs. Look for something like this:
Using generated security password: 29aa0d09-eaca-47ae-bcad-e5b22affd466
This behavior is not what you want in a real application. Users expect the password to remain the same unless they change it themselves. Let’s add a configuration to make it happen.
Create the class SecurityConfiguration:
@EnableWebSecurity
public class SecurityConfiguration extends WebSecurityConfigurerAdapter {

    private PasswordEncoder passwordEncoder = new BCryptPasswordEncoder();

    @Override
    protected void configure(AuthenticationManagerBuilder auth) throws Exception {
        auth.inMemoryAuthentication()
            .passwordEncoder(passwordEncoder())
            .withUser("john.doe")
            .password(passwordEncoder().encode("secret"))
            .roles("USER");
    }

    @Bean
    public PasswordEncoder passwordEncoder() {
        return passwordEncoder;
    }
}
The class above extends WebSecurityConfigurerAdapter, and allows you to change the authentication management method. In this example, you create a single user, but you can create as many as you want. Just append a new withUser call after the first one.
Now that the user has authenticated to your application, you don’t need to ask for a username anymore. Instead, you will display the information based on the current user. Inside the HelloWorldController, make these changes in the code:
@Controller
public class HelloWorldController {

    @GetMapping({"/", "hello"})
    public String helloWorld(Model model, Principal principal) {
        model.addAttribute("name", principal.getName());
        return "hello-world";
    }
}
The Principal interface stores the name of the current user. Spring Security takes care of the dirty work: you only need to add it as an argument, and the method receives the correct value.
To see this change, stop the application and run it again. If you access http://localhost:8080/, it will ask you to log in again. Use john.doe as the username secret as the password. After submitting the information, you will see the following text:
Hello, john.doe!
Now you’re ready to deploy your application in the cloud!
Deploy The Application To AWS Elastic Beanstalk
To deploy the service, you will use AWS Elastic Beanstalk. If you don’t have an AWS account go ahead and create one here.
After logging into the AWS console, go to Services and type Elastic Beanstalk in the search. Click on it, and it will redirect you to a Welcome page. Click on the Get started button to start creating your application in the cloud. You will see the following screen:
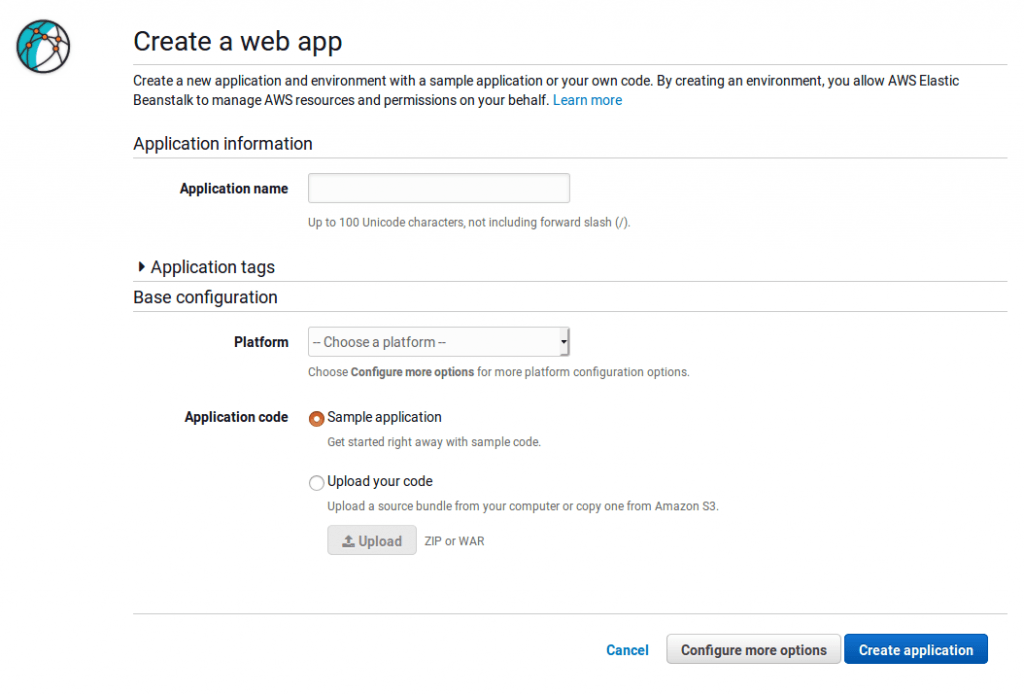
Here you will create a web application. Put the following information in the fields above:
Application name:  hello-world
Platform: Java
Application code: Upload Your code
Before you upload your code you will need to export it as a JAR file. Go inside your application folder and type the following command:
./mvnw package -DskipTests
After it runs, upload the file hello-world-0.0.1-SNAPSHOT.jar under the target folder.
When the upload completes, click on the Create application button. AWS will start to create the environment, displaying the logs of what is happening in the process.
Once the environment is set up, AWS will redirect you to the Dashboard. Above the dashboard menu, you’ll find the URL to access the application. Open it in a new tab, and it will load your web page.
Right now, you get a 502 error response, which is expected. By default, Elastic Beanstalk runs the application on port 5000, while Spring Boot executes on port 8080. Let’s direct your app run on port 5000 to fix the issue.
Click on Configuration the dashboard menu. You will see the screen below:
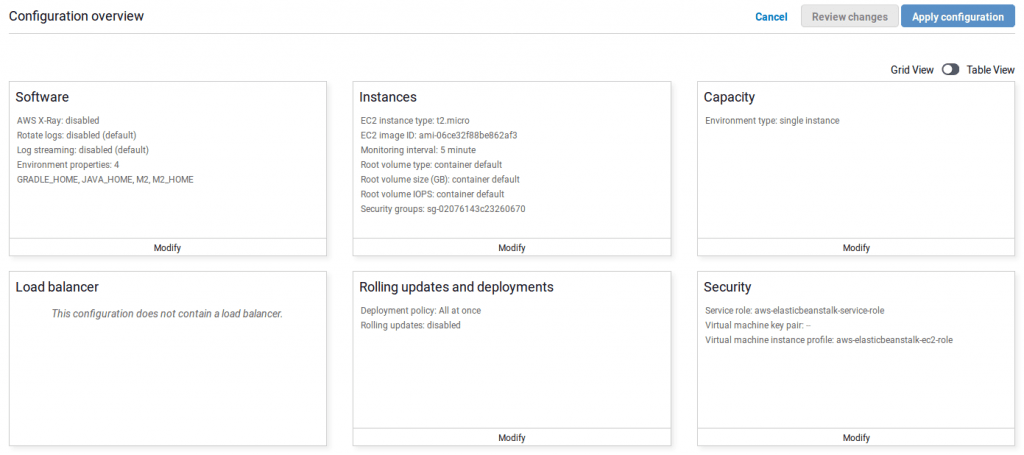
You can change many variables and features in your environment: add a load balancer, increase the number of instances, or in this case add environment variables.
Go to the Software card and click on Modify. Look for Environment properties and add the following value to the list:
SERVER_PORT : 5000
After changing it, click on the Apply button and wait for AWS to apply the changes in the environment. When the message Environment update completed successfully. appears, open the URL again.
Now it worked! Type the username and password you defined in your code, john.doe and secret. It will then redirect you to the hello page, which will show you the same result as your local environment:
Hello, john.doe!
If you have problems, you can always check the logs.
- In the menu, click on
Logs, which will redirect you to the following page:

- Go to
Request Logs>Full Logs. This will generate a zip file with all your environment logs - Download and extract the file
- Go to
var/log/rotated - Over there you’ll find another zip file from your app. Extract it, then open the extracted file to see the applications logs
Did everything work so far? Congratulations, you have your first Spring Boot application running in the cloud! Awesome, isn’t it? But wait, you still have work to do before you can celebrate.
Make Your Application Security Production-Ready
Remember you created a user and put the credentials inside your code? This strategy might work for testing purposes, but it’s a huge no-go for real applications.
Handling identity management is not a trivial task, and you’ll want to use a service instead of “rolling your own”.
Okta is an excellent identity management service, which provides an identity provider, authentication, authorization and user security out of the box. Let’s configure your application to use it.
- Create an Okta account
- Login into your account
- Click Applications
- Click Add Application
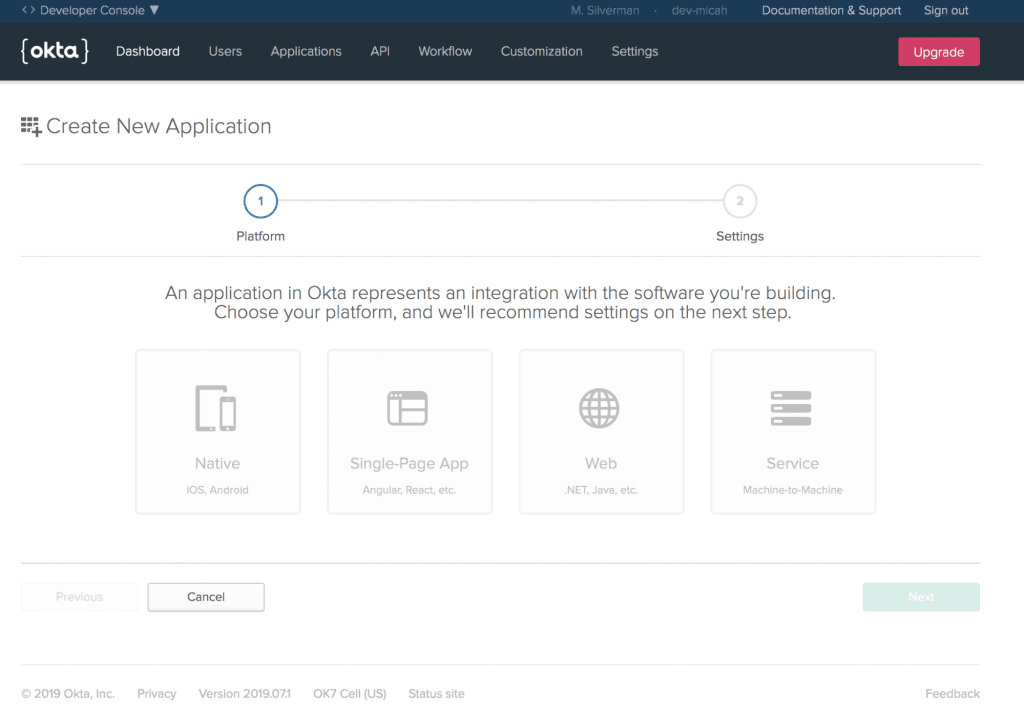
- Select Web and click on the Next button.
- Fill in the following options into the form:
Name: hello-world
Base URIs: http://localhost:8080/, ${BEANSTALK_URL}
Login redirect URLs: http://localhost:8080/login/oauth2/code/okta, ${BEANSTALK_URI}/login/oauth2/code/okta
Grant Type allowed: Client Credentials. Authorization Code
Change ${BEANSTALK_URL} to your AWS environment URL. For instance, my value is HelloWorld-env.t3z2mwuzhi.us-east-1.elasticbeanstalk.com.
Great! You whitelisted your local and production environments. If you make calls to your Okta application from them, it will permit the request.
Secure The Application With Okta and OAuth 2.0
With your application in Okta, you need to change the code to start using it. Okta handle the authentication for you from now on.
Replace the Spring Security dependency inside your pom.xml file with the okta dependency, which itself includes Spring Security. Put the following code inside the <dependencies> tag:
<dependency>
    <groupId>com.okta.spring</groupId>
    <artifactId>okta-spring-boot-starter</artifactId>
    <version>1.2.1</version>
</dependency>
The library will handle the communication between your application and Okta. All that you have to do is identify your Okta information. Set the following environment variables locally:
OKTA_OAUTH2_ISSUER={ORG_URL}/oauth2/default
OKTA_OAUTH2_CLIENT_ID={CLIENT_ID}
OKTA_OAUTH2_CLIENT_SECRET={CLIENT_SECRET}
Great! You whitelisted your local and production environments. If you make calls to your Okta application from those places, it will permit the request.
Your {ORG_URL} will be visible in your Okta dashboard, just click on Dashboard in the menu. You will see the Org URL in the right upper corner.
You can find {CLIENT_ID} and {CLIENT_SECRET} in your Okta application:
- In your Okta’s menu, go to
Applications - Select the
hello-worldapplication - Click on the
Generaltab - Scroll down to
Client Credentials
There you’ll see both the client id and secret.
With these changes, you now authenticate with OpenID Connect. When the user goes to the homepage, your application will redirect her to your Okta login page, then back to webpage.
OpenID Connect is a thin layer on top of the OAuth 2.0 authorization framework and is focused on identity and authentication.
With OpenID Connect, you need to change the way you receive the authenticated user. Go to the HelloWorldController class and update the code:
@Controller
public class HelloWorldController {

    @GetMapping({"/", "hello"})
    public String helloWorld(Model model, @AuthenticationPrincipal OidcUser user) {
        model.addAttribute("name", user.getGivenName());
        return "hello-world";
    }
}
This still passes authentication information to Thymeleaf using the model, but moves from using Principal to use OidcUser. This allows you to retrieve any attribute you want. In this example, we want the given_name attribute.
NOTE: Since you are using Okta to authenticate, you don’t need your old configuration anymore. Go ahead and delete the
SecurityConfigurationclass.
Let’s run the application! Start it again and go to http://localhost:8080/. Notice you’re redirected to the Okta login page:
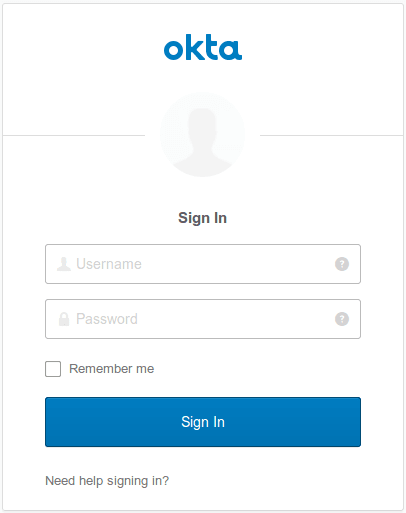
If you supply your username and password, you are redirected to the / endpoint. In my case, I’ll see the following message:
Hello, Daniel!
Now you have a secure web application! The best part: you didn’t have to worry about implementing authentication yourself.
Redeploy the Application on AWS Elastic Beanstalk
You have a production-ready application, so let’s send it to your production environment! Log in to the AWS Console, and go to your Elastic Beanstalk environment.
- Select the environment you created in the previous steps.
- In the menu, click on
Configuration - Press the
Modifybutton inside theSoftwarecard.
Add the same environment variables you used in your local environment:
OKTA_OAUTH2_ISSUER={ORG_URL}/oauth2/default
OKTA_OAUTH2_CLIENT_ID={CLIENT_ID}
OKTA_OAUTH2_CLIENT_SECRET={CLIENT_SECRET}
After making the changes click Apply.
The last step is to update the application to the latest version. Go inside your project folder, and type:
./mvnw package -DskipTests
This command generates a JAR file with the current version of your application. Go to the AWS Elastic Beanstalk dashboard, and click on the Upload and deploy button. Select the file aven created (such as hello-word-0.0.1-SNAPSHOT.jar), and click on the Deploy button.
To make sure it is working, click on the AWS Elastic Beanstalk URL. It will redirect you to the Okta’s login if you haven’t logged in. When you enter valid credentials, it will redirect you to the Hello World page! In my case, the result will be:
Hello, Daniel!
Congratulations! You have deployed an application in the cloud and handled security the right way.
If you want to take a look at the code, you can find the repository with the examples here.
Would you like to learn more about Security, OAuth 2.0, and Spring in general? We recommend these posts:
As always, leave comments below and don’t forget to follow us on Twitter and subscribe to our YouTube channel.
“Easy Spring Boot Deployment with AWS Elastic Beanstalk” was originally published on the Okta Developer Blog on August 7, 2019.
Friends don’t let friends write user auth. Tired of managing your own users? Try Okta’s API and Java SDKs today. Authenticate, manage, and secure users in any application within minutes.
