“I love writing authentication and authorization code.” ~ No Java Developer Ever. Tired of building the same login screens over and over? Try the Okta API for hosted authentication, authorization, and multi-factor auth.
In this post, you’re going to work through various options for implementing a login feature using Spring Boot 2.1. You’ll start with the most simple, basic auth, which you’d likely never want to use except for perhaps an internal backend tool, and move on to a simple form-based authentication page. Next, you’ll customize the default, auto-generated form by overriding some default templates and controllers. Finally, you’ll move on to adding Single Sign-on using OAuth 2.0. You’ll see how to allow the user to sign in using Github and Okta.
The assumptions for this tutorial are pretty basic. I’m assuming that you’ve got a basic familiarity with Spring and Spring Boot, but not necessarily an in-depth understanding of Spring Security or Spring’s various security features. You’ll want to have gitinstalled, and gradle would be nice, but you can use the Gradle wrapper for all of the gradle commands, so that’s not strictly necessary.
Go ahead and clone the the repository I created for this tutorial:
git clone https://github.com/oktadeveloper/okta-spring-boot-login-options-example.git
This repository contains five subdirectories:
basic-authform-authcustom-form-authoauth-startoauth-okta-githuboauth-okta-starter
These correspond to the four sections of this tutorial (with three for the last section, the OAuth section). Except for the oauth-start, these are fully functional applications. In this tutorial, you’ll walk through what the code means and how to build them.
Build HTTP Basic Login in Spring Boot
Basic authentication is, well, basic. It’s a simple scheme built directly into the HTTP protocol. It comes from pastoral times before massive amounts of data and money flowed through the various pipes and tubes of the internet. As such, it’s really not incredibly secure. According to the spec, the password and username are encoded using Base64 in the HTTP authorization header. Because Base64 might as well be plain text, if you are going to use basic auth for anything, make sure that you’re always using HTTPS/SSL because you’re sending your authentication credentials with every request.
Open the basic-auth Spring Boot project with your favorite IDE or editor.
The first thing you’ll want to check out is the build.gradle file. It’s reproduced below. I won’t go through all of them in detail but I want to orient you to a few things going on here in case you’re not already familiar.
plugins {
    id 'org.springframework.boot' version '2.1.4.RELEASE'
    id 'java'
}

apply plugin: 'io.spring.dependency-management'

group = 'com.okta.springsecurityauth'
version = '0.0.1-SNAPSHOT'
sourceCompatibility = '1.8'

repositories {
    mavenCentral()
}

dependencies {
    implementation 'org.springframework.boot:spring-boot-starter-security'
    implementation 'org.springframework.boot:spring-boot-starter-web'
    testImplementation 'org.springframework.boot:spring-boot-starter-test'
    testImplementation 'org.springframework.security:spring-security-test'
}
There are two Spring plugins being added to the build: org.springframework.boot and io.spring.dependency-management. Notice that the version is set to 2.1.4.RELEASE. One of the real pains with Spring in the past has been dependency management. Spring is a huge collection of libraries, and when you bring in one, you need to bring in others with compatible versions. When you update one, often this causes others to fall out of compatibility. Fixing this in the past could land you in what was called “dependency hell.”
Fortunately, Spring has made things much easier. Look at our two Spring dependencies:
dependencies {
    implementation 'org.springframework.boot:spring-boot-starter-security'
    implementation 'org.springframework.boot:spring-boot-starter-web'
...
}
Notice that they have no version numbers. These are basically large, meta-dependencies for feature sets (security and web, in this case), and the Spring plugins manage all of the sub-dependencies for you based on the version set in this line:
id 'org.springframework.boot' version '2.1.4.RELEASE'
The executive summary of all that is that this build.gradle file will be loading Spring Boot version 2.1.4 and will be adding the web and security feature modules. A list of all the available starters from Spring can be found in their docs.
Other than the gradle.file, there are really only three other files of interest, all Java files. Look under src/main/java/com/okta/springsecurityauth and you’ll see them:
Application.java(the main class that auto-magic’s the whole Spring Boot framework into existence)SecurityConfiguration.java(configures the security options)WebController.java(a very basic HTTP request controller)
Application.java is the entry point into the app. It’s pretty simple in this case, and in many cases. The most important thing is the @SpringBootApplication annotation, which tells your Spring dependencies to bootstrap the whole Spring Boot framework. There is, of course, also the main() method, which is where the Application class is loaded and run by Spring.
package com.okta.springsecurityauth;

import org.springframework.boot.SpringApplication;
import org.springframework.boot.autoconfigure.SpringBootApplication;

@SpringBootApplication
public class Application {

    public static void main(String[] args) {
        SpringApplication.run(Application.class, args);
    }

}
WebController.java is, cleverly enough, your web request controller. It defines request endpoints and determines the responses.
package com.okta.springsecurityauth;

import org.springframework.stereotype.Controller;
import org.springframework.web.bind.annotation.RequestMapping;
import org.springframework.web.bind.annotation.ResponseBody;

@Controller
public class WebController {

    @RequestMapping("/")
    @ResponseBody
    public String index() {
        return "That's pretty basic!";
    }

}
In this case, the web controller is returning a simple string instead of routing to a template file, as we’ll see in a bit. The @ResponseBody annotation is what allows this method to directly return the string.
SecurityConfiguration.java is where the action is happening in this tutorial. This is where Spring Boot is configured to use basic authentication. This is also where you can configure a hard-coded default user and password (not something I’d do in production, obviously, but great for tutorials).
package com.okta.springsecurityauth;

import org.springframework.context.annotation.Configuration;
import org.springframework.security.config.annotation.authentication.builders.AuthenticationManagerBuilder;
import org.springframework.security.config.annotation.web.builders.HttpSecurity;
import org.springframework.security.config.annotation.web.configuration.WebSecurityConfigurerAdapter;

@Configuration
public class SecurityConfiguration extends WebSecurityConfigurerAdapter {

    @Override
    public void configure(HttpSecurity http) throws Exception {
        http
            .authorizeRequests()
            .anyRequest().authenticated()
            .and()
            .httpBasic();
    }

    @Override
    protected void configure(AuthenticationManagerBuilder auth) throws Exception {
        auth.inMemoryAuthentication()
            .withUser("user")
            .password("{noop}pass") // Spring Security 5 requires specifying the password storage format
            .roles("USER");
    }

}
If you look at the configure() method, you’ll see the http object being used with its fluent interface to tell spring to authenticate all requests and use HTTP basic authentication. This is pretty trivial, but there’s tons of power here in this interface as you’ll see in a minute.
The configure() method is mostly a hack for this tutorial to create a user in an in-memory authentication manager. You’re creating a user with username user and password pass. The user has the USER role assigned to it.
That’s it!
Open a terminal and make sure you’re in the root directory of the basic-auth project. Run the project with the following command:
./gradlew bootRun
Wait for the Spring Boot app to finish loading.
Navigate to http://localhost:8080.
You’ll see a login window.
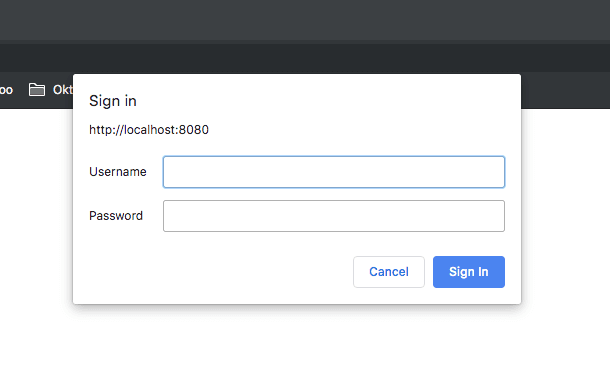
Log in using user and pass as credentials.
You’ll be taken to a success screen that says, “That’s pretty basic!”
Configure Spring Boot Form-based Login
When using basic auth, the login form is actually generated by the browser, not by the application. It appears as an un-styled pop-up window. This isn’t great flow or very professional looking.
With some pretty minimal changes to the code, you can have Spring Boot auto-generate a more professional-looking login form. The completed code can be found in the form-auth subdirectory of the GitHub repo, or you can just make the changes to the basic-auth project if that’s still open.
You want to change the configure() method of the SecurityConfiguration.java file to look like this:
@Override
public void configure(HttpSecurity http) throws Exception {
    http
        .authorizeRequests()
        .anyRequest().authenticated()
        .and()
        .formLogin()
        .and()
        .httpBasic();
}
The only different is the addition of the .and().formLogin(). Other than that the two projects are the same.
Run it again using ./gradlew bootRun.
Navigate to http://localhost:8080 (you may need to open an incognito window to trigger re-authentication).
This time you’ll see the login page that Spring generates for you.
Customize the Spring Boot Login Form
The next step in our journey of increasingly sophisticated Spring Boot authentication is to customize the login form. Spring makes this super easy. There are, however, a number of new files and more changes to the code than last time, so I’d suggest opening the project found under the custom-form-auth folder of the repo.
In the build.gradle file there’s one new dependency. This brings in the Thymeleaf templating engine, the default web templating engine for use with Spring Boot.
dependencies {
    ...
    implementation 'org.springframework.boot:spring-boot-starter-thymeleaf'
    ...
}
The SecurityConfiguration.java file now looks like this (with some parts omitted for brevity):
package com.okta.springsecurityauth;

...

@Configuration
@EnableWebSecurity
public class SecurityConfiguration extends WebSecurityConfigurerAdapter {

    @Override
    public void configure(HttpSecurity http) throws Exception {
        http
            .authorizeRequests()
            .antMatchers( "/public/**").permitAll()
            .anyRequest().authenticated()
                .and()
            .formLogin()
                .loginPage("/login.html")
                .failureUrl("/login-error.html")
                .permitAll();
    }

    ...

}
Notice that the .httpBasic() is gone, and the .formLogin() has some new options. Here you’re setting a login page and a login failure page and making sure that these are publicly available.
Also notice this line:
.antMatchers( "/public/**").permitAll()
Here you are making the public directory on the classpath root available without authentication. Under src/main/resources/static there is a public directory. When the app is launched, everything under the src/main/resources/static directory is copied to the classpath, so the public directory ends up at the classpath root and all files within it will be available without authentication. This is great for things like images, JavaScript files, and CSS files.
The WebController.java also has some new endpoints:
package com.okta.springsecurityauth;

...

@Controller
public class WebController {

    @RequestMapping("/")
    @ResponseBody
    public String index() {
        return "You made it!";
    }

    // Login form
    @RequestMapping("/login.html")
    public String login() {
        return "login.html";
    }

    // Login form with error
    @RequestMapping("/login-error.html")
    public String loginError(Model model) {
        model.addAttribute("loginError", true);
        return "login.html";
    }

}
Notice that while the index() method has the @RequestBody annotation, meaning that it is going to return its request body directly as a string, the login() and loginError() methods do not. Instead, they are returning the name of the Thymeleaf templates that Spring Boot will render. By default these templates are found under src/main/resources/templates. Also, notice that the loginError() is a bit of a routing trick. It actually just returns the login.html template but with an error attribute injected into the model.
src/main/resources/templates/login.html is a new file. It’s the login template file.
<!DOCTYPE html>
<html xmlns:th="http://www.thymeleaf.org">
<head>
    <title>Login page</title>
    <link th:href="@{/public/style.css}" rel="stylesheet" />
</head>
<body>
<div id="container">
    <h2>Login page</h2>
    <form th:action="@{/login.html}" method="post">
        <label for="username">Username</label>
        <input type="text" id="username" name="username" autofocus="autofocus" />
        <label for="password">Password</label>
        <input type="password" id="password" name="password" />
        <input id="submit" type="submit" value="Log in" />
    </form>
    <p th:if="${loginError}" class="error">Wrong user or password</p>
</div>
</body>
</html>
A real, in-depth explanation of Thymeleaf is well beyond the scope of this tutorial. Head over to their website to dig into it if you like.
Remember when you made the public directory public? There is a very basic stylesheet that is being pulled in by this line here. Mostly I included this to demonstrate one way to include static resources in template files.
<link th:href="@{/public/style.css}" rel="stylesheet" />The error line is rendered conditionally based on the loginError attribute of the model, which is injected by the loginError() method of the controller.
<p th:if="${loginError}" class="error">Wrong user or password</p>
Other than that, it’s a pretty simple login form!
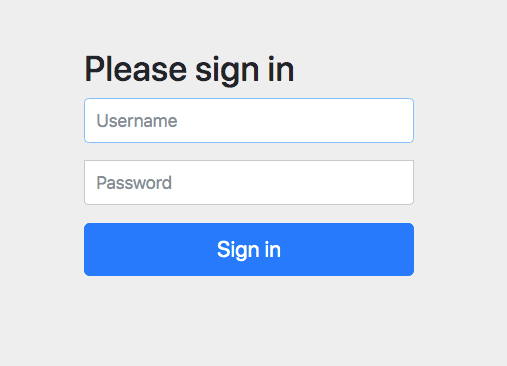
Once again, ./gradlew bootRun to run it.
You’ll see the styled, customized login form:

Log in again using user:pass and you’ll see our success screen saying, “You made it!”
Spring Boot OAuth 2.0 Login Using GitHub and Single Sign-On
Up until this point, all of your authentications have been done locally, using the ad hoc in-memory AuthenticationManager. More commonly in production, applications are supporting OAuth 2.0 and OIDC (Open ID Connect). OAuth 2.0 is an open standard for authorization. OIDC is built on top of OAuth 2.0 and adds authentication, for a more complete identity management protocol.
In this tutorial, you’ll first see how to add Single Sign-on (SSO) using GitHub. After that, you’ll see how to use Okta, a software-as-service identity solutions provider.
Both are super easy, and there is a real benefit in allowing users to re-use existing identity providers. Forcing users to handle and manage separate, strong passwords for hundreds of websites is a fool’s errand that ultimately results in weaker passwords and passwords reused across multiple sites (multiplying their vulnerability to attack); not to mention the old “just scribble it on a sticky note and stick it to the monitor” password management solution.
Simplify Your Spring Boot App Login with GitHub Single Sign-on
Now it’s time to implement a GitHub OAuth 2.0 client.
First, you need to register a new OAuth application with GitHub. Go to their website and do this now. Fill in the values as shown below.
Pay particular attention to the Authorization callback URL, as this needs to be http://localhost:8080/login/oauth2/code/github.
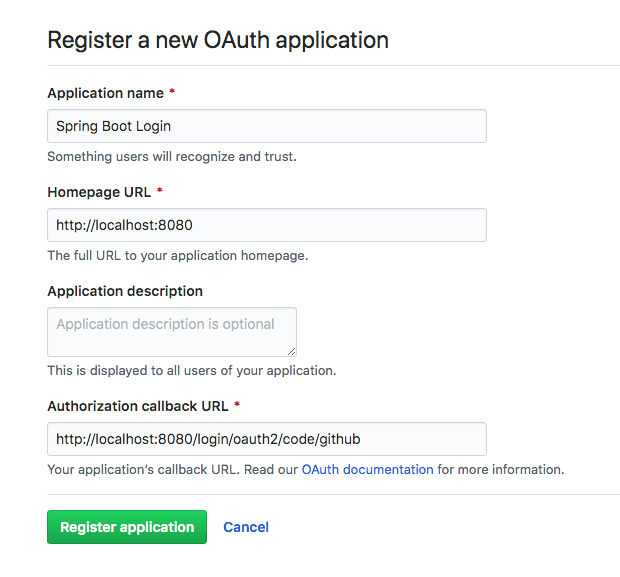
Click Register application. Take note of the Client ID and Client Secret as you’ll need them in a sec.
Now, back to Java. Open the oauth-start project in your IDE.
In the build.gradle file, notice a couple of new dependencies:
...
dependencies {
    implementation 'org.springframework.boot:spring-boot-starter-security'
    implementation 'org.springframework.boot:spring-boot-starter-thymeleaf'
    implementation 'org.springframework.boot:spring-boot-starter-web'
    implementation 'org.springframework.security:spring-security-oauth2-client'
    implementation 'org.springframework.security:spring-security-oauth2-jose'
    ...
}
The security, Thymeleaf, and web starters are still there. However, there two new Spring starters: oauth2-client and oauth2-jose.
oauth2-client brings in the libraries required for implementing an OAuth 2.0 client. oauth2-jose brings in some common libraries for signing and encryption. JOSE stands for Java Object Signing and Encryption.
The SecurityConfiguration.java file has been updated for OAuth login:
package com.okta.spring.SpringBootOAuth;
...

@Configuration
public class SecurityConfiguration extends WebSecurityConfigurerAdapter {
    @Override
    public void configure(HttpSecurity http) throws Exception {
        http.antMatcher("/**")
            .authorizeRequests()
            .antMatchers("/", "/login**").permitAll()
            .anyRequest().authenticated()
            .and()
            .oauth2Login();
    }
}
Two things to notice: 1) all requests to / and login are public, and 2) the oauth2Login() method is what is causing Spring Boot to configure the OAuth 2.0 client.
If this seems too easy, you’re correct. Some of the configuration has been moved to the application.yml file.
Open the src/main/resources/application.yml file:
spring:
  thymeleaf:
    cache: false
  security:
    oauth2:
      client:
        registration:
          github:
            client-id: << your GitHub client ID>>
            client-secret: << your GitHub client secret >>
You need to fill in the Client ID and Client Secret from above into this file.
The web routing and templating have changed as well. Look at the WebController.java file:
package com.okta.spring.SpringBootOAuth;

...

@Controller
public class WebController {

    @RequestMapping("/securedPage")
    public String securedPage(Model model,
                              @RegisteredOAuth2AuthorizedClient OAuth2AuthorizedClient authorizedClient,
                              @AuthenticationPrincipal OAuth2User oauth2User) {
        model.addAttribute("userName", oauth2User.getName());
        model.addAttribute("clientName", authorizedClient.getClientRegistration().getClientName());
        model.addAttribute("userAttributes", oauth2User.getAttributes());
        return "securedPage";
    }

    @RequestMapping("/")
    public String index() {
        return "index";
    }

}
This controller defines two endpoints that return two template files:
/–>src/main/resources/templates/index.html/securedPage–>src/main/resources/templates/securedPage.html
In the securedPage() method, notice how dependency injection is used to get information about the authenticated user so that it can be injected into the model, which is then passed to the template file.
The src/main/resources/templates/index.html is pretty simple:
<!DOCTYPE html>
<html lang="en">
<head>
    <meta charset="UTF-8">
    <title>Home</title>
</head>
<body>
    <h1>Spring Security SSO</h1>
    <a href="securedPage">Login</a>
</body>
</html>
And the src/main/resources/templates/securedPage.html template file:
<!DOCTYPE html>
<html xmlns:th="http://www.thymeleaf.org">
<head>
    <meta charset="UTF-8">
    <title>Secured Page</title>
</head>
<body>
    <h1>Secured Page</h1>
    <div>User Name: <span th:text="${userName}"></span></div>
    <div>Client Name: <span th:text="${clientName}"></span></div>
    <div>User Attributes: <span th:text="${userAttributes}"></span></div>
</body>
</html>
Now you’re ready to try it out. Again, make sure you’re in the project root, and run ./gradlew bootRun.
Navigate to http://localhost:8080 and click the Login link.
If your browser bypasses the login page and goes straight to the /securedPage endpoint, open an incognito browser and try it again.
First, you will need to authorize the Spring Boot Login application to use your Github account for OAuth login.
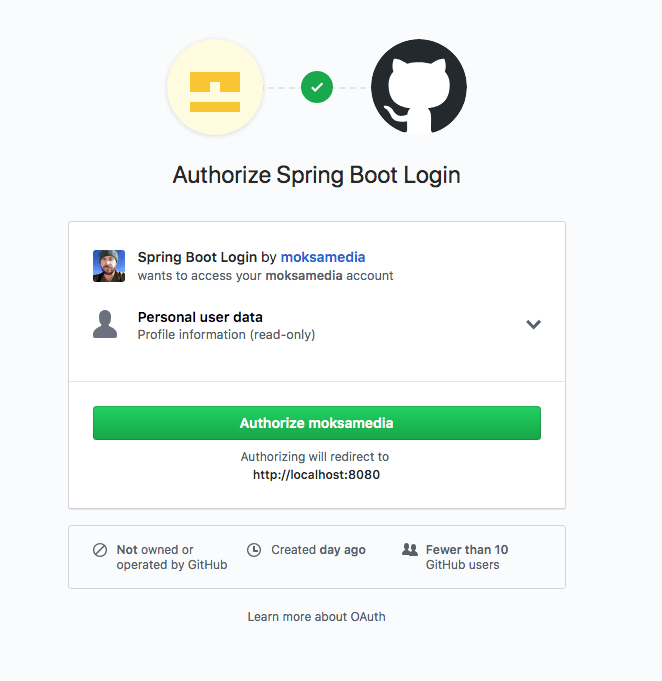
Next, you will see the GitHub OAuth login screen:
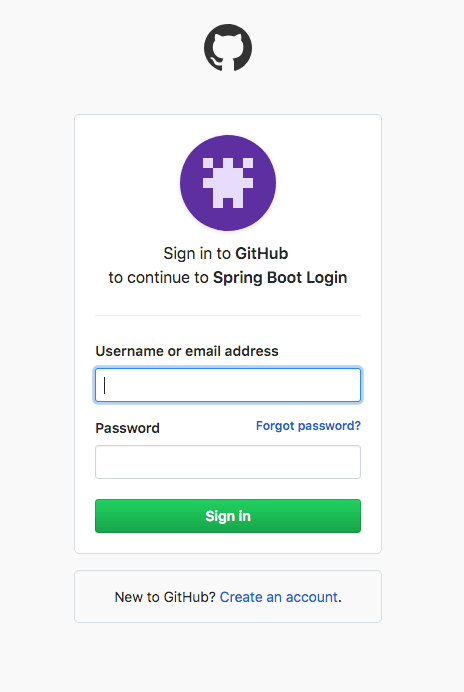
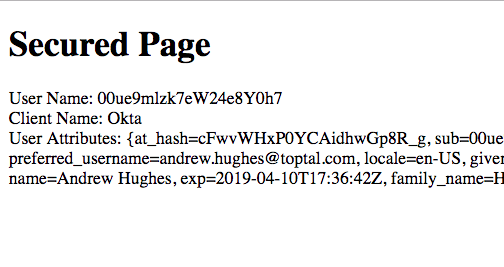
If you’re successful, you’ll see a simple text page that says “Secured Page” in bold letters and displays some information about your OAuth user.
Pretty sweet, huh?
Now you’re going to add a second OAuth provider: Okta.
Add OAuth 2.0 Login with Okta to Your Spring Boot App
First, go to developer.okta.com and sign up for a free developer account, if you don’t already have one.
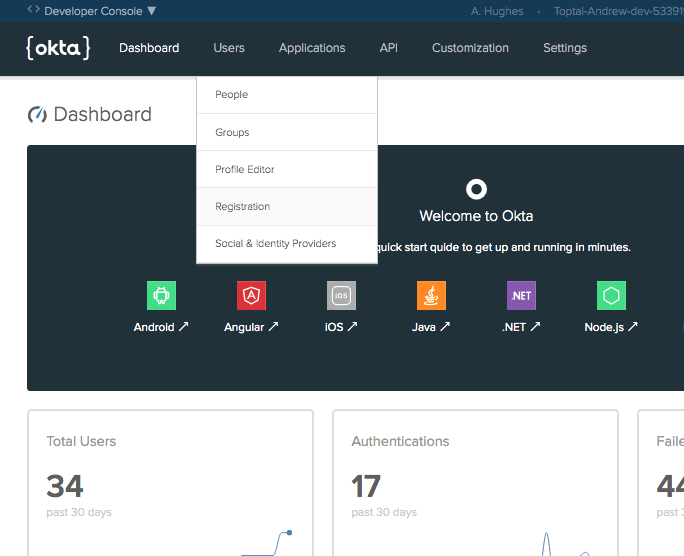
Once you have an account, to create an OAuth/OIDC app, open your Okta developer dashboard. Click on the Applications top menu item, and then click on Add Application.
Select Web as the platform and click Next.
Give the app a name. I named mine “Spring Boot Login”, but you can name yours whatever you like.
Change the Login redirect URIs to http://localhost:8080/login/oauth2/code/okta.
The other defaults are fine.
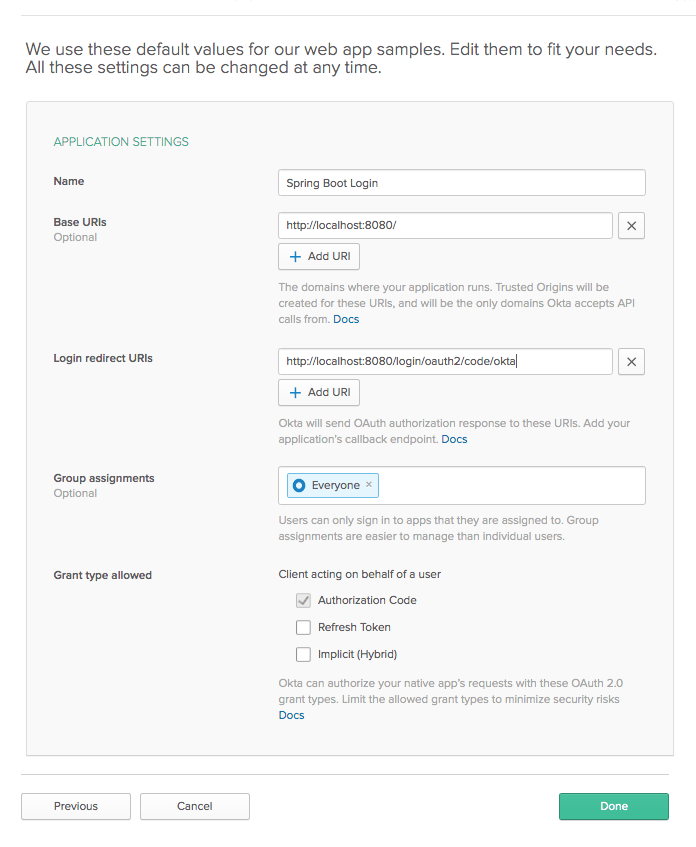
Click Done.
Take note of the Client ID and Client Secret on the next page.
Update the application.yml file for Okta:
spring:
  ...
  security:
    oauth2:
      client:
        registration:
          github:
            client-id: << Your GitHub Client ID >>
            client-secret: << Your GitHub Client Secret >>
          okta:
            client-id: << Your Okta Client ID >>
            client-secret: << Your Okta Client Secret >>
            client-name: Okta
        provider:
          okta:
            issuer-uri: https://{yourOktaDomain}/oauth2/default
You need to add the Okta registration and provider entries, making sure to fill in your Client ID, Client Secret, and Okta issuer.
Restart the app, go to http://localhost:8080, and click the Login link.
This time you’ll be given a choice of OAuth providers. This screen is auto-generated by Spring Boot.
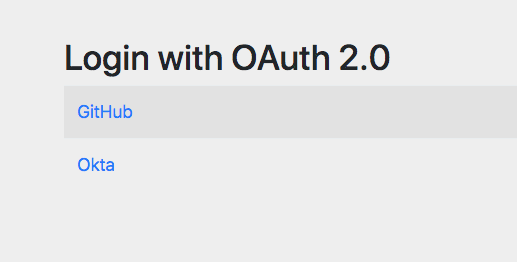
Click Okta and you’ll be taken to the Okta login page (usual caveat about logging out and/or incognito apply).
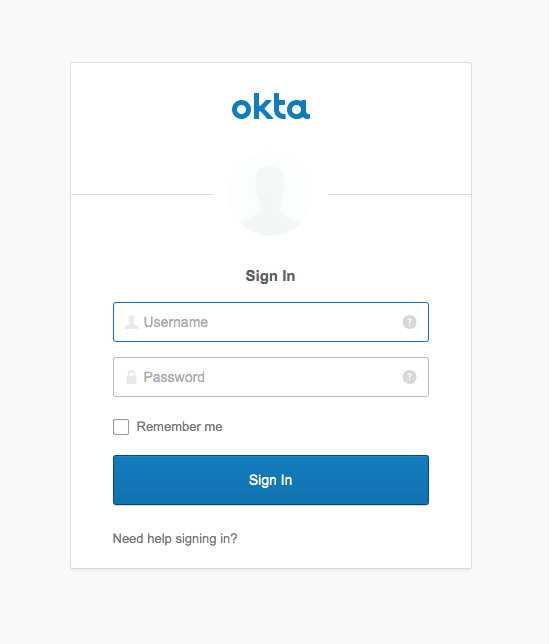
Log in successfully and you’ll see our success page.
At this point, you’ve brought the oauth-start project up to date with the oauth-github-okta project folder, and you’ve seen how easy it is to add multiple OAuth providers to a Spring Boot app.
Simplify OAuth 2.0 Login With Okta’s Spring Boot Starter
The last thing you’re going to do in this tutorial is to configure Okta to allow new user registration. Before you do that, however, I want to introduce you to the Okta Spring Boot Starter. The project simplifies integrating Spring Boot and Okta. The project’s README is a great source for more in-depth info.
You’re going to integrate the Okta Spring Boot Starter into this project and simplify the configuration a little. Just for simplicity, you’re also going to remove the GitHub OAuth integration.
Add one dependency to the build.gradle file:
dependencies {
    ...
    implementation 'com.okta.spring:okta-spring-boot-starter:1.1.0'
    ...
}
Now update the application.yml file:
okta:
  oauth2:
    issuer: https://{yourOktaDomain}/oauth2/default
    client-id: <<yourOktaClientID>>
    client-secret: <<yourOktaClientSecret>>
spring:
  thymeleaf:
    cache: false
Fill in your Client Secret and Client ID.
Try it. Run ./gradlew bootRun.
You should be able to log in via Okta. This time you won’t be given a choice of OAuth 2.0 providers.
Enable User Registration
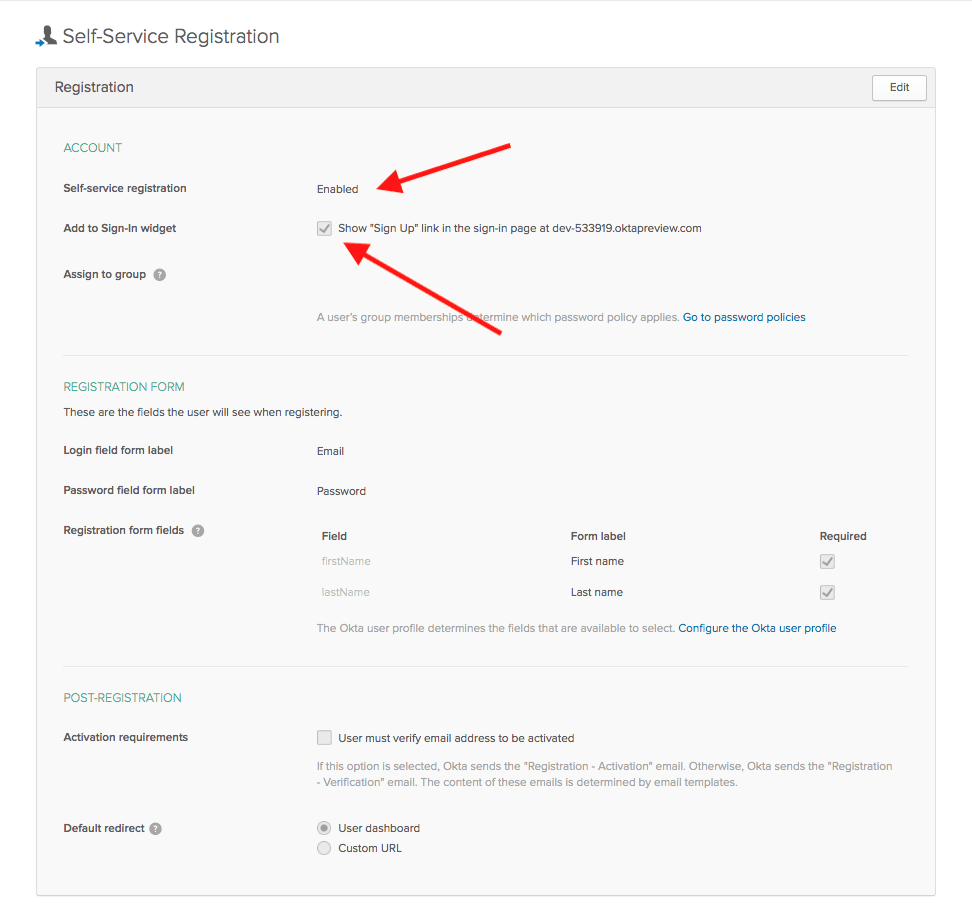
Log into your developer.okta.com account.
Hover over Users and click on Registration.
Enable registration. Also, enable the Show “Sign Up” link in the sign-in page… option. This causes the registration link to be shown in the hosted login page.
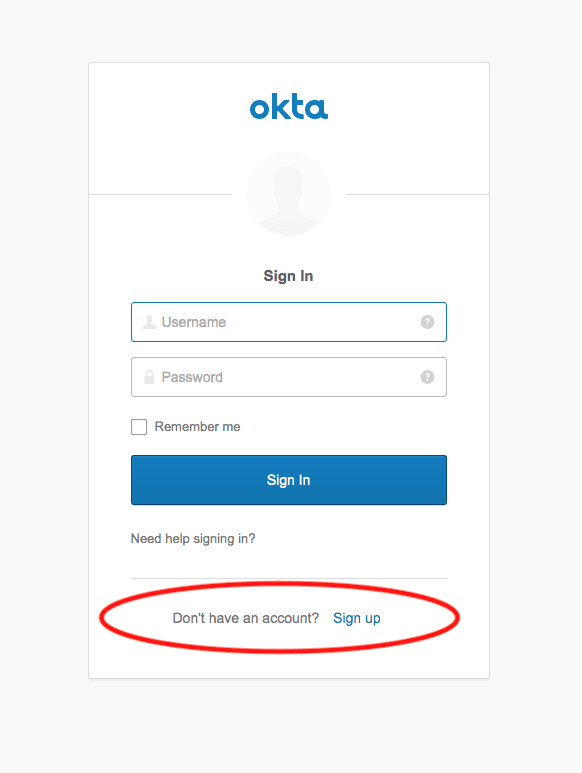
Log in again, using an incognito window. This time you’ll notice the user has the option of registering as a new user.
Enter your email address, password, and name; set up a few security questions, and you’re done! You registered a new user for your application using Okta.
There’s a lot more you can do with Okta’s Self-Service Registration options. All of this can be configured and customized. Take a look at their docs to dig deeper.
The final product for this using the Okta Spring Boot Starter and with the GitHub OAuth removed is found in the oauth-okta-starter directory.
Learn More About Spring Boot Login Options and Secure Authentication
You covered a TON of territory in this tutorial. You implemented a Spring Boot app using basic auth, form-based auth, and customized form-based auth. You then used OAuth 2.0 and OIDC to implement SSO using GitHub and Okta. Finally, you saw how the Okta Spring Boot Starter can be used to simplify OAuth/OIDC SSO configuration in Spring Boot, and how to allow users to self-service register with Okta.
You can find all the code for the examples in this tutorial on GitHub.
To dig deeper into creating custom login forms, take a look at the Spring documentation on the subject.
Spring Security’s oauth2login sample also has some great information and more examples.
Here are some related blog posts that demonstrate how to use Spring Boot and Spring Security for login and authentication:
- Simple Token Authentication for Java Apps
- Build a Web App with Spring Boot and Spring Security in 15 Minutes
- Create a Secure Spring REST API
- Build a Simple CRUD App with Spring Boot and Vue.js
If you enjoyed this post, follow us on social media { Twitter, Facebook, LinkedIn, YouTube } to know when we’ve posted similar ones.
“A Quick Guide to Spring Boot Login Options” was originally published on the Okta developer blog on May 15, 2019.
“I love writing authentication and authorization code.” ~ No Java Developer Ever. Tired of building the same login screens over and over? Try the Okta API for hosted authentication, authorization, and multi-factor auth.

Hi,
I tried the example of SecurityConfiguration class mentioned above.
I accessed the login page with http://localhost:8080
1) But on entering “user” and “pass” gives me the message “Bad Credetials”.
2) Secondly it seems that configure method has the user name pass word hard coded.
Is there a way that more than on user can be allowed to login instead of just the user “user”, which is hard coded in the SecurityConfiguration class ?
Regards,
Karthik.