Introduction
Basically the database setup involves several steps before we can use it through configured datasource in our application. This actually is required in case of actual project implementations. However, there are situations where we just need a POC to be done for something, and the whole database setup thing still becomes an obligation. Similarly, for unit tests, it would be ideal to have our own set of records in the database, so its independent, without getting impacted by the data changes in the deployed environment. For such use cases, in-memory databases are the ideal solution.
An in-memory database gets created when the application starts, while it gets destroyed when the application stops.
Spring Boot integrates H2 database with lot of ease. So you can easily and quickly switch between a real database and an in-memory database.
Note that, H2 InMemory Database is a relational DBMS written in Java.
Let’s check out a quick demo.
Implementation
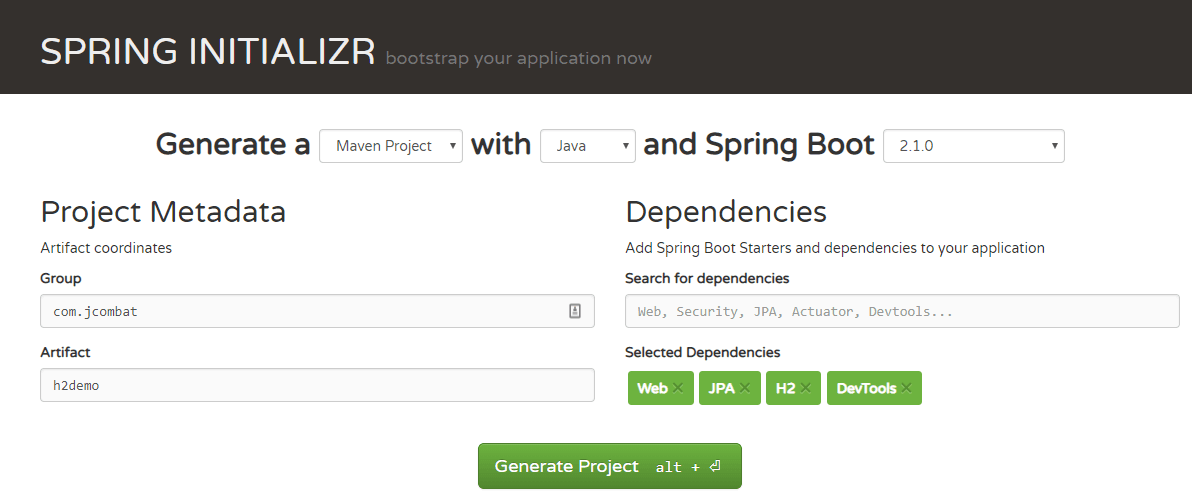
Lets generate the Spring Boot project from Spring initializr. Ensure you add Web, JPA, H2 and DevTools dependencies as shown below.
Let’s look at the generated pom file.
pom.xml
<?xml version="1.0" encoding="UTF-8"?>
<project xmlns="http://maven.apache.org/POM/4.0.0"
	xmlns:xsi="http://www.w3.org/2001/XMLSchema-instance"
	xsi:schemaLocation="http://maven.apache.org/POM/4.0.0 http://maven.apache.org/xsd/maven-4.0.0.xsd">
	<modelVersion>4.0.0</modelVersion>

	<groupId>com.jcombat</groupId>
	<artifactId>h2demo</artifactId>
	<version>0.0.1-SNAPSHOT</version>
	<packaging>jar</packaging>

	<name>h2demo</name>
	<description>Demo project for Spring Boot</description>

	<parent>
		<groupId>org.springframework.boot</groupId>
		<artifactId>spring-boot-starter-parent</artifactId>
		<version>2.1.0.RELEASE</version>
		<relativePath /> <!-- lookup parent from repository -->
	</parent>

	<properties>
		<project.build.sourceEncoding>UTF-8</project.build.sourceEncoding>
		<project.reporting.outputEncoding>UTF-8</project.reporting.outputEncoding>
		<java.version>1.8</java.version>
	</properties>

	<dependencies>
		<dependency>
			<groupId>org.springframework.boot</groupId>
			<artifactId>spring-boot-starter-data-jpa</artifactId>
		</dependency>
		<dependency>
			<groupId>org.springframework.boot</groupId>
			<artifactId>spring-boot-starter-web</artifactId>
		</dependency>

		<dependency>
			<groupId>org.springframework.boot</groupId>
			<artifactId>spring-boot-devtools</artifactId>
			<scope>runtime</scope>
		</dependency>
		<dependency>
			<groupId>com.h2database</groupId>
			<artifactId>h2</artifactId>
			<scope>runtime</scope>
		</dependency>
		<dependency>
			<groupId>org.springframework.boot</groupId>
			<artifactId>spring-boot-starter-test</artifactId>
			<scope>test</scope>
		</dependency>
	</dependencies>

	<build>
		<plugins>
			<plugin>
				<groupId>org.springframework.boot</groupId>
				<artifactId>spring-boot-maven-plugin</artifactId>
			</plugin>
		</plugins>
	</build>

</project>
We also notice application.properties file generated as –
application.properties
# H2
spring.h2.console.enabled=true
spring.h2.console.path=/h2

# Datasource
spring.datasource.url=jdbc:h2:mem:testdb
spring.datasource.username=sa
spring.datasource.password=
spring.datasource.driver-class-name=org.h2.Driver
The property spring.h2.console.enabled=true enables the web console at http://localhost:8080/h2
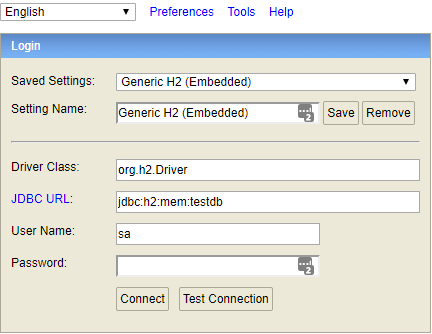
Click on Connect and you get into the page where you see available tables in the DB.
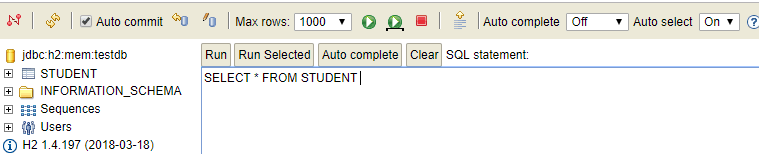
You might be wondering, how come Student table got created. The magic happens with data.sql placed at src/main/resources. Just ensure you have the insert statements in the data.sql file as mentioned below –
data.sql
insert into STUDENT
values(10001,'Ajay', 'AAA1');

insert into STUDENT
values(10002,'Ajit', 'AAA2');
Spring Boot Auto Configuration checks the values in the data.sql file and does the needful for you, i.e. creates the STUDENT table, and executes the insert statements. Smart!
Lets check out how we can operate on these student records.
To do that, let’s have the Student entity class created now.
Student.java
package com.jcombat.entity;

import javax.persistence.Entity;
import javax.persistence.GeneratedValue;
import javax.persistence.Id;

@Entity
public class Student {

	@Id
	@GeneratedValue
	private Long id;
	private String name;
	private String section;

	public Student() {
	}

	public Student(Long id, String name, String section) {
		this.id = id;
		this.name = name;
		this.section = section;
	}

	public Long getId() {
		return id;
	}

	public void setId(Long id) {
		this.id = id;
	}

	public String getName() {
		return name;
	}

	public void setName(String name) {
		this.name = name;
	}

	public String getSection() {
		return section;
	}

	public void setSection(String section) {
		this.section = section;
	}

}
To access the database, let’s write a simple JPA interface which provides the required helper functions to do basic DB operations.
StudentRepository.java
package com.jcombat.repository;

import org.springframework.data.jpa.repository.JpaRepository;
import org.springframework.stereotype.Repository;

import com.jcombat.entity.Student;

@Repository
public interface StudentRepository extends JpaRepository<Student, Long> {

}
Let’s now customize the Spring Boot entry point class using Command Line Runner, so we will be able to execute our Spring Boot application from command line.
package com.jcombat.h2demo;

import org.slf4j.Logger;
import org.slf4j.LoggerFactory;
import org.springframework.beans.factory.annotation.Autowired;
import org.springframework.boot.CommandLineRunner;
import org.springframework.boot.SpringApplication;
import org.springframework.boot.autoconfigure.SpringBootApplication;
import org.springframework.boot.autoconfigure.domain.EntityScan;
import org.springframework.data.jpa.repository.config.EnableJpaRepositories;

import com.jcombat.repository.StudentRepository;

@SpringBootApplication
@EntityScan("com.jcombat.entity")
@EnableJpaRepositories("com.jcombat.repository")
public class H2demoApplication implements CommandLineRunner {

	// mvn spring-boot:run
	private Logger LOG = LoggerFactory.getLogger("H2demoApplication");

	StudentRepository studentRepository;

	@Autowired
	public H2demoApplication(StudentRepository studentRepository) {
		this.studentRepository = studentRepository;
	}

	public static void main(String[] args) {
		SpringApplication.run(H2demoApplication.class, args);
	}

	@Override
	public void run(String... args) throws Exception {
		LOG.info("Student count in DB: {}", studentRepository.count());
	}
}
Executing the application
To run the application, you can either do it directly from your Eclipse IDE, or from command-line through below command –
mvn spring-boot:run
When executed, we see the below output displayed on console –
![]()
Download the source code
![]()
| Published on Java Code Geeks with permission by Abhimanyu Prasad, partner at our JCG program. See the original article here: Understanding H2 InMemory Database with Spring Boot Opinions expressed by Java Code Geeks contributors are their own. |

Hi Abhimanyu. Just a couple of friendly remarks. It’s about some annotations that actually are not required in this specific example.
1) The annotation @Autowired on the constructor of H2DemoApplication is not required. You are using constructor injection, which works fine without any explicit autowiring annotation.
2) The annotations EntityScan and EnableJpaRepositories in H2DemoApplication are also not required. These annotations are necessary only when your entities or your repositories are not in the application package or a subpackage of the application package (so if they are not in the package com.jcombat.h2demo or a subpackage of it).
Thanks for the example!