4 external displays to use with Android Things: TM1637, Max7219, SSD1306, LCD 1602, LCD 2004
External displays are peripherals we can use with Android Things to show information. This article covers how to use 4 external display with Android Things. Displays are important when it is necessary to show information. When we develop smart devices based on Android Things usually it is necessary to show information to the user. Even if we could use RGB LEDs to show some kind of information, an external display connected to Android Things plays an important role when it is necessary to display messages or other kinds of information.
Android Things support several external displays and there are different drivers that we can use to interact with these external displays.
This Android Things tutorial describes how to use the following external display with Android Things:
- TM1637 This is a 4-digit display
- Max7219 This a matrix LED usually 8×8. It is made by 64 single LED that can be addressed. Moreover, it has a SPI interface
- LCD display (LCD 1602, LCD 2004) built on HD44780 chip and controlled with the PCF8574 chip
- SSD1306 An OLED display with 0.96inch screen. This OLED display has a resolution of 128×64 and each led can be controlled turning it on and off
This article will cover step by step how to connect an external display with Android Things and how to display information.
Table Of Contents
1. How to connect TM1637 external display to Android Things
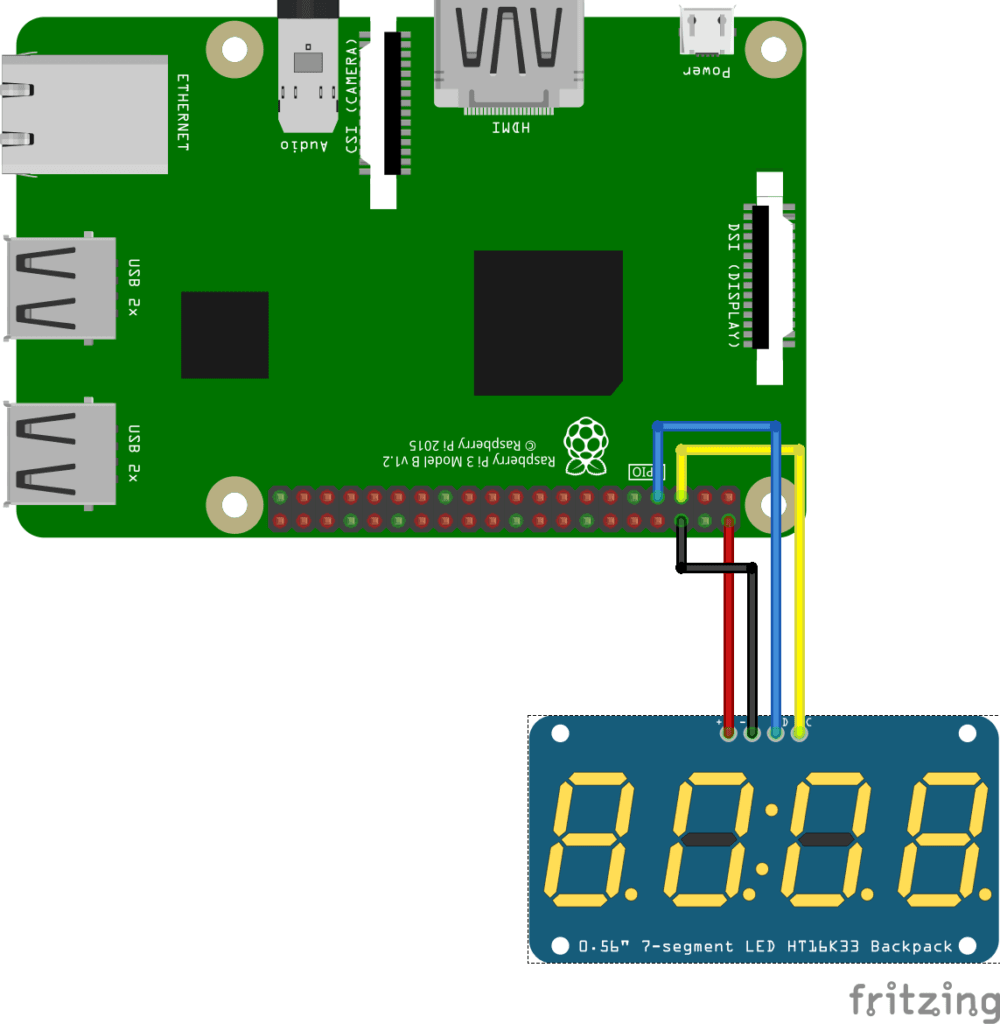
Let us start with the simplest external display we can use with Android Things: the TM1637. It has four pins that we have to connect to Android Things:
- Vcc (+3V or +5V)
- GND
- DIO (Data)
- CLK (Clock)
The sketch to connect Android Things with TM1637 is shown below:
Where can we use this display? This external display can be used in these scenarios:
- Time display
- To display sensor data
How to use TM1637 with Android Things
The first step is importing the right driver so that we can interact with the TM1637. The TM1637 display has a supported driver in Android Things.
To use this display it is necessary to add the following line to build.gradle:
dependencies {
 implementation 'com.google.android.things.contrib:driver-tm1637:1.0'
 ......
}
Let us create a new class that will handle the TM1637 external display. This class is named TM1637Display and looks like:
public class TM1637Display {

    private NumericDisplay display;

    private String DATA_PIN = "BCM4";
    private String CLK_PIN  = "BCM3";

    private static TM1637Display me;

    public static TM1637Display getInstance() {
        if (me == null)
            me = new TM1637Display();

        return me;
    }

    private TM1637Display() {
        init();
    }

  ....
}
This class is a singleton and in the init() method, the app initialize the driver using the Data pin and the Clock pin:
private void init() {
  try {
    display = new NumericDisplay(DATA_PIN, CLK_PIN);
  }
  catch(IOException ioe) {
     ioe.printStackTrace();
  }
}
Now it is possible to display the data using this method:
public void display(String data) {
  try {
   display.display(data);
   display.setColonEnabled(true);
   display.setBrightness(NumericDisplay.MAX_BRIGHTNESS);
 }
 catch (IOException ioe) {
   ioe.printStackTrace();
 }
}
As you can notice, it is possible to change the display brightness using setBrightness. In the MainActivity we can show data using the TM1637 display in this way:
private void testTM1637() {
   TM1637Display display = TM1637Display.getInstance();
   display.display("1420");
}
The result is shown in the picture below:
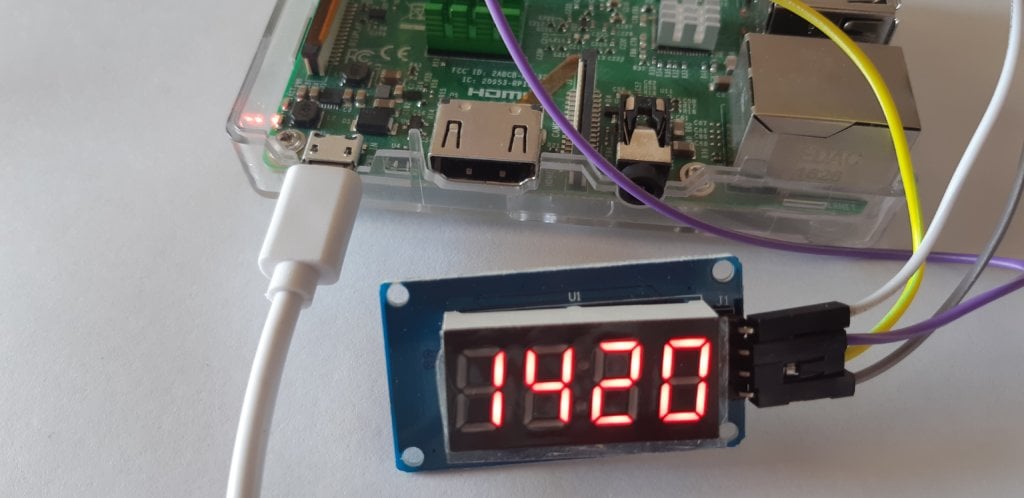
This external display is very easy to use.
2. How to connect Max7219 to Android Things
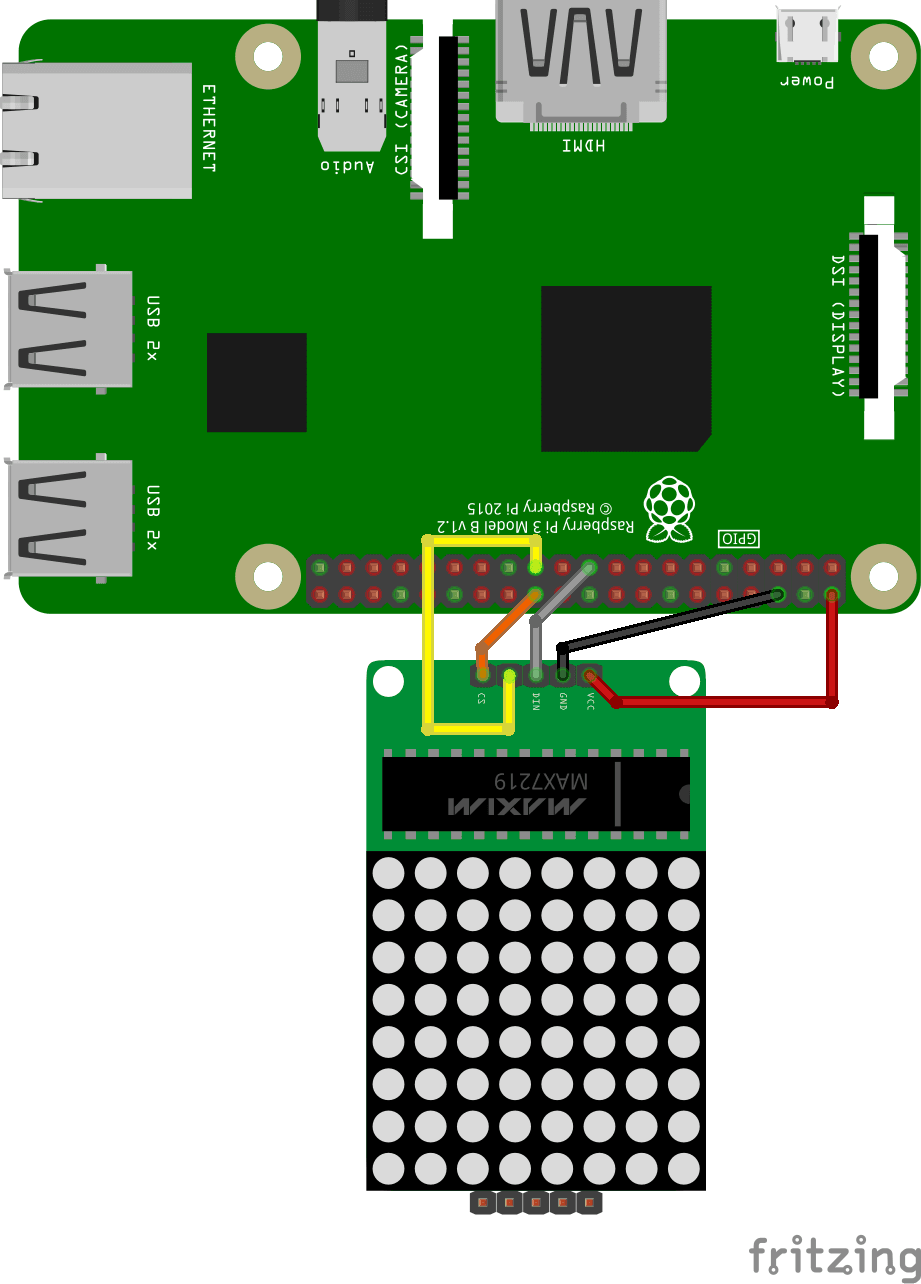
Max7219 display is a LED matrix that has 8×8 LEDs and it is possible to address each of them turning it on or off. Usually, it is a monochrome display but there are other variants with RGB LEDs. It is a SPI interface and the interesting aspect is the capability to chain them. It has 5 different pins:
- Vcc (+5V)
- GND
- CLK (Clock>
- CS
- Data
Even if it is some limits, this external display can have several usages and it can be used to show simple images too.
The schema below shows how to connect Max7219 to Android Things:
How to use Max7219 with Android Things
Before using Max7219 with Android Things it is necessary to add the driver that handles this peripheral. Unfortunately, this display is not supported officially in Android Things, for this reason, it is necessary to find an unofficial driver.
There are several drivers available, the one used in this article is this:
dependencies {
  implementation 'rocks.androidthings:max72xx-driver:0.2'
  ....
}
Of course, you can use other drivers too anyway be aware that the classes can change.
To handle this external display (Max7219) we can create a simple class named Max7219Display that is a singleton as discussed previously:
public class Max7219Display {

    private MAX72XX display;
    private static Max7219Display me;

    private Max7219Display() {
        init();
    }

    public static Max7219Display getInstance() {
        if (me == null)
            me = new Max7219Display();

        return me;
    }
....
}
where in the init() method, the Android Things app initializes the display:
private void init() {
  try {
    display = new MAX72XX("SPI0.0", 1);
    //
    display.setIntensity(0, 13);
    display.shutdown(0, false);
    display.clearDisplay(0);
  }
  catch(IOException ioe) {
     ioe.printStackTrace();
  }
}
In the previous code, we initialize the LED intensity using the method setIntensity. To know better how to use this external display, let us suppose we want to create a simple box.
As a first step, it is necessary to create a byte array:
private byte ROW = (byte) 0b11111111;
In this array, the 1 means that the LED is turned on while 0 is turned off. In this example, all the LEDs are on. The array size is 8 as the number of the LEDs in the matrix. The next step is drawing the box borders:
public void drawBorder() {
   try {
     display.setRow(0, 0, ROW);
     display.setRow(0, 7, ROW);
     display.setColumn(0, 0, ROW);
     display.setColumn(0, 7, ROW);
     display.close();
   }
   catch(IOException ioe) {
     ioe.printStackTrace();
   }
}
In the code above, the Android Things app uses setRow to apply the byte array to all the LEDs in the row. In this case, the first row (x = 0, y = 0) and the last row (x = 0, y = 7). In the same way, the app draws the border along the columns.
The final result is shown in the picture below:
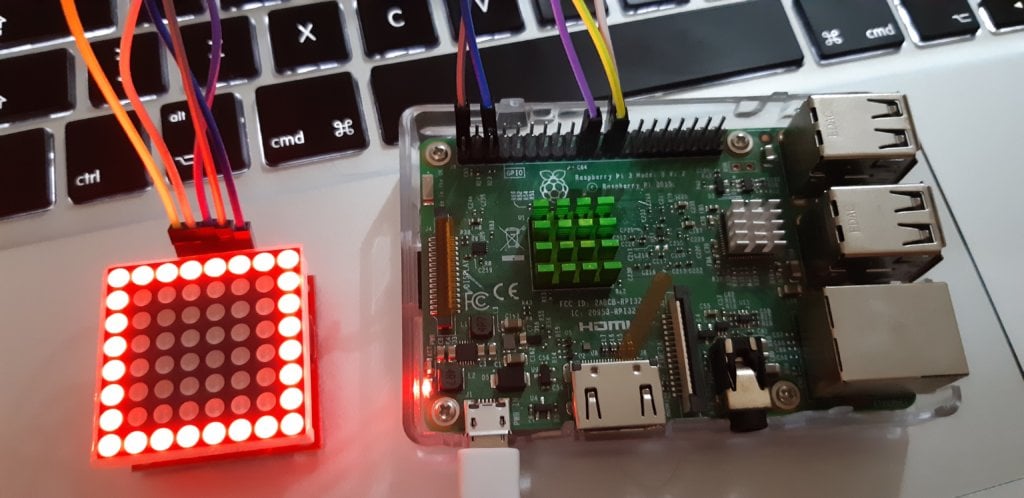
We can do more and show a more complex array that can be used for all the rows and columns. Add this array to the class:
private byte[] table =
    {(byte) 0b10101010,
     (byte) 0b01010101,
     (byte) 0b10101010,
     (byte) 0b01010101,
     (byte) 0b10101010,
     (byte) 0b01010101,
     (byte) 0b10101010,
     (byte) 0b01010101};
This is the method that displays the draw above:
public void drawTable() {
        try {
           for (int i=0 ; i < table.length; i++)
               display.setRow(0, i, table[i]);

           display.close();
        }
        catch(IOException ioe) {
            ioe.printStackTrace();
        }
    }
You can run it and verify the result.
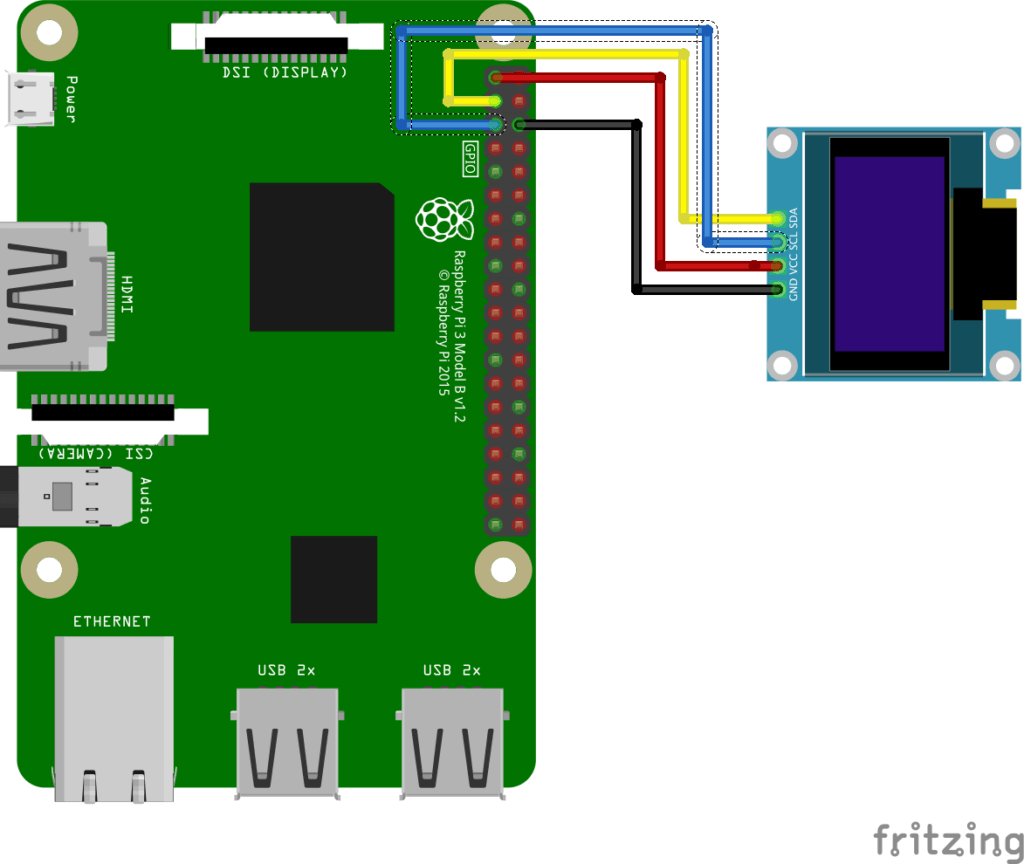
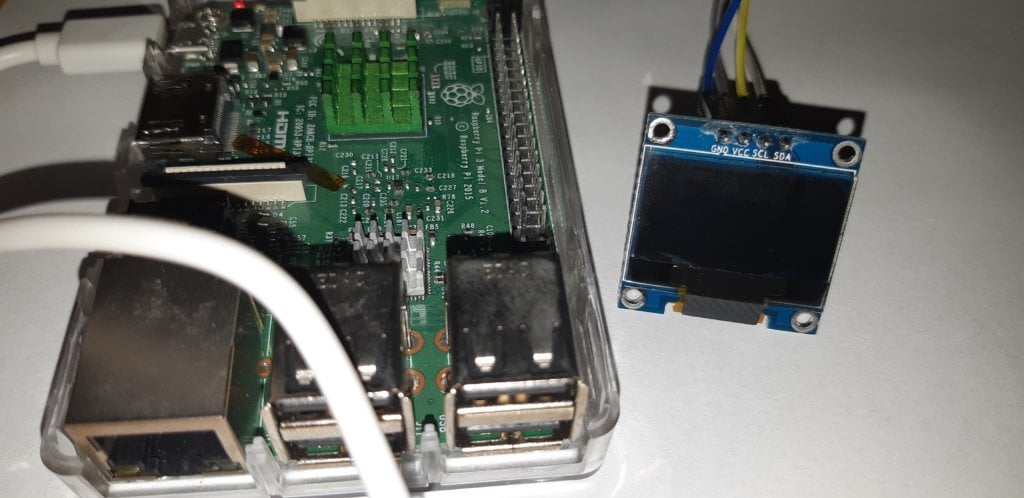
3. How to connect SSD1306 external display to Android Things
As specified before, the SSD1306 is an external display with a resolution of 128×64. It is an OLED display and it is possible to control each pixel during it on or off. There are two different variants of this display: one with a SPI interface and the other one with I2C interface. The one used in this article has an I2C interface. Therefore, there are four different pins:
- Vcc (+3V or +5V)
- GND
- Data
- CLK
The details about how to connect the SSD external display to Android Things is shown below:
How to use SSD1306 with Android Things
The SSD1306 external display is officially supported by Android Things. Therefore, there is a driver that we can use to connect to this external peripheral.
To use this LCD display it is necessary to add this driver to the build.gradle:
dependencies {
    implementation 'com.google.android.things.contrib:driver-ssd1306:1.0'
    ....
}
As we did previously, let us create a new class that will handle all the details and let us call id as SSD1306Display. This class looks like:
public class SSD1306Display {

    private  static SSD1306Display me;
    private Ssd1306 display;

    private SSD1306Display() {
        init();
    }

    public static SSD1306Display getInstance() {
        if (me == null)
            me = new SSD1306Display();

        return me;
    }
   ..
}
and the init() method is defined as:
private void init() {
  try {
    display = new Ssd1306("I2C1");
    display.clearPixels();
  }
  catch (IOException ioe) {
    ioe.printStackTrace();
  }
}
[/code]
Finally, we can start using this LCD display. The Android Things app can turn on or off each LED in this display so that using this feature, it can draw a simple line:
public void drawLine(int y) {
   for (int x = 0; x < display.getLcdWidth(); x++)
     display.setPixel(x, y, true);

     try {
       display.show();
     }
     catch (IOException ioe) {
        ioe.printStackTrace();
     }
}
Using the setPixel, the Android Things app can select the state of each pixel. The final result is shown below (there should be a line but it is not visible!!!):
Even if it can be useful to turn on or off each LED, it can be quite complex when we want to shows more complex images.
For this reason, it is possible to use another way as shown below:
public void drawBitmap(Resources res) {
    Bitmap img = BitmapFactory.decodeResource(res, R.drawable.weathersun);
    BitmapHelper.setBmpData(display, 0,0, img, false);
    try {
      display.show();
    }
    catch (IOException ioe) {
      ioe.printStackTrace();
    }
}
It is possible to load directly the image and display it on the LCD display. This is very useful and easy.
That’s all.
More useful resources:
How to send notification via SMS using Android Things and Twilio
How to integrate Android Things and Tensorflow to build a smart object
4. How to connect a LCD display 1602 or 2004 to Android Things
The last external display we cover in this article is a simple LCD display. It can display standard characters or a custom char.
It has several sizes but they work all in the same way. The 16×2 and 20×4 sizes are the easiest to find. The first one can display 16 chars in two lines, while the second can display 20 chars on four lines.
The image below shows how to connect Android Things with LCD 2004:
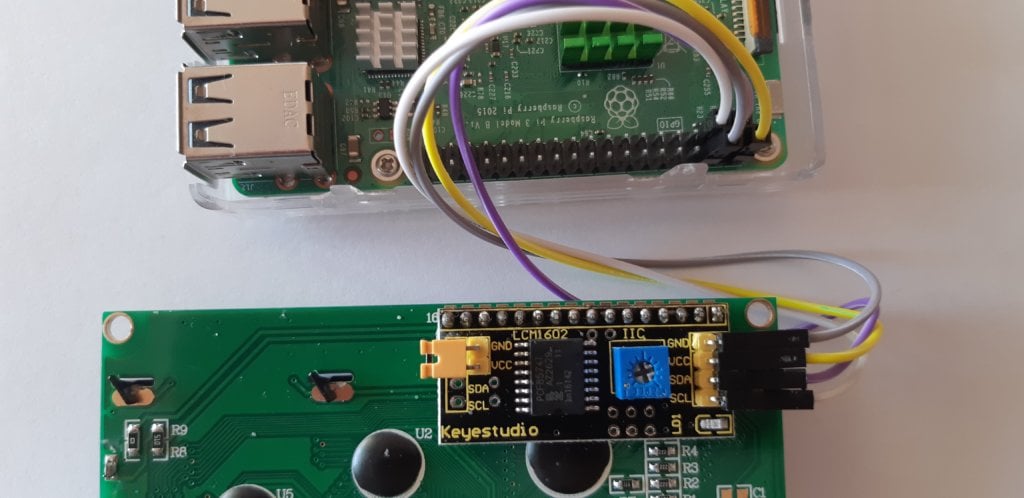
It has an I2C interface and it has the back-light too.
How to connect LCD display to Android Things
This kind of devices are not supported natively by Android Things, anyway, there are several drivers available.
The driver that we will use is shown below:
dependencies {
  ...
 implementation 'com.leinardi.android.things:driver-hd44780:1.0'
}
Let us start creating again a new class called LCDDisplay that is similar to the classes previously described, the only difference is in the init()
private void init() {
  try {
     driver = new Hd44780(I2C_PIN, I2C_ADDR, GEOMETRY);
     driver.cursorHome();
     driver.clearDisplay();
     driver.setBacklight(true);
  }
  catch(Exception e) {
     e.printStackTrace();
  }
}
where
private static final String I2C_PIN = "I2C1";
private static final int I2C_ADDR = 0x27;
private static final int GEOMETRY = Hd44780.Geometry.LCD_20X4;
Tip
Please notice that the I2C_ADDR could be different from the one shown above
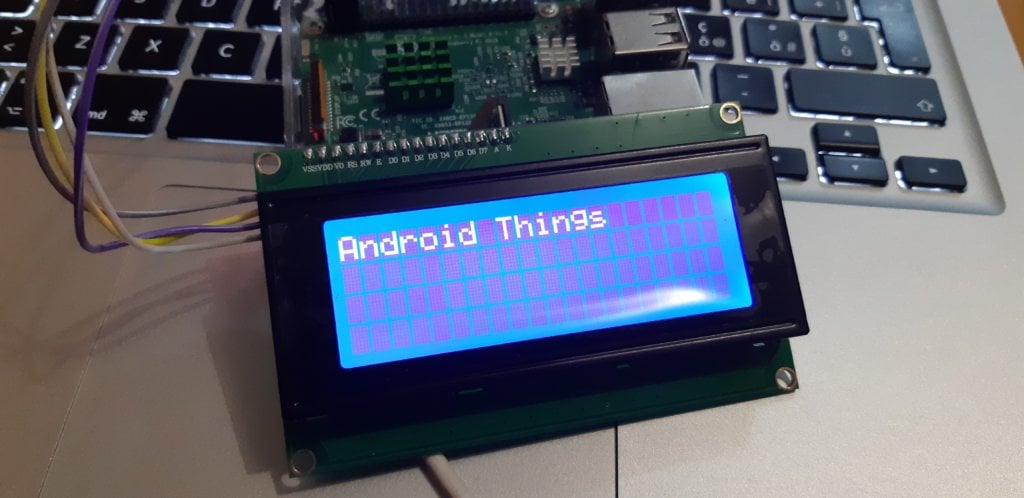
Let us suppose the Android Things app wants to display a message on the LCD screen. The code to use is shown below:
public void display(String data) {
  try {
    driver.clearDisplay();
    driver.cursorHome();
    driver.setBacklight(true);
    driver.setText(data);
    driver.close();
  }
  catch (Exception e) {
     e.printStackTrace();
  }
}
This method at the beginning clears the display and set the cursor to home. The next step is setting the backlight and finally, it displays the message.
The result is shown below:
If we want to scroll the message along the display we can use this method:
public void shift(final String word, final int speed) {
  final int size = 20 - word.length();

  Runnable r = new Runnable() {
     @Override
     public void run() {
        try {
           driver.createCustomChar(empty, 0);
           for (int i = 0; i <= size; i++) {
              if (i > 0) {
                driver.setCursor(i - 1, 0);
                driver.writeCustomChar(0);
              }
              driver.setCursor(i, 0);
              driver.setText(word);
              Thread.sleep(speed);
            }
         }
         catch (Exception e) {
             e.printStackTrace();
         }
       }
    };

    Thread t = new Thread(r);
    t.start();
}
The important interesting aspect to notice is the fact that we can create a custom char. In this case, the custom char is a blank char:
int[] empty = {0b000000, 0b000000,
               0b000000, 0b000000,
               0b000000, 0b000000,
               0b000000, 0b000000};
5. Summary
At the end of this article, hopefully you have gained the knowledge how to use external display with Android Things. As you have learned there are several external displays with different features. According to our needs and the scenario we can select the best external display to use with Android Things.
| Published on Java Code Geeks with permission by Francesco Azzola, partner at our JCG program. See the original article here: 4 external displays to use with Android Things: TM1637, Max7219, SSD1306, LCD 1602, LCD 2004 Opinions expressed by Java Code Geeks contributors are their own. |
