In this article, we take a one step further and let you through the creation of the first Ignite application to write and read (put/get) from the distributed cache. As a first example, we leave it as simple as possible to show you how to write an application in Java for manipulating the data of the Apache Ignite cluster.
The application shows in this section are available from the GitHub repository (chapter two). You can clone or download the project from the GitHub, compile the application with Maven and run it in your workstation. However, if you want to enter the programs by hand, you are free to do so. In this case, you must enter the program into your computer using a text editor, not a word processor.
You follow these next three steps:
1. Start your Ignite node.
2. Create a mvn project or enter the program.
3. Compile the program.
4. Run the program.
Step 1.
Start your Apache Ignite single node cluster if it is not started yet. Use the following command in your favorite terminal.
$ IGNITE_HOME/bin/ignite.sh
Step 2.
Create a maven project with the following command. If you download the project from the GitHub, skip this step.
mvn archetype:generate -DartifactId=chapter-two -DgroupId=com.blu.imdg -DarchetypeArtifac\ tId=maven-archetype-quickstart -DinteractiveMode=false
The above command will create a directory with the same name given as the artifactId. Change into the directory chapter-two. Under this directory, you will find the following standard project structure.
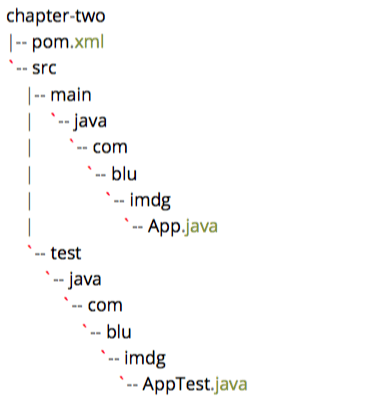
The src/main/java directory contains the project source code, the src/test/java directory contains the test sources, and the pom.xml is the project’s Project Object Model or POM. The pom.xml file is the core of the project’s configuration in Maven. It is a single configuration file that contains all the necessary information to compile and run the Java program. The pom.file could be complicated, but it’s not necessary to understand all of the intricacies just yet to use it effectively.
Step 3.
Add the following Ignite maven dependency into the pom.xml file.
<dependency>
<groupId>org.apache.ignite</groupId>
<artifactId>ignite-core</artifactId>
<version>${ignite.version}</version>
</dependency>
Also, add the project properties section into the pom.xml file as shown below.
<properties>
<project.build.sourceEncoding>UTF-8</project.build.sourceEncoding>
<ignite.version>2.4.0</ignite.version>
</properties>
You can run the application from the command line with Maven. Alternatively, you can build a single executable JAR file that contains all the necessary dependencies, classes, and resources, and run the application. This makes it easy to ship, version, and deploy the service as an application throughout the development lifecycle, across different environments, and so on. Add two more plugins into the plugin section of the pom.xml to create a
fat executable jar for running the application efficiently.
<build> <plugins>
<plugin>
<groupId>com.jolira</groupId> <artifactId>onejar-maven-plugin</artifactId> <version>1.4.4</version>
<executions>
<execution> <id>build-query</id> <configuration>
<mainClass>com.blu.imdg.HelloIgnite</mainClass> <attachToBuild>true</attachToBuild> <classifier>onejar</classifier> <filename>HelloIgnite-runnable.jar</filename>
</configuration> <goals>
<goal>one-jar</goal> </goals>
</execution> </executions>
</plugin> </plugins>
</build>
Step 4.
Within the src/main/java/com/blu/imdg directory, you can add any Java classes you want.
To maintain consistency with the rest of this guide, create the following java class: HelloIgnite in these directory.
package com.blu.imdg;
public class HelloIgnite { }
Step 5.
Add all the following libraries after the package statement.
import org.apache.ignite.Ignite;
import org.apache.ignite.IgniteCache;
import org.apache.ignite.Ignition;
import org.apache.ignite.configuration.IgniteConfiguration;
import org.apache.ignite.spi.discovery.tcp.TcpDiscoverySpi;
import org.apache.ignite.spi.discovery.tcp.ipfinder.multicast.TcpDiscoveryMulticastIpFinder
Step 6.
Now that you have a Java class, copy the following lines of code into the class.
public static void main(String[] args) {
System.out.println("Hello Ignite");
// create a new instance of TCP Discovery SPI
TcpDiscoverySpi spi = new TcpDiscoverySpi();
// create a new instance of tcp discovery multicast ip finder TcpDiscoveryMulticastIpFinder tcMp = new TcpDiscoveryMulticastIpFinder(); tcMp.setAddresses(Arrays.asList("localhost")); // change your IP address here // set the multi cast ip finder for spi
spi.setIpFinder(tcMp);
// create new ignite configuration
IgniteConfiguration cfg = new IgniteConfiguration(); cfg.setClientMode(true);
// set the discovery spi to ignite configuration
cfg.setDiscoverySpi(spi);
// Start ignite
Ignite ignite = Ignition.start(cfg);
// get or create cache
IgniteCache < Integer, String > cache = ignite.getOrCreateCache("HelloWorld"); // put some cache elements
for (int i = 1; i <= 100; i++) {
cache.put(i, Integer.toString(i)); }
// get them from the cache and write to the console
for (int i = 1; i <= 100; i++) { System.out.println("Cache get:" + cache.get(i));
}
// close ignite instance
ignite.close();
}
The program should be familiar to anyone who has some programming experience in Java. Let’s carefully examine each part of the program. It has a main() method at which the program will begin execution. All Java program begins execution by calling main() method. The next line of the code inside main() method outputs the string Hello Ignite. Next, we created the instance of a TCP Discovery SPI and set multicast IP finder instance on it.
Later, we set the multi-cast IP finder for the SPI. When TCP discovery starts, this finder sends a multicast request and waits for some time when others nodes reply to this request with messages containing their addresses. Then we created an Ignite configuration instance and set the discovery SPI to the configuration.
After starting the Ignite instance, it joins with an existing Ignite cluster as a client. Next, we created a cache with the name “HelloWorld” and put 100 entries into it. In the for-each loop, we read those 100 entries from the cache and prints on the console. Finally, we stopped the Ignite client instance.
Now that, you have a project that is ready to be built with Maven, the next step is to build and run the application.
Step 7.
To try out the build, issue the following at the command line.
$ mvn clean install
This will run Maven, telling it to execute the install goal. This goal will compile, test and package your project code and then copy it into the local dependency repository. The first time the build process will take a few minutes to complete, after successful compilation, an executable jar will be created in the target directory.
Step 8.
Run the application by typing the following command.
$ java -jar .\target\HelloIgnite-runnable.jar
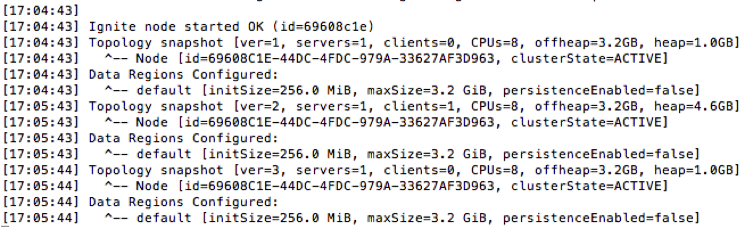
You should see a lot of logs into the terminal. First, a new Ignite client instance will be created, and it will connect to the random node (in our case, there is only one single node) in the cluster. In the Ignite server node console, you should see the logs as shown below:
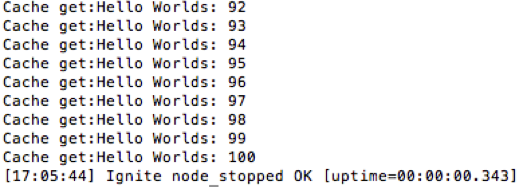
On the other hand, Apache Ignite client node console print the cache entries by 1 to 100.
Let’s examine the cache entries with the Ignite visor administrator console. Apache Ignite visor command line tool provides monitoring and administration capabilities for Ignite cluster. Lunch the visor tool with the following command.
$ IGNITE_HOME/bin/ignitevisorcmd.sh
Issue the following command into the visor command tool.
cache -a
It will return you the details of the cache statistics for our cache “HelloWorld” as shown in the next figure.
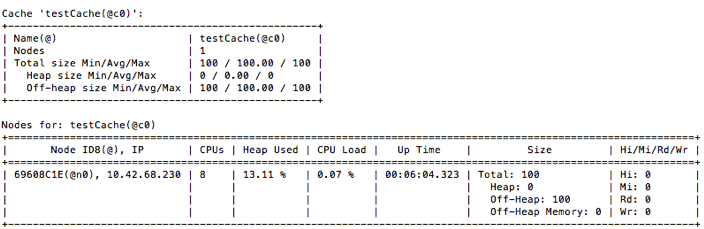
You will notice that the total cache size is 100 and the Offheap size also 100. From the version 2.0.1, by default Apache Ignite stores cache entries into the Offheap memory. In the later chapter, we will detail look at the Offheap memory and the difference between the Onheap and the Offheap memory. Also note that, for doing the example as simple as possible, we didn’t use any spring related configuration here in this program.
| Published on Java Code Geeks with permission by Shamim Bhuiyan, partner at our JCG program. See the original article here: Apache Ignite made easy: first Java application Opinions expressed by Java Code Geeks contributors are their own. |
