1. Introduction
Over the time, Spring framework became the de-facto standard to create any applications that are REST API based. Spring offers a variety of out of the box components to avoid writing the repeated and cumbersome boiler plate code. Also, the beautiful thing about Spring is that if there is a ready solution; it offers you the effortless ways to integrate with that available library/framework. In this article let’s see how to write a Spring based RESTful API’s using a full stack spring technology; Spring Boot, Spring Validations and Spring data JPA with an example that shows a complete information on the following:
- Spring Boot and it’s configuration
- Dependency Management with Spring boot starters
- Avoiding bottleneck DAO code using Spring data JPA.
- Spring’s support for validations at VO level.
- Centralized exception handling.
We use the Gradle for dependency management and as the build tool. Let’s go through the steps.
2. Generate the project
Here are the steps that needed to be followed to generate the project.
2.1 Spring Intializer
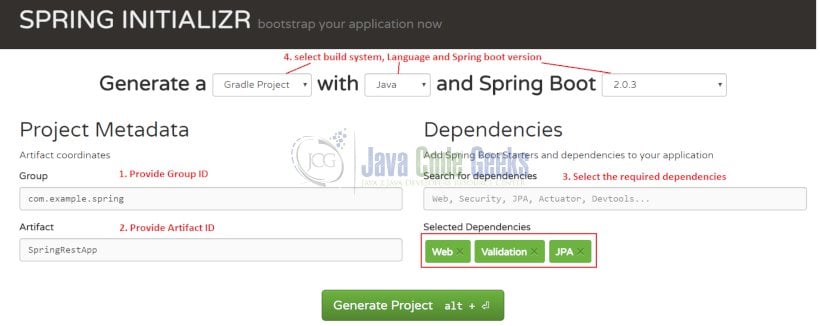
Spring provides an easy to start project generation tool at this location Spring INITIALIZR. At this web page you can boot strap your application by adding the required dependencies. You can generate the project skeleton by adding the 3 dependencies mentioned below (please see the image below for clear understanding).
1. ‘Web’: This dependency is needed to code the web layer and to create the APIs. When the project gets generated, it shows up as the following dependency in the build.gralde file.
compile('org.springframework.boot:spring-boot-starter-web')
2. ‘Validation’ : To enable the spring validation. It shows up as the following dependency in the build.gradle.compile('org.springframework.boot:spring-boot-starter-validation')
3. ‘JPA’ : To enable the usage of spring data JPA. It shows up as the following dependency in the build.gradle.
compile('org.springframework.boot:spring-boot-starter-data-jpa')
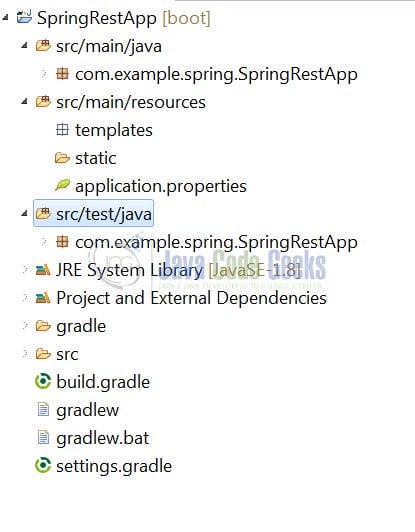
2.2 Eclipse configuration
Generate the project and import it to eclipse. Once this is done, you are all set to create your API. The project imported in the eclipse should look like the below.
3. Create the API
Before writing the API, let’s create the packages as per the Java conventions as shown below.
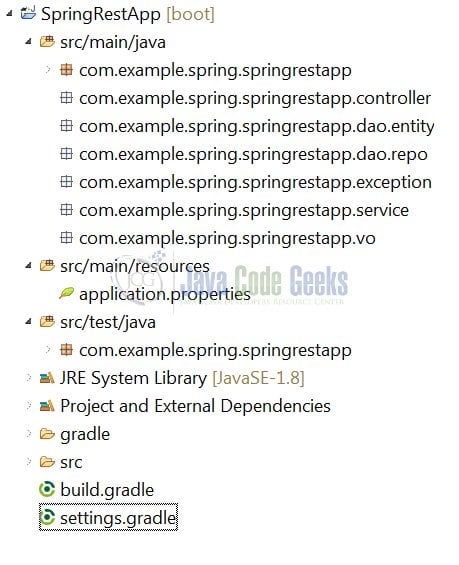
With the generated code, we get a class at the root package i.e. com.example.spring.springrestapp. This is our bootup class.
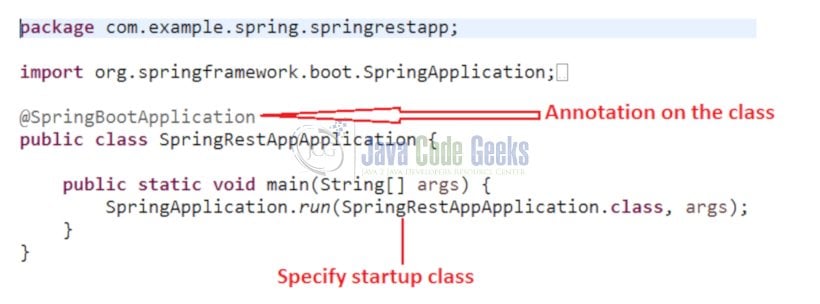
Note: Startup classes should be created at the root package level with the default configurations.
Now let’s go ahead and create a class for controller and an API method to add user details to DB. For this API which we are going to build, let’s assume some constraints as our requirements:
- This API should collect First name, Last name, email, address and phone number of a user and store them in MySQL DB
- API callers to pass First name, last name and email as mandatory fields. Email should be validated for its format.
- Home address and phone number can be optional.
4. Configure DB details:
For this project, you need to have a local instance of MySQL DB running. You can provide the DB details in application.properties as below.
APPLICATION PROPERTIES
spring.datasource.url = jdbc:mysql://localhost:3306/boot_app
spring.datasource.username = root
spring.datasource.password = root
In the MySQL DB, lets create a table containing first name, last name, email, address, and phone number in the MySQL DB using the following script.
CREATE TABLE SCRIPT
create table user_info(
user_id smallint(10) primary key auto_increment,
first_name varchar(150),
last_name varchar(150),
email varchar(200),
address varchar(250),
phone smallint(10)
);
5. Configure the Spring Data JPA
Once table is ready, we need to map it a Java object using the JPA. Every field of the table is mapped in the java object using the annotations. Below is how our entity is going to look.
JPA ENTITY
package com.example.spring.springrestapp.dao.entity;

import javax.persistence.Column;
import javax.persistence.Entity;
import javax.persistence.GeneratedValue;
import javax.persistence.GenerationType;
import javax.persistence.Table;
import javax.validation.constraints.Email;
import javax.validation.constraints.NotBlank;

import org.springframework.data.annotation.Id;

@Entity
@Table(name = "user_info")
public class UserInformation {

    @Id
    @GeneratedValue(strategy = GenerationType.IDENTITY)
    @Column(name = "USER_ID")
    private Integer userId;

    @Column(name = "FIRST_NAME")
    private String firstName;

    @Column(name = "LAST_NAME")
    private String lastName;

   @Column(name = "EMAIL")
    private String email;

    @Column(name = "ADDRESS")
    private String address;

    @Column(name = "PHONE")
    private Integer phone;


	public String getFirstName() {
		return firstName;
	}

	public void setFirstName(String firstName) {
		this.firstName = firstName;
	}

	public String getLastName() {
		return lastName;
	}

	public void setLastName(String lastName) {
		this.lastName = lastName;
	}

	public String getAddress() {
		return address;
	}

	public void setAddress(String address) {
		this.address = address;
	}

	public Integer getPhone() {
		return phone;
	}

	public void setPhone(Integer phone) {
		this.phone = phone;
	}

	public String getEmail() {
		return email;
	}

	public void setEmail(String email) {
		this.email = email;
	}
}
Now, create the Spring data JPA repository. Data JPA repositories can be created by extending the interface JpaRepository as below. (Note that you need to pass the entity and data type of the ID field. In my example, entity is User and type of id field is Integer)
JPA REPOSITORY
package com.example.spring.springrestapp.dao.repo;

import org.springframework.data.jpa.repository.JpaRepository;
import com.example.spring.springrestapp.dao.entity.UserInformation;
public interface UserRepo extends JpaRepository {

}
That simple, our DAO code is ready! Spring takes care of generating the underlying DAO implementation.
6. Service and Controller layer
Let’s now create a service class just to save the User details. You can add the business logic as per your needs in the methods.
SERVICE CLASS
@Service
public class UserDetailService {
	@Autowired
	private UserRepo userRepo;

	public UserInformation saveUser(UserInformation user) {
		return userRepo.save(user);
	}
}
Let’s now go and create a controller and API method. The saveUser api accepts the json data in request body and returns the response as JSON in body.
CONTROLLER LAYER
@RestController
@RequestMapping("/api/user")
public class SpringRestAppController {

	@Autowired
	private UserDetailService userService;

	@PostMapping(value = "/save")
	public @ResponseBody UserInformation createUser(@RequestBody UserInformation user) {
		return userService.saveUser(user);
	}
}
@RequestMapping is used for mapping the resources.
@PostMapping is same as HttpPost assigned to @RequestMapping.
7. Configuring VO level validations
Our API needs validations on the data it receives as per the requirements mentioned in the beginning. For that, we are going to apply data validations at entity level as shown below.
DATA VALIDATIONS
@Entity
@Table(name = "user_info")
public class UserInformation {

    @Id
    @GeneratedValue(strategy = GenerationType.IDENTITY)
    @Column(name = "USER_ID")
    private Integer userId;

    @Column(name = "FIRST_NAME")
    @NotBlank(message = "first name can't be blank")
    private String firstName;

    @Column(name = "LAST_NAME")
    @NotBlank(message = "last name can't be blank")
    private String lastName;

   @Column(name = "EMAIL")
   @NotBlank(message = "email can't be blank")
   @Email(message = "invalid format")
    private String email;

    @Column(name = "ADDRESS")
    private String address;

    @Column(name = "PHONE")
    private Integer phone;
Note that the annotation @NotBlank is to not allow empty or null values and @Email to check a valid email format. Also, we added messages for the failed validations.
Now, we need to tell Spring to do validations as per the annotations specified in the entity. For that, we can use @Valid annotation on request payload as below.
    @PostMapping(value = "/save")
    public @ResponseBody User createUser(@RequestBody @Valid UserInformation user) {
        return userService.saveUser(user);
    }
8. Configure exception Handling
When a validation is failed, we need to give the properly formatted error response to the API consumers. For example, if first name is not given, I want to return error message in below format with HTTP error code bad request. Its’s not good idea to give exception stack trace for the API consumers.
{
"errorCode": "VALIDATION_FAILED",
"message": ""
}
We can do it in each API controller method or we can create a single global exception handling, thus avoid writing duplicate code in multiple places for the same need.
To handle the central exception in a single place, we take advantage of Spring’s error handler. With Spring 3.2, @ControllerAdvice is provided to globalize the exception/error handling. To return error response lets create a VO having error Code and message.
ERROR HANDLING IN VALUE OBJECT
@JsonInclude(content = Include.NON_NULL)
@JsonIgnoreProperties(ignoreUnknown = true)
public class ApiErrorVO {

	private String errorCode;
	private String message;

	public ApiErrorVO(String errorCode, String message) {
		super();
		this.errorCode = errorCode;
		this.message = message;
	}
When a validation fails, Spring throws a MethodArgumentNotValidException. We can catch this exception and extract the error message from the thrown exception. We use @ExceptionHandler to catch the exception as below.
EXCEPTION HANDLING
@ControllerAdvice
public class ApiExceptionHandler {

	@ExceptionHandler(MethodArgumentNotValidException.class)
	@ResponseStatus(code = HttpStatus.BAD_REQUEST)
	@ResponseBody
	public ApiErrorVO handleValidationError(MethodArgumentNotValidException ex) {
		BindingResult bindingResult = ex.getBindingResult();
		FieldError fieldError = bindingResult.getFieldError();
		String defaultMessage = fieldError.getDefaultMessage();
		return new ApiErrorVO("VALIDATION_FAILED", defaultMessage);
	}
}
@ResponseStatus is used to specify the HTTP Bad request status.
@ResponseBody makes sure error is written to response body.
9. Conclusion
Now let’s test the API.
Case 1: validation failure
URL: http://localhost:8080/restApp/api/user/save
RequestPayload: Notice the blank first name
{
"firstName":"",
"lastName":"K",
"email":"alexk@abc.com"
}
Response: with Http Status 400
{
"errorCode": "VALIDATION_FAILED",
"message": "first name can't be blank"
}
Case 2: When provided all required values
Request payload:
{
"firstName":"Alex",
"lastName":"K",
"email":"alexk@abc.com"
}
Response: With Http Status 200
{
"userId": 8,
"firstName": "Alex",
"lastName": "K",
"email": "alexk@abc.com",
"address": null,
"phoneNumber": null
}
This concludes the test.
10. Download the Source Code
You can download the full source code here: SPRING DATA JPA

Any tips how to handle exceptions on database connection level?
Good Explanation.
this concept was very helpful.