In this tutorial, we will learn how to create very basic web application with Servlet.
Servlet is a class that extends the capabilities of the servers to intercept and respond to incoming requests. Servlet is a web component that is written, built and deployed on the server to create dynamic web pages.
To start with, we need Eclipse IDE to be installed in our system and follow the steps as listed below.
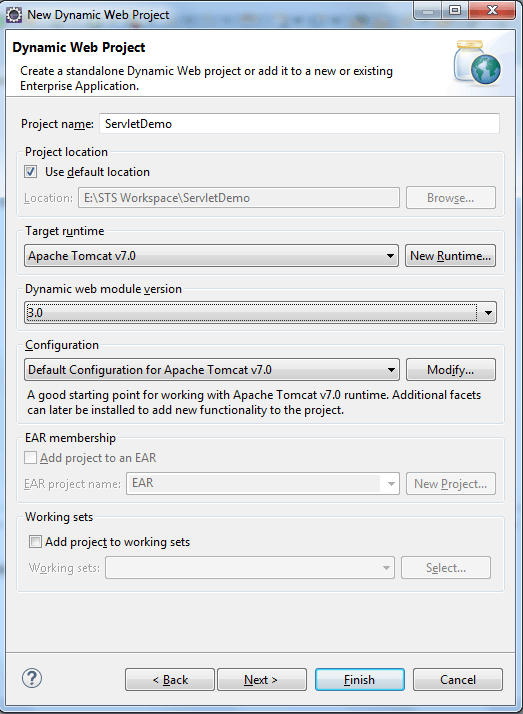
1. Open Eclipse and create a Dynamic Web Project.

2. Specify the project details as shown below and click on Next.
3. Set the Web Module details and generate the web.xml.
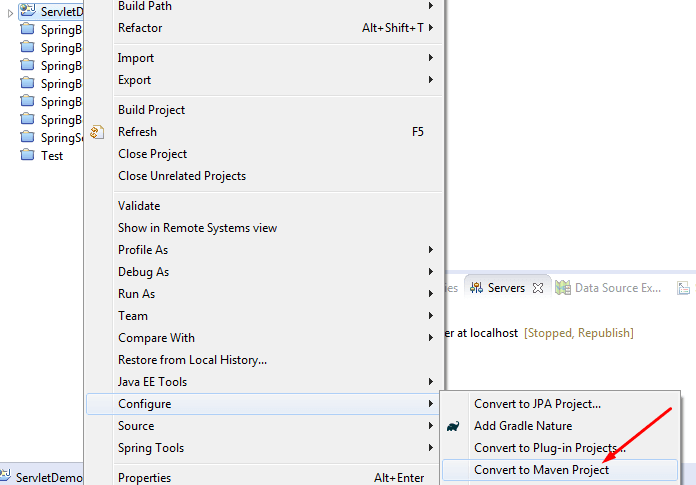
4. Click on Finish. Right-click on the Servlet Demo project and click on ‘Convert to Maven Project’.
Thats it. We are done with the basic setup.
Validate the web.xml file looks like one mentioned below.
web.xml
<?xml version="1.0" encoding="UTF-8"?>
<web-app xmlns:xsi="http://www.w3.org/2001/XMLSchema-instance" xmlns="http://java.sun.com/xml/ns/javaee" xsi:schemaLocation="http://java.sun.com/xml/ns/javaee http://java.sun.com/xml/ns/javaee/web-app_3_0.xsd" id="WebApp_ID" version="3.0">
  <display-name>ServletDemo</display-name>
  <welcome-file-list>
    <welcome-file>hello.jsp</welcome-file>
  </welcome-file-list>
  <servlet>
    <description></description>
    <display-name>DemoServlet</display-name>
    <servlet-name>demo</servlet-name>
    <servlet-class>com.jcombat.sample.DemoServlet</servlet-class>
  </servlet>
  <servlet-mapping>
    <servlet-name>demo</servlet-name>
    <url-pattern>/demo</url-pattern>
  </servlet-mapping>
</web-app>
Create the DemoServlet class in the same package as specified above in the web.xml.
DemoServlet.java
package com.jcombat.sample;

import java.io.IOException;

import javax.servlet.ServletException;
import javax.servlet.http.HttpServlet;
import javax.servlet.http.HttpServletRequest;
import javax.servlet.http.HttpServletResponse;

public class DemoServlet extends HttpServlet {
	private static final long serialVersionUID = 1L;

    /**
     * @see HttpServlet#HttpServlet()
     */
    public DemoServlet() {
        super();
    }

	/**
	 * @see HttpServlet#doGet(HttpServletRequest request, HttpServletResponse response)
	 */
	protected void doGet(HttpServletRequest request, HttpServletResponse response) throws ServletException, IOException {
		doPost(request, response);
	}

	/**
	 * @see HttpServlet#doPost(HttpServletRequest request, HttpServletResponse response)
	 */
	protected void doPost(HttpServletRequest request, HttpServletResponse response) throws ServletException, IOException {
		request.getRequestDispatcher("/Test.jsp").forward(request, response);
	}

}
Now let’s create two JSP files – hello.jsp and test.jsp under Web Content.
hello.jsp
<%@ page language="java" contentType="text/html; charset=ISO-8859-1"
	pageEncoding="ISO-8859-1"%>
<!DOCTYPE html PUBLIC "-//W3C//DTD HTML 4.01 Transitional//EN" "http://www.w3.org/TR/html4/loose.dtd">
<html>
	<head>
		<meta http-equiv="Content-Type" content="text/html; charset=ISO-8859-1">
		<title>Hello World</title>
	</head>
	<body>Welcome to landing page</body>
</html>
Test.jsp
@ page language="java" contentType="text/html; charset=ISO-8859-1"
	pageEncoding="ISO-8859-1"%>
<!DOCTYPE html PUBLIC "-//W3C//DTD HTML 4.01 Transitional//EN" "http://www.w3.org/TR/html4/loose.dtd">
<html>
	<head>
		<meta http-equiv="Content-Type" content="text/html; charset=ISO-8859-1">
		<title>Demo Page</title>
	</head>
	<body>Welcome to demo page</body>
</html>
Next compare and validate the pom.xml with the one mentioned below –
pom.xml
<project xmlns="http://maven.apache.org/POM/4.0.0" xmlns:xsi="http://www.w3.org/2001/XMLSchema-instance"
	xsi:schemaLocation="http://maven.apache.org/POM/4.0.0 http://maven.apache.org/xsd/maven-4.0.0.xsd">
	<modelVersion>4.0.0</modelVersion>
	<groupId>com.jcombat.sample</groupId>
	<artifactId>ServletDemo</artifactId>
	<version>0.0.1-SNAPSHOT</version>
	<packaging>war</packaging>
	<name>Servlet with Maven Demo</name>
	<description>Servlet with Maven & Tomcat Demo</description>

	<dependencies>
		<dependency>
			<groupId>javax.servlet</groupId>
			<artifactId>javax.servlet-api</artifactId>
			<version>3.0.1</version>
			<scope>provided</scope>
		</dependency>
	</dependencies>

	<build>
		<sourceDirectory>src</sourceDirectory>
		<plugins>
			<plugin>
				<artifactId>maven-war-plugin</artifactId>
				<version>2.4</version>
				<configuration>
					<warSourceDirectory>WebContent</warSourceDirectory>
					<failOnMissingWebXml>false</failOnMissingWebXml>
				</configuration>
			</plugin>
			<plugin>
				<artifactId>maven-compiler-plugin</artifactId>
				<configuration>
					<source>1.7</source>
					<target>1.7</target>
				</configuration>
			</plugin>
		</plugins>
	</build>
</project>
| Published on Java Code Geeks with permission by Abhimanyu Prasad, partner at our JCG program. See the original article here: Creating your first servlet Opinions expressed by Java Code Geeks contributors are their own. |
