Build a Spring Boot App with Secure Server-to-Server Communication via OAuth 2.0 and Okta
“I love writing authentication and authorization code.” ~ No Java Developer Ever. Tired of building the same login screens over and over? Try the Okta API for hosted authentication, authorization, and multi-factor auth.
Most OAuth 2.0 guides are focused around the context of a user, i.e., login to an application using Google, Github, Okta, etc., then do something on behalf of that user. While useful, these guides ignore server-to-server communication where there is no user and you only have one service connecting to another one. Thankfully, Okta is here to lend a hand with this area of application security as well.
The OAuth 2.0 client credentials grant type is exclusively used for scenarios in which no user exists (CRON jobs, scheduled tasks, other data workloads, etc.). This flow is less showy than other OAuth flows as there is no end user or browser to deal with, but is far easier to understand than the more complicated user-centric OAuth 2.0 grant types. In this tutorial we’ll walk through the OAuth 2.0 client credentials grant type, and how you can deploy it for secure server-to-server communications in Spring Boot.
OAuth 2.0 Client Credentials Grant
The goal of the client credentials grant is to allow two machines to communicate securely. In this grant type you have a client (think of this as your application) making API requests to another service (this is your resource server).
To help illustrate why this flow is important, let’s take a step back and talk about what we did before OAuth 2.0.
NOTE: If you’re an OAuth pro, you can skip ahead to the code examples below or check out the example on GitHub.
Before OAuth 2.0 the way developers handled server-to-server authentication was with HTTP Basic Auth. Essentially what this boiled down to was that a developer would send over a server’s unique username and password (often referred to as an ID and secret) on each request. The API service would then validate this username and password on every request by connecting to a user store (database, LDAP, etc.) in order to validate the credentials.
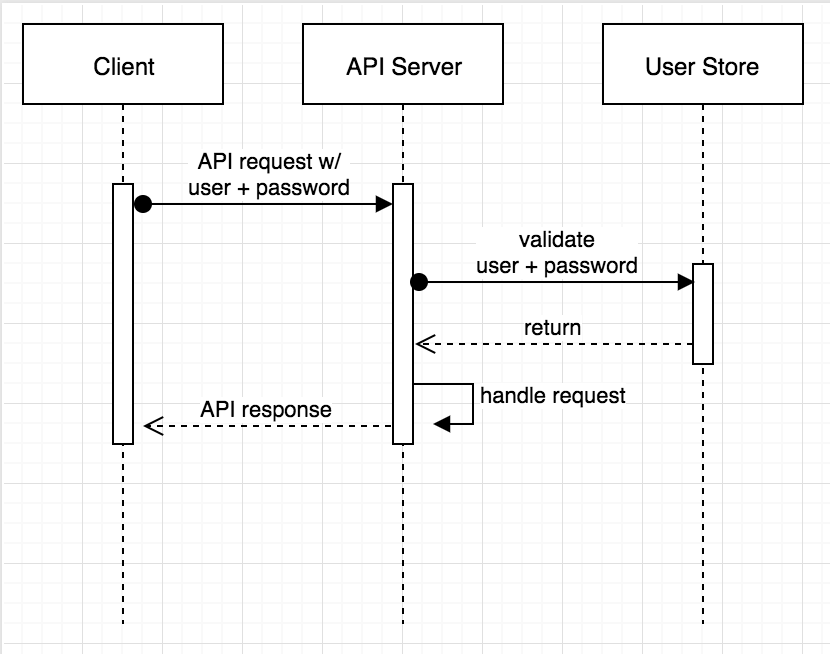
This approach has a few drawbacks and exposure points:
- Each application in the diagram above handles the username and password
- A second username and password might be needed to connect to user store
- The same username and password is used for each request
There are various ways to help mitigate these risks, but that’s out of scope in this post.
The OAuth 2.0 client credentials grant was created to help solve for the problems that HTTP Basic Auth had. While the client still uses a username and password (called the client_id and client_secret), instead of sending them directly to the API service on each request they are instead exchanged for a token via an authorization server.
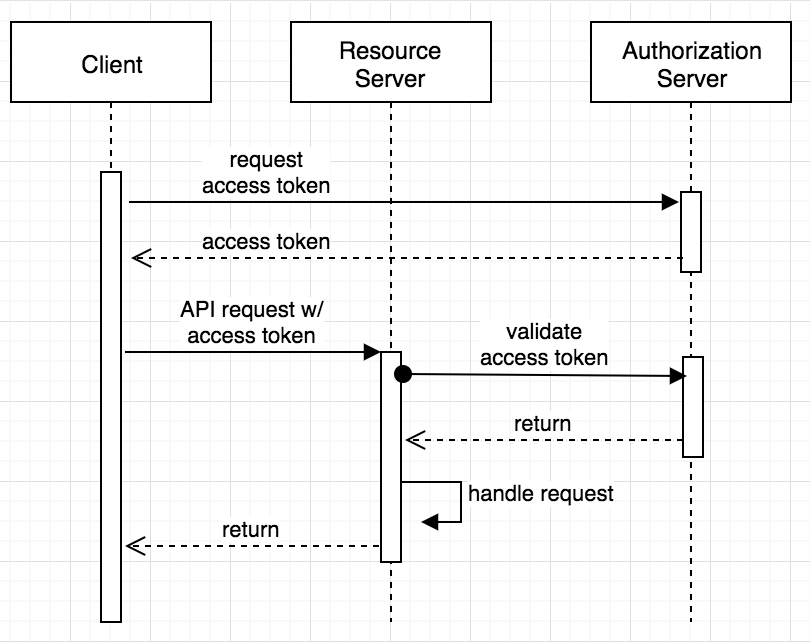
The authorization server returns a temporary access token (which is used until it expires). The client then uses this access token when communicating with the resource server which means that your client’s most sensitive data (the id and secret) are only shared over the network once every expiration period, dramatically reducing the likelihood of compromise. Once the resource server receives the incoming request with the access token it will then validate the token with by talking to the authorization server.
I’ll talk about a couple of ways to reduce the number of network calls further at the end of this post, but first, onto an example!
Let’s Build an OAuth 2.0 Client Credentials App!
Enough talk, let’s do something! I’m going to show you how to implement the client credentials grant type with Spring using two applications: a client and server. The server will have a single endpoint which returns a “message of the day.” The client will be a simple command line application; you could easily replace this with a backend web application, CRON job, or any other backend script.
Set Up Your Authorization Server
To keep things simple, you’ll use Okta to create an OAuth 2.0 authorization server. This will handle all of the client credentials grant stuff mentioned above. Do you need to use Okta? Not at all! You can use any OAuth 2.0 compatible server you want — but because our service is free and simple to use, it speeds this process up.
If you don’t already have a free developer account, head over to developer.okta.com and click sign up. When that’s done you’ll have two pieces of information, your Okta base URL which looks something like: dev-123456.oktapreview.com, and an email with instructions on how to activate your account.
After activating your account, while you are still in the Okta Developer Console, you then need to create an application and a custom OAuth scope. The application will give you a client ID and secret, while the custom scope will restrict your access token to this example.
Click the Applications menu item, then Add Application, then Service -> Next. Change the name to whatever you want (I’m going to use “My MOD App”), then click Done.
You will need the Client ID and Client secret values for the next steps.
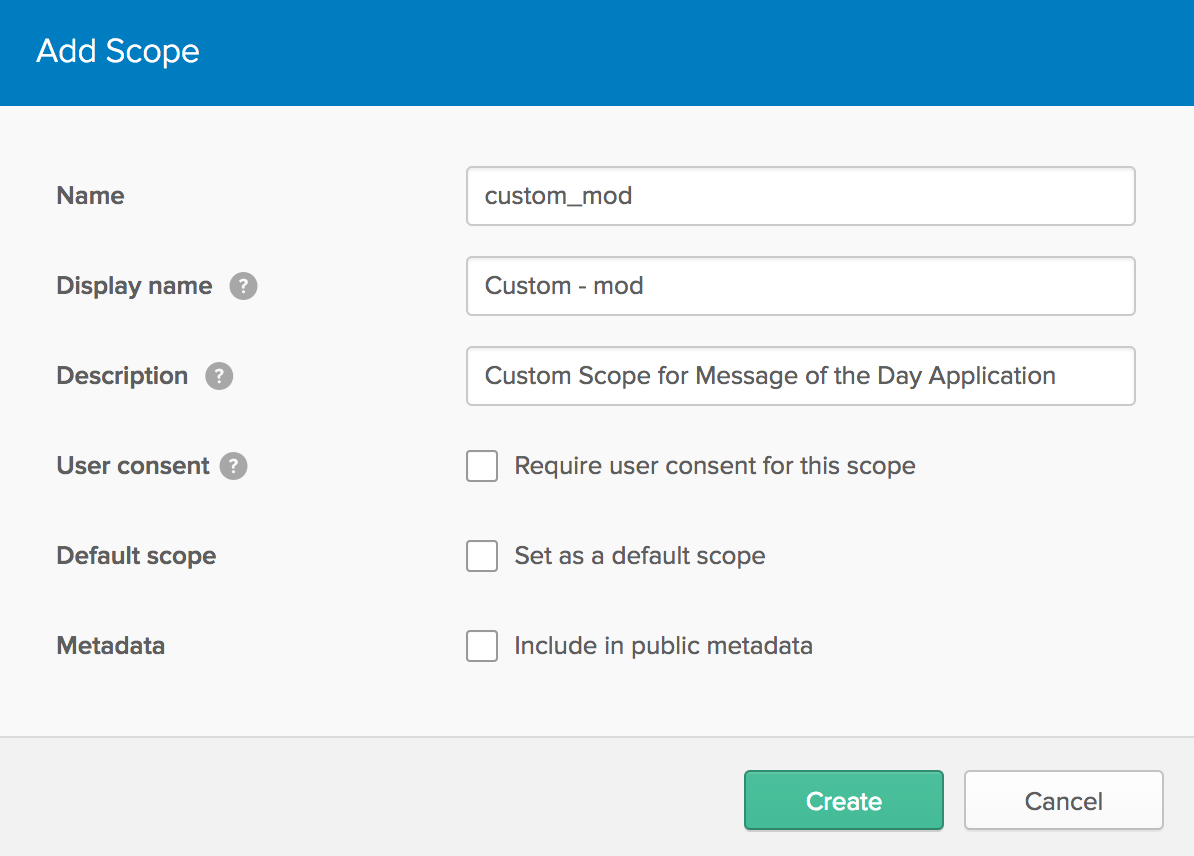
Next, create a custom scope for your application.
From the menu bar select API -> Authorization Servers. Remember the Issuer URI value; you will need this for the next steps. Edit the authorization server by clicking on the edit pencil, then click Scopes -> Add Scope. Fill out the name field with custom_mod and press Create.
Onto the fun stuff!
Create a Resource Server
This resource server (aka: API service) is going to be overly simple and consist of a single /mod endpoint. Create a new project using the Spring Initializer on the command line:
curl https://start.spring.io/starter.tgz  \
  -d artifactId=creds-example-server \
  -d dependencies=security,web \
  -d language=java \
  -d type=maven-project \
  -d baseDir=creds-example-server \
| tar -xzvf -

# change into the new directory
cd creds-example-server
You will also need to manually add one more dependency to your pom.xml:
<dependency>
    <groupId>org.springframework.security.oauth.boot</groupId>
    <artifactId>spring-security-oauth2-autoconfigure</artifactId>
    <version>2.0.0.RELEASE</version>
</dependency>NOTE: I also renamed the DemoApplication to ServerApplication because we are going to create another application shortly.
Update ServerApplication to include the @EnableResourceServer annotation and add a simple REST controller:
@EnableResourceServer
@SpringBootApplication
public class ServerApplication {

    public static void main(String[] args) {
        SpringApplication.run(ServerApplication.class, args);
    }

    /**
     * Allows for @PreAuthorize annotation processing.
     */
    @EnableGlobalMethodSecurity(prePostEnabled = true)
    protected static class GlobalSecurityConfiguration extends GlobalMethodSecurityConfiguration {
        @Override
        protected MethodSecurityExpressionHandler createExpressionHandler() {
            return new OAuth2MethodSecurityExpressionHandler();
        }
    }

    @RestController
    public class MessageOfTheDayController {
        @GetMapping("/mod")
        @PreAuthorize("#oauth2.hasScope('custom_mod')")
        public String getMessageOfTheDay(Principal principal) {
            return "The message of the day is boring for user: " + principal.getName();
        }
    }
}
Now it’s time to configure the application! I renamed my application.properties file to application.yml and updated it to include:
security:
  oauth2:
    client:
      clientId: {client-id-from-above}
      clientSecret: {client-secret-from-above}
    resource:
      tokenInfoUri: {issuer-uri-from-above}/v1/introspect
That’s it: a few lines of code and a couple lines of config! Spring Boot will automatically handle the validation of the access tokens, all you need to worry about is your code.
Start it up and leave it running:
./mvn spring-boot:run
You can try to access http://localhost:8080/mod if you want, it will respond with a, HTTP 401 UNAUTHORIZED.
Create the OAuth 2.0 Client
Next, you’re going to create a simple command line client (you could easily duplicate this logic in any type of application).
Open up a new terminal window and create a second application with the Spring Initializer:
curl https://start.spring.io/starter.tgz  \
  -d artifactId=creds-example-client \
  -d dependencies=security \
  -d language=java \
  -d type=maven-project \
  -d baseDir=creds-example-client \
| tar -xzvf -

# change into the new directory
cd creds-example-client
Same as before, add in the Spring OAuth 2.0 library as a dependency in your pom.xml:
<dependency>
    <groupId>org.springframework.security.oauth.boot</groupId>
    <artifactId>spring-security-oauth2-autoconfigure</artifactId>
    <version>2.0.0.RELEASE</version>
</dependency>
This time I’ll start by defining the configuration (again I renamed application.properties to application.yml):
example:
  baseUrl: http://localhost:8080
  oauth2:
    client:
      grantType: client_credentials
      clientId: {client-id-from-above}
      clientSecret: {client-secret-from-above}
      accessTokenUri: {issuer-uri-from-above}/v1/token
      scope: custom_mod
I’ve namespaced the configuration under example as you could be connecting to multiple servers.
I configured a few properties:
baseUrlis the base URL of our example servergrantTypedefines the grant type for the connectionclientIdandclientSecretare the same as aboveaccessTokenUridefines the URI used to get an access tokenscopeis the custom scope we created above
Last up is our ClientApplication (renamed from DemoApplication):
@SpringBootApplication
public class ClientApplication implements CommandLineRunner {

    private final Logger logger = LoggerFactory.getLogger(ClientApplication.class);

    @Value("#{ @environment['example.baseUrl'] }")
    private String serverBaseUrl;

    public static void main(String[] args) {
        SpringApplication.run(ClientApplication.class, args);
    }

    @Bean
    @ConfigurationProperties("example.oauth2.client")
    protected ClientCredentialsResourceDetails oAuthDetails() {
        return new ClientCredentialsResourceDetails();
    }

    @Bean
    protected RestTemplate restTemplate() {
        return new OAuth2RestTemplate(oAuthDetails());
    }

    @Override
    public void run(String... args) {
        logger.info("MOD: {}", restTemplate().getForObject(serverBaseUrl + "/mod", String.class));
    }
}
There are a few things I want to touch on:
- The
CommandLineRunnerinterface adds arunmethod, which is called automatically after initialization, the application exits after leaving this method - I created a
ClientCredentialsResourceDetailsbean which is bound to my configuration properties:example.oauth2.client - I use an
OAuth2RestTemplatein place of a standardRestTemplatethis automatically manages all of the OAuth 2.0 access token exchange and sets theAuthentication: Bearerheader value. Basically, it handles all of the OAuth detail so you don’t need to worry about any of them!
Run the application with ./mvnw spring-boot:run and you should see console output similar to:
2018-03-20 12:56:10.058 INFO 15833 --- [main] c.e.c.ClientApplication: MOD: The message of the day is boring for user: 0oabcd12yz2EpHuis75s3
The client has successfully communicated with the server! Not bad, right? In just a few lines of code you were able to get an OAuth 2.0 authorization server setup and configured as well as create two Spring apps (one client and one server) which can now communicate securely using the OAuth 2.0 client credentials grant type!
NOTE: if you see a 401 or 500 exception double check that your application.yml config files contain the correct information.
Extra Credit: Reduce the Number of Calls to the Authorization Server
The second sequence diagram above seems more complicated than the first, even when factoring in the reuse of an access token. Access tokens are opaque, there is no spec behind them, and the format is left to the implementation of the authorization server.
At Okta we use signed JWTs which means you can validate them locally instead of making an additional request from the API service to the authorization server on each request.
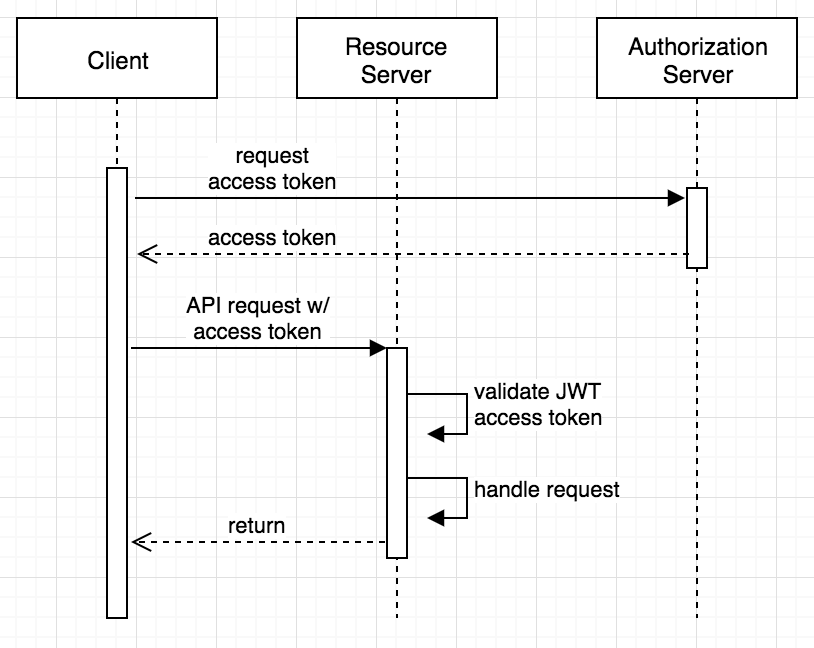 We have helper libraries in a few different languages and a Spring Boot starter that will handle the local validation for you.
NOTE: at the time of this writing okta-spring-boot only works with Spring Boot 1.5.x, see an example on GitHub
Learn More About OAuth 2.0 and Okta
In this post, I’ve explained the OAuth 2.0 client credentials grant type and created small demo applications that exercised this flow (with very little code, thanks to Spring Boot!). If you have questions, leave them below or ping me (@briandemers) or @OktaDev on Twitter.
For more info on OAuth 2.0 and Okta check out these resources:
Secure Server-to-Server Communication with Spring Boot and OAuth 2.0 was originally published on the Okta developer blog on April 2, 2018.
“I love writing authentication and authorization code.” ~ No Java Developer Ever. Tired of building the same login screens over and over? Try the Okta API for hosted authentication, authorization, and multi-factor auth.

Amazing source of information.