At Foreach we own a Synology RS815+ to store all our backups. These backups come from different sources in our network such as routers, switches, database servers, web servers, application log files, mail servers, and so on.
The Synology NAS makes it really easy to configure file shares and quotas for these backups. However, it lacked a few features:
- Monitoring quotas on file shares (hard quotas as well as files shares without quota).
- Deleting obsolete backup files, predefined by a retention policy.
- Verifying backup files, to make sure we actually received backup files.
In this blog post, we will outline how we set up a Spring Boot 2 application which exposes a GUI and can be monitored with (for example) Zabbix.
Oh Backup, Where Art Thou?
You might recognize the following problem:
You need to restore a backup and go to your backup location only to see that your backup file isn’t there. You start to dig around and find out the backup never arrived on your NAS because the quota of your shared folder was exceeded. Or worse, your whole NAS was actually full. Damnit! We should have cleaned up our backup files from 3 years ago!
If the gods are somewhat good to you, you will actually find your backup file, but it might be outdated or too old to restore. The data you required, needed to be from a few days ago at most, not from 3 weeks ago. Darnit! We should have checked if backup tasks were actually working!
Eureka!
To solve the issue, we created a Spring Boot 2.0 application which has several roles:
- It exposes a GUI, based on Bootstrap, which is readable to us (yay!) and a monitoring platform (in our case Zabbix).
- It monitors all file shares which are configured in our Synology and warns us if quota limits are close to being reached.
- It deletes old backups files from file shares, based on a retention policy.
- It verifies backup files and ensures the files are recent enough and that there is a certain amount of history available.
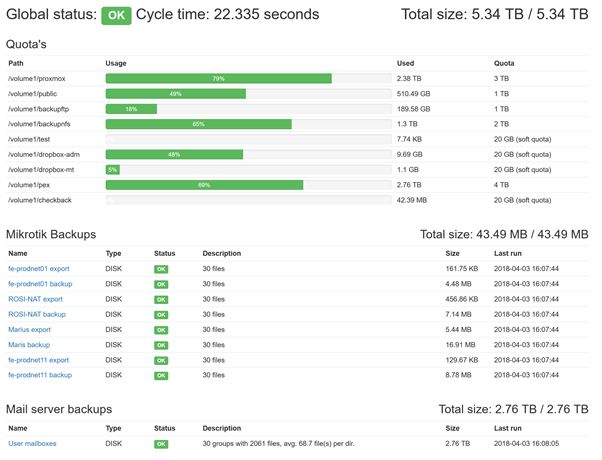
The end result looks like this:
High-level setup
We used the Spring Initialzr to generate a Maven Project with Java 8 and Spring Boot 2.0. Thymeleaf 3 and Bootstrap 3 were used to create the overview page.
Using jquery/bootstrap webjars we were able to set up a Controller and prototyped layout in just a few minutes.
The Global status: OK is the required string which is monitored by Zabbix. If any of the underlying statuses fail, the Global status will also fail.
We deployed the application using a Spring Boot fat jar in its own file share (you don’t want the application log files to fill your other backup file shares, right?). To create an executable jar, add the following to your pom.xml. See the documentation for more information.
<build>
       <finalName>checkback</finalName>
       <plugins>
            <plugin>
              <groupId>org.springframework.boot</groupId>
                 <artifactId>spring-boot-maven-plugin</artifactId>
                 <configuration>
                 <executable>true</executable>
                 </configuration>
            </plugin>
       </plugins>
</build>
The Synology NAS does not really come with standard System V environment. To take advantage of the start/stop scripts that are embedded in the executable jar, I went to read how the embedded launch script actually works. You can find it on GitHub.
The highlight here is:
# Follow symlinks to find the real jar and detect init.d script
cd "$(dirname "$0")" || exit 1
[ [ -z "$jarfile" ] ] && jarfile=$(pwd)/$(basename "$0")
while [ [ -L "$jarfile" ] ]; do
  if [ [ "$jarfile" =~ init\.d ] ]; then
    init_script=$(basename "$jarfile")
  else
    configfile="${jarfile%.*}.conf"
    # shellcheck source=/dev/null
    [ [ -r ${configfile} ] ] && source "${configfile}"
  fi
    jarfile=$(readlink "$jarfile")
    cd "$(dirname "$jarfile")" || exit 1
    jarfile=$(pwd)/$(basename "$jarfile")
done
Basically, it checks the location of where the .jar file resides. If the .jar file is actually located in a directory called “init.d” (the location does not have to be /etc/init.d), it will be treated as start/stop script. You only need to create an init.d directory somewhere and create a symbolic link from the start/stop script towards your executable jar.
In our environment we ended up with following structure for the application:
/volume1/checkback (the file share for this application)
/volume1/checkback/checkback.jar (the Spring Boot executable jar)
/volume1/checkback/checkback.conf (Spring Boot application config file)
/volume1/checkback/init.d/checkback.sh (A symbolic link to /volume1/checkback/checkback.jar)
With this in place, we can start/stop and see the status of our Spring Boot application. It’s also possible to create a startup trigger in the Synology NAS, that way your application will start whenever your Synology reboots for their patches.
user@synology:/volume1/checkback/init.d$ ./checkback.sh status
Running [18657]
user@synology:/volume1/checkback/init.d$
The checkback.conf file contains the location of our production config file and also specifies the log folder (instead of the default /var/log location)
bash-4.3# cat checkback.conf
RUN_ARGS="--spring.config.location=/volume1/checkback/synology-config.yml"
LOG_FOLDER="/volume1/checkback"
bash-4.3#
Now that we have the structure up and running, we can start coding testing. Whenever I’m developing an application, I like it to have some test data or a snapshot of the production data. To achieve this you can read the blog on mocking Synology data for JUnit Testing.
Now, let’s start coding. Our application uses a YAML file to define which folder to check for quotas and which backup sets need to be verified. They are mapped onto @ConfigurationProperties by Spring. The config looks like this:
checkback:
  cron: '0 0 10 * * *'
  slack.channel: '#infra'
  quota-configs:
    - path: /volume1
      excludePattern: '^@.*'
  backup-set-configs:
    - name: Mikrotik Backups
      uri: /volume1/backupftp/mikrotik_backup
      type: DISK
      file-set:
        - name: fe-prodnet01 export
          filterPattern: '.*fe-prodnet01-.*\.rsc'
        - name: fe-prodnet11 backup
          filterPattern: '.*fe-prodnet11.*\.backup'
    - name: Exchange Backups
      uri: /volume1/pex/backups
      type: DISK
      file-set:
        - name: Exchange psts
          filterPattern: '.*\.pst'
          groupByPattern: '.*\/backups\/(\d{4}-\d{2}-\d{2})\/'
          groupByPatternHasDatePattern: 'yyyy-MM-dd'
          deletePolicy:
            deleteEmptyDirectories: true
As you can see we update the status every day at 10:00, it is defined by the cron entry in the YAML. If there are any warnings we will also post them to our Slack channel. For this we use jSlack, but a lot of other alternatives are around.
Checking quotas
To check the quotas we defined a path where to check for quotas. By default we exclude directories that start with “@”, these are Synology specific directories.
quota-configs:
  - path: /volume1
    excludePattern: '^@.*'
On Synology, you can specify a quota for a certain file share. We will call these hard quotas. If you didn’t set a quota (or forget to do so), we will default to a quota of 20GB; this is what we’ll call soft quotas.
To check a quota on Synology you can use the btrfs command:
bash-4.3# /sbin/btrfs qgroup show -f /volume1/share -f -r --raw
WARNING: Qgroup data inconsistent, rescan recommended
qgroupid       rfer      excl   max_rfer
--------       ----      ----   --------
0/1931   2559573532672         0 4398046511104
There is a problem with this approach:
- As you can see from the WARNING,
btrfscalculates the current usage based on a schedule and the data is inconsistent. To get an accurate near-real-time value, you would have to executebrtfs quota rescan <path>, wait for it to complete and then get the estimated size in therferfield.
Because of the inconsistent calculation of brtfs, our application will execute the command per directory, and only take the max_rfer into account. If max_rfer is equal to none, no quota was set and the default will be 20GB.
The following piece of java code executes this command and parses the output.
ProcessBuilder processBuilder = new ProcessBuilder();
processBuilder.command("/sbin/btrfs", "qgroup", "show", "-f", f.toString(), "-r", "--raw");
String MAX_RFER = "";

LOG.info("executing command: " + f.toString());
try (InputStreamReader inputStreamReader = new InputStreamReader(processBuilder.start().getInputStream())) {
try (LineNumberReader reader = new LineNumberReader(inputStreamReader)) {
    String line;
    while ((line = reader.readLine()) != null) {
        LOG.info(reader.getLineNumber() + " : " + line);
        if (reader.getLineNumber() == 3) {
            MAX_RFER = line.split("\\s+")[3];
            break;
        }

    }
}
} catch (IOException ignore) {
LOG.error("Exception getting quota from btrfs command", ignore);
}
try {
  return Long.parseLong(MAX_RFER);
} catch (NumberFormatException ignore) {
  return 0;
}
Now that we have our quota limit, we just need to calculate the size of a directory. Instead of relying on brtfs or du, we will just let Java NIO do the job.
AtomicLong totalSize = new AtomicLong();
Files.walkFileTree(f, new SimpleFileVisitor<Path>() {
  @Override
  public FileVisitResult visitFile(Path file, BasicFileAttributes attrs) {
      totalSize.addAndGet(Files.size(file));
      return FileVisitResult.CONTINUE;
  }
});

quotaStatus.used(totalSize.get());
All that’s left to do is calculate the remaining percentage and display it in a Bootstrap progress bar.
Formatting the bytes so that they’re readable by a human can be done with Apache Commons FileUtils’ byteCountToDisplaySize. However, this method has the bad mojo of rounding the values in an inconsistent way.
As an alternative we used byteunits and used it the following way to get a pretty optional two-point decimal value:
public class FileSizeUtil {
  public static String readableFileSize(long size) {
      return BinaryByteUnit.format(size,"#,##0.##");
  }
}
If you think we’re done, you’re forgetting one caveat. To execute the brtfs command inside the application, you must be root. Luckily this application is on our internal network and the risk of doing this is limited.
Please do not run applications as root if your Synology has a public connection to the internet.
To run your Spring Boot application as root, just chown the file as root. Spring Boot will do the rest for you, because it always runs the application under the user that owns the jar file.
bash-4.3# chown root:root checkback.jar
You’re done! We’re all set with checking for quotas.
Check back next week for a rundown on how to monitor the backup sets.
| Published on Java Code Geeks with permission by Marc Vanbrabant, partner at our JCG program. See the original article here: Creating a sturdy backup system Opinions expressed by Java Code Geeks contributors are their own. |
