In today’s world data plays a very important role. With so many applications using various types of data for different operations, the most important aspect is communication between applications. Data sharing becomes easy between application when they can communicate.
It’s like an application running in Asia is providing data to an application running in Europe or vice versa. How is it possible that Facebook servers hosted in the USA are able to provide Facebook services in Asia? How is it possible that validate using Google account option is available in so many websites hosted on different parts of the world?
The answer to the above questions is Web services. There are two types of web services as mentioned below.
- REST web service
- SOAP web service
Let us discuss in detail about REST web service.
1. Introduction
1.1 REST
REST is an architecture principle for data transmission based on Web-standards and HTTP protocol. In REST, there are resources which are hosted using REST server. Every resource will have a unique Id known as URI and can be modified and accessed using REST client.
REST allows representation of resources in different formats like XML, JSON, Text, etc.
1.2 HTTP Operations
As REST supports HTTP protocol it allows following operations on the resources.
- GET – GET request is used for accessing a resource and it provides a representation of the resource in the desired format.
- POST – POST request is used for updating of an existing resource. It is also used for the creation of the new resource. It supports resource representation in various formats.
- PUT – PUT request is used for updating a resource by completely replacing the existing one. As per the definition, PUT request is idempotent.
- DELETE – DELETE request is used for removing a resource.
In REST web services also we have two different flavours of REST web services as mentioned below.
- RESTful web service
- RESTless web service
We will discuss in detail about RESTful web services as part of the tutorial.
1.3 RESTful Web Services and JAX-RS
RESTful web services are the ones that follow REST based architecture and are majorly used for websites. It’s simple and fast as it is not bounded by strict restriction and consumes less bandwidth.
Java came up with programming specification for the creation of web service in accordance with REST architecture. The name for this API specification is JAX-RS which stands for Java API for RESTful Web Services. JAX-RS was part of Java SE 5 and became a permanent member of the Java family from Java EE 6. The current version of JAX-RS is version 2.1 and it was released in September 2017.
2. Annotations
Let’s discuss the different annotations and specification which are supported by JAX-RS.
@Path:- It tells the relative path of the resource class or method.@GET:- The HTTP Get request, which is used to fetch the resource.@PUT:- The HTTP PUT request, which is used to create a resource.@POST:- HTTP POST request, which is used to create or update a resource.@DELETE:- HTTP DELETE request, which is used to delete a resource.@HEAD:- It is HTTP HEAD request, which is used to get status of method availability.@Produces:- This tells the type of HTTP Response that is generated from the web service. For example, APPLICATION/XML, APPLICATION/JSON etc.@Consumes:- This tells the type of HTTP Request that the web service can process. For example, APPLICATION/XML can be used to send the request in XML format.@PathParam:- It binds the parameter passed to the method to a value in the path.@QueryParam:- This binds the parameter passed to the method to a query parameter in the path.@HeaderParam:- This binds the parameter passed to the method to an HTTP header.@DefaultValue:- It will assign a default value to a parameter that is passed to the method.@Context:- It is the context of the resource. For example, HTTPRequest as a context.
3. Jersey
3.1 What is Jersey
Jersey is an open source framework which is used for building RESTful web services. It is more than just the implementation of JAX-RS. Jersey provides its own APIs also in order to make web service creation more simple and useful. It also provides a number of SPIs to extend the framework based on developer’s needs.
3.2 Components of Jersey
Jersey is full of a lot of features and component. But, there are major four components of Jersey. They are as follows.
- Core Server:- It is used for building RESTful web services. The components consist of jersey-core, jersey-server and jsr311-api.
- Core Client:- For interaction with web services we need a client to communicate between web services. The components consist of jersey-client.
- JAXB support:- Jersey provides support for JAXB. It makes XML to object conversion easy. The component which performs this support is jersey-server.
- JSON support:- Jersey provides support for JAXB. It makes JSON to object conversion easy. The component which performs this support is jersey-server.
- Easy integration with Spring and Guice framework.
These are some of the major components and features of Jersey. Now let’s discuss how to install Jersey.
3.3 Jersey Installation
There are two ways of installing Jersey in your program. We can use Gradle or we can perform a direct installation from jersey website.
Let’s look at both ways.
3.3.1 Gradle
In case we are using Gradle then we have to add the following lines in the project-dependencies section.
compile 'org.glassfish.jersey.containers:jersey-container-servlet-core:2.26'
Please note that the name of the project has changed starting from version 2.26. All the earlier versions had the name onlyjersey-container-servlet.
3.3.2 Installation from Jersey Website
For installation of Jersey from its website, we can download the package available at the website which contains all the dependencies excluding the third party dependencies.
You can download the package from this link.
After downloading the package extract the zip file and paste all the jars in the WEB-INF/lib of your program. That’s all you are ready to use jersey now.
4. Tools and Technologies
Let us look at the technologies and tool used for building the program.
- Eclipse Oxygen.2 Release (4.7.2)
- Java – version 9.0.4
- Gradle – 4.6
- JAX-RS 2.1
- Jersey-2.26
- Tomcat 9.0
5. Project Structure
Our project structure will look as shown in the below image.
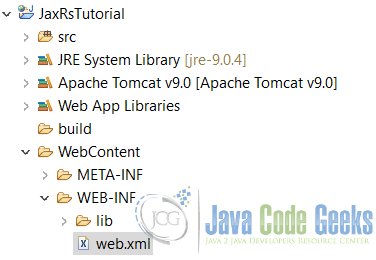
The project structure shown above is for plan implementation of JAX-RS where libraries will be downloaded from Jersey website. For projects with build.gradle and pom.xml the project structure will differ slightly.
6. An objective of the program
As part of the program, we will try to create a simple web service using Jersey. Also, we will try to understand the configuration and setup that needs to be done in order to create a web service.
6.1 Jars
Following is the list of Jars that will be part of folderWEB-INF/lib.
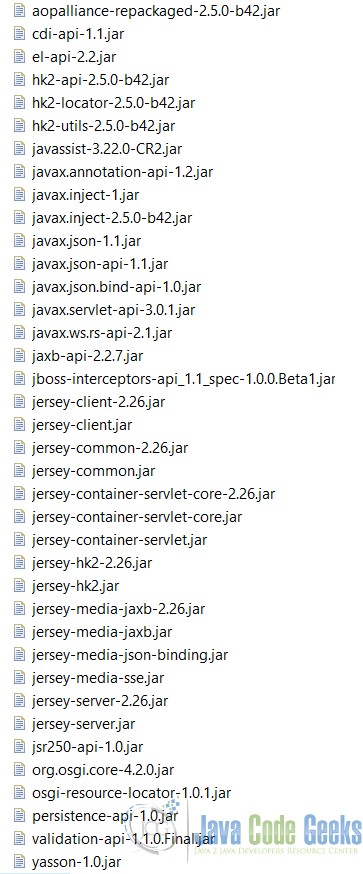
There are two ways to add the jars as part of the project. Both the ways are mentioned below.
- Addition of Jar using build files: Jars can be added to the project using build file like build.gradle or pom.xml by providing the jars along with version as the dependencies.
- Download from Jersey website: All the jars mentioned above are available as part of the Jersey package which can be downloaded and copy pasted at WEB-INF/lib. Link for downloading the Jars.
5.2 Configuration for JAX-RS
In order to use JAX-RS, we have to register Jersey as the dispatcher servlet for REST requests. We have to modify to web.xml have the following lines.
Web.xml for Jersey as Dispatcher servlet
<?xml version = "1.0" encoding = "UTF-8"?>
<web-app xmlns:xsi="http://www.w3.org/2001/XMLSchema-instance"
	xmlns="http://java.sun.com/xml/ns/javaee" xmlns:web="http://java.sun.com/xml/ns/javaee/web-app_2_5.xsd"
	xsi:schemaLocation="http://java.sun.com/xml/ns/javaee http://java.sun.com/xml/ns/javaee/web-app_2_5.xsd"
	id="WebApp_ID" version="2.5">
	<display-name>JAX-RS Application Demo</display-name>
	<servlet>
		<servlet-name>jersey-servlet</servlet-name>
		<servlet-class>org.glassfish.jersey.servlet.ServletContainer</servlet-class>
		<init-param>
			<param-name>jersey.config.server.provider.packages</param-name>
			<param-value>com.tutorial</param-value>
		</init-param>
	</servlet>
	<servlet-mapping>
		<servlet-name>jersey-servlet</servlet-name>
		<url-pattern>/rest/*</url-pattern>
	</servlet-mapping>
</web-app>
There are different tags as part of the web.xml for a different purpose. display-name is used only for the display purpose. init-param tag is used for initialization. We have used a param jersey.config.server.provider.packages this parameter defines which package Jersey will look into for service classes. The package defined here should contain service classes. url-patter this tag is used to define the URL pattern. By default, the start of the URL is going to be with the project name followed by the url-pattern defined at this tag.
6.3 Service class
The service class is responsible for processing the request. Once the request is received by the dispatcher servlet ( which in our case is Jersey), the request is transferred to the service class based on the URL path. The service class name is HelloWorld.java
Service class for the project
package com.tutorial;

import javax.ws.rs.GET;
import javax.ws.rs.Path;
import javax.ws.rs.PathParam;
import javax.ws.rs.core.Response;

@Path("/hi")
public class HelloWorld
{
  @GET
  @Path("/{name}")
  public Response getMessage(@PathParam("name") String name)
  {
    String outMsg = "Hello " + name + "!";
    return Response.status(200).entity(outMsg).build();
  }

}
In the code above @Path is defined for the URL path. So, the URL will contain the project name, the url-pattern defined as part of the web.xml and the attribute supported with the @Path annotation. The request will be diverted to this class by the dispatcher servlet. @GET defined the type of HTTP method. If it contains@Path parameters with these {} brackets then those parameters are known as @PathParam. In our case name is a path parameter. You can define path at service level as well as at the method level.
6.4 Run the Program
In order to run the program, a web server is needed to run the web-service. For our program, we have used Apache Tomcat.
Let’s create a war file and deploy the war on the tomcat server. Also, we can integrate the tomcat server with Eclipse. Once the Tomcat server is integrated with Eclipse and the project war is deployed on the server, we will get the following screen.

Now let’s start the tomcat server.
Once the tomcat server is started we will type the following URL into the browser.
http://localhost:8080/JaxRsTutorial/rest/hi/Anand
Observe that the URL first contains the project name followed by the url-pattern mentioned as part of the web.xml, then the service path and at the end the path parameter which is the name.
The following screen will appear in the browser.

7. Download the Eclipse Project
This was a tutorial for JAX-RS using Jersey.
