“I love writing authentication and authorization code.” ~ No Java Developer Ever. Tired of building the same login screens over and over? Try the Okta API for hosted authentication, authorization, and multi-factor auth.
Vert.x is one of the fastest growing elements in the Spring ecosystem, and securing a Vert.x server can be a challenge. Deploying Okta allows you to add secure single sign-on to your server and while granting you access to a wealth of information about your users. This tutorial will walk you through standing up a new Vert.x server and integrating it with Okta for secure user management.
A Quick Recap of the 3-Legged OAuth Flow
This example will be using the third-party provider OAuth flow known as the 3-legged flow (the meat of single sign-on). Before launching into the code, a brief refresher of this process might be helpful.
The problem
I’m a web server, and I want to secure my site and require users to log in. However, writing, maintaining, and managing user identities is a lot of work.
The solution
Let someone else deal with it. To achieve this, a bit of cooperation is required between me (the web server), my user (perhaps on a web browser), and whoever is handling auth for me (in this example, Okta). These three cooperating participants are the three “legs” of the 3-legged OAuth flow. The process they go through is a three-way handshake:
- The user’s browser requests a protected resource from me, the web server
- I, the web server, decide that the user needs to sign in first. I refuse to service the request, and instead return a 302 redirect response that tells the browser to go visit Okta instead
- The browser complies, visits Okta instead, and the user signs in. Okta then returns its own 302 redirect, telling the browser to go back and visit me again… but this time, carrying a secret code
- The browser visits me once again, but this time I see that it carries with it this secret code. I now make my own direct call to Okta, exchanging this secret code for sensitive information about the user such as their name, email address, or phone number
The above handshake is what will be happening behind the scenes once this example is completed. Vert.x supplies a handy OAuth library to take care of this entire process for you – all you need to do is configure it and register it appropriately. That’s what this tutorial demonstrates.
As a starter guide, this post assumes only basic familiarity with Java and a few Java essentials such as Maven. If you already have a Vert.x server running, feel free to fast forward to the good stuff: you’ll integrate with Okta in the Configure the Vert.x OAuth Handler section.
The completed code example, including imports and pom.xml, can be found on Github.
Start A New Vert.x Server
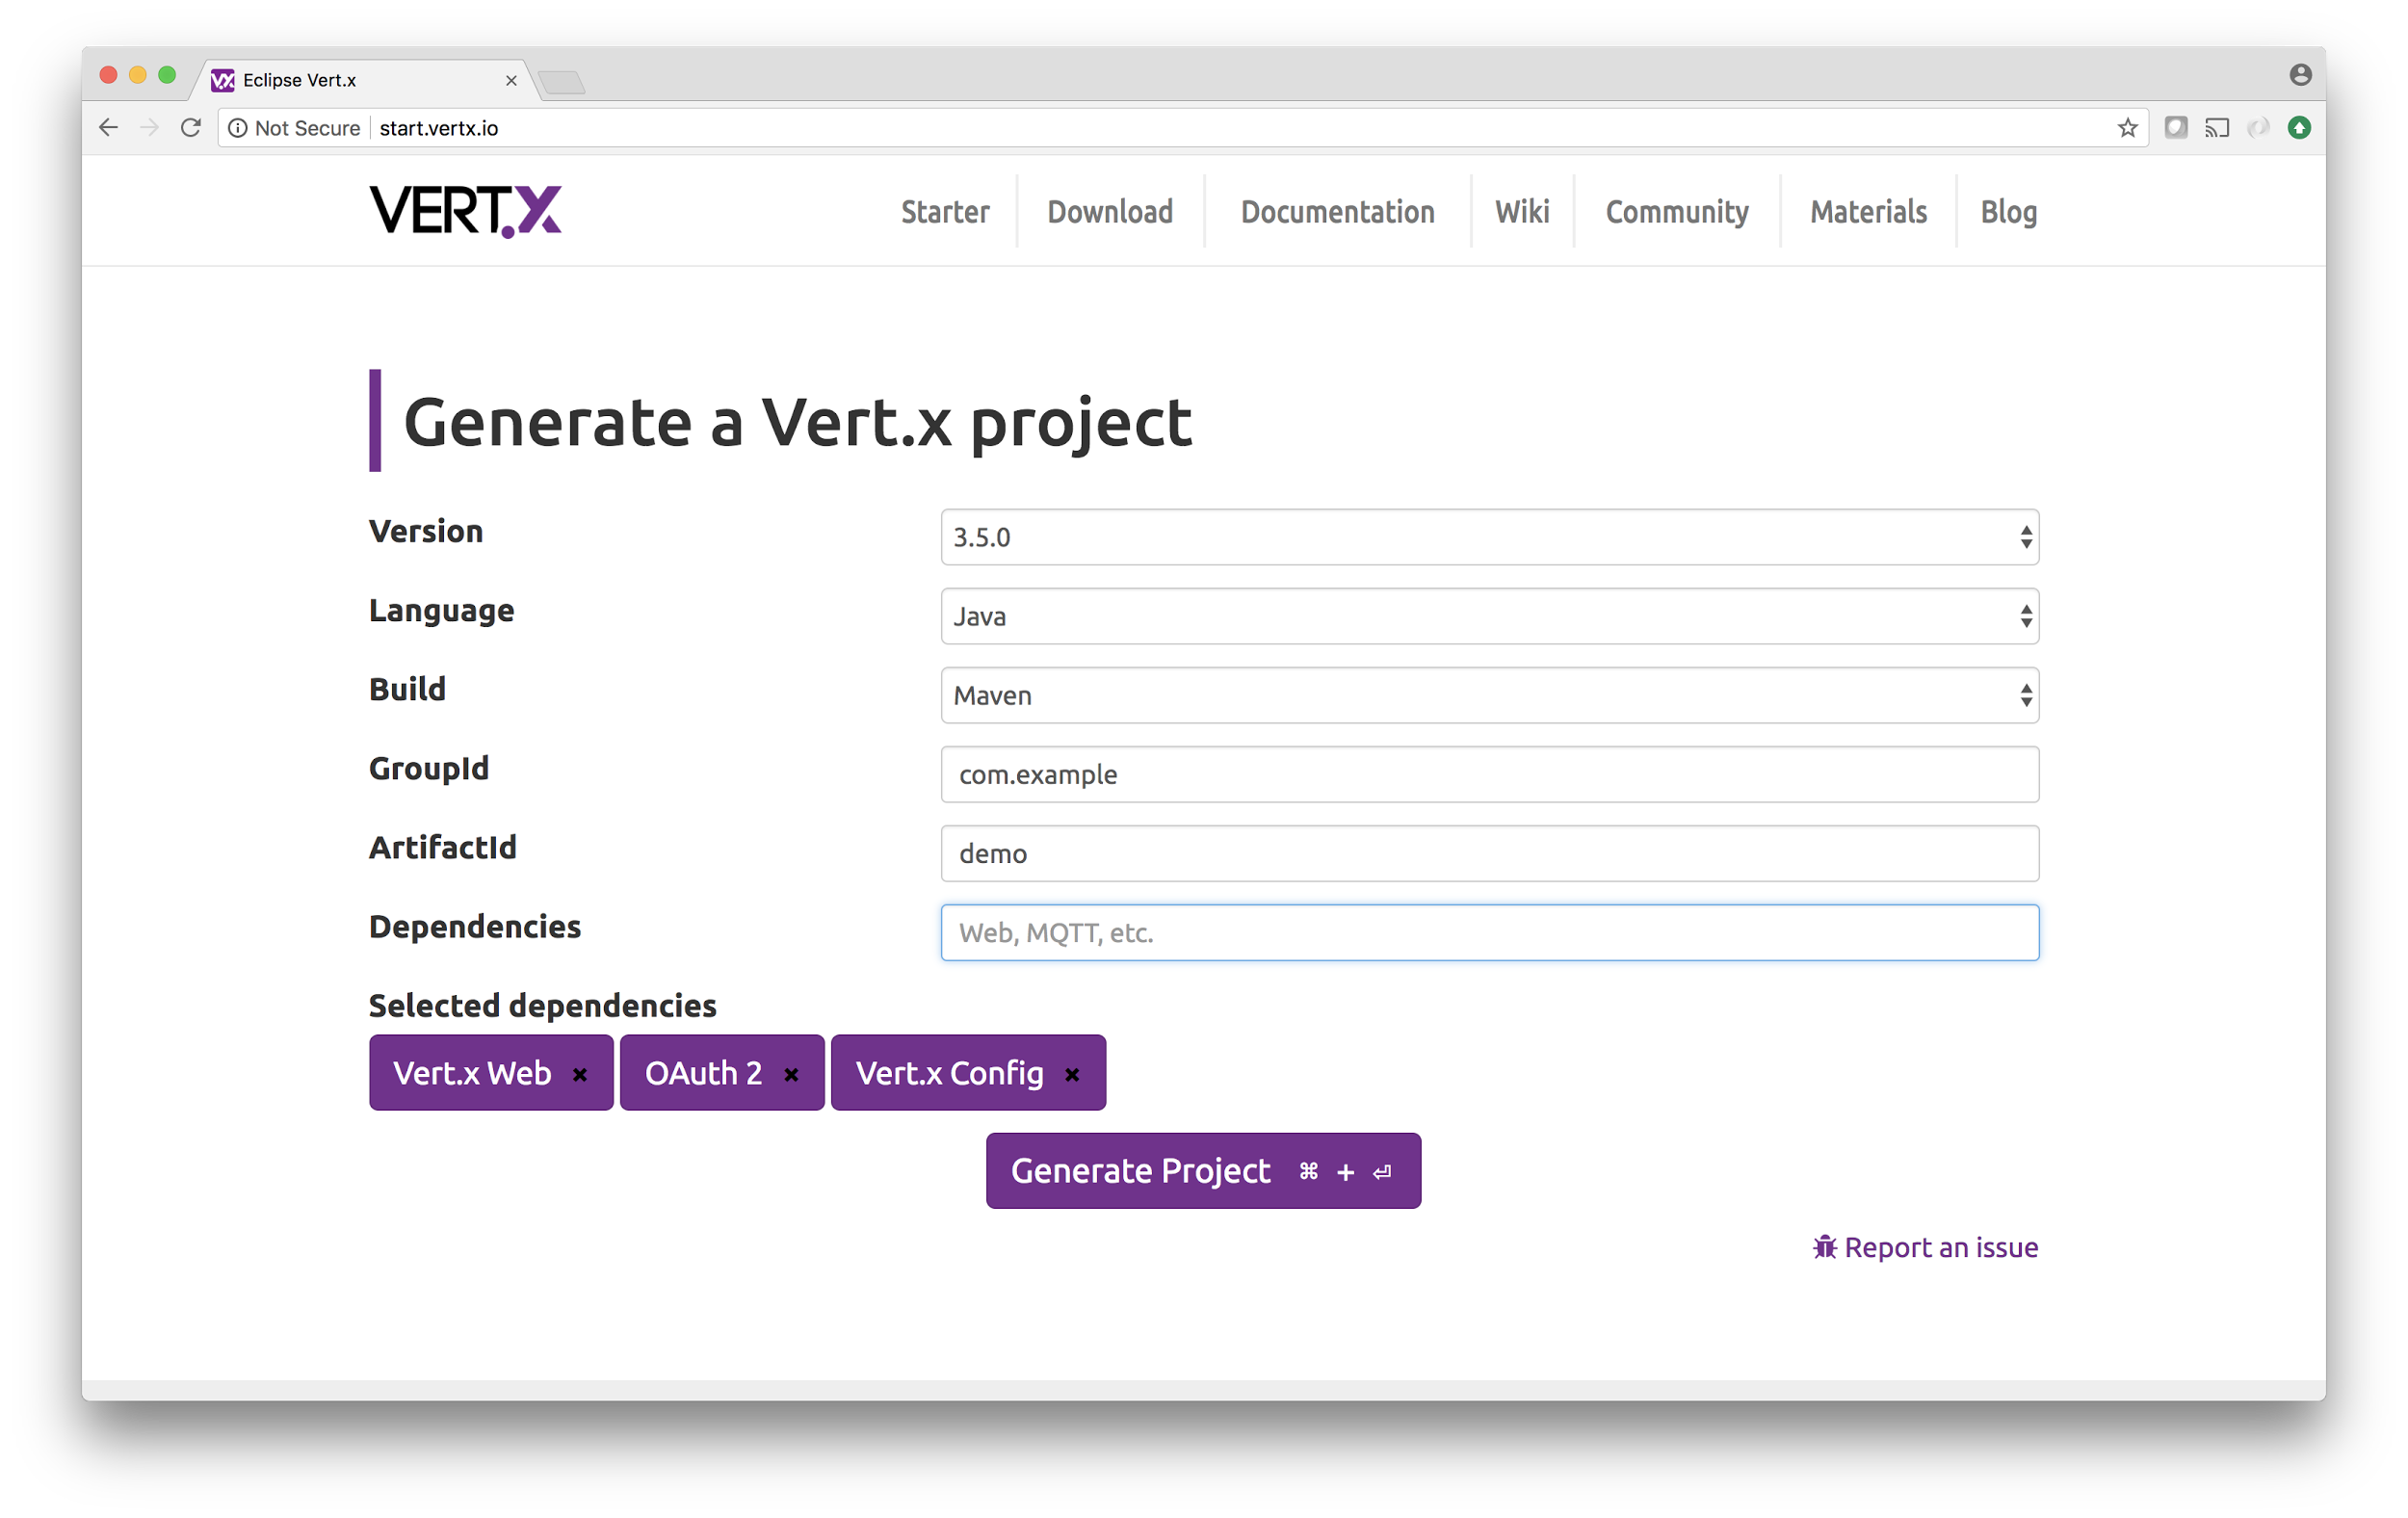
To kick things off, visit the Vert.x Starter page and generate a new project. For this tutorial, you can leave all the default values in place, and include the Vert.x Web, OAuth, and Vert.x Config dependencies:
After clicking generate, downloading, and unzipping locally, you should see the following simple directory structure:

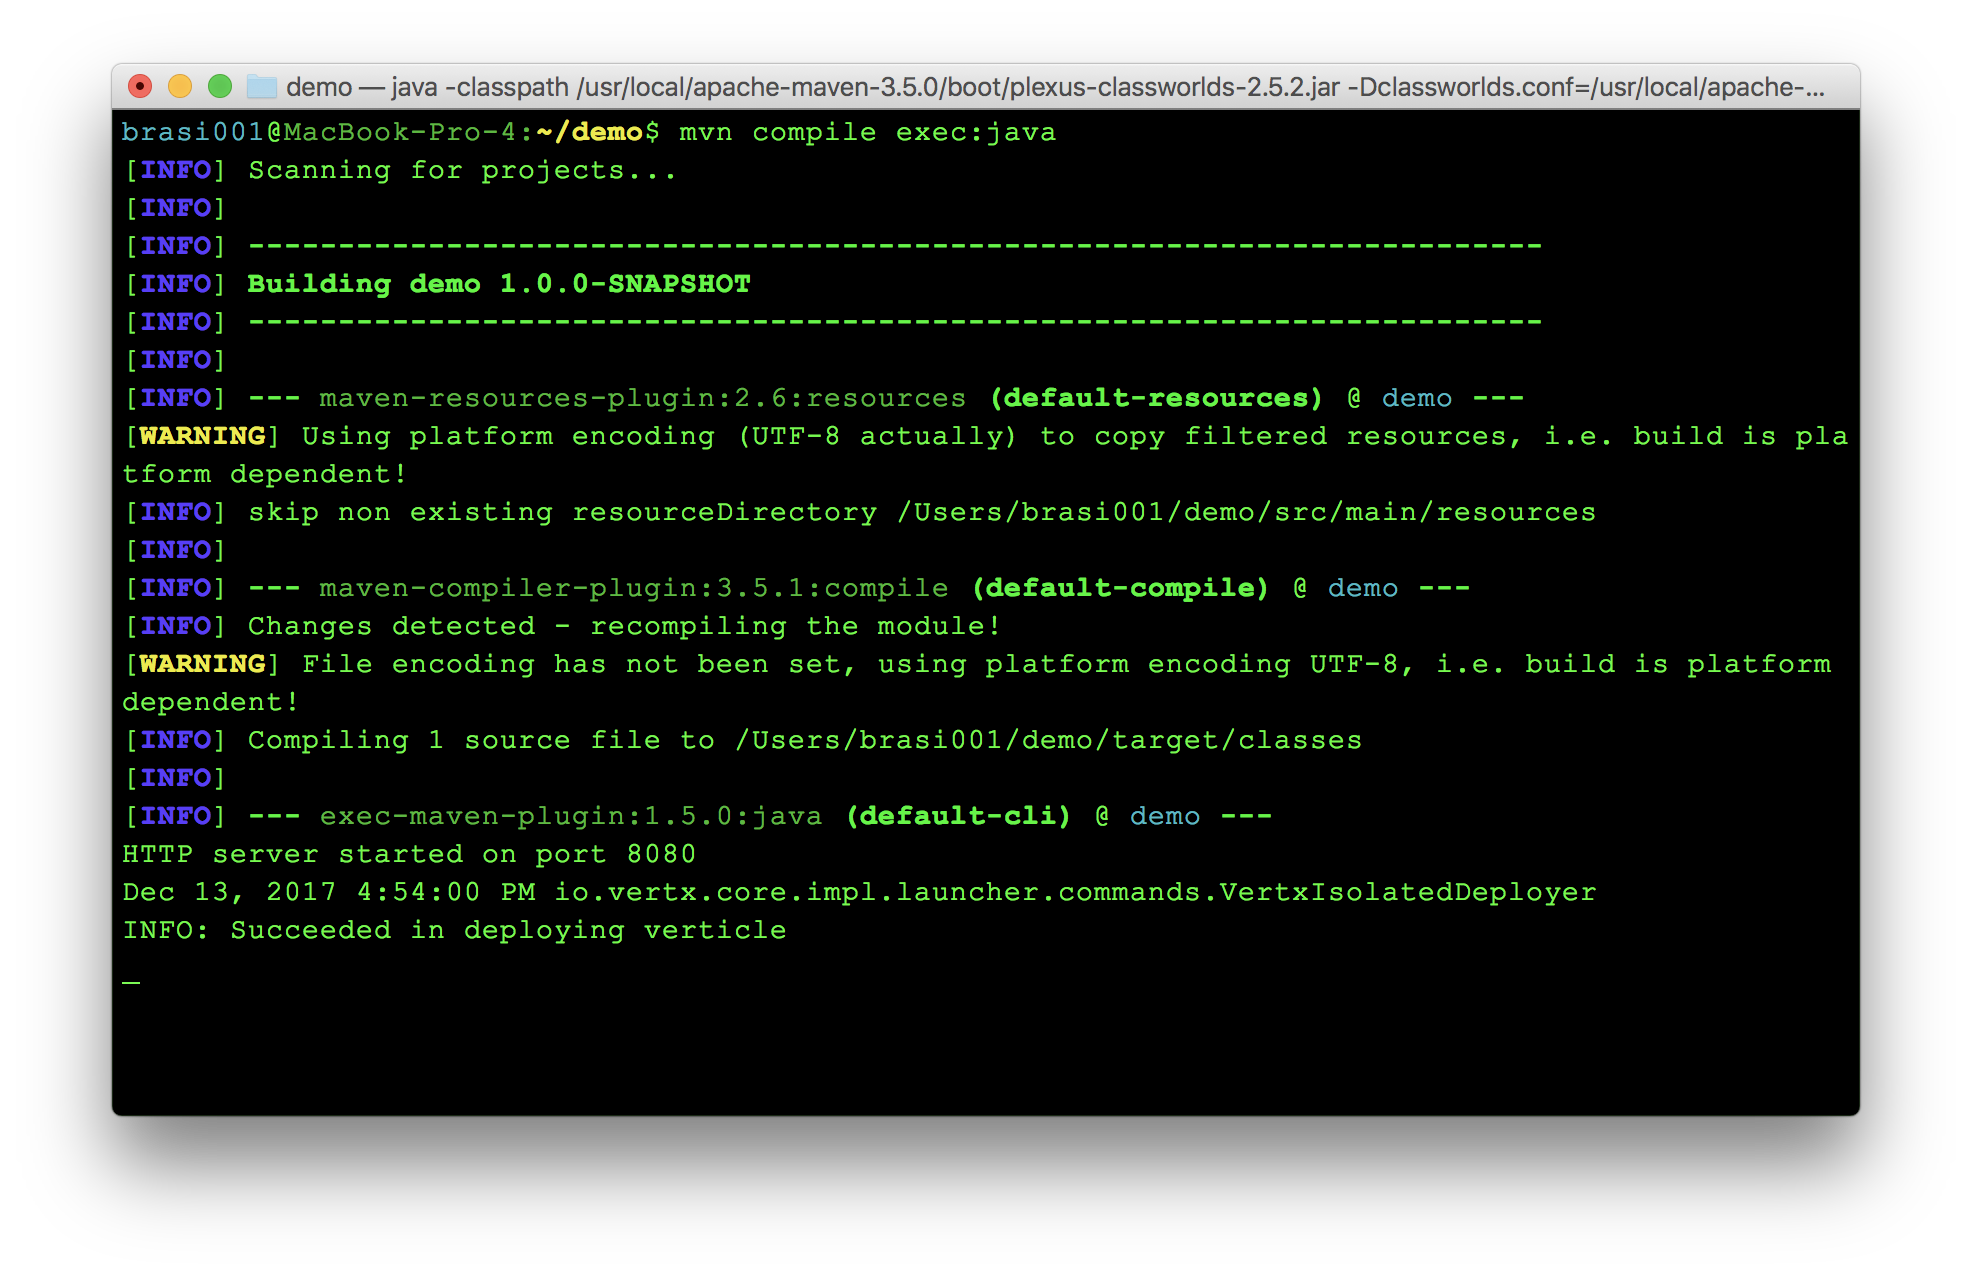
And running with mvn compile exec:java from the demo directory should start the server on port 8080:
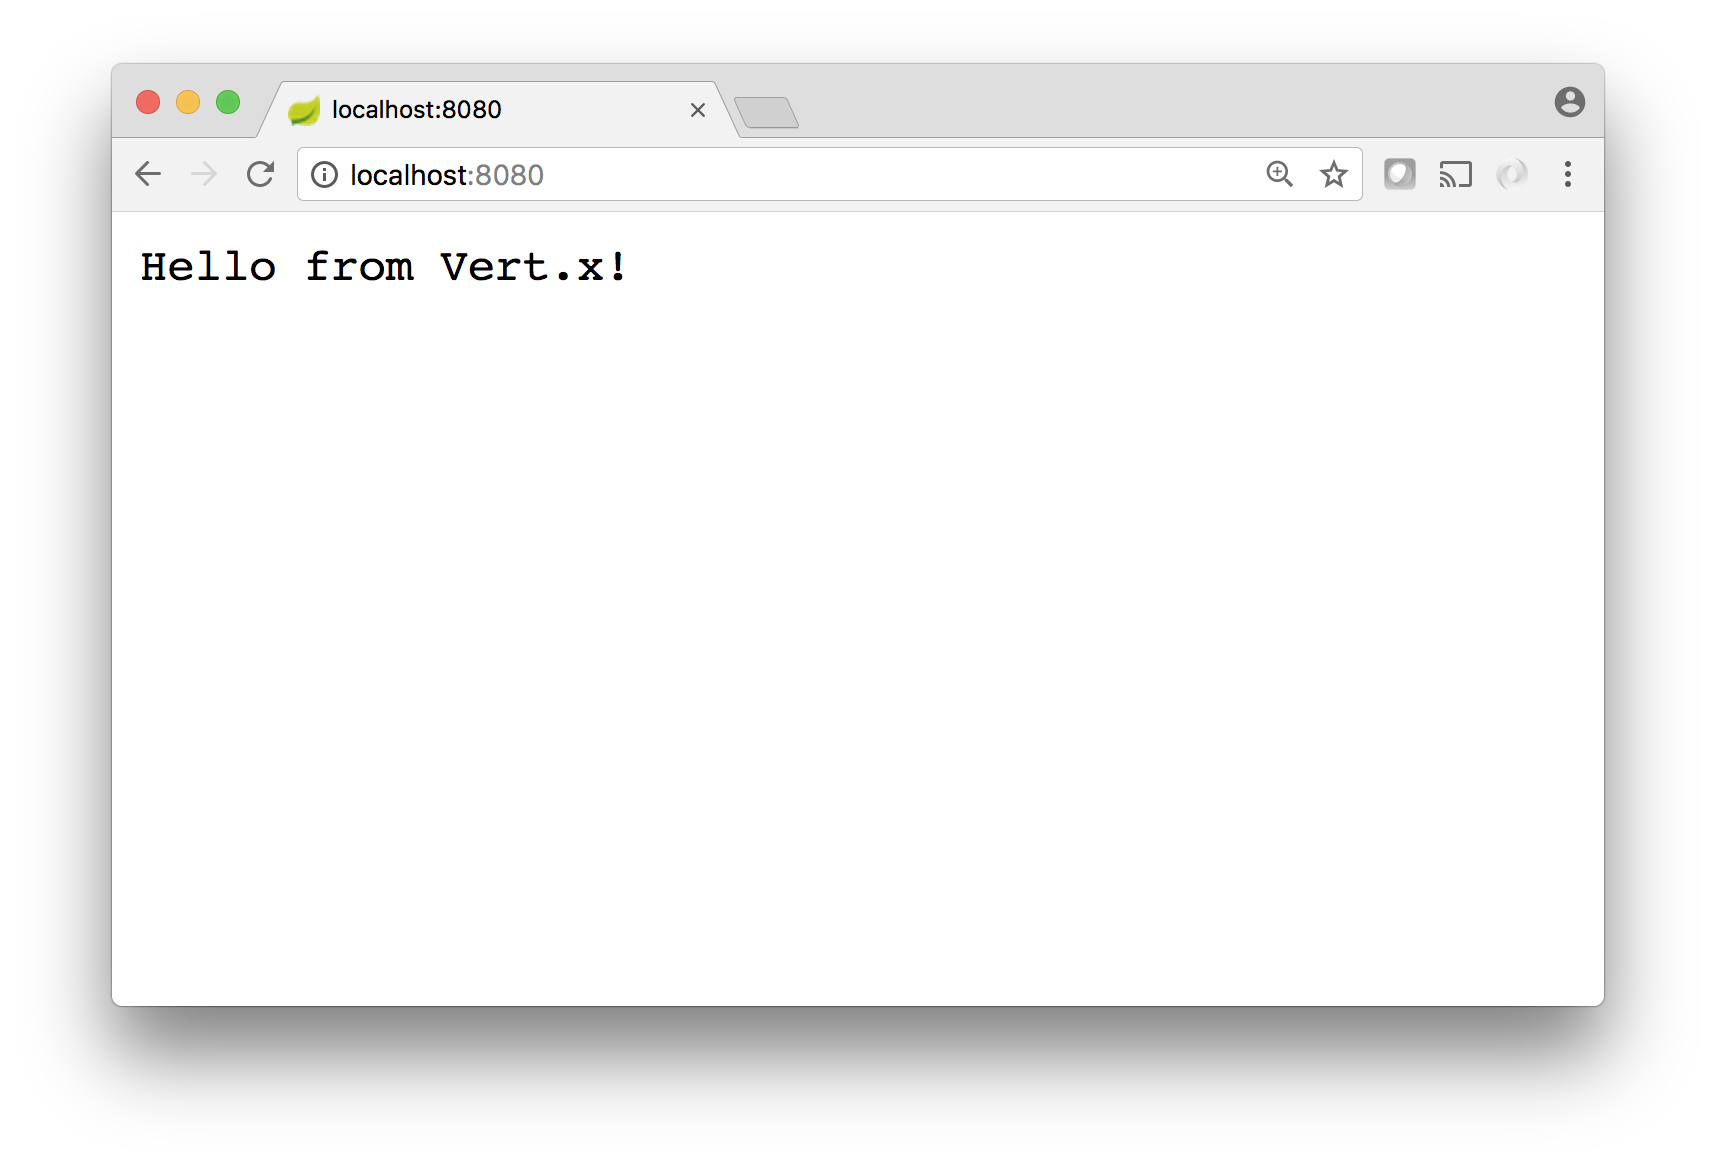
Visiting http://localhost:8080 in your browser returns a reassuring hello world response:
At this point, a proper next step would be to switch to https before continuing to add authentication. However, to keep the tutorial short and focused, that part will be skipped and the examples will continue to use the unencrypted http server mode.
Bring in the Vert.x Config
Vert.x offers a versatile config library, albeit a little more work to set up than in Spring. This example will make use of a handful of config values, so you can take this opportunity to add Vert.x Config to your project. The dependency should already be present in your pom.xml if you specified Vert.x Config when creating the starter project.
<dependency>
   <groupId>io.vertx</groupId>
   <artifactId>vertx-config</artifactId>
   <version>${vertx.version}</version>
</dependency>
Create a file called src/main/application.json and add the following content:
{
   "clientId": "{okta-client-id}",
   "clientSecret": "{okta-client-secret}",
   "issuer": "https://{yourOktaDomain}/oauth2/default",
   "callbackUrl": "http://localhost:8080/login",
   "port": 8080
}
You’ll be updating those values shortly. Now in src/main/java/com/example/demo/MainVerticle.java, replace the contents of the start() method with the following, which will load the config. Notice that when it completes, it calls a method called startServer() that doesn’t exist yet. You will add that in the next section.
@Override
public void start() throws Exception {
   ConfigStoreOptions fileStore = new ConfigStoreOptions()
       .setType("file")
       .setConfig(new JsonObject().put("path", "src/main/application.json"));
   ConfigRetrieverOptions options = new ConfigRetrieverOptions()
       .addStore(fileStore);
   ConfigRetriever retriever = ConfigRetriever.create(vertx, options);
   retriever.getConfig(ar -> {
       if (ar.failed()) {
           System.err.println("failed to retrieve config.");
       } else {
           config().mergeIn(ar.result());
           startServer();
       }
   });
}
Incorporate the Vert.x Router
By leveraging the Vert.x Router, you will be able to easily intercept calls to sensitive endpoints and enforce preauthentication. To do this, you’ll now implement the startServer() method in src/main/java/com/example/demo/MainVerticle.java:
void startServer() {

    Router router = Router.router(vertx);

    router.route("/private/secret")
	    .handler(ctx -> {
        ctx.response().end("Hi");
    });

    vertx.createHttpServer()
		.requestHandler(router::accept)
		.listen(config().getInteger("port"));
}
In the example above, you have created a new endpoint at /private/secret with the intent of soon protecting every endpoint under the /private path. But first, the Vert.x OAuth handler needs to be set up.
Create an Okta Account and Gather Credentials
If you don’t already have a free Okta account, you can follow these instructions to create one and set up your first Okta application. There are four key pieces of information you will need to gather:
- Client Id – e.g.: oot9wrjjararhfaa
- Client Secret – (keep it secret!)
- Issuer – e.g.: https://dev-123123.oktapreview.com/oauth2/default …be sure to include the /oauth2/default path!
- Callback Url – this will be http://localhost:8080/login if you followed the instructions above.
These values can now be used in your src/main/application.json file.
Configure the Vert.x OAuth Handler
Vert.x comes with an out-of-the-box OAuth manager that integrates nicely with Okta as an identity provider. To keep things tidy, you’ll create a separate factory method in src/main/java/com/example/demo/MainVerticle.javathat produces a configured OAuth handler. Add the following to the MainVerticle class, replacing the client info below with your account details obtained from the Okta developer dashboard:
AuthHandler getOAuthHandler(Router router) {
    OAuth2Auth oauth2 = OAuth2Auth.create(vertx, OAuth2FlowType.AUTH_CODE, new OAuth2ClientOptions()
        .setClientID(config().getString("clientId"))
        .setClientSecret(config().getString("clientSecret"))
        .setSite(config().getString("issuer"))
        .setTokenPath("/v1/token")
        .setAuthorizationPath("/v1/authorize")
        .setUserInfoPath("/v1/userinfo")
        .setUseBasicAuthorizationHeader(false)
    );

    OAuth2AuthHandler authHandler = OAuth2AuthHandler.create(oauth2, config().getString("callbackUrl"));
    authHandler.extraParams(new JsonObject("{\"scope\":\"openid profile email\"}"));
    authHandler.setupCallback(router.route());
    return authHandler;
}
In the above example, note the three requested scopes: openid, profile, and email. Future posts will explore additional scopes and authorization levels, but for now, these three will provide the absolute essentials (such as the user’s name and email address). Using the email address, you can also directly query Okta’s API for additional information about the user, and to perform account management tasks.
Intercept and Authorize Protected Endpoints
Now that the AuthHandler is prepared, it needs to precede request handling of any protected endpoint and authenticate the user. By using a wildcard to register it as the top-level handler for all paths below /private/, it will only need to be dealt with once for all future handlers you might create. Any request handler below the /private/ path can then be guaranteed that when it is called, it will only be from a properly authenticated user.
Alter the startServer() method of the MainVerticle class as indicated below to generate and register the handler:
public void startServer() {

    Router router = Router.router(vertx);

    //create and register the auth handler to intercept all
    //requests below the /private/ URI:
    AuthHandler authHandler = getOAuthHandler(router);
    router.route("/private/*").handler(authHandler);

    router.route("/private/secret")
	    .handler(ctx -> {
        ctx.response().end("Hi");
    });

    vertx.createHttpServer()
		.requestHandler(router::accept)
		.listen(config().getString(“port”));
}
This would be an excellent time to start up the server again and make sure everything is running as expected. By running mvn compile java:exec again and hitting http://localhost:8080/private/secret from your browser, you should now be automatically redirected to Okta’s login page. After logging in, you should then be redirected back to your site to continue responding to the original /private/secret request.
Extract User Info from the JWT
Now that callers to your /private/ APIs are logged in, the next thing you’ll want is their information. This is delivered in the form of a JSON Web Token, which must be extracted and decoded. The Vert.x OAuth handler hides this as a named member of a stringified JSON object called the principal, which is itself a component of the context’s user object. That encoded token is then decoded and verified using the JWT library of your choice. This example uses Okta’s JWT verifier library.
Both the access_token and id_token are available, but this tutorial will only decode the id_token. There is a similar function to decode the access_token if needed. To accomplish this, include the Okta JWT lib dependency in your pom.xml:
<dependency>
    <groupId>com.okta.jwt</groupId>
    <artifactId>okta-jwt-verifier</artifactId>
    <version>0.2.0</version>
</dependency>
…and add the following new function to the MainVertical class:
Map<String, Object> getIdClaims(RoutingContext ctx) {
    try {
        JwtVerifier jwtVerifier = new JwtHelper()
            .setIssuerUrl(config().getString(“issuer”))
            .setAudience("api://default")
            .setClientId(config().getString("clientId"))
            .build();

        Jwt idTokenJwt = jwtVerifier.decodeIdToken(ctx.user().principal().getString("id_token"), null);
        return idTokenJwt.getClaims();
    } catch (Exception e) {
        //do something with the exception...
        return new HashMap<>();
    }
}
And that’s it! You can now access user information in your request handler. To demonstrate, the /private/secret handler can be updated to retrieve claims from the JWT as shown below:
void startServer() {
Router router = Router.router(vertx);
AuthHandler authHandler = getOAuthHandler(router);
router.route("/private/*").handler(authHandler);
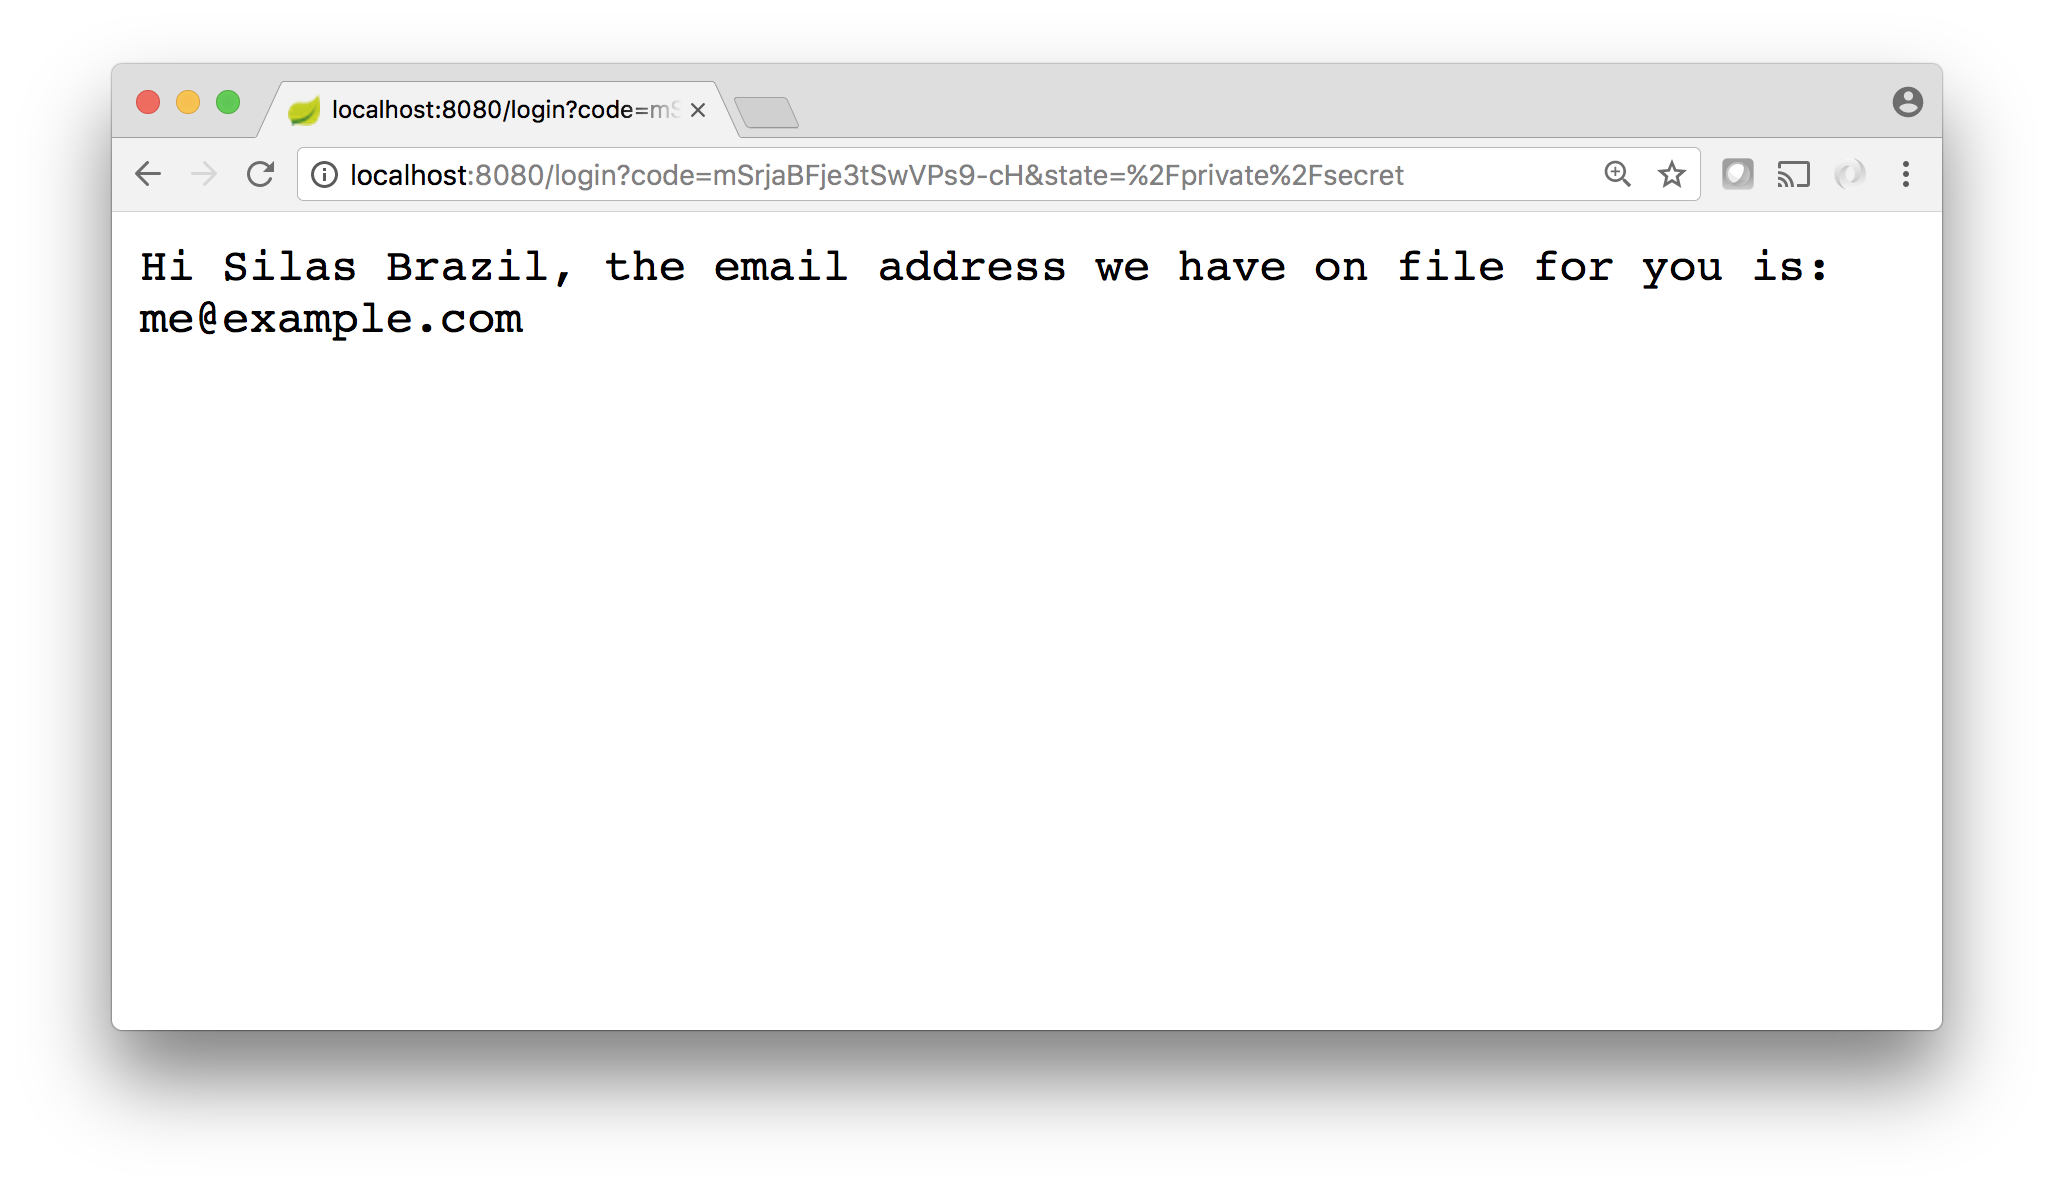
router.route("/private/secret").handler(ctx -> {
Map claims = getIdClaims(ctx);
ctx.response().end("Hi " +
claims.get("name") +
", the email address we have on file for you is: "+
claims.get("email"));
});
vertx.createHttpServer().requestHandler(router::accept).listen(config().getString(“port”));
}With this final change, restarting your server and once again hitting http://localhost:8080/private/secret, your browser should now display a message with your authenticated user’s information!
Onward and Upward
Congratulations, you now have a high-performance Vert.x server protected by Okta’s state-of-the-art security and identity management! Okta provides a Java SDK for interacting further with users and accounts, including adding custom data and attributes to your users.
Thanks for reading, and as always, please hit us up in the comments below with questions. We’d love to have you follow us on Twitter @OktaDev, or read on for more great Java content from our blog:
- Get Started with Spring Security 5.0 and OIDC
- Bootiful Development with Spring Boot and React
- Use Kong Gateway to Centralize Authentication
- Build a Basic CRUD App with Angular 5.0 and Spring Boot 2.0
- Secure Your SPA with Spring Boot and OAuth
“I love writing authentication and authorization code.” ~ No Java Developer Ever. Tired of building the same login screens over and over? Try the Okta API for hosted authentication, authorization, and multi-factor auth.
Add Single Sign-on to your Vert.x Server with Okta was originally published on the Okta developer blog on January 11, 2018.

Nice Article, appreciate your time to put this for us. I got a fair idea how things work with okta.