Welcome to angular5 jwt authentication with spring security.In this tutorial, we will be creating a full stack app using jwt authentication in an angular5 single page application having backened server supported by spring boot with integration of spring security.Having said that we will have a sample angular5 example application with HttpInterceptor integrated with it to intercept all the HTTP request to add jwt authorization token in the header and in the server we will have some REST endpoints exposed and secured using spring security.The resource will be accessible only if valid jwt token is found in the header.We will be using Mysql DB for persistant storage.
This article is comprised of 4 sections.In the first section we will be building our single page angular5 application using material design. In the second section we will be creating a spring boot application with sample REST endpoints exposed. In the third section we will have JWT integration with spring security and in the fourth section we will have jwt integration with angular5 using HttpIntrceptor.So, let’s get started.
Technologies Used
We have frequent version upgrades in angular as well as in spring boot. Hence, let us first confirm the versions of these technologies that we will be using to build this application.
1. Spring Boot 1.5.8.RELEASE
2. jjwt 0.6.0
3. Angular 5.2.0
4. Angular Material 5.1.0
5. MySql
6. Java 1.8
Jwt Authentication
JSON Web Token (JWT) is an open standard (RFC 7519) that defines a compact and self-contained way for securely transmitting information between parties as a JSON object.a stateless authentication mechanism as the user state is never saved in server memory.A JWT token consists of 3 parts seperated with a dot(.) i.e. Header.payload.signature
Header has 2 parts type of token and hashing algorithm used.The JSON structure comprising these two keys are Base64Encoded.
{
  "alg": "HS256",
  "typ": "JWT"
}
Payload contains the claims.Primarily, there are three types of claims: reserved, public, and private claims. Reserved claims are predefined claims such as iss (issuer), exp (expiration time), sub (subject), aud (audience).In private claims, we can create some custom claims such as subject, role, and others.
{
  "sub": "Alex123",
  "scopes": [
    {
      "authority": "ROLE_ADMIN"
    }
  ],
  "iss": "http://devglan.com",
  "iat": 1508607322,
  "exp": 1508625322
}
Signature ensures that the token is not changed on the way.For example if you want to use the HMAC SHA256 algorithm, the signature will be created in the following way:
HMACSHA256(
  base64UrlEncode(header) + "." +
  base64UrlEncode(payload),
  secret)
The server’s protected routes will check for a valid JWT in the Authorization header, and if it’s present, the user will be allowed to access protected resources.Whenever the user wants to access a protected route or resource, the user agent should send the JWT, typically in the Authorization header using the Bearer schema. The content of the header should look like the following:
Authorization: Bearer eyJhbGciOiJIUzI1NiJ9.eyJzdWIiOiJBbGV4MTIzIiwic2N.v9A80eU1VDo2Mm9UqN2FyEpyT79IUmhg
Create Angular5 Application
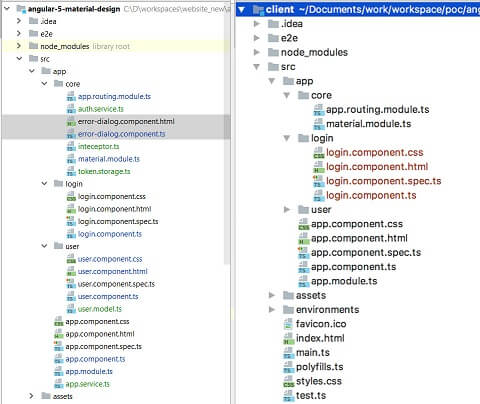
We already have our angular5 application created in my last article here – Angular5 Material App.This was a very simple application with angular material integrated.In this application, we have 2 modules user and login module with routing integrated.But here the login validation was hard coded in the client application itself and once the user is successfully logged in, he will be redirected to user page where he can see a list of users in a data table.
Following is the previous project structure and the project structure which we will be building now.
In this example we need to create a HTTP client first that will be consuming the REST APIs.To do so we will be using HttpClient from @angular/common/http. Following is our app.service.ts.For demo purpose we only have one HTTP call to fetch the user list.
import {Injectable} from '@angular/core';
import { HttpClient, HttpHeaders } from '@angular/common/http';
import {Observable} from 'rxjs/Observable';
import {User} from './user/user.model';


const httpOptions = {
  headers: new HttpHeaders({ 'Content-Type': 'application/json' })
};

@Injectable()
export class UserService {

  constructor(private http: HttpClient) {}

  private userUrl = 'http://localhost:8080/';

  public getUsers(): Observable {
    return this.http.get(this.userUrl + '/users');
  }

}
Don’st forget to include userService and HttpClientModule in the providers in app.module.ts
Similarly, in the user.component.ts we have following changes to the service and populate the data table.One more thing to note here is we have disabled the authentication for /users endpoint in spring security config.
import {Component, OnInit} from '@angular/core';
import {MatTableDataSource} from '@angular/material';
import {User} from './user.model';
import {UserService} from '../app.service';
import {Router} from '@angular/router';
@Component({
selector: 'app-root',
templateUrl: './user.component.html',
styleUrls: ['./user.component.css']
})
export class UserComponent implements OnInit {
displayedColumns = ['id', 'username', 'salary', 'age'];
dataSource = new MatTableDataSource();
constructor(private router: Router, private userService: UserService) {
}
ngOnInit(): void {
this.userService.getUsers().subscribe(
data => {
this.dataSource.data = data;
}
);
}
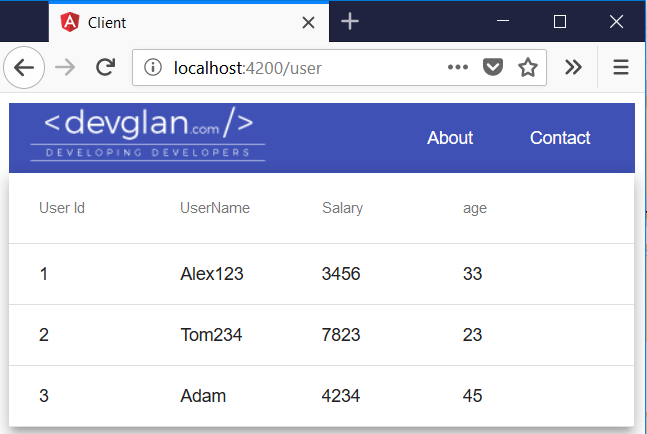
}Now, with this much implementation, we should be able to display list of users in the data table for url – http://localhost:4200/user
Create Spring Boot Application
First of all, checkout the project structure below. it’s the same project we built during spring boot jwt authentication tutorial.
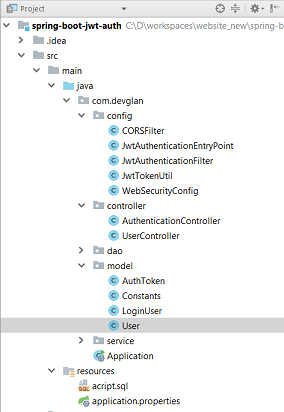
The spring boot application has an endpoint exposed at /users from controller class. It’s a simple implementation.Also, we have CORS enabled for angular and the user model class has 4 attributes as id, username, age and salary.
UserController.java
package com.devglan.controller;

import com.devglan.model.User;
import com.devglan.service.UserService;
import org.springframework.beans.factory.annotation.Autowired;
import org.springframework.web.bind.annotation.*;

import java.util.List;

@CrossOrigin(origins = "http://localhost:4200", maxAge = 3600)
@RestController
public class UserController {

    @Autowired
    private UserService userService;

    @RequestMapping(value="/users", method = RequestMethod.GET)
    public List listUser(){
        return userService.findAll();
    }
}
Spring Security Configuration
Now we will configure the security to secure our application. For now, we will allow /users endpoint for public access so that we can validate our jwt authentication later and display users list in the data table as in the image above.All this configurations have been discussed in my last article here – Spring Boot Security JWT Authentication.Here authenticationTokenFilterBean() has no effect as we have allowed /users endpoint for public access.
@Configuration
@EnableWebSecurity
@EnableGlobalMethodSecurity(prePostEnabled = true)
public class WebSecurityConfig extends WebSecurityConfigurerAdapter {

    @Resource(name = "userService")
    private UserDetailsService userDetailsService;

    @Autowired
    private JwtAuthenticationEntryPoint unauthorizedHandler;

    @Override
    @Bean
    public AuthenticationManager authenticationManagerBean() throws Exception {
        return super.authenticationManagerBean();
    }

    @Autowired
    public void globalUserDetails(AuthenticationManagerBuilder auth) throws Exception {
        auth.userDetailsService(userDetailsService)
                .passwordEncoder(encoder());
    }

    @Bean
    public JwtAuthenticationFilter authenticationTokenFilterBean() throws Exception {
        return new JwtAuthenticationFilter();
    }

    @Override
    protected void configure(HttpSecurity http) throws Exception {
        http.cors().and().csrf().disable().
                authorizeRequests()
                .antMatchers("/token/*").permitAll()
                .anyRequest().authenticated()
                .and()
                .exceptionHandling().authenticationEntryPoint(unauthorizedHandler).and()
                .sessionManagement().sessionCreationPolicy(SessionCreationPolicy.STATELESS);
        http
                .addFilterBefore(authenticationTokenFilterBean(), UsernamePasswordAuthenticationFilter.class);
    }

    @Bean
    public BCryptPasswordEncoder encoder(){
        return new BCryptPasswordEncoder();
    }

}
Adding JWT Authentication in Spring Security
The simple implementation for JWT is to write a filter class that will intercept all the requests and look for JWT Authorization token and if the token is found in the header, it will extract the token, parse it to find the user related information such as username and roles.Once he token is validated, it will prepare the spring security context and forward the request to next filter in the filter chain.
So for this purpose, we have spring provided OncePerRequestFilter class that executes once per request. In the filter, we are hard coding the roles but in real time application either we can extract it from custom scopes from JWT token or do a DB lookup in UserDetailsService
JwtAuthenticationFilter.java
public class JwtAuthenticationFilter extends OncePerRequestFilter {

    @Autowired
    private UserDetailsService userDetailsService;

    @Autowired
    private JwtTokenUtil jwtTokenUtil;

    @Override
    protected void doFilterInternal(HttpServletRequest req, HttpServletResponse res, FilterChain chain) throws IOException, ServletException {
        String header = req.getHeader(HEADER_STRING);
        String username = null;
        String authToken = null;
        if (header != null && header.startsWith(TOKEN_PREFIX)) {
            authToken = header.replace(TOKEN_PREFIX,"");
            try {
                username = jwtTokenUtil.getUsernameFromToken(authToken);
            } catch (IllegalArgumentException e) {
                logger.error("an error occured during getting username from token", e);
            } catch (ExpiredJwtException e) {
                logger.warn("the token is expired and not valid anymore", e);
            } catch(SignatureException e){
                logger.error("Authentication Failed. Username or Password not valid.");
            }
        } else {
            logger.warn("couldn't find bearer string, will ignore the header");
        }
        if (username != null && SecurityContextHolder.getContext().getAuthentication() == null) {

            UserDetails userDetails = userDetailsService.loadUserByUsername(username);

            if (jwtTokenUtil.validateToken(authToken, userDetails)) {
                UsernamePasswordAuthenticationToken authentication = new UsernamePasswordAuthenticationToken(userDetails, null, Arrays.asList(new SimpleGrantedAuthority("ROLE_ADMIN")));
                authentication.setDetails(new WebAuthenticationDetailsSource().buildDetails(req));
                logger.info("authenticated user " + username + ", setting security context");
                SecurityContextHolder.getContext().setAuthentication(authentication);
            }
        }

        chain.doFilter(req, res);
    }
}
Once this implementation is done, we can actually remove the “/users” from WebSecurityConfig.java and validate that we will get 401 while trying to load data in our angular data table.
Create JWT Token in Spring Security
We have this controller defined to generate the JWT token.This controller will method will be called from client during login request. It will validate the user from DB with the username and password combination and accordingly generate JWT token.
AuthenticationController.java
@RestController
@RequestMapping("/token")
public class AuthenticationController {

    @Autowired
    private AuthenticationManager authenticationManager;

    @Autowired
    private JwtTokenUtil jwtTokenUtil;

    @Autowired
    private UserService userService;

    @RequestMapping(value = "/generate-token", method = RequestMethod.POST)
    public ResponseEntity register(@RequestBody LoginUser loginUser) throws AuthenticationException {

        final Authentication authentication = authenticationManager.authenticate(
                new UsernamePasswordAuthenticationToken(
                        loginUser.getUsername(),
                        loginUser.getPassword()
                )
        );
        SecurityContextHolder.getContext().setAuthentication(authentication);
        final User user = userService.findOne(loginUser.getUsername());
        final String token = jwtTokenUtil.generateToken(user);
        return ResponseEntity.ok(new AuthToken(token));
    }

}
Angular5 JWT Authorization
Now when coming to JWT authorization integration in angular5 with spring security, first we need to make a POST request for login with username and password. In the response, server will provide you a JWT token after successfull authentication.Once, we get this token, we can cache it in our browser for reuse for further API calls.For now let us define our authservice that will request for JWT token on login.
auth.service.ts
import {Injectable} from '@angular/core';
import {Observable} from 'rxjs/Observable';
import { HttpClient, HttpHeaders } from '@angular/common/http';

@Injectable()
export class AuthService {

  baseUrl: 'http://localhost:8080/email2sms/';

  constructor(private http: HttpClient) {
  }

  attemptAuth(ussername: string, password: string): Observable {
    const credentials = {username: ussername, password: password};
    console.log('attempAuth ::');
    return this.http.post('http://localhost:8080/token/generate-token', credentials);
  }

}
Now during login, we will be calling this service to authenticate the user by calling spring security AUTH API.
login.component.ts
import { Component, OnInit } from '@angular/core';
import {Router} from '@angular/router';
import {MatDialog} from '@angular/material';
import {AuthService} from '../core/auth.service';
import {TokenStorage} from '../core/token.storage';

@Component({
  selector: 'app-login',
  templateUrl: './login.component.html',
  styleUrls: ['./login.component.css']
})
export class LoginComponent {

  constructor(private router: Router, public dialog: MatDialog, private authService: AuthService, private token: TokenStorage) {
  }

  username: string;
  password: string;

  login(): void {
    this.authService.attemptAuth(this.username, this.password).subscribe(
      data => {
        this.token.saveToken(data.token);
        this.router.navigate(['user']);
      }
    );
  }

}
Adding this token manually in the header for all the API requests is not a cleaner way yo do. Hence, we will be implementing a HTTPInterceptor that will intercept all the rquest and add this JWT authorization token in the header. Also, we can intercept the response and for any unauthorized request or expired token we can redirect user to login page.Also, to store this token locally, we can use sessionstorage – The sessionStorage object stores data for only one session (the data is deleted when the browser tab is closed). The interceptor will implement the HttpInterceptor interface and override intercept(). Here, we are cloning the request to set the headers we want.Following is the interceptor implementation.
app.interceptor.ts
import { Injectable } from '@angular/core';
import {HttpInterceptor, HttpRequest, HttpHandler, HttpSentEvent, HttpHeaderResponse, HttpProgressEvent,
  HttpResponse, HttpUserEvent, HttpErrorResponse} from '@angular/common/http';
import { Observable } from 'rxjs/Observable';
import { Router } from '@angular/router';
import {TokenStorage} from './token.storage';
import 'rxjs/add/operator/do';

const TOKEN_HEADER_KEY = 'Authorization';

@Injectable()
export class Interceptor implements HttpInterceptor {

  constructor(private token: TokenStorage, private router: Router) { }

  intercept(req: HttpRequest, next: HttpHandler):
    Observable | HttpUserEvent> {
    let authReq = req;
    if (this.token.getToken() != null) {
      authReq = req.clone({ headers: req.headers.set(TOKEN_HEADER_KEY, 'Bearer ' + this .token.getToken())});
    }
    return next.handle(authReq).do(
        (err: any) => {
          if (err instanceof HttpErrorResponse) {

            if (err.status === 401) {
              this.router.navigate(['user']);
            }
          }
        }
      );
  }

}
Don’t miss out to register this interceptor in app.module.ts.
To store this token in the browser storage, let us define our token.storage.ts
import { Injectable } from '@angular/core';


const TOKEN_KEY = 'AuthToken';

@Injectable()
export class TokenStorage {

  constructor() { }

  signOut() {
    window.sessionStorage.removeItem(TOKEN_KEY);
    window.sessionStorage.clear();
  }

  public saveToken(token: string) {
    window.sessionStorage.removeItem(TOKEN_KEY);
    window.sessionStorage.setItem(TOKEN_KEY,  token);
  }

  public getToken(): string {
    return sessionStorage.getItem(TOKEN_KEY);
  }
}
There are also client side jwt token validator with which we can check the token expiry. Doing so, we don’t have to depend on the server to check for token expiry.
Conclusion
In this article, we learned about integrating JWT token with Angular5 application with spring boot security in the backened. If you liked this post, I would love to hear back in the comment section.
| Published on Java Code Geeks with permission by Dhiraj Ray, partner at our JCG program. See the original article here: Angular5 JWT Authentication(Spring Boot Security) Opinions expressed by Java Code Geeks contributors are their own. |

Great! Thanks!!
how to refresh tpken in both angular 5 and spring boot
can you upload the source on GIT
Please check this url – https://www.devglan.com/spring-security/angular-jwt-authentication for original article.