Introduction
Since the Servlet 3 specification web.xml is no longer needed for configuring your web application and has been replaced by using annotations. In this article, we will look at how to deploy a simple Spring-based application without web.xml to Tomcat 8.5.*.
Creating an Empty Application
Use the following command to create an empty web application using maven webapp archetype:
mvn archetype:generate -DgroupId=info.sanaulla -DartifactId=spring-tomcat-sample
   -Dversion=1.0 -DarchetypeArtifactId=maven-archetype-webapp
Delete the web.xml created in src\main\webapp\WEB-INF and then we need to update the maven-war-plugin not to fail if web.xml is missing, this can be done by updating the plugin information in the build tag as shown below:
<plugin>
  <groupId>org.apache.maven.plugins</groupId>
  <artifactId>maven-war-plugin</artifactId>
  <version>3.1.0</version>
  <executions>
    <execution>
      <id>default-war</id>
      <phase>prepare-package</phase>
      <configuration>
        <failOnMissingWebXml>false</failOnMissingWebXml>
      </configuration>
    </execution>
  </executions>
</plugin>
Setting up dependencies
We would need the following dependencies added to the pom.xml:
<dependency>
  <groupId>javax.servlet</groupId>
  <artifactId>javax.servlet-api</artifactId>
  <version>4.0.0</version>
  <scope>provided</scope>
</dependency>
<dependency>
  <groupId>org.springframework</groupId>
  <artifactId>spring-webmvc</artifactId>
  <version>${spring.version}</version>
</dependency>
<dependency>
  <groupId>org.springframework</groupId>
  <artifactId>spring-jdbc</artifactId>
  <version>${spring.version}</version>
</dependency>
<dependency>
  <groupId>org.thymeleaf</groupId>
  <artifactId>thymeleaf-spring5</artifactId>
  <version>${thymeleaf.version}</version>
</dependency>
<dependency>
  <groupId>nz.net.ultraq.thymeleaf</groupId>
  <artifactId>thymeleaf-layout-dialect</artifactId>
  <version>${thymeleaf-layout-dialect.version}</version>
</dependency>
<dependency>
  <groupId>com.fasterxml.jackson.core</groupId>
  <artifactId>jackson-databind</artifactId>
  <version>${jackson.version}</version>
</dependency>
<dependency>
  <groupId>com.h2database</groupId>
  <artifactId>h2</artifactId>
  <version>${h2.version}</version>
</dependency>
<dependency>
  <groupId>org.projectlombok</groupId>
  <artifactId>lombok</artifactId>
  <optional>true</optional>
  <version>${lombok.version}</version>
</dependency>
And their corresponding version properties are given below:
<properties>
  <maven.compiler.target>1.8</maven.compiler.target>
  <maven.compiler.source>1.8</maven.compiler.source>
  <java.version>1.8</java.version>

  <apache.commons.version>3.6</apache.commons.version>
  <h2.version>1.4.196</h2.version>
  <jackson.version>2.9.2</jackson.version>
  <lombok.version>1.16.18</lombok.version>
  <spring.version>5.0.0.RELEASE</spring.version>
  <thymeleaf.version>3.0.9.RELEASE</thymeleaf.version>
  <thymeleaf-layout-dialect.version>2.2.1</thymeleaf-layout-dialect.version>
</properties>
Configuring H2 Embedded DB
Let us create a configuration bean for configuring our DataSource which is Embedded H2 and creating a Bean of type NamedParameterJdbcTemplate:
@Configuration
public class DBConfiguration {

  @Bean
  public DataSource dataSource() {
    return new EmbeddedDatabaseBuilder()
      .generateUniqueName(false)
      .setName("testdb")
      .setType(EmbeddedDatabaseType.H2)
      .addDefaultScripts()
      .setScriptEncoding("UTF-8")
      .ignoreFailedDrops(true)
      .build();
  }

  @Bean
  public NamedParameterJdbcTemplate namedParamJdbcTemplate() {
    NamedParameterJdbcTemplate namedParamJdbcTemplate =
      new NamedParameterJdbcTemplate(dataSource());
    return namedParamJdbcTemplate;
  }
}
Then we need a SQL script schema.sql which will set up the tables and data.sql will seed them with data each time the application is run. Let us create the corresponding files in src/main/resources:
-- schema.sql
DROP TABLE IF EXISTS person;

CREATE TABLE person(
  id NUMERIC IDENTITY PRIMARY KEY,
  first_name VARCHAR(512) NOT NULL,
  last_name VARCHAR(512) NOT NULL,
  date_of_birth TIMESTAMP NOT NULL,
  place_of_birth VARCHAR(512)
);

-- data.sql
INSERT INTO person(first_name, last_name, date_of_birth, place_of_birth)
VALUES ('First', 'Last', DATE '1990-02-21', 'Bangalore');
INSERT INTO person(first_name, last_name, date_of_birth, place_of_birth)
VALUES ('First2', 'Last2', DATE '1987-02-21', 'Mumbai');
INSERT INTO person(first_name, last_name, date_of_birth, place_of_birth)
VALUES ('First3', 'Last3', DATE '1996-02-21', 'Chennai');
INSERT INTO person(first_name, last_name, date_of_birth, place_of_birth)
VALUES ('First4', 'Last4', DATE '1978-02-21', 'Delhi');
Creating an API Controller
Lets us create a model class Person:
@Data
public class Person {
  private Integer id;
  private String firstName;
  private String lastName;
  private Date dateOfBirth;
  private String placeOfBirth;
}
And a corresponding DAO class PersonDAO:
@Service
public class PersonDAO {

  @Autowired NamedParameterJdbcTemplate jdbcTemplate;

  public List<Person> getPersons(){
    return jdbcTemplate.query("SELECT * FROM person",
      (ResultSet rs, int rowNum) -> {
        Person p = new Person();
        p.setId(rs.getInt("id"));
        p.setFirstName(rs.getString("first_name"));
        p.setLastName(rs.getString("last_name"));
        p.setDateOfBirth(rs.getDate("date_of_birth"));
        p.setPlaceOfBirth(rs.getString("place_of_birth"));
        return p;
    });
  }
}
The API controller is as shown below:
@RestController
@RequestMapping("/api/persons")
public class ApiController {

  @Autowired PersonDAO personDao;

  @GetMapping
  public ResponseEntity<?> getPersons(){
    return ResponseEntity.ok(personDao.getPersons());
  }
}
Deploying app to Tomcat
I assume that you have downloaded Tomcat and extracted to your file system. For development purpose, I prefer to update server.xml to configure the context and point to the exploded war directory as shown below:
<Context path="/sample" reloadable="true"
  docBase="G:\samples\spring-tomcat-sample\target\spring-tomcat-sample" />
For production-related deployments, you can upload the war on to the server.
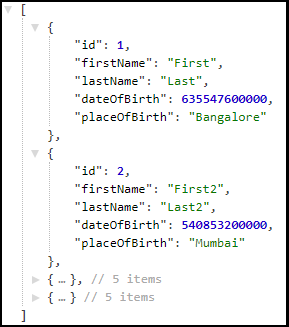
So once you start the server, you can verify if the app has been deployed correctly by visiting the API URL http://localhost:8080/sample/api/persons in the browser to get the data as shown below:
Configuring Thymeleaf
Let us now configure Thymeleaf as our templating engine to serve the UI for our application. Configuring it requires the following bean definitions:
– Technique for resolving the templates. There are many possibilities and we will use Classpath based template resolver
– Create an instance of SpringTemplateEngine and set the template resolver technique
– Setup Spring’s ViewResolver to use the SpringTemplateEngine
@Configuration
public class ViewConfiguration {

  @Bean
  public ClassLoaderTemplateResolver templateResolver() {
    ClassLoaderTemplateResolver templateResolver =
      new ClassLoaderTemplateResolver();
    templateResolver.setPrefix("templates/");
    templateResolver.setSuffix(".html");
    templateResolver.setTemplateMode(TemplateMode.HTML);
    templateResolver.setCacheable(false);
    return templateResolver;
  }

  @Bean
  public SpringTemplateEngine templateEngine() {
    SpringTemplateEngine templateEngine =
      new SpringTemplateEngine();
    templateEngine.setTemplateResolver(templateResolver());
    templateEngine.addDialect(new LayoutDialect());
    return templateEngine;
  }

  @Bean
  public ViewResolver viewResolver() {
    ThymeleafViewResolver viewResolver =
      new ThymeleafViewResolver();
    viewResolver.setTemplateEngine(templateEngine());
    viewResolver.setCharacterEncoding("UTF-8");
    return viewResolver;
  }

}
Creating View Controller
Let us create a simple controller which will serve our UI templates:
@Controller
@RequestMapping("/")
public class ViewController {

  @Autowired PersonDAO personDao;

  @GetMapping
  public String index(Model model) {
    model.addAttribute("persons", personDao.getPersons());
    return "index";
  }
}
Creating a Thymeleaf Based Template
We need to create a template index.html which is returned from the above controller:
<!DOCTYPE html>
<html xmlns="http://www.w3.org/1999/xhtml"
  xmlns:th="http://www.thymeleaf.org">
  <head>
    <link rel="stylesheet"
      href="https://bootswatch.com/4/cerulean/bootstrap.min.css" />
  </head>
  <body>
    <nav class="navbar navbar-expand-lg navbar-dark bg-primary">
      <a class="navbar-brand" href="#">Spring on Tomcat</a>
    </nav>
    <div class="container">
      <div class="page-header"><h1>Spring on Tomcat</h1></div>
      <div class="row">
        <div class="col">
          <ul class="list-group">
            <li class="list-group-item" th:each="p : ${persons}">
            [[${p.firstName}]] [[${p.lastName}]],
            Date Of Birth: [[${#dates.format(p.dateOfBirth, 'dd/MMM/yyyy')}]]
            Place: [[${p.placeOfBirth}]]
            </li>
          </ul>
        </div>
      </div>
    </div>
    <script src="https://bootswatch.com/_vendor/jquery/dist/jquery.min.js"></script>
    <script src="https://bootswatch.com/_vendor/popper.js/dist/umd/popper.min.js"></script>
    <script src="https://bootswatch.com/_vendor/bootstrap/dist/js/bootstrap.min.js"></script>
  </body>
</html>
Conclusion
In this article, we looked at configuring a simple Spring MVC based application without web.xml (without using Spring Boot) and deploying it to Tomcat. We also configured Thymeleaf to render our UI templates. The complete code for this can be found here
| Published on Java Code Geeks with permission by Mohamed Sanaulla, partner at our JCG program. See the original article here: How to Deploy Spring Application Without web.xml to Tomcat Opinions expressed by Java Code Geeks contributors are their own. |
