Spring Cloud solves common problems of distributed systems. However, for someone who works only with widely known monolith applications jumping into the long list of patterns designed for distributed services might be quite overwhelming at the very beginning. This article will take you through the basics of Spring Cloud by taking a practical approach. After finishing, not only you should know how to start a project based on Spring Cloud, but also understand why all steps are required and what problems they solve.
1. First services
Let’s define the problem which we will tackle using Spring Cloud. The aim of this demo is to build the foundation of a distributed blogging platform.
The core component of a distributed system is a service, which is nothing more than a regular application designed to focus on a particular part of the domain. In a complex system, there might be dozens of different services, but for clarity of our demo we will start with just two. The first service will take care of authors while the second one will concentrate on articles.
1.1. Author service
In our case, the author service is a typical Spring Boot application created using spring-boot-starter-web. For now, we don’t use any features of Spring Cloud.
@SpringBootApplication
public class AuthorServiceApplication {

    public static void main(String[] args) {
        SpringApplication.run(AuthorServiceApplication.class, args);
    }

}
Here is an author domain class, which is the main focus of our first service.
class Author {

    private final Long id;
    private final String name;

    //…

}
Finally, we create a REST controller, which allows to fetch all authors or to find a particular one based on his identifier.
@RestController
class AuthorController {

    //…

    @GetMapping
    List<Author> findAll() {
        //…
    }

    @GetMapping("/{id}")
    Author findOne(@PathVariable long id) {
        //…
    }

}
1.2. Article service
The second service is analogous to the previous one. If you need code samples, you can find them in the GitHub repository.
The key point of this step is to realize that instead of one bigger application, we are separating different parts of the domain into smaller and loosely coupled applications. What does it give us? There are many advantages like for instance simpler scalability, resilience, or faster deployments. If you need more theoretical background, I encourage you to check a great book by Sam Newman called Building microservices.
2. Distributed configurations
If you try to start both services on a single machine, it won’t be possible with the default Spring Boot settings since both applications will try to run on the port 8080. You could customize settings and pick different ports in application.properties of each application, which for two services wouldn’t be an issue, but for dozens it could be more problematic.
2.1. Configuration server
For complex distributed systems it is wiser to keep configurations for all services in a single place in order to simplify the whole management process. As befits for a microservice system, these configurations will be served by … another service. Create the application and put the following dependency in your pom.xml.
<dependency>
    <groupId>org.springframework.cloud</groupId>
    <artifactId>spring-cloud-config-server</artifactId>
</dependency>
The main application class in the configuration server doesn’t differ much from other applications. The only difference is the @EnableConfigServer annotation from the previously added Spring Cloud dependency, which is responsible for exposing the API for external configurations.
@SpringBootApplication
@EnableConfigServer
public class ConfigServerApplication {

    public static void main(String[] args) {
        SpringApplication.run(ConfigServerApplication.class, args);
    }

}
2.2. Config location
Where will we keep configurations for our services? Bundling properties within the configuration server JAR file wouldn’t be a flexible solution. Some external location seems to be a better idea. By default, Spring Cloud uses a Git repository to manage configurations. The URI address (and other details) of the Git server can be set in application.properties of the configuration application. Luckily, in our demo we don’t need a separate Git server. For a testing purpose, a local repository works just fine.
server.port=9001
spring.application.name=config-server

spring.cloud.config.server.git.uri=file://${user.home}/config
The location of the Git repository is set with the spring.cloud.config.server.git.uri property. In order to use a real server, the value should be changed to some URL without the file: prefix. We also altered the default port to avoid collision with another services when running on a single machine. In addition, the application received its own name. At this moment it’s not needed, but later on we will use that name as a reference to the configuration server in other services.
2.3. Config repository
Configurations for all services will be kept in the location set in spring.cloud.config.server.git.uri. At this moment we can create two files dedicated to previously developed services in which we will change the default port and assign names just like we did for the configuration server.
Here is the content of the article-service.properties file.
server.port=9003
spring.application.name=article-service
The author-service.properties file at this moment looks almost identical.
server.port=9004
spring.application.name=author-service
Finally, initialize the Git repository and commit both created configurations.
git init
git add .
git commit -m 'Service configs'
3. Service Discovery
The configuration server is ready, but other services still don’t know about its existence and the way how to fetch their configurations. One possible solution of this issue is to directly connect services with the server using Spring Cloud Config Client which can be added with the spring-cloud-starter-config dependency. The main drawback is that we would have to hardcode the address of the configuration server in each service. If the location of this service changes in the future or we would like to provide redundant peers, all services will require an update. The problem of finding other services in a distributed system is solved by the pattern called Service Discovery.
3.1. Registry server
We’ve already created a server for all configurations which was our first infrastructure service. By the same token, now we’re going to develop a registry server, which is another infrastructure service that will act as an address book for all components in our distributed system. Create a new application with the following dependencies.
<dependencies>
    <dependency>
        <groupId>org.springframework.cloud</groupId>
        <artifactId>spring-cloud-starter-eureka-server</artifactId>
    </dependency>
    <dependency>
        <groupId>org.springframework.cloud</groupId>
        <artifactId>spring-cloud-starter-config</artifactId>
    </dependency>
</dependencies>
The first one is responsible for exposing the registry API. The second dependency has already been mentioned and is used to connect with our configuration server, which will also hold the configuration for the registry that we’re creating. The main application class is similar to other Spring Boot apps. We just add the @EnableEurekaServer annotation to expose the registry API.
@SpringBootApplication
@EnableEurekaServer
public class RegistryServerApplication {

    public static void main(String[] args) {
        SpringApplication.run(RegistryServerApplication.class, args);
    }

}
The last missing thing in the registry server is bootstrap configuration. The main part of the configuration will be served by the configuration server, but we need to describe how to find it. Create a bootstrap.properties file in the main/resources directory and add lines presented below which are the address of the configuration server and the name of the registry application used to fetch properties.
spring.cloud.config.name=registry-server
spring.cloud.config.uri=http://localhost:9001
3.2. Exposing registry configuration
The next step is to add the configuration to our Git repository monitored by the configuration server. Create a file called registry-server.properties. It’s important that file’s name matches with the value of the spring.cloud.config.name property in the bootstrap.properties file in the registry server application. The minimal required configuration is presented below. Don’t forget to commit changes to the Git repository.
spring.application.name=registry-server
server.port=9002

eureka.client.register-with-eureka=false
eureka.client.fetch-registry=false
eureka.client.serviceUrl.defaultZone=http://localhost:9002/eureka/
First two properties are typical for an ordinary Spring Boot application. The other three are dedicated to Spring Cloud Eureka Client. By default, each Eureka Server will try to connect to other peer servers to register its presence. In our simple demo we have only a single instance of the registry server, but in a production solution you would probably provide some redundancy of such service. Our registry server isn’t going to connect to anything and that’s why we change the default values to false. Registration events are propagated to all Eureka servers listed in eureka.client.serviceUrl.defaultZone, but even though there is only one as in our case we still need to set this property to override the default value.
3.3. Running registry with external configuration
At this moment we can run both servers to verify if they work as expected. Since the registry server depends on the configuration server, it needs to be started first. After a few seconds, the registry server can also be started. If you didn’t miss any step both applications should run without any errors in the logs. The configuration server should fetch configuration and run on port 9002. After navigating to http://localhost:9002/, the Eureka Dashboard will be displayed with some details about the running instance.
4. Configuration service registration
The fact that our registry service connects with the configuration server doesn’t mean that this server is registered as a service. It’s service’s responsibility to communicate its presence to the distributed register. In order to connect to the registry service, the configuration server needs the following dependency.
<dependency>
    <groupId>org.springframework.cloud</groupId>
    <artifactId>spring-cloud-starter-eureka</artifactId>
</dependency>
It will allow us to use the Eureka client annotation in the main class of the configuration server.
@EnableEurekaClient
public class ConfigServerApplication {
    //…
}
The last thing is the address of the registry server which has to be added to application.properties of the configuration server.
eureka.client.serviceUrl.defaultZone=http://localhost:9002/eureka/
At this moment you might start to wonder how communication between servers will work. The registry server requires configuration from the configuration server, while at the same time the configuration server wants to connect to the registry to notify about its presence. In what order should they communicate?
Actually, nothing changes. You first start the configuration server. Every few seconds it will try to connect with the registry server and print error logs on every failure. Once the registry server is started, it will fetch its configuration and start accepting registrations. Finally, the configuration server will register and no more error logs will be shown. Try it out to confirm if it’s working as expected.
5. Configuration fetching
Our configuration server can be finally discovered by domain services created at the beginning of the article. First, with a small modification we need to repeat all steps from the previous paragraph for both Author and Article services in order to allow communication with the registry service. Just to remind, these steps are:
- Adding dependency on spring-cloud-starter-eureka
- Annotating the main class with @EnableEurekaClient
- Setting eureka.client.serviceUrl.defaultZone in the bootstrap.properties (not in application.properties)
This will allow services to communicate with the registry server, but still won’t fetch any configuration. To automate this process we need another small dependency in our services (please note the same one is used in the registry server).
<dependency>
    <groupId>org.springframework.cloud</groupId>
    <artifactId>spring-cloud-starter-config</artifactId>
</dependency>
Finally, we need to set some additional details in bootstrap.properties. Here is a sample file for the Author service. Analogue properties should be added to the Article service.
spring.cloud.config.name=author-service
spring.cloud.config.discovery.service-id=config-server
spring.cloud.config.discovery.enabled=true
The value of spring.cloud.config.name has to match with the corresponding property file in the config repository served by the configuration server. The second property is used to identify configuration server registered in our Eureka server. This value for a change has to match with the value of spring.application.name present in the application.properties in the configuration server. With the last property we enable configuration discovery process.
You should be able to verify if both services start on ports defined in the centralized configuration. If you turned off configuration and discovery services, start them first and then run domain services. As long as all have been done correctly, both services should respond to the browser on configured ports. In another case make sure you didn’t miss any step or compare your code with the samples in the repository.
6. One Service to rule them all, One Service to find them
At this moment we could actually consider our basic setup as ready, but we’re going to add another piece to the puzzle and learn about a different patter used in distributed system called the Service Gateway. As the name suggests, its purpose is to allow clients to find all services with a single access point. In other words, the gateway acts as a router to distributed services.
6.1. Gateway service
Let’s create the last Spring Boot application in this demo and add dependencies mentioned below. The only new one is spring-cloud-starter-zuul which contains classes needed to create our gateway.
<dependency>
    <groupId>org.springframework.cloud</groupId>
    <artifactId>spring-cloud-starter-zuul</artifactId>
</dependency>
<dependency>
    <groupId>org.springframework.cloud</groupId>
    <artifactId>spring-cloud-starter-eureka</artifactId>
</dependency>
<dependency>
    <groupId>org.springframework.cloud</groupId>
    <artifactId>spring-cloud-starter-config</artifactId>
</dependency>
In addition to previously added annotations, the main class of the application should also use @EnableZuulProxy to declare itself as a proxy gateway.
@SpringBootApplication
@EnableZuulProxy
@EnableEurekaClient
public class GatewayServiceApplication {

    public static void main(String[] args) {
        SpringApplication.run(GatewayServiceApplication.class, args);
    }

}
The application also requires the bootstrap.properties file with values similar to previously configured domain services. There’s nothing new here that needs explanation.
spring.cloud.config.name=gateway-service
spring.cloud.config.discovery.service-id=config-server
spring.cloud.config.discovery.enabled=true

eureka.client.serviceUrl.defaultZone=http://localhost:9002/eureka/
6.2. Configuration fetching
Just like for other regular services, the gateway depends on the configuration stored in the Git repository managed by the configuration server. Create a file with name gateway-service.properties, set its content with the following values, and then commit changes to the configuration repository.
spring.application.name=gateway-service
server.port=8080

zuul.routes.author-service.path=/authors/**

zuul.routes.article-service.path=/articles/**
We already know the first two values. The other two are more interesting. Here we define that for the given URL patterns all requests to the gateway should be forwarded to services identified by their names. Note that we don’t couple the gateway with any particular host addresses of these services. The gateway will find them using the previously created discovery service.
6.3. Final basic setup verification
After starting the gateway, the application should listen on port 8080. Try accessing both domain services with configured mappings:
http://localhost:8080/articles
http://localhost:8080/authors
The gateway pattern allows us to decouple clients of our API from particular hosts on which services are running. Only the address of the gateway has to be shared with clients. The gateway can also take care of load balancing for duplicated services, but let’s leave this topic for another time.
7. Summary
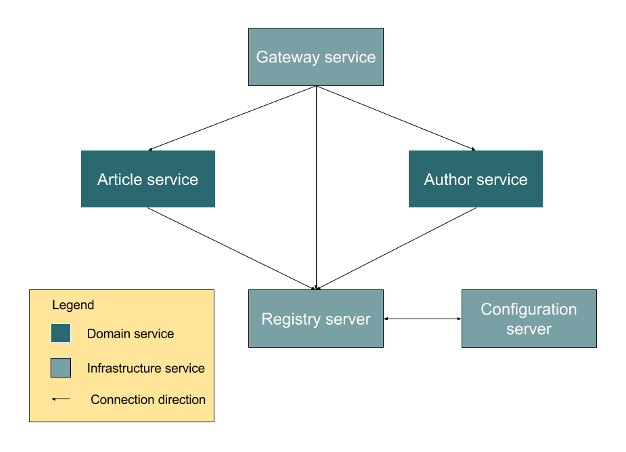
At the first glance the basic Spring Cloud setup might seem to be quite complex, especially in comparison with a typical monolith application base. There are many more building blocks that create a system. Yet, each component has its own purpose designed with the Single Responsibility Principal in mind. We learned about three fundamental patterns used in the microservice architecture which are Service Discovery, Distributed Configuration, and Service Gateway. Each of them has a dedicated application which focuses only on a single task. Dividing responsibilities is the main essence of the microservice architecture and even the small demo we created greatly depicts this idea in practice.
| Published on Java Code Geeks with permission by Daniel Olszewski, partner at our JCG program. See the original article here: Spring Cloud – Basic setup Opinions expressed by Java Code Geeks contributors are their own. |

Thanks, Daniel. Such a great explanation.