In this article, we cover how to develop an Android IoT app that uses Android Things. In more details, this Android IoT app will send data, acquired from the sensors, to the cloud. This IoT app helps us to introduce some important aspects about programming Android Things app that uses sensors.
As you may already know, Android Things is the new IoT OS developed by Google, that brings the power of Android to the IoT. Using Android Things, we can reuse the Android knowledge to build Android Things app using almost the same APIs. To this purpose, in this tutorial, we will explore how to send the data acquired by the sensors directly to the cloud using an IoT cloud platform: Ubidots. Moreover, this Android IoT app will log all the data acquired by the sensors to the cloud. At the end of this tutorial, you will be able to develop an Android Things app with cloud support. This is a common scenario in an IoT project so it is useful to investigate. Moreover, you can further improve this Android IoT app to support other kinds of sensors or to send data to a different cloud platform. This is a general purpose project that can be customized according to your need and your cloud platform specifications. If you want to try other IoT cloud platform you can read this article listing all the free IoT platforms.
To build this project we will use:
- A Temperature, Pressure and humidity sensor BMP280
- A raspberry Pi 3 to runs the Android Things OS
Moreover, the Android IoT app uses:
How to connect Android Things to the BMP280 sensor and read data
In this step, we will cover how to connect the BMP280 to the Android Things. The BMP280 is an I2C sensor, that means we need four different wires to connect it:
- Vcc (+3v)
- GND
- CLK (Clock)
- SDA (data)
In this tutorial, as said previously, we use a Raspberry Pi 3 board, then, according to the board pinout the connections looks like the picture shown below:

Once the wires are connected correctly, we can focus our attention on the Android IoT app development. If this is the first time you use Android Things, it is important you read this tutorial about how to get started with Android Things. Anyway, as the first step, you have to clone the template repository from GitHub. This is an empty project made for Android Studio, that we will use to build our Android IoT app. Let us start building the app.
The first step is adding the Android Things driver that the Android Things app uses to exchange data with the sensor. To this purpose, open gradle.build (app level) and add the following line:
dependencies {
  ....
  compile 'com.google.android.things.contrib:driver-bmx280:0.4'
  ...
}
The purpose of this app is acquiring data continuously from the sensor, then it is necessary to implement the same approach used in Android when the app monitors a sensor.
Acquire data from sensors using Android Things: SensorManager, Listeners, and Drivers
Android Things provides an elegant way to monitor the status of a sensor using listeners. In MainActivity, add the following lines:
private Bmx280SensorDriver sensor;
private SensorManager manager;

@Override
protected void onCreate(Bundle savedInstanceState) {
  super.onCreate(savedInstanceState);
  Log.d(TAG, "onCreate");
  try {
    manager = (SensorManager) getSystemService(Context.SENSOR_SERVICE);
    registerSensors();
    sensor = new Bmx280SensorDriver(pin);
    sensor.registerTemperatureSensor();
    sensor.registerPressureSensor();
  }
  catch(IOException ioe) {
   ioe.printStackTrace();
  }
}
The code above is quite simple:
- the app gets a reference of SensorManager
- the app registers sensors listeners to get notified when the sensors read new values
- it initializes the BMP280 driver
- it registers the dynamic sensor callback (temperature and pressure)
Let us skip for awhile the step 2 and focus our attention on step 3 and 4. In step 3, the Android IoT app creates a new instance of Bmx280Sensor driver using the pin name where the sensor is connected. For Raspberry Pi 3 the pin is I2C1.
Before registering the listeners to get the new values from sensors, it is necessary to register the two different listeners that are notified when the sensor is connected to the Android Things. This BMP280 sensor reads two physical properties so it is considered as double sensors. Finally, the code to register the value listeners:
private void registerSensors() {
  manager.registerDynamicSensorCallback(new SensorManager.DynamicSensorCallback() {
    @Override
    public void onDynamicSensorConnected(Sensor sensor) {
      if (sensor.getType() == Sensor.TYPE_AMBIENT_TEMPERATURE) {
        manager.registerListener(tempListener, sensor,
                SensorManager.SENSOR_DELAY_NORMAL);
      }
      else if(sensor.getType() == Sensor.TYPE_PRESSURE) {
        manager.registerListener(pressListener, sensor,
                SensorManager.SENSOR_DELAY_NORMAL);
     }
   }
 });
}
The method onDynamicSensorConnected is invoked as soon as the sensor is connected to the board. In this moment, the app can register the two listeners that will be notified when the sensor read new values.
The last step is reading data from sensor:
private SensorEventListener tempListener = new SensorEventListener() {
          @Override
          public void onSensorChanged(SensorEvent event) {
             // new value read
          }

          @Override
          public void onAccuracyChanged(Sensor sensor, int accuracy) {
          }
       };
private SensorEventListener pressListener = new SensorEventListener() {
          @Override
          public void onSensorChanged(SensorEvent event) {
            // new value read
          }

          @Override
          public void onAccuracyChanged(Sensor sensor, int accuracy) {
          }
      };
As you may already guess, in the method onSensorChanged, the app will send the new value to the cloud. In this phase, you can test the Android IoT app and check if it reads the data from the sensor. Anyway, before using the app, it is necessary to add these permissions in the Manifest.xml:
<uses-permission android:name="com.google.android.things.permission.MANAGE_INPUT_DRIVERS" />
<uses-permission android:name="com.google.android.things.permission.MANAGE_SENSOR_DRIVERS" />
Configure Ubidots to get data from Android IoT app
This step describes how to configure Ubidots to accept data coming from Android Things app. Before starting, it is necessary to have a free Ubidots account. Then, we have to configure the device that represents our device. This topic is covered in several posts also on this blog, so you can referer to this article: how to configure Ubidots for an IoT project:
The next step is adding the variables that will hold the values sent from Android app:
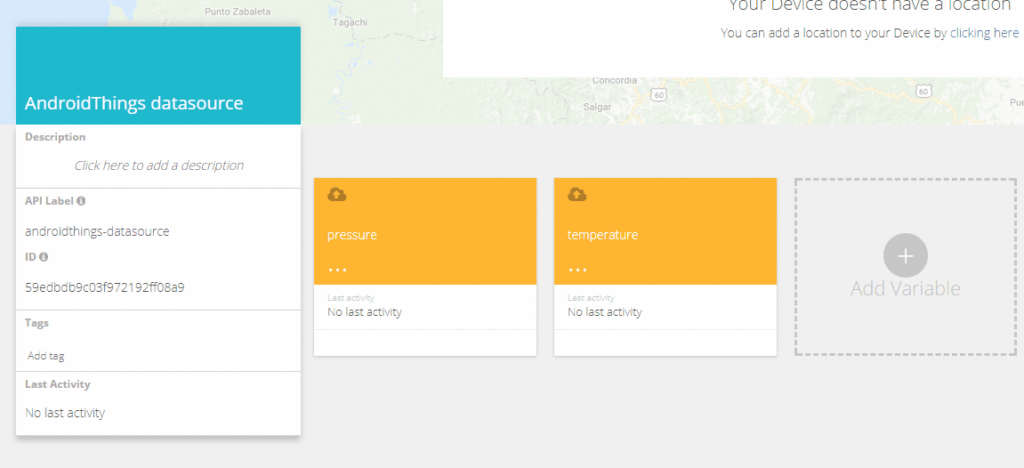
That’s all, all the next steps necessary to configure Ubidots are completed. We can focus on the last step of sending data to the cloud.
Sending data from Android Things to the cloud
In this last step of this project, the Android IoT app sends data to the cloud. To this purpose, the app uses the libraries developed for Android apps that simplify the Android app programming.
Ubidots exposes a set of API that the app can use to send data. These are JSON API. In this context, Retrofit library and Gson are very useful.
Let us add the dependencies in the build.gradle:
dependencies {
  ...
  compile 'com.squareup.retrofit2:retrofit:2.3.0'
  compile 'com.google.code.gson:gson:2.8.2'
  compile 'com.squareup.retrofit2:converter-gson:2.3.0'
}
The Ubidots API the app calls is /api/v1.6/collections/values that accepts a JSON array holding:
- variable id
- variable value
where the variable id is the unique variable identifier provided by Ubidots and the value is the value the app sends. To develop an Android IoT app that invokes this API, we use Retrofit. Briefly, this library simplifies the process of invoking JSON API. To this purpose, the first step is developing a Java interface that represents the API invoked:
public interface UbiAPI {
 @POST("/api/v1.6/collections/values")
 public Call<ResponseBody> sendValue(
        @Body ArrayList<Data> dataList, @Query("token") String token);
}
The annotation @POST declares the API context, while the method defined in the interface represents the method the app invokes to send the data. This method accepts as body an array of Data and a token that identifies our app. The Data class is:
import com.google.gson.annotations.Expose;
import com.google.gson.annotations.SerializedName;

public class Data {

    @SerializedName("variable")
    @Expose
    private String variable;
    @SerializedName("value")
    @Expose
    private Double value;

    public String getVariable() {
        return variable;
    }

    public void setVariable(String variable) {
        this.variable = variable;
    }

    public Double getValue() {
        return value;
    }

    public void setValue(Double value) {
        this.value = value;
    }
}
This class holds the variable id and the value and describes how to convert these values to JSON format. Finally, we have to define the client that handles the communication to Ubidots:
public class UbiClient {
    private static final String TAG = UbiClient.class.getSimpleName();
    private static final String UBI_BASE_URL =  "http://things.ubidots.com/";

    private static UbiClient client;
    private UbiAPI api;
    private Retrofit retroClient;

    private UbiClient() {
        retroClient = new Retrofit.Builder()
            .baseUrl(UBI_BASE_URL)
            .addConverterFactory(GsonConverterFactory.create())
            .build();
    }

    public static final UbiClient getClient() {
      if (client != null)
          return client;

      client = new UbiClient();
      return client;
    }


    private UbiAPI getUbiClient() {
        return retroClient.create(UbiAPI.class);
    }

    public void sendData(ArrayList<Data> dList, String token) {
      api = client.getUbiClient();
      Call c = api.sendValue(dList, token);
      c.enqueue(new Callback() {
         @Override
         public void onResponse(Call call, Response response) {
            Log.d(TAG, "onResponse");
            Log.d(TAG, "Result:" + response.isSuccessful());
         }

         @Override
         public void onFailure(Call call, Throwable t) {
             t.printStackTrace();
         }
      });
   }
}
That’s all. We have our client that connects to Ubidots and sends data. The last step is modified the code shown above, where the app reads the sensor values and add the following code to send the data to the cloud:
private SensorEventListener tempListener = new SensorEventListener() {
   @Override
   public void onSensorChanged(SensorEvent event) {

       final Data dTemp = new Data();
       dTemp.setValue( (double) event.values[0]);
       dTemp.setVariable("59edbdc7c03f9721cc571662");
       UbiClient.getClient().sendData(new ArrayList<Data>(){{
          add(dTemp);
       }}, token);
    }

    @Override
    public void onAccuracyChanged(Sensor sensor, int accuracy) {
    }
 };

private SensorEventListener pressListener = new SensorEventListener() {
    @Override
    public void onSensorChanged(SensorEvent event) {

      final Data dPress = new Data();
      dPress.setVariable("59edbdcec03f97212ff872c6");
      dPress.setValue( (double) event.values[0]);
      UbiClient.getClient().sendData(new ArrayList<Data>(){{
           add(dPress);
      }}, token);
   }

   @Override
   public void onAccuracyChanged(Sensor sensor, int accuracy) {
   }
 };
The interesting piece of code is the part that sends data where the app builds the information to send to the cloud:
final Data dPress = new Data();
// Variable id
dPress.setVariable("59edbdcec03f97212ff872c6");
dPress.setValue( (double) event.values[0]);
UbiClient.getClient().sendData(new ArrayList<Data>(){{
     add(dPress);
}}, token);
Do not forget, to add the permission to connect to the internet in the Manifest.xml
<uses-permission android:name="android.permission.INTERNET" />
Running the app and accessing to the Ubidots dashboard the result is:

Summary
At the end of this article, you, hopefully, gained the knowledge about how to develop an Android IoT app that uses Android Things to send data the cloud. Moreover, you gained the knowledge about using I2C sensor with Android Things.
| Published on Java Code Geeks with permission by Francesco Azzola, partner at our JCG program. See the original article here: How to develop an Android IoT app using Android Things and Cloud Opinions expressed by Java Code Geeks contributors are their own. |
