In this post, we will describe how to use voice to control IoT devices. In other words, in this article, we will use our voice to send a set of commands to an IoT device. During this post, we will build a voice-activated IoT project. This is an interesting topic because this project uses a different way to interact with IoT device. Usually, we are used to interacting with a device using a simple user interface exposed by the device or a using a smartphone app that sends commands to the device.
How to use voice to control IoT device – Project overview
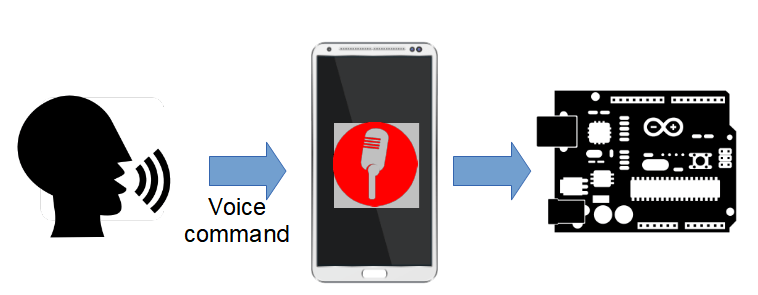
The idea that stands behind this project is exploring how to use voice commands to control a device like Arduino or ESP8266. To build this voice-activated project, we develop an Android app that is the mean that captures the user’s voice and transforms it into a set of commands that are sent to the device. The picture below describes the project overview:
In more details this project is made by two different sub-systems:
- Android app
- IoT app
The Android app takes care to interact with the user and listens to the voice commands. Next, the app translates the voice commands into commands that the IoT device can understand. In this article, as IoT device, we will use an ESP8266 WeMos that controls a NeoPixel Ring. You can use an Arduino Uno instead of the ESP or a MKR1000.
How to develop a speech recognition Android app
The first step in this project is developing an Android app that recognizes user speech. Fortunately, Android provides a built-in system that is able to recognize the user words. The app user interface is very simple. There is only one button that we use to start sending commands: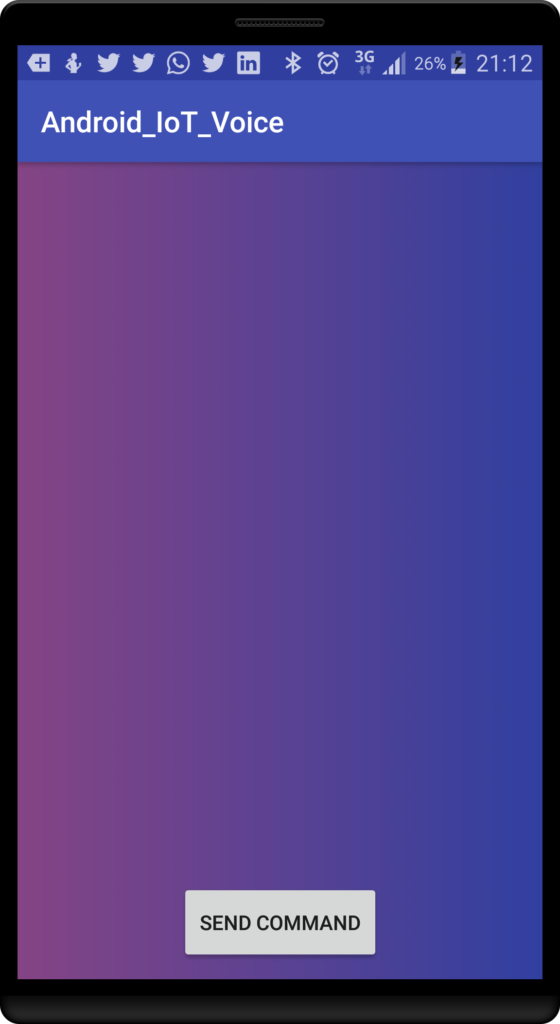
The layout is very simple as shown below:
01 02 03 04 05 06 07 08 09 10 11 12 13 14 15 16 17 18 19 20 21 | <android.support.constraint.ConstraintLayout android:layout_width="match_parent" android:layout_height="match_parent" tools:context="com.survivingwithandroid.voice.MainActivity" android:id="@+id/mainView" android:background="@drawable/bg_gradient"> <Button android:layout_width="wrap_content" android:layout_height="wrap_content" app:layout_constraintLeft_toRightOf="parent" app:layout_constraintRight_toLeftOf="parent" android:text="Send command" android:id="@+id/btnCommand" app:layout_constraintBottom_toBottomOf="parent" android:layout_marginBottom="15dp"/></android.support.constraint.ConstraintLayout> |
The next step is overriding in the MainActivity.java the onCreate method:
01 02 03 04 05 06 07 08 09 10 11 12 | @Overrideprotected void onCreate(Bundle savedInstanceState) { super.onCreate(savedInstanceState); setContentView(R.layout.activity_main); btn = (Button) findViewById(R.id.btnCommand); btn.setOnClickListener(new View.OnClickListener() { @Override public void onClick(View v) { startVoiceCommand(); } });} |
where the startVoiceCommand() is the method that handles the voice interaction with the user.
In this context, to capture the user’s voice the app uses an Intent delegating all the hard work to the Android OS:
01 02 03 04 05 06 07 08 09 10 11 12 13 | private void startVoiceCommand() { Log.d(TAG, "Starting Voice intent..."); Intent i = new Intent(RecognizerIntent.ACTION_RECOGNIZE_SPEECH); i.putExtra(RecognizerIntent.EXTRA_LANGUAGE_MODEL, RecognizerIntent.LANGUAGE_MODEL_FREE_FORM); i.putExtra(RecognizerIntent.EXTRA_LANGUAGE, Locale.getDefault()); i.putExtra(RecognizerIntent.EXTRA_PROMPT, "Tell me, I'm ready!"); try { startActivityForResult(i, REQ_SPEECH_RESULT); } catch (Exception e) { Snackbar.make(v, "Speech to text not supported", Snackbar.LENGTH_LONG).show(); }} |
This method is very simple, it invokes the intent RecognizerIntent.ACTION_RECOGNIZE_SPEECH providing some configuration parameters as the current locale and the message we want to show to the user. When the user clicks on the button the app shows the dialog waiting for the voice input. Finally, the app starts the intent waiting for the result: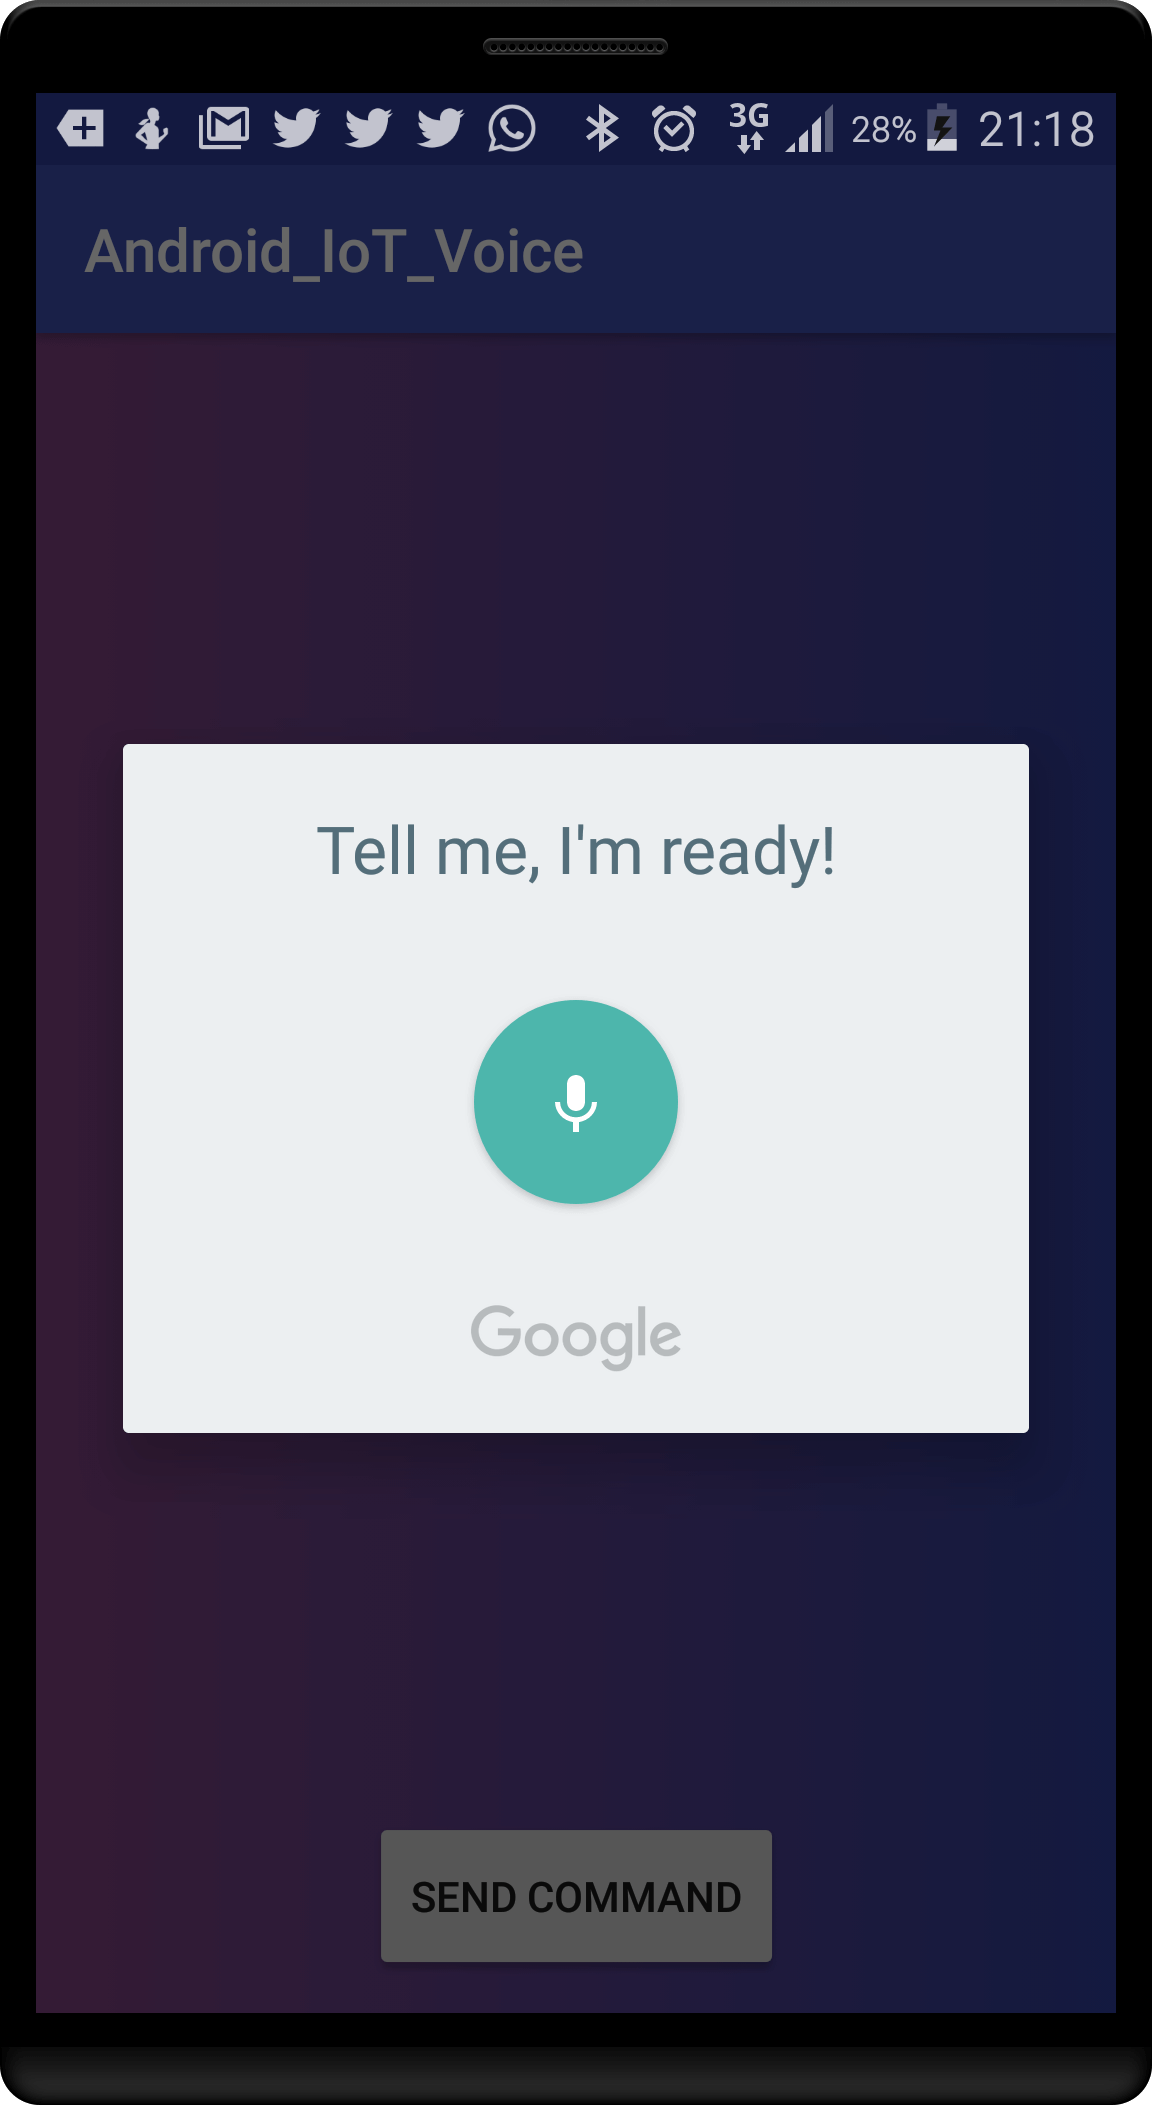
To this purpose, the app overrides the method onActivityResult:
01 02 03 04 05 06 07 08 09 10 11 12 13 | @Overrideprotected void onActivityResult(int requestCode, int resultCode, Intent data) { super.onActivityResult(requestCode, resultCode, data); // Check the Request code if (requestCode == REQ_SPEECH_RESULT) { Log.d(TAG, "Request speech result.."); ArrayList<String> results = data.getStringArrayListExtra(RecognizerIntent.EXTRA_RESULTS); String command = results.get(0); Log.d(TAG, "Current command ["+command+"]"); // Now we send commands to the IoT device }} |
In the method above, the app extracts the command and according to it invoke the ESP8266 to set the ring LEDs color. In this example, the Android IoT voice app handles simple commands like Red, Green, Blue and so on.
How to exchange data with ESP8266 from the Android app
In this step of this project explaining how to use voice to send commands to an IoT device, we implement the network communication. By now, we can suppose that the ESP8266 exposes a method that the Android app invokes to set the ring colors. In this context, we can suppose that the ESP8266 exposes a RESTful API. In order to invoke this API, the app uses an HTTP connection. To this purpose, it is necessary to create a new class called IoTConnectionHandler that handles all the network details. The class is shown below:
01 02 03 04 05 06 07 08 09 10 11 12 13 14 15 16 17 18 19 20 21 22 23 24 25 26 27 28 29 30 31 32 33 34 35 36 37 | public class IoTConnectionHandler { private static IoTConnectionHandler me; private OkHttpClient client; private static final String TAG = IoTConnectionHandler.class.getName(); private static final String IOT_URL = private IoTConnectionHandler() { client = new OkHttpClient(); } public static IoTConnectionHandler getInstance() { if (me == null) me = new IoTConnectionHandler(); return me; } public void sendData(String data) { Request req = new Request.Builder() .url(IOT_URL + data) .build(); client.newCall(req).enqueue(new Callback() { @Override public void onFailure(Call call, IOException e) { Log.e(TAG, "Connection error", e); } @Override public void onResponse(Call call, Response response) throws IOException { Log.i(TAG, "Command sent"); } }); }} |
It is very simple and it uses OkHTTP library. Notice that the data parameter holds the color hex code retrieved from the voice command.
The next part is implementing the IoT side of the project that receives the color hex code using the API exposed by the device and set the LEDs color.
How to develop an IoT device controlled by voice
In this step of this voice-controlled IoT device, we will develop the code necessary to:
- expose an API invoked by the Android app
- control a Neopixel RGB ring
Before diving into the IoT project details, it is useful to know how to connect the ESP8266 to the Neopixel RGB ring:![]()
To simplify the code development the IoT devices uses these two libraries:
The first one is used to control the LEDs ring while the second library is necessary to expose some functions in the sketch as API. If you are new to this library, you can read my previous post describing how to expose Arduino functions as API.
The code below is the sketch:
01 02 03 04 05 06 07 08 09 10 11 12 13 14 15 16 17 18 19 20 21 22 23 24 25 26 27 28 29 30 31 32 33 34 35 36 37 38 39 40 41 42 43 44 45 46 47 48 49 50 51 52 53 54 55 56 57 58 59 60 61 62 63 64 65 66 67 68 69 70 71 72 73 74 75 | #include <Adafruit_NeoPixel.h>#include <ESP8266WiFi.h>#include <aREST.h>#define PIN D2#define NUMS 12#define SERVER_PORT 8080// Neopixel ringsAdafruit_NeoPixel pixels = Adafruit_NeoPixel(12, PIN, NEO_GRB + NEO_KHZ800);aREST rest = aREST();char *ssid = "xxxxx";char *pwd = "xxx";// Let us create the serverWiFiServer server(SERVER_PORT);void setup() { Serial.begin(9600); pixels.begin(); pixels.setBrightness(85); // Register the function rest.function("ring", setColor); WiFi.begin(ssid, pwd); Serial.println("Connecting to WiFi..."); while (WiFi.status() != WL_CONNECTED) { delay(1000); Serial.println("Try again...."); } Serial.println("WiFi connected..."); // let us start the server server.begin();}void loop() { WiFiClient client = server.available(); if (!client) { return ; } while (!client.available()) { delay(1); } rest.handle(client);}int setColor(String color) { Serial.println("Hex color [" + color + "]"); long tmpColor = strtol( &("#" + color)[1], NULL, 16); Serial.println("Int ["+String(tmpColor)+"]"); int r = tmpColor << 16; int g = tmpColor << 8 & 0xFF; int b = tmpColor & 0xFF; Serial.print("Red [" + String(r) + "]"); Serial.print("Green [" + String(g) + "]"); Serial.println("Blue [" + String(b) + "]"); for (int i = 0; i < 12; i++) pixels.setPixelColor(i, pixels.Color(r,g,b)); pixels.show(); return 1;} |
In details, at the beginning, the sketch tries to connect to the WiFi network. To this purpose, you have to provide the WiFi ssid and the password. Once the connection is established, the sketch configures the server and its port. Moreover, it declares the function we want to export as API.
The last of part is the method used to control the Neopixel ring.
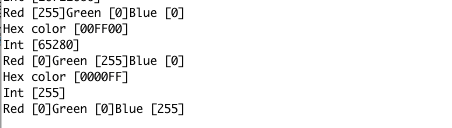
As soon as we send a voice command to the IoT device app shows these logs:
Summary
At the end of this post, you know how to use voice to control an IoT device. In more details, you have explored how to connect and Android app with an ESP8266 and how to use voice to interact with it.
| Published on Java Code Geeks with permission by Francesco Azzola, partner at our JCG program. See the original article here: How to use Voice to control IoT devices using Android Opinions expressed by Java Code Geeks contributors are their own. |

Now that Google Assistant is available on Android phones, all that Android code is mostly useless with Google Assistant and IFTTT.
You can define what IFTTT calls receipes, that performs HTTP calls either directly on you ESP8266 if it’s open to the net (bad idea if you want my opinion) or to your home automation gateway (better idea).
Well, I wouldn’t say the code is useless. First of all, this article uses a different approach to the problem to command a device using voice.
While with using IFTTT you have to send the data over the net, in this article you can use just your smartphone in your network.
I’d say it is a different approach. Moreover, your ESP826 should be exposed to net or your a gateway to achieving the same result i’m showing in the article.