This post describes how to build an Android IoT app for Android Things. As you may already know, recently Google has released a new IoT operating system called Android Things. Android Things is OS derived from Android and the interesting part is that we can re-use our Android knowledge to develop Android IoT app. Before diving into Android IoT app, it is important you know what is Android Things and how it works.
The goals of this post are:
- Build a simple RGB led controller using Android IoT app
- Build an Android IoT app that uses a UI developed using Android API
We will use to this purpose Raspberry Pi 3 as IoT prototyping board. Even if you can use other development boards compatible with Android Things.
If you are eager to know the final result, the video below shows the Android IoT app in action:
This Android IoT app helps you to familiarize with new Android Things APIs. Moreover, this IoT app is useful to have an overview about to develop an Android IoT app UI.
Getting started Android IoT app
Usually, an IoT project has two sides: an electric/electronic side and the software side. To keep things simple so that we can focus our mind on the Android IoT app, this IoT application controls a simple RGB led (common anode). This RGB led is connected to Raspberry using 220Ω resistor, one for each color. The schematic diagram is shown below:
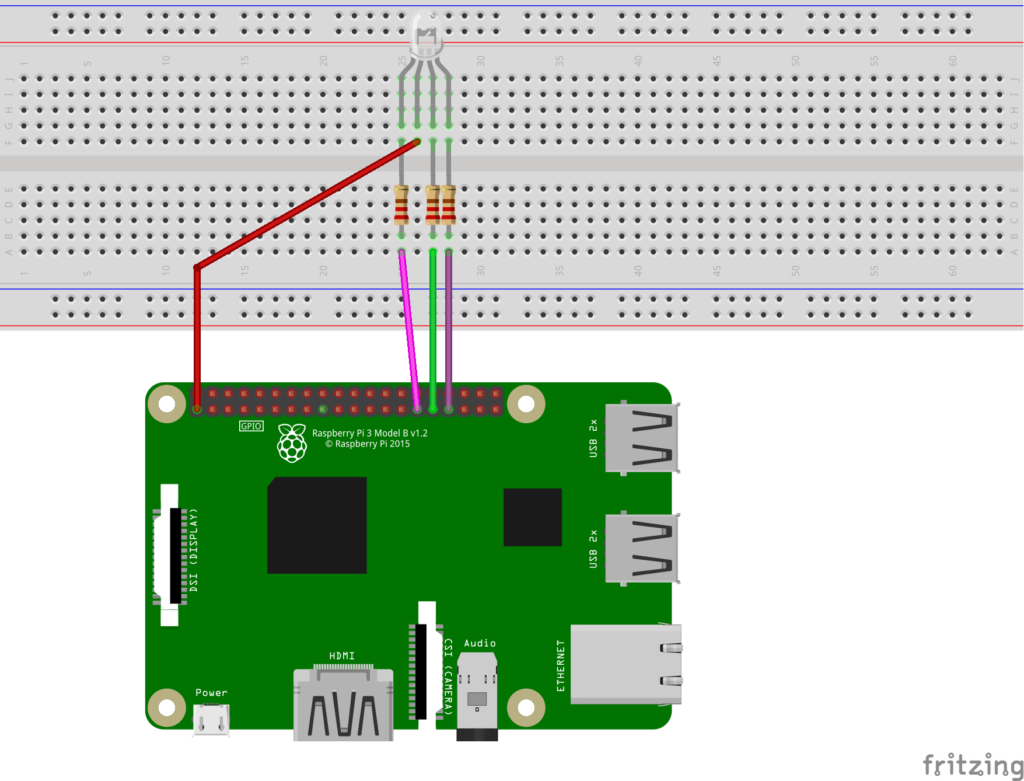
The RGB led is a common anode led, so Raspberry Pi 3 powers the pin anode. The RGB pins, that control the led color, are connected to Raspberry pins:
- Pin 29
- Pin 31
- Pin 33
These pin numbers are important because later we will use them in the Android IoT app. Check twice the connections before powering Raspberry on.
Now it is time to create the IoT application using Android studio. The first step is configuring the Android IoT project using build.gradle:
dependencies {
  provided 'com.google.android.things:androidthings:0.1-devpreview'
}
Android Things uses Activity as we are used in Android. So let’s create a class called RGBThingActivity and in onCreate method we handle Pin communication.
Android Thing PeripherManagerService
To handle the communication to the RGB led, we use GPIO Pins. GPIO pins use a programmable interface to read the device status or to set the output value (High or Low). Using Raspberry GPIO Pins, we turn on or turn off the three color components (Red, Green and Blue).
Android Things SDK provides a service called PeripheralManagerService to abstract the GPIO communication interface. We have to use it every time we want to read or write data. At the beginning, the Android IoT app initializes the service and then set the pin values:
try {
  PeripheralManagerService manager = new PeripheralManagerService();
  blueIO = manager.openGpio("BCM5");
  blueIO.setDirection(Gpio.DIRECTION_OUT_INITIALLY_LOW);
  greenIO = manager.openGpio("BCM6");
  greenIO.setDirection(Gpio.DIRECTION_OUT_INITIALLY_HIGH);
  redIO = manager.openGpio("BCM13");
  redIO.setDirection(Gpio.DIRECTION_OUT_INITIALLY_LOW);
  redIO.setValue(false);
  blueIO.setValue(false);
  greenIO.setValue(false);
}
catch (IOException e) {
  Log.w(TAG, "Unable to access GPIO", e);
}
This piece of code introduces some new important new aspects. First of all, we have to select the right pins. If we are used to Raspberry, we know that each pin has a corresponding number. In the same way, Android Things uses the same addressing model, anyway the pins are named in a different way. Using the Raspberry pin reference you can know each pin address. These address names are used in the code above. For example, to use the Pin BCM5 (or Pin 29), the code is:
blueIO = manager.openGpio("BCM5");At the beginning, we turn all the pin to low (or off), so the led is off. Changing the pins values: low to high or high to low we have different led colors.
Android IoT app UI
Another interesting feature provided by Android Things is the UI interface. We can develop a UI interface for Android IoT app in the same way we develop Android UI. As in an Android app, the UI is in XML format. In this example, we want to control the RGB led using three switchings:
<?xml version="1.0" encoding="utf-8"?>
  <LinearLayout xmlns:android="http://schemas.android.com/apk/res/android" android:orientation="vertical"
            android:layout_width="match_parent"
            android:layout_height="match_parent">

 <Switch android:text="Red"
         android:layout_width="wrap_content"
         android:layout_height="wrap_content"
         android:id="@+id/switchRed"
         android:layout_marginTop="20dp"/>

 <Switch android:text="Green"
        android:layout_width="wrap_content"
        android:layout_height="wrap_content"
        android:id="@+id/switchGreen"
        android:layout_marginTop="20dp"/>

 <Switch android:text="Blue"
         android:layout_width="wrap_content"
         android:layout_height="wrap_content"
         android:id="@+id/switchBlue"
         android:layout_marginTop="20dp"/>

</LinearLayout>
In onCreate method, the app sets the layout:
@Override
protected void onCreate(Bundle savedInstanceState) {
  super.onCreate(savedInstanceState);
  setContentView(R.layout.activity_main);
..}
and to handle user switch:
Switch switchRed = (Switch) findViewById(R.id.switchRed);
switchRed.setOnCheckedChangeListener(
  new CompoundButton.OnCheckedChangeListener() {
    @Override
    public void onCheckedChanged(CompoundButton buttonView,
             boolean isChecked) {
      try {
        redIO.setValue(!isChecked);
      }
      catch (IOException e) {
         Log.w(TAG, "Red GPIO Error", e);
      }
   }
});
You have to repeat the same piece of code for other pins. The final result is below:
The last aspect is the Manifest.xml. To use our app we have to add inside the application tag:
<uses-library android:name="com.google.android.things"/>
and then declare that our Activity is an IoT activity and it starts at boot:
<intent-filter>
    <category android:name="android.intent.category.IOT_LAUNCHER"/>
    <category android:name="android.intent.category.DEFAULT"/>
</intent-filter>
Conclusions
At the end of this post, you know a bit better how to use Android Things. The interesting aspect is that using a few new APIs Android developers can be ready to the next technological revolution called IoT. Moreover, the development process is the same used in Android app.
Using a few code lines, an Android developer can build an Android IoT app.
| Reference: | Building Android IoT app for Android Things from our JCG partner Francesco Azzola at the Surviving w/ Android blog. |
