Tools for Deep Learning development
To start playing with Deep Learning one have to pick a proper tool for it. Python ecosystem tools for Deep Learning such as Keras, Theano and TensorFlow are easy to install and start development. Below follows a guide on how to install them on Windows and Linux operating systems.
What are those Theano, TensorFlow and Keras all about?
A few words about those tools from official websites.
Theano is a Python library that allows you to define, optimize, and evaluate mathematical expressions involving multi-dimensional arrays efficiently.
TensorFlow™ is an open source software library for numerical computation using data flow graphs.
Keras is a high-level neural networks library, written in Python and capable of running on top of either TensorFlow or Theano. It was developed with a focus on enabling fast experimentation. Being able to go from idea to result with the least possible delay is key to doing good research.
Windows Strikes Back or a Big Surprise
A few days ago after upgrading to Ubuntu 16.04 from 15.10 I wanted to run some code example in TensorFlow but I found out that TensorFlow was not working. So I switched to Windows thanks to a dual-boot installation and to my amazement found that Keras -> Theano and Keras -> TensorFlow can be installed and run there very easily with some caveats. So let’s proceed to installation steps.
Prerequisites for Windows 7 or 10
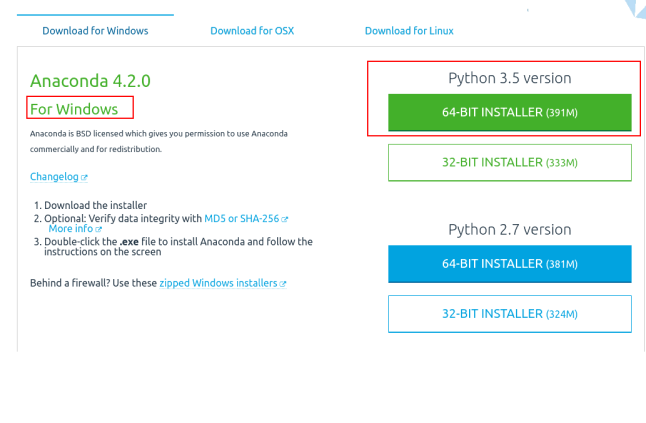
It is possible to install Theano and Keras on Windows with Python 2 installation. However, if you want to be able to work on both Theano and TensorFlow then you need to install Python 3.5. As of now TensorFlow 0.12 is supported on 64 bit WIndows with Pythin 3.5. The steps below aim at providing support for Theano and TensorFlow.
Anaconda Is Very Helpful
Anaconda is an open source packaging tool for Python and other languages. It is very helpful, easy to use and intuitive with detailed tutorials. It will help us install Python and all the dependencies for Keras, Theano and TensorFlow with only a few directives. Anaconda is brought to you by Continuum Analytics.
So if you have 64 bit Windows PC or a VM do the following steps.
- Install Anaconda for 64 bit OS. This process takes a few minutes and a few hundreds MB of space.
- After Anaconda was installed open terminal and Install Theano.
- When you are asked about installing dependencies click ‘y’ for yes.
C:\>conda install theano
- To enable gcc compiler for Theano install following
- When you are asked about installing dependencies click ‘y’ for yes.
C:\>conda install mingw libpython
- That’s it theano is installed. To check what version is installed
C:\>conda list theano
- To install TensorFlow and Keras we’ll need to use pip Python packaging manager which is included in Anaconda
C:\>pip install tensorflow
C:\>pip install keras
- To figure out what is the current backend type
C:\>python -c "from keras import backend; print(backend._BACKEND)"
- To be able to change what backend Keras will use it is possible to edit keras.json configuration file. It may be found at
C:\Users\relevantUser\.keras\keras.json
- Change the “backend” string to “theano” or “tensorflow” according to your needs.
{
"image_dim_ordering": "tf",
"epsilon": 1e-07,
"floatx": "float32",
"backend": "theano"
}- To test that they work at all let’s run this example in Python interpreter line by line
C:\>python
>>> import theano
>>> from theano import tensor
>>> a = tensor.dscalar()
>>> b = tensor.dscalar()
>>> c = a + b
>>> f = theano.function([a,b],c)
>>> result = f(1.5, 2.5)
>>> print(result)
4.0
>>>
- To see that Keras is really functioning there is a need to run a code that I’ll add in advance to GitHub.
Same Process on Linux (Ubuntu)
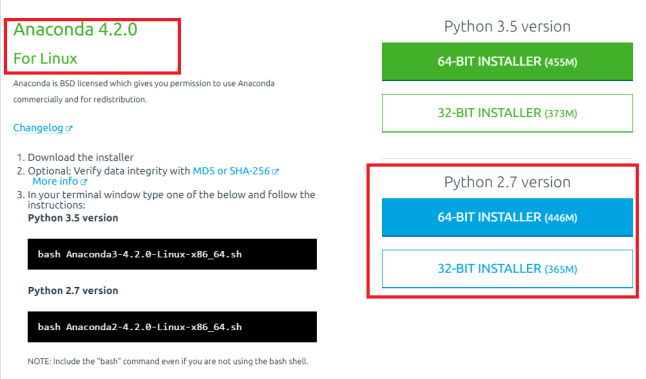
Installation of Keras, Thano and TensorFlow on Linux is almost the same as on Windows. Actually it is even easier since TensorFlow is working nice with Python 2 on Ubuntu. That is why below I’ll provide installation steps for 64 bit Ubunut 16.04 and Python 2.
- Install Anaconda for 64 bit OS. This process takes a few minutes and a few hundreds MB of space.
- After Anaconda was installed open terminal and Install Theano.
$ conda install theano
- That’s it theano is installed. To check what version is installed
$ conda list theano
- To install TensorFlow and Keras run this commands
- If you are asked about installing dependencies click ‘y’ for yes.
$ conda install tensorflow
$ conda install keras
- To figure out what is the current backend type
$ python -c "from keras import backend; print(backend._BACKEND)"
- To be able to change what backend Keras will use it is possible to edit keras.json configuration file. It may be found at
$ ~/.keras/keras.json
- Change the “backend” string to “theano” or “tensorflow” according to your needs.
{
"image_dim_ordering": "tf",
"epsilon": 1e-07,
"floatx": "float32",
"backend": "theano"
}- To test that they work at all let’s run this example in Python interpreter line by line
$ python
>>> import theano
>>> from theano import tensor
>>> a = tensor.dscalar()
>>> b = tensor.dscalar()
>>> c = a + b
>>> f = theano.function([a,b],c)
>>> result = f(1.5, 2.5)
>>> print(result)
4.0
>>>
- To see that Keras is really functioning there is a need to run a code that I’ll add in advance to GitHub.
Official References
What’s next?
Deep Learning.
| Reference: | Keras, Theano and TensorFlow on Windows and Linux from our JCG partner Andrei Cheremskoy at the GetToCode.com blog. |
