Introduction
In this post I am going through a full (Java) example of integrating AWS Lambda, DynamoDb and Api Gateway to create a function and expose this function as a HTTP resource for other parties to consume.
Before we dive into the details I will give a brief overview of the AWS services used in this example (as taken from the AWS documentation):
- AWS Lambda. AWS Lambda is a compute service that runs developers’ code in response to events and automatically manages the compute resources for them, making it easy to build applications that respond quickly to new information.
- DynamoDB: Fast and flexible, managed, NoSql database.
- Api Gateway: Amazon API Gateway is a fully managed service that makes it easy for developers to create, publish, maintain, monitor, and secure APIs at any scale.
In this example we are going to create a lambda function which tracks the location (latitude and longitude) of a specific mobile device. The data flow looks like this:
mobile device -> HTTP POST -> Api Gateway -> recordLocation (Lambda function) -> DynamoDb (store location)
Creating the application
Prerequisites:
- IntelliJ Idea is used for this example but any IDE will do. Gradle is used for the build system.
- AWS account to actually deploy and run the example.
- After you are done with the example, delete any AWS resources you have created to prevent unnecessary billing.
For the implementation of the Lambda function we use the AWS Java SDK.
1. In IntelliJ, Select File -> New project and choose Gradle with the Java library. Click Next
2. groupId=com.example, artifactId=locationpersister. Click Next.
3. Choose a Java 8 IDE and Click Next, click Finish.
4. Create the src/main/java folder if it does not exist already.
5. Open de build.gradle file and add the following dependencies:
compile 'com.amazonaws:aws-lambda-java-core:1.1.0'
compile 'com.amazonaws:aws-lambda-java-events:1.1.0'
6. Add the following code to the build.gradle file:
task buildZip(type: Zip) {
    from compileJava
    from processResources
    into('lib') {
        from configurations.runtime
    }
}
build.dependsOn buildZip
The above code creates a zip archive when the build task is triggered. The zip file can be uploaded directly to AWS Lambda.
7. Create a class com.example.persister.DeviceLocation with the members: lat (double), lng (double) and deviceId (string). This class holds the data that gets submitted to the Lambda function.
8. Create a new class com.example.persister.LocationPersisterFunction. This class will hold the implementation of the Lambda function.
9. Make the LocationPersisterFunction implement the com.amazonaws.services.lambda.runtime.RequestHandler
interface.
This interface defines the handleRequest function which is executed when the Lambda function is triggered. The handleRequest function takes two parameters: the input (which is of DeviceLocation type and is passed-in when the function is invoked Context object).
Creating the DynamoDb table
To store the data in DynamoDB we need to create a table.
1. Open the AWS console and navigate to the DynamoDB section.
2. Click create Table and for the name use: “DeviceLocation”. Type id (string field) to use as a partition key and do not specify a sort key. Leave everything default and click Create.
3. Please note that the table is created in the selected regio. If you click on the table and look at the details you can see the region of the table.
Create the DeviceLocation class
The DeviceLocation class holds the input which is passed to the Lambda function.
1. Create a new class named DeviceLocation with the following fields: id (string), lat (double) and lng (double)
2. Make sure the class contains both setters and getters. The setters are used by AWS Lambda to populate this object based on the passed in JSON when calling the Lambda function.
Implementing the Lambda function
1. Open the LocationPersisterFunction
2. Add the following code to the body of the handleRequest method:
final AmazonDynamoDBClient client = new AmazonDynamoDBClient(new EnvironmentVariableCredentialsProvider());
        client.withRegion(Regions.EU_WEST_1); // specify the region you created the table in.
        DynamoDB dynamoDB = new DynamoDB(client);
        Table table = dynamoDB.getTable("DeviceLocation");
        final Item item = new Item()
                .withPrimaryKey("id", UUID.randomUUID().toString()) // Every item gets a unique id
                .withString("deviceId", input.getDeviceId())
                .withDouble("lat", input.getLat())
                .withDouble("lng", input.getLng());
        table.putItem(item);
        return null;
3. Make sure you change the region to match the region you created the table in.
4. The above code gets a reference to the DynamoDB DeviceLocation table, creates an item and persist it.
5. Execute the gradle build task to create a zip-archive or our code.
5. Now that the implementation is complete we are ready to create our AWS Lambda function.
Creating out Lambda function
1. Open the AWS console and navigate to the Lambda section.
2. Select Blank function and click next (we do not create a trigger at this stage).
3. As name choose: persistDeviceLocation and select Java 8 as the runtime
4. Upload the /build/distributions/locationpersister-1.0-SNAPSHOT.zip file
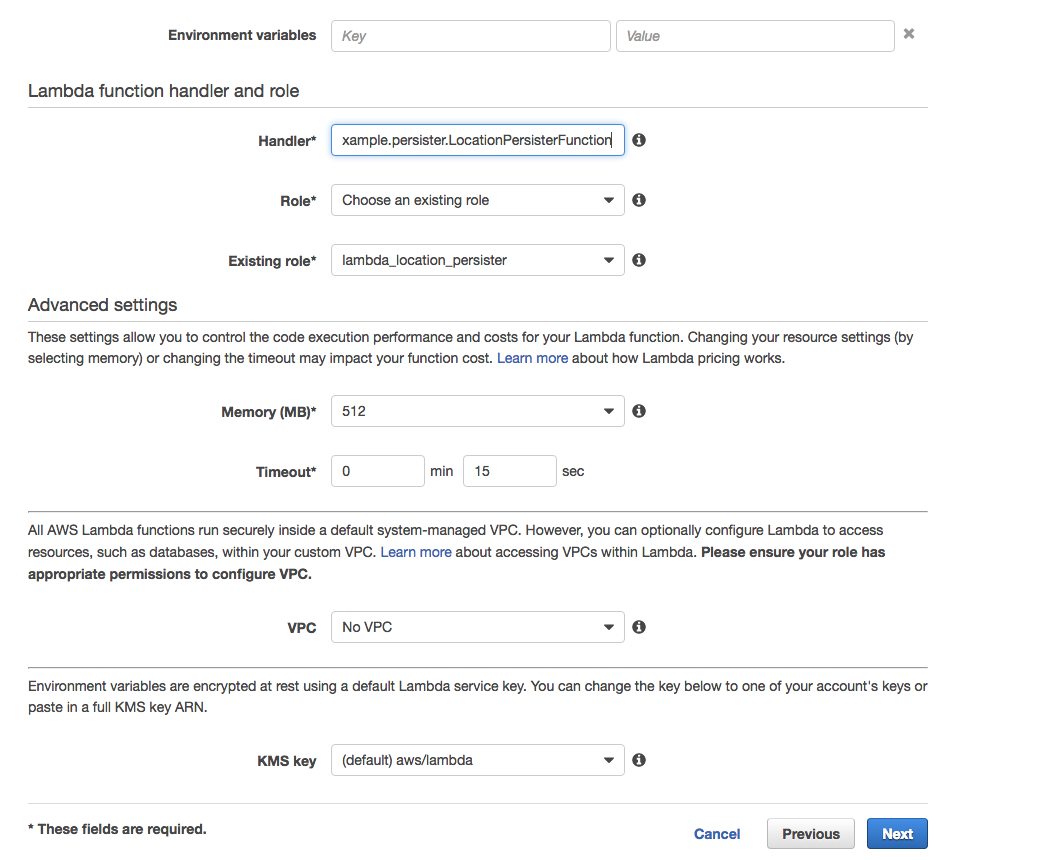
5. In the Handler field specify the fully qualified classname which implements our handler: com.example.persister.LocationPersisterFunction
6. In the Role field select to create a custom role. The create role form is opened. Use lambda_location_persister as the Role name and click allow. The role is created and selected in the Existing Role field. See the screenshot “lambda_role”
7. Leave everything default and click Next
8. Click Create function
After the function is created we are going to test is using the AWS console.
1. Click Test
2. A dialog opens where you can specify the data sent to the Lambda function. Use the following testdata:
{
  "deviceId": "deviceId",
  "lat": 52.5,
  "lng": 5.5
}
3. You can modify the testdata at any time by clicking Actions -> configure test event
4. When done, click Test
5. If everything went according to plan you should get an error message which states the following: Status Code: 400; Error Code: AccessDeniedException
6. This is correct until this point. Although we created a custom role, we did not gave this role permissions to access our DynamoDB table.
Add DynamoDB permissions to our role
1. Open the AWS console and navigate to the IAM section.
2. Click on Roles
3. Click on the lambda_location_persister to open it.
4. Click Attach Policy
5. In the filter field search for DynamoDB
6. Select the AmazonDynamoDBFullAccess policy and click Attach
7. Navigate back to AWS Lambda and test the function again. The function should be succesfull.
8. Navigate to DynamoDB and select the DeviceLocation table and click on items. You should see one item added to the table.
9 If you get a Status Code: 400; Error Code: ResourceNotFoundException error, check the region you specified in the Lambda implementation corresponds to the region of the DynamoDB table.
Creating the API Gateway
The API Gateway is used to create an HTTP endpoint which is the trigger for the Lambda function. Applications can communicate with this endpoint over HTTP.
1. Open de AWS console and navigate to API Gateway.
2. Create a new API. As the name use: LocationPersisterApi
3. Click Create API
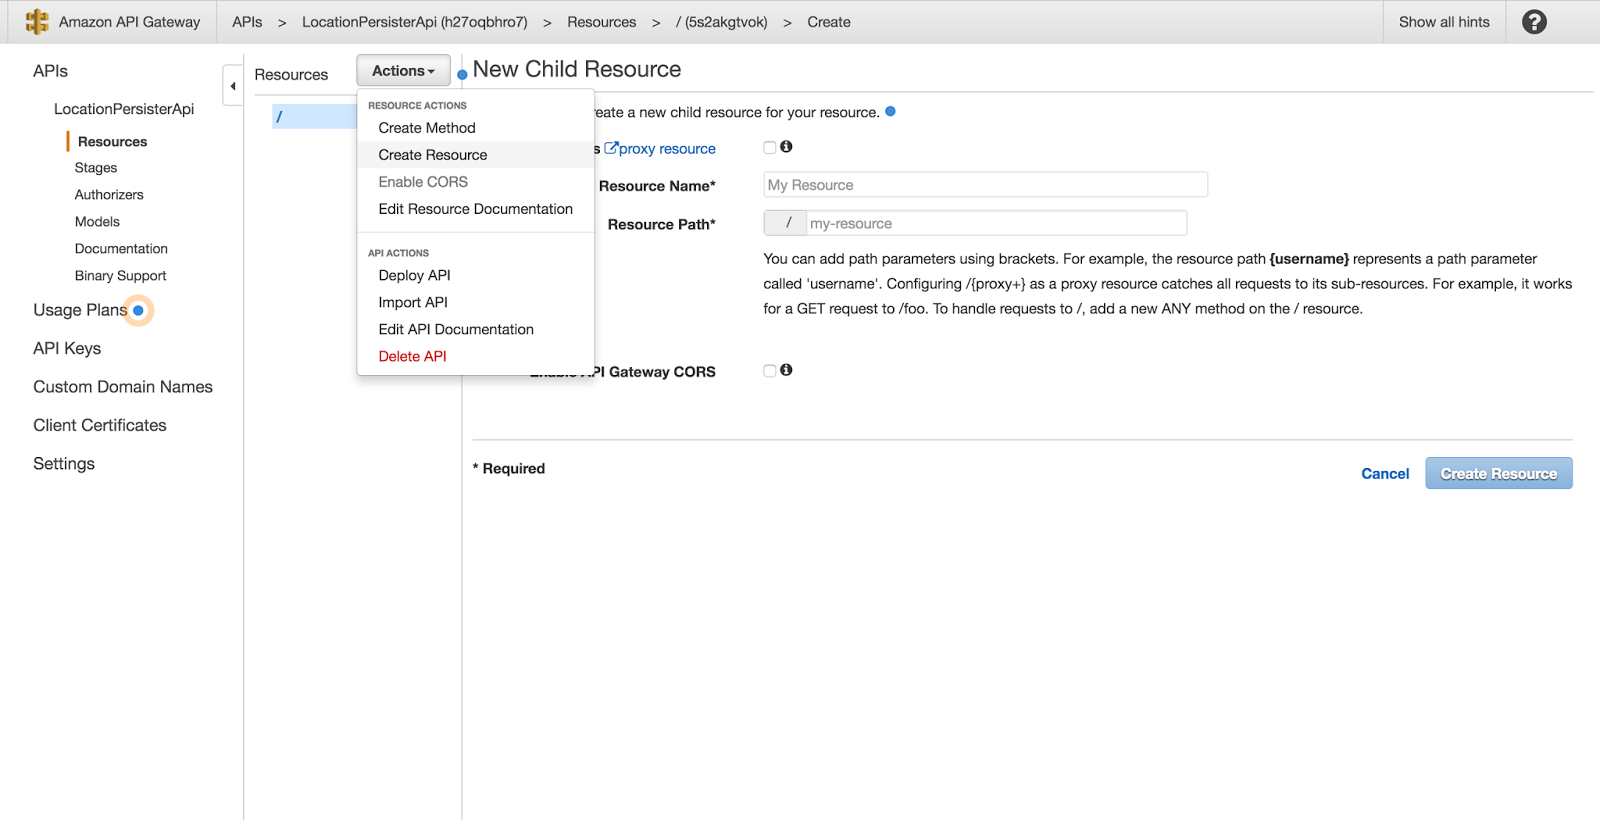
4. Select Actions -> and click Create Resource, see screenshot_create_resource
5. As resource name use: devicelocation, and click Create Resource
6. Select Actions -> and click Create Method and select POST.
7. In the method details select as Integration Type: Lambda Function, Lambda Region (the region you created the Lambda Function in, and as Lambda Function: persistDeviceLocation (the name of the Lambda function))
8. Click Save and then OK
9. Click Test and paste a test message in the body. This can be the same message as used in the Test section of the Lambda function. After the body is filled-in, click Test. If everything is OK you should see a HTTP 200 status code.
10. Select Actions -> Deploy API and select [New Stage]. Specify prod as the stage name.
11. Click Deploy. Your API will be deployed so that it can be accessed from the outside world.
12. Navigate to the prod stage, expand the resources and select the POST method. Copy the URL after the ‘Invoke URL’ text in, for example, Postman. Execute an HTTP post with a test-message body. You should see a HTTP 200 status code (success).
13. If you now open the DynamoDB tables and list the items you should see several items added to the table.
Conclusion
AWS Lambda, DynamoDB and API Gateway is a powerful to provision functionality in the cloud without having to provision entire servers or more full-fledged managed services like elastic beanstalk. This post showed you how to use those AWS services to create A Lambda function which uses DynamoDB and make it available using API gateway.
Resources
– The full source code of the example project can be found on Github.
– AWS Lambda
– AWS DynamoDB
– AWS Api Gateway
| Reference: | AWS Lambda/Java, DynamoDB and Api gateway integration from our JCG partner Jamie Craane at the Jamie Craane’s Blog blog. |
