Building Identity Management, including authentication and authorization? Try Stormpath! Our REST API and robust Java SDK support can eliminate your security risk and can be implemented in minutes. Sign up, and never build auth again!
OAuth 2.0 token management is often misunderstood and difficult to implement correctly. Fortunately, with Stormpath’s SDKs and integrations, we make Token Management easy – fun, even. This 20-minute tutorial will show you how to implement Token Management with Stormpath’s Spring Boot and Spring Security integrations.
While Spring Security does have built in OAuth 2.0 support, there is no native token management support in Spring Boot, and working with the OAuth protocol has been known to cause spontaneous outbreaks of hives, cold sweats, and prolonged “face desking.”

Stormpath’s Spring Boot integration supports two OAuth flows: grant_type=password and grant_type=refresh_token. The Password Grant Type allows you to pass in a username and password and get back an Access Token and a Refresh Token. The Refresh Token Grant Type allows you to pass in a Refresh Token and get back a new Access Token.
They are both accessed through a single endpoint, /oauth/token, which is available out of the box with the Stormpath integration. So, fear not! Stormpath’s Token Management does all the heavy lifting. You just have to create the HTTP request using some basic rules discussed below.
Resources for This Tutorial
By then end of this post, you’ll have everything you need to swap a username and password for a set of tokens that allows a user to access restricted resources in an application. You’ll also be able to refresh and revoke tokens to provide a fine degree of control over how users access your application and how long they stay logged in.
The code that backs this post is here.
You can see the example in action at: https://jquery-spa.herokuapp.com (due to the Heroku sleeppolicy, you may have to wait a few seconds for the app to respond initially) and you can deploy it to your Heroku account right now using the button below.
![]()
While Token Management is typically a behind-the-scenes affair, this example uses a SPA or Single Page Application. To keep the example simple (and Javascript framework-agnostic), all calls are made using jQuery’s ajax functionality.
Modern Token Management – Access and Refresh Tokens
In a modern application that supports OAuth 2.0 Token Management, a user’s session typically has one Access Token with a short expiration and one Refresh Token with a longer expiration. When the Access Token expires, the application will use the Refresh Token to obtain a new Access Token. This process is repeated until the Refresh Token expires. At this point, the user would need to log into the application again.
For a deep dive into OAuth tokens and how they work, check out my colleague Randall’s post that explores OAuth in detail.
JSON Web Token (JWT) Security PSA
The OAuth 2.0 specification does not specify a particular token format, so Stormpath uses JWTs to represent Access Tokens and Refresh Tokens. JWTs have additional information encoded into them, and more importantly, they are cryptographically signed to provide conclusive evidence that the token has not been tampered with.
Stormpath Access Tokens also provide an important layer of additional security – they always contain a reference to the associated Refresh Token. This reference is a claim identified by the code rti. It’s one of the ways Stormpath ensures it is an Access Token being used to access a protected resource and not a Refresh Token. Other implementations of OAuth 2.0 have (inadvertently) allowed a refresh token to act as an access token, giving users longer access then they should have. We guard against that.
If you want to learn more about JWTs and how to use them securely, check out our posts on how to Use JWTs the Right Way, Build Secure User Interfaces with JWTs, and Where to Store Your JWTs.
OK, with all that out of the way, let’s get started!
Spring Security Configuration
In the sections that follow, we’re going to explore the example application through the lens of the jQuery calls that are made to the backend /oauth/token endpoint in the Spring Boot application.
Before we get to that, let’s look at the Spring Security configuration for this example application:
@Configuration
public class SpringSecurityWebAppConfig extends WebSecurityConfigurerAdapter {

    @Override
    protected void configure(HttpSecurity http) throws Exception {
        http.apply(stormpath()).and()
            .authorizeRequests()
            .antMatchers("/").permitAll()
            .antMatchers("/decode").permitAll()
            .antMatchers("/static/**").permitAll();
    }
}
Stormpath’s Spring Security integration follows the default access configuration for Spring Security, which is that all paths are locked down.
In the above configuration, we are allowing unauthenticated access to / and /decode as well as any path within /static. We’ll see this in action as we work through the example below.
Let’s Get Some Tokens
There are two primary static files in our SPA example: home.html and static/js/token-management-guided-tour.js.
home.html is a Thymeleaf template in which the static/js/token-management-guided-tour.jsJavascript file is loaded.
Here’s a view of the different sections of home.html:

It’s broken down into 7 steps and the application walks you through the example, “guided tour” style.
The first step is to pass in an email and password and get back Access and Refresh Tokens. Let’s look at that in action.
Login with Email and Password
Here’s the jQuery code that processes the initial request to the /oauth/token endpoint (error and complete functions omitted for brevity):
$('#login-form').submit(function (e) {

    var theForm = $('#login-form');

    $.ajax({
        type: 'post',
        url: '/oauth/token',
        data: theForm.serialize(),
        success: function (data) {
            accessToken = data.access_token;
            refreshToken = data.refresh_token;
            var accessTokenParts = accessToken.split('.');
            $.each(['header', 'payload', 'signature'], function (index, value) {
                $('#access-token-' + value).html(accessTokenParts[index]);
            });
            $('#login-error').hide();
            showOnlyDiv('access-token-div');
        }
    });

    e.preventDefault();
});
Line 3 gives us a handle to the form.
Per the OAuth spec, the method will be POST and the Content-Type is application/x-www-form-urlencoded (this is the default for jQuery’s $.ajax call). The data passed to /oauth/token will look like this:
grant_type=password&username=<username>&password=<password>
This is the result of the call to theForm.serialize() on line 8.
The success handler which begins on line 9 stores the access_token and the refresh_token in local variables. It also displays the parts of the access_token (header, payload, and signature) in your browser as a visual representation of the JWT:
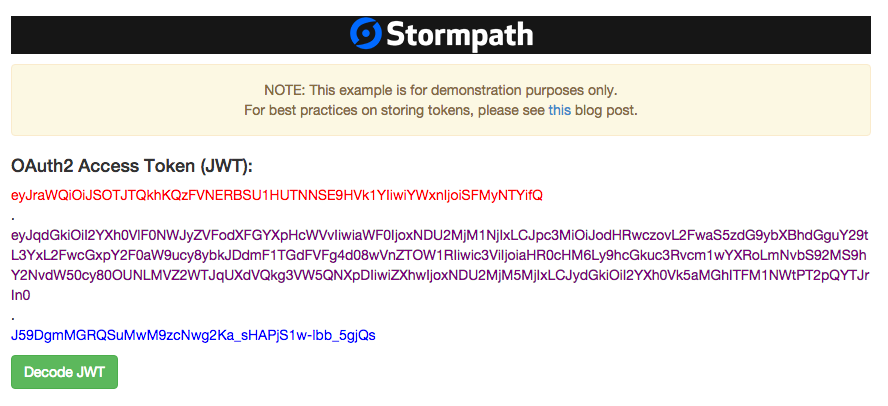
Note: As the screenshot shows, the example app is for demonstration purposes only. In “real life” you would not want to show an Access Token in the browser and you would want to use best practices for storing tokens in your client app. We have a great post on those best practices here.
Anatomy of a Stormpath Access Token
In the example app, if you click on the Decode button, you will see something like the following:
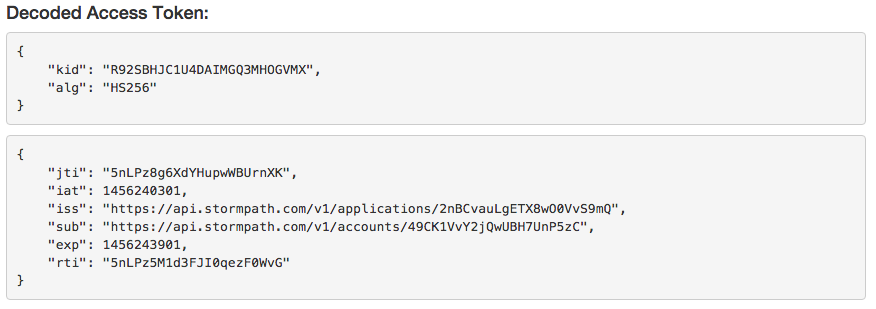
This shows you the header and the payload sections of the JWT that are the Access Token. To understand how we decoded our Access Token, we need to take a look at the decode method in the APIController in the example app:
@RequestMapping("/decode")
public Jws<Claims> decode(@RequestParam String token) throws UnsupportedEncodingException {

    Jws<Claims> claims = Jwts.parser()
        .setSigningKey(client.getApiKey().getSecret().getBytes("UTF-8"))
        .parseClaimsJws(token);

    return claims;
}
The method takes a JWT (which in this case is our Access Token) as a parameter and uses the JJWTlibrary to parse out the claims. It also verifies that the JWT signature is valid as part of the parsing process. To do this, it uses the secret from the Stormpath Client which was used to create the JWT in the first place.
Finally, the method returns the Jws<Claims> object. This is where Spring Boot’s automatic Jackson JSON mapper kicks in and converts that object to JSON. Here’s what the raw response looks like:
{
    "header": {
        "kid": "R92SBHJC1U4DAIMGQ3MHOGVMX",
        "alg": "HS256"
    },
    "body": {
        "jti": "6UBPQ975cDDiz8ckHqWIZF",
        "iat": 1456242057,
        "iss": "https://api.stormpath.com/v1/applications/2nBCvauLgETX8wO0VvS9mQ",
        "sub": "https://api.stormpath.com/v1/accounts/49CK1VvY2jQwUBH7UnP5zC",
        "exp": 1456245657,
        "rti": "6UBPQ5n0hcukMJWt5af1xB"
    },
    "signature": "Pm30FjdXOmx_fMGhfku85Z9xc6qE-EZgKHI4mV46KO8"
}
Notice that the body (payload) of the decoded JWT includes a reference to the Stormpath Account in the sub (subject) claim. It is this Account that is used when accessing restricted resources as we will see next.
Using an Access Token
After decoding the Access Token, the next step in our example app’s guided tour is to hit a restricted resource using that Access Token. Here’s the jQuery code that accomplishes that:
$('#restricted').click(function () {

    $('#account-info-table tbody').empty();
    $.ajax({
        type: 'get',
        url: '/restricted',
        success: function (data) {
            var newRowContent = '<tr><td>' + data.fullName + '</td><td>' + data.email + '</td></tr>';
            $('#account-info-table tbody').append(newRowContent);
            showOnlyDiv('account-info-div');
        }
    })
});
You may be wondering where the authentication is in the above code. Cookies were set in the browser in the steps above when you logged in. If you look at the inspector in your browser, you will see that the access_token is passed up to the request to the /restricted endpoint. In a separate browser session, you can try hitting: http://localhost:8080/restricted. You will be redirected to /login. This is a function of our Spring Security configuration. The /restricted path was not one of the paths that we explicitly allowed in the Spring Security configuration and as such, the request must be authenticated. To understand the response from /restricted, let’s look at the restricted method in the APIController:
@RequestMapping("/restricted")
public AccountInfo restricted(HttpServletRequest req) {
    Account account = AccountResolver.INSTANCE.getAccount(req);
    return new AccountInfo(account.getFullName(), account.getEmail());
}
This is simply returning an AccountInfo model object that has the full name and email address of the authenticated user. The AccountInfo object defined in the example app is easily converted to JSON by the same automatic Spring Boot mapper process that we saw above.
The jQuery success function above displays the Account information returned from the request to /restricted.
Token Management: It’s Refreshing!
The next step in our journey is to use the Refresh Token to obtain a new Access Token. In a typical mobile application, the following would happen behind the scenes without the user ever knowing:
- The current Access Token expires
- The user tries to access a restricted part of the application using the (expired) Access Token
- The application receives a
401(unauthorized) HTTP response code - The application uses the Refresh Token to obtain a new Access Token
- The application tries to access the restricted part of the application using the new Access Token
- The user sees the result of that request without having to log in again
Note: If the Refresh Token has expired, then the user of the application would need to log in again at Step 4
Stormpath provides an OAuth Policy in the admin console to set expirations for Access Tokens and Refresh Tokens.
A Look at the OAuth Policy
Here’s what the OAuth Policy looks like in the Stormpath Admin Console:
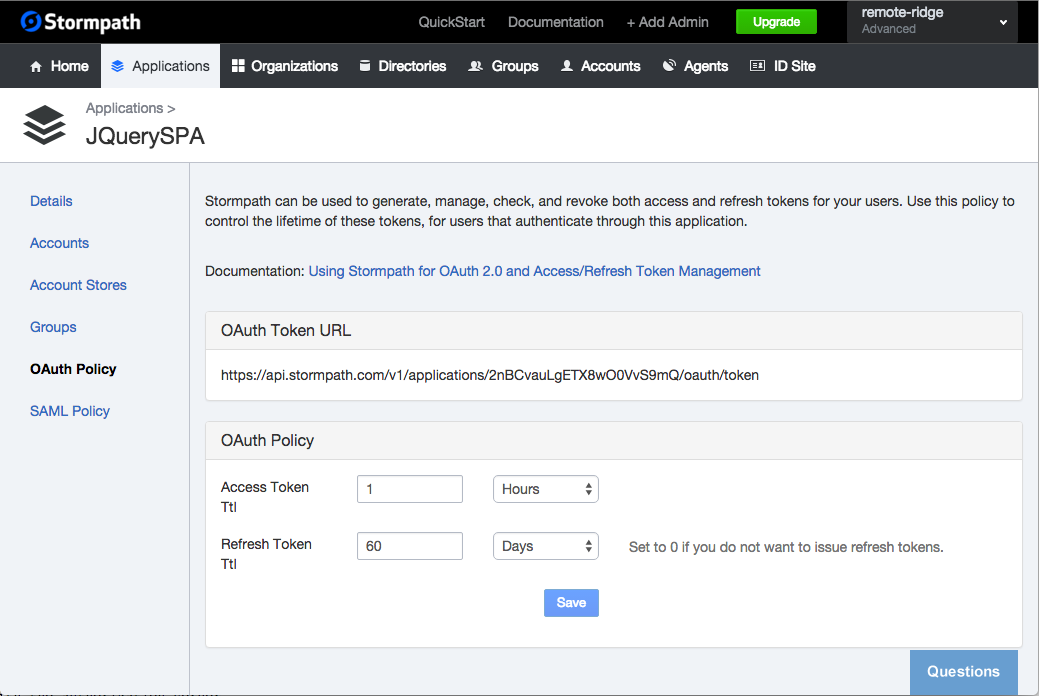
The default time-to-live for Access Tokens is 1 hour and the default TTL for Refresh Tokens is 60 days.
Refreshing the Access Token
When you click the Refresh the Access Token button in the example app, you get a response that looks like this:
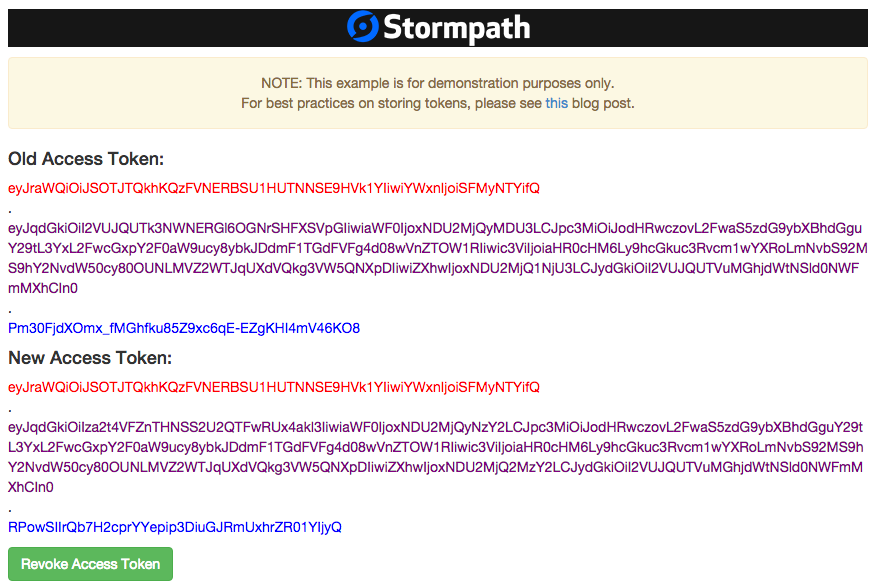
This displays the new Access Token retrieved in the refresh process. To understand what’s going on there, we turn back to our jQuery code (success handler omitted for brevity):
$('#refresh').click(function () {

    $.ajax({
        type: 'post',
        url: '/oauth/token',
        data: 'grant_type=refresh_token&refresh_token=' + refreshToken,
        success: function (data) {
        }
    })
});
Once again, we are making an HTTP POST to the /oauth/token endpoint. Unlike the grant_type=password flow, in this instance we are using grant_type=refresh_token and we are passing in the Refresh Token we saved from earlier.
The response from this ajax call is a new Access Token which is then displayed in the browser underneath the old Access Token.
Kick that Token to the Curb
The last part of our Token Management joyride is revoking the Access and Refresh Tokens. This is accomplished by hitting the (built-in) /logout endpoint providing the Access Token as a Bearer token, as we did when hitting a restricted resource earlier. Let’s look at the jQuery code that accomplishes this:
$('#revoke').click(function () {

    $.ajax({
        type: 'post',
        url: '/logout',
        success: function () {
            showOnlyDiv('revoke-div');
        }
    })
});
We’re sending an HTTP POST request to /logout. The cookies containing the access_token and refresh_token are removed at this point and the tokens are revoked on the Stormpath backend. This is handled automatically behind the scenes.
The example app tries to hit the /restricted path again. The result looks like this:
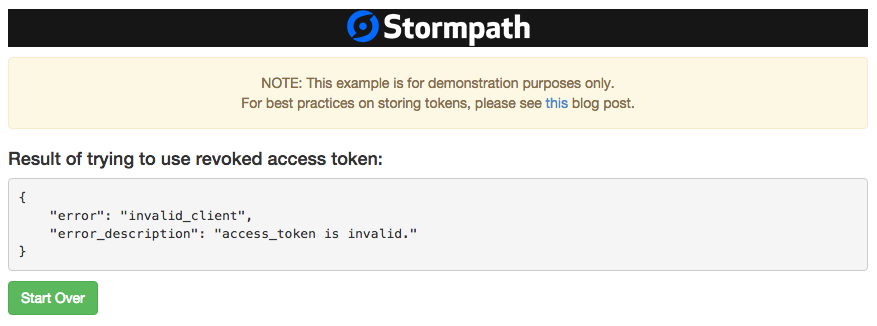
The result shows that trying to use a deleted Access Token will not work.
In Summary
The /oauth/token endpoint provided out-of-the-box in Stormpath’s Spring Boot integration enables all the functionality of a modern Token Management system.
In this post, we’ve covered what Access and Refresh tokens are, as well as how they are obtained, used, refreshed, and revoked.
You can see the example application used throughout this post at: https://jquery-spa.herokuapp.com or, you can use the button below to deploy the app to your own Heroku account.
![]()
Building Identity Management, including authentication and authorization? Try Stormpath! Our REST API and robust Java SDK support can eliminate your security risk and can be implemented in minutes. Sign up, and never build auth again!