Earlier this year, I published a series of posts on the deployment of Apache Drill to Azure. While the steps covered in those posts work, I’d like to speed up the process significantly. With the MapR Converged Data Platform available in the Azure Marketplace, I can have a Drill-enabled MapR cluster up and running much faster and with much less effort.
In this post, I’ll tackle how to spin up such a cluster quickly. In a subsequent series of posts, I’ll tackle integration of the cluster with a few key Azure resources. Together, I hope these entries will help accelerate the work of those interested in working with Drill on MapR in the Azure cloud.
Access MapR in the Azure Marketplace
If you have an Azure subscription, log in to the Azure Portal at https://portal.azure.com. If you do not have a subscription, you should contact your organization’s Azure administrator to obtain one or otherwise set up a pay-as-you-go account.
If you haven’t yet run anything sizeable in your Azure account, you should be aware that the account has a default quota limit of 20 virtual machine cores available to it. This cap is intended to keep users from inadvertently running up a large bill. If you intend to deploy a small, i.e. 3-node, cluster as shown in this post, you shouldn’t hit the quota limit. Should you need to go larger, you may want to go ahead and request the quota be increased to accommodate your needs.
Once signed into the portal, the dashboard populates with a bunch of options. To access the Azure Marketplace, simply click the +New option in the left-hand navigation bar.
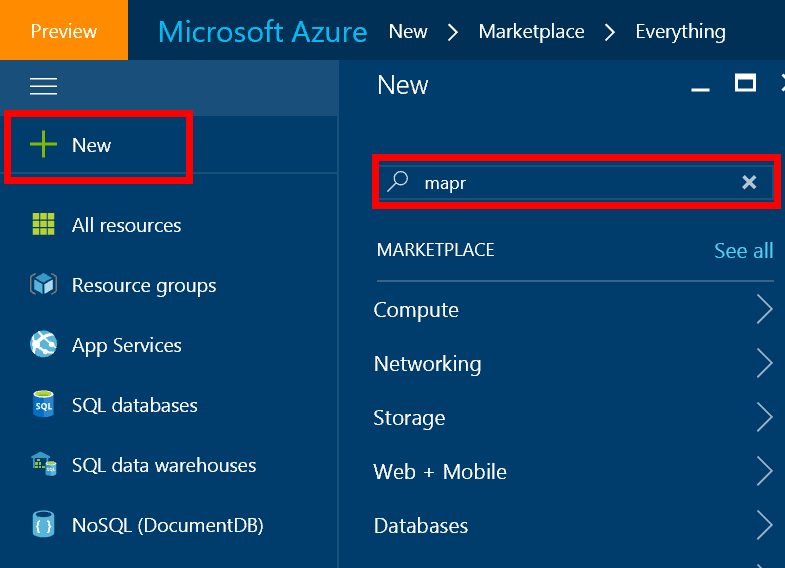
In the resulting panel, enter MapR into the search box and click enter. You should see a few options from MapR, including a series of stand-alone Sandbox VMs, which are great for training and demo purposes. But as our goal is to deploy a cluster, select the MapR Converged Platform v5.2 item as highlighted in the image below.

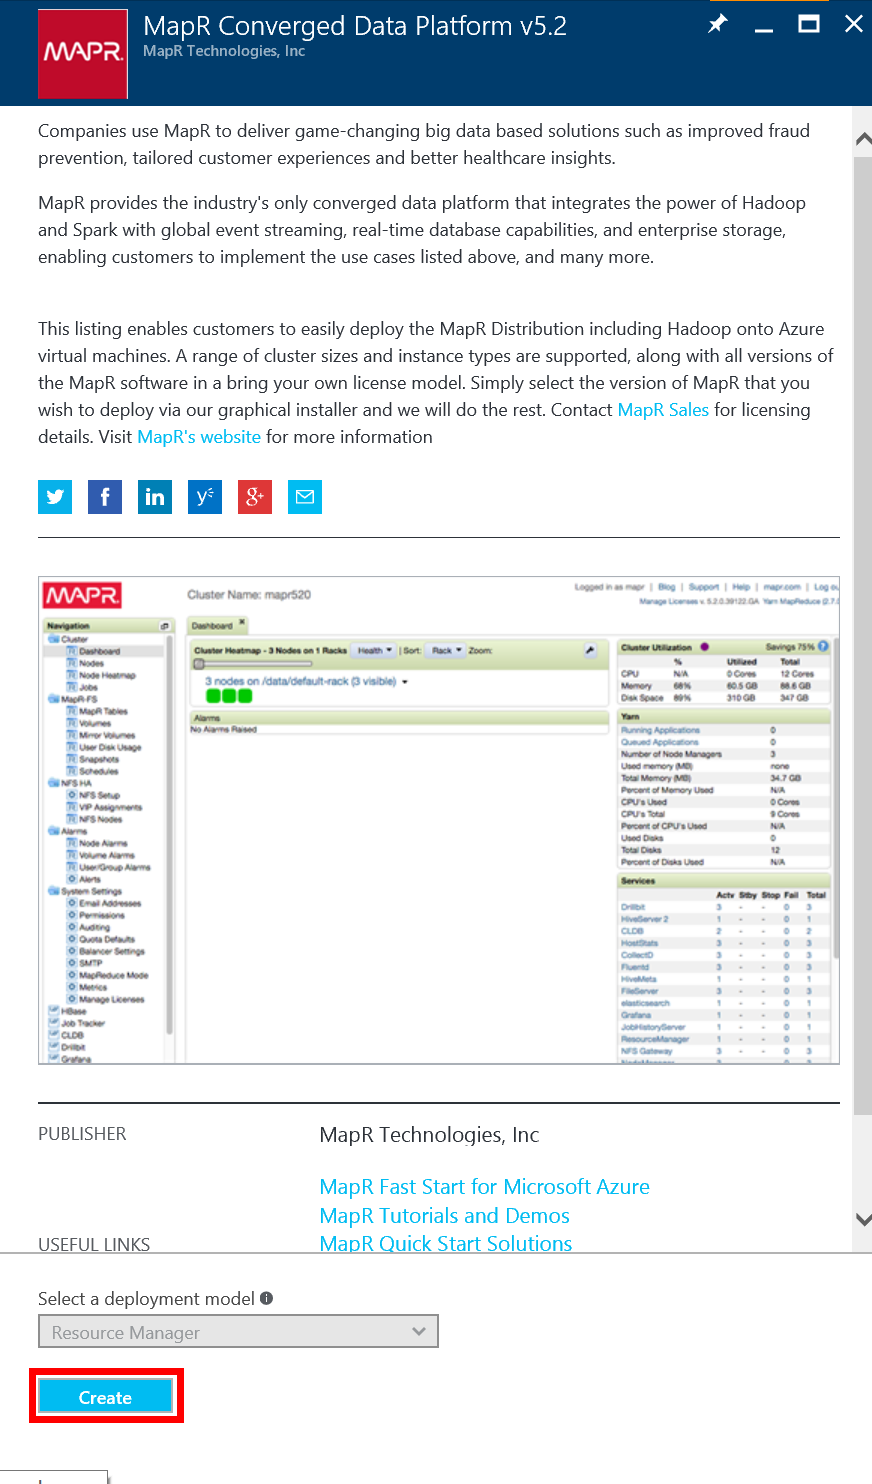
Click on this item to bring up a panel within which you can review your selection and access supporting documentation. Click the Create button at the bottom of that panel to start the deployment process.
Deploy the MapR Cluster
Through the portal, the deployment process is handled through a series of forms. The first two forms require input, while the last two forms provide validation and confirmation prior to the actual deployment.
In the first form, provide some basic information about the cluster:
- MapR Cluster name – the internal name of the cluster
- SysAdmin Username – the name of the system administrator on the Linux virtual machines (VMs) that will form this cluster
- Authentication type – the authentication mechanism to use for the Linux VMs, either password or SSH public key
- Password & Confirm Password – a strong password to associate with the SysAdmin username if password authentication type is selected
- SSH public key – an OpenSSH public key if SSH public key authentication type is selected
- Subscription – the Azure subscription with which this cluster should be associated. This option isn’t very interesting unless you are associated with multiple subscriptions.
- Resource Group – the Resource Group, uniquely named within your subscription, with which to associate your cluster. If you are new to the concept of a Resource Group, think of it as a tag assigned to your Azure items that can be used for management and spend tracking. More information can be found here.
- Location – the Azure region within which to deploy your cluster
Click OK to proceed to the second form.
On the second form, provide the information for the cluster infrastructure:
- Cluster size – the total number of machines in the cluster, including both data and head nodes. Valid values are between 3 and 30.
- Virtual machine size – the size of the VMs to deploy with the cluster. The default VM size of Standard D3 includes 4 processor cores and 14 GB of RAM and runs on HDDs. By clicking on the option and selecting View All, you can choose any but the smallest machines in the D, DS, G, and GS series. (More information on the different sizes can be found here.)
- MapR Version – 5.2.0 is the currently supported version with this template
- Password & Confirm Password – the password employed by the MapR user to authenticate to the cluster
- MapR Edition – select the Converged Community edition
Click OK to proceed to the Network Information form: you can select an existing Virtual network or create a new one. Whether a new or existing virtual network is selected, choose a Subnet within that virtual network to which to deploy the virtual machines for this cluster.
Click OK to proceed to the Summary/Validation form. Once validation is passed, click the OK button again to proceed to the Buy/Purchase form. As always, carefully read the language on this form, but the gist of the legalese is that expenditures for this cluster infrastructure come out of the billing mechanisms associated with your Azure account, and any expenditure with MapR is outside of those agreements. Keep in mind that the Marketplace image you are using comes with a free 30-day license from MapR for non-production use of the technology. Once you are ready to proceed, click Purchase to start the deployment.
While the deployment is in motion, you will see a spinning tile on the Azure dashboard. In my tests, deployment took between 30 and 60 minutes. Your mileage may vary, but once deployment is finished, you should have a tile pointing to the resource group containing your cluster.

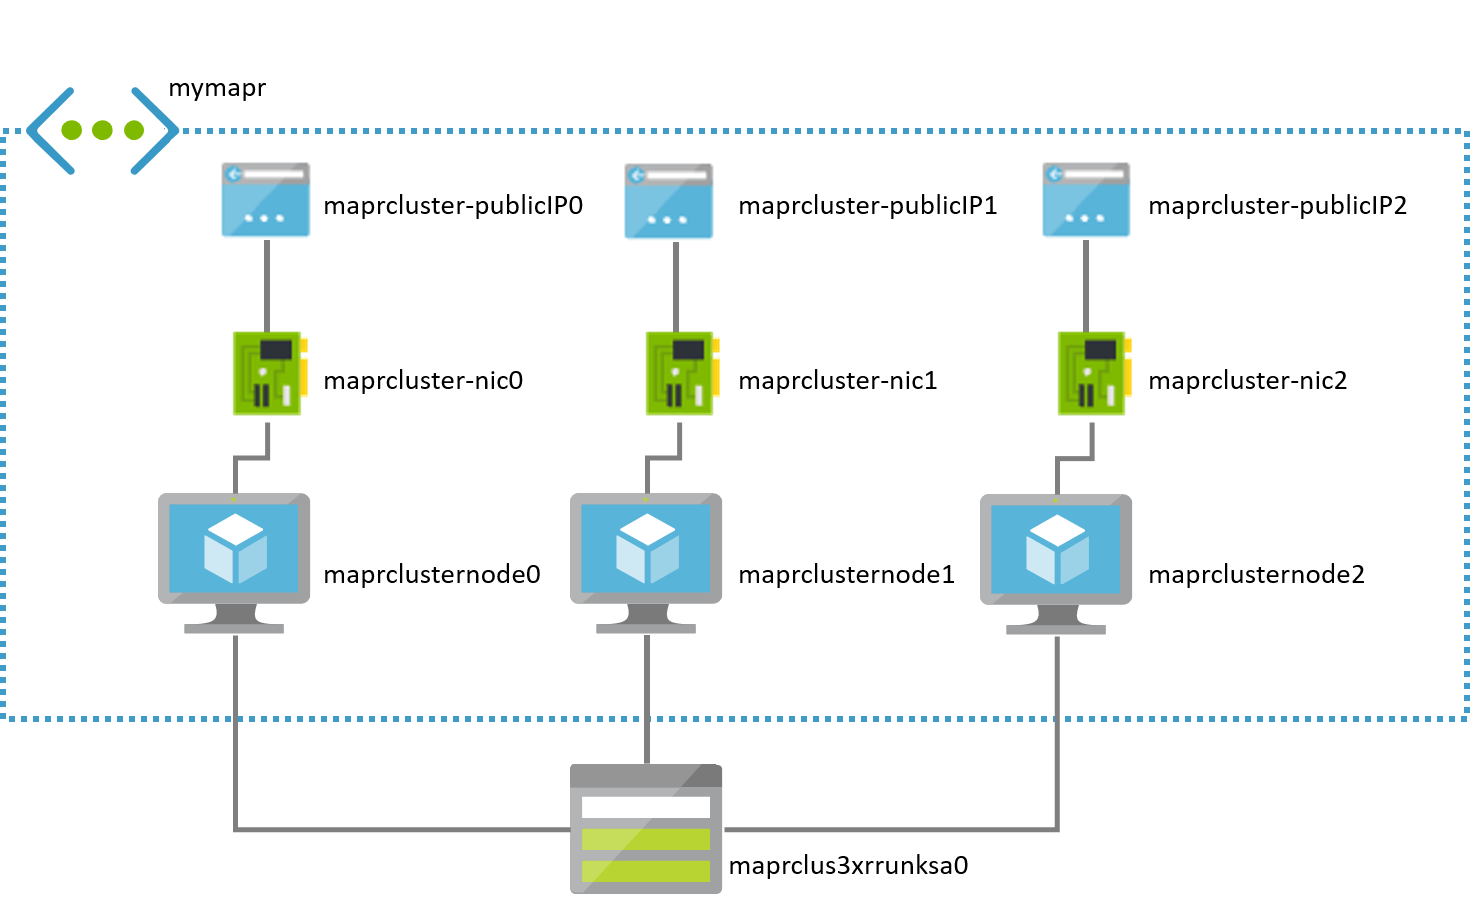
Clicking on that tile takes you into the Resource Group associated with the MapR cluster. You will see a virtual network and a storage account as well as one public IP address, one virtual network card, and one virtual machine for each node in your cluster. Assuming you have a 3-node cluster, you might think of your assets as being organized something like this (though the names of your Azure assets will likely vary):
Connect to the Drill Console
Coming out of the deployment, your cluster should be up and running. You will now want to connect to the Drill Console to verify that it is operational.
To do this verification, you must first locate the fully qualified, publicly addressable name associated with one of the nodes of the cluster. I suggest doing this for cluster node0, the VM named maprclusternode0 in my example.
To locate the public name for cluster node0, click on the tile for the resource group containing your cluster (as described above). Locate the public IP address associated with that node, the asset named maprcluster-publicIP0 in my example. Click on that resource to open its panel.
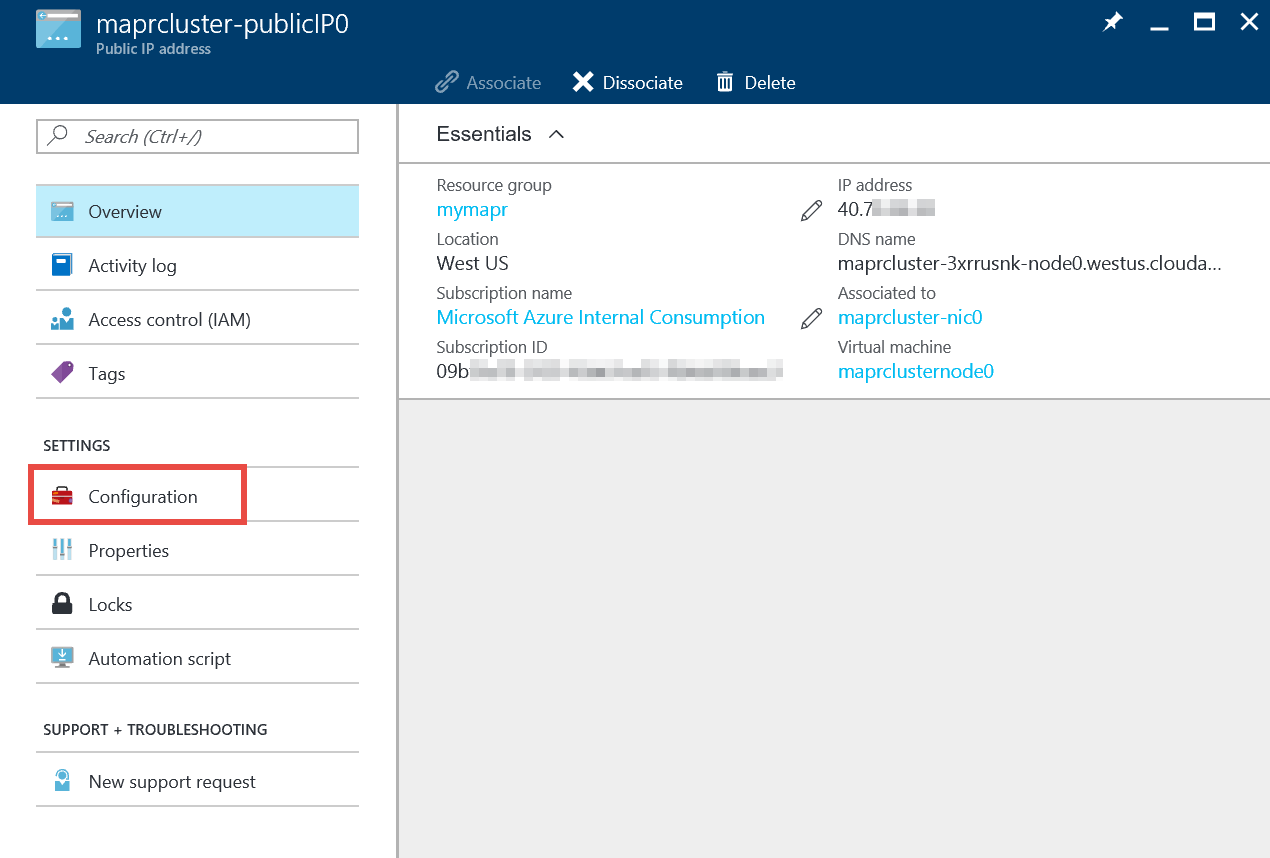
Click on the Configuration option in the left-hand portion of that panel, and in the resulting Configuration panel, locate the value assigned to the DNS name label. Copy that name along with the domain name presented under the textbox. If you don’t like the name assigned to the node here, you can modify it; just be sure that the name is unique within the assigned domain.

Armed with the fully qualified name of the node, you should now be able to connect to the Drill Console via HTTP on port 8047. To proceed, open a modern browser and navigate to port 8047 on the machine, using HTTP. (Your address will look something like this: http://maprcluster-3xrrusnk-node0.westus.cloudapp.azure.com:8047.)
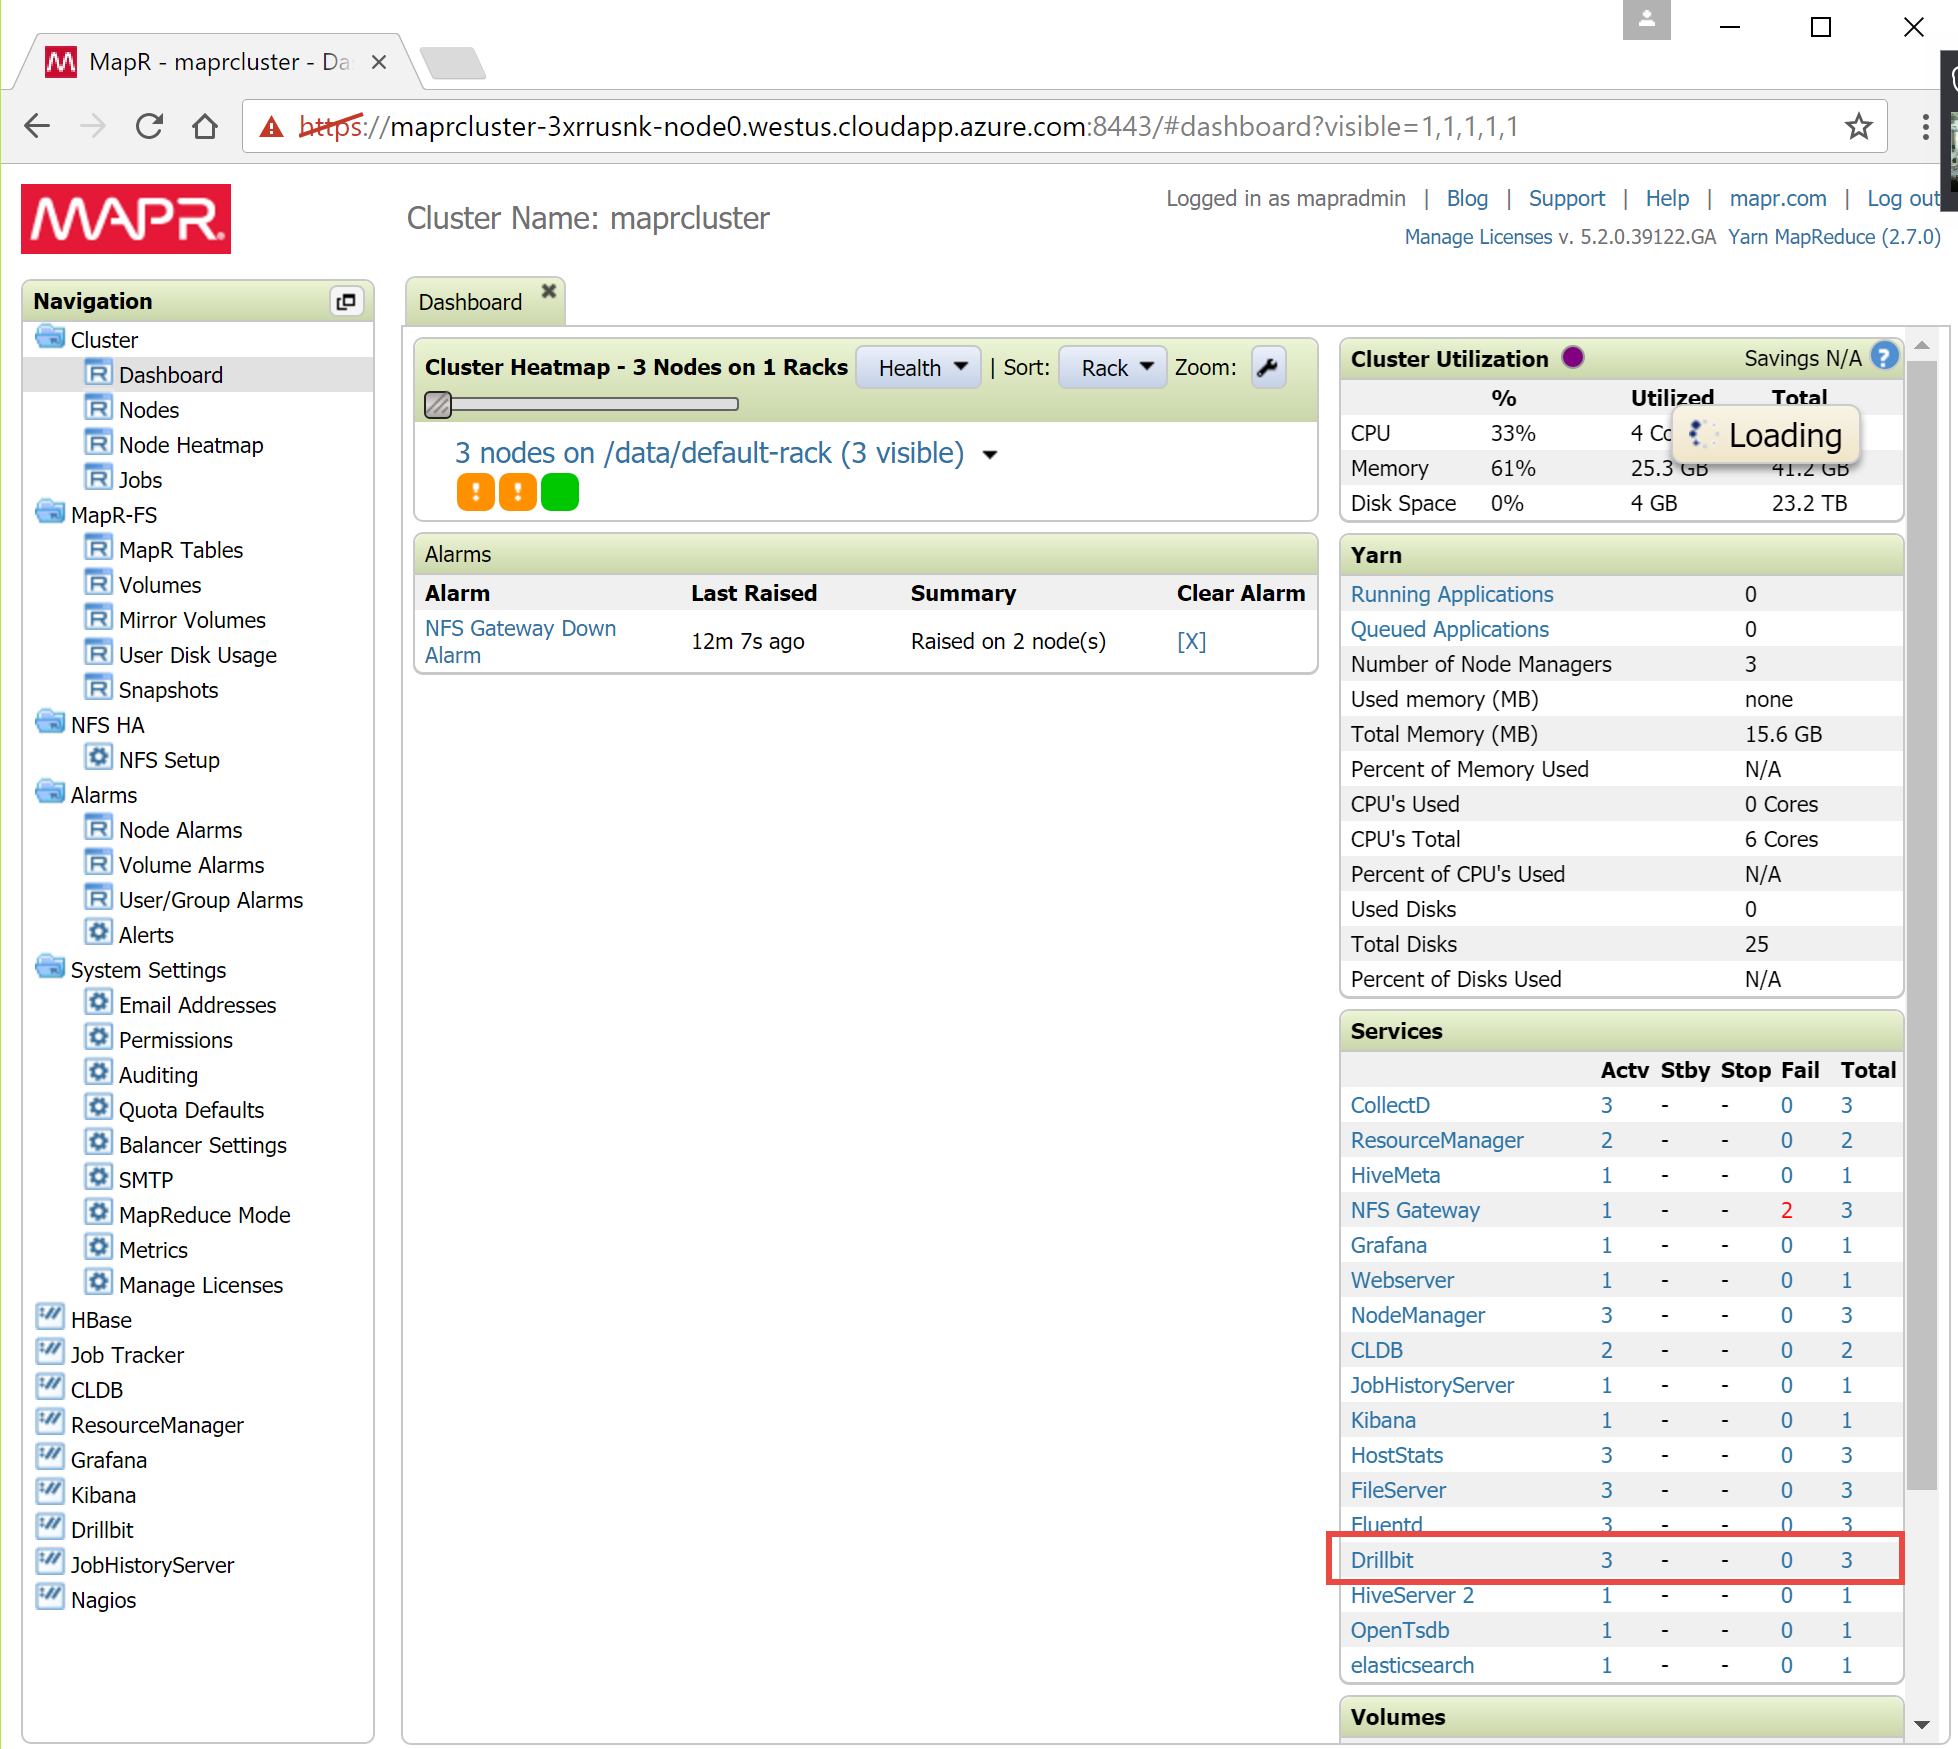
Doing this step, you should now be presented with the Drill Console’s default page. Verify that the number of running Drillbits matches the number of nodes in your cluster.

Should any nodes not be running Drill properly, you can connect to the MapR Dashboard on one of the running nodes via port 8443 using HTTPS. Again, use a modern browser to navigate to that address, log in the SysAdmin user name – default is mapradmin – and the password you provided in the first form in the deployment process. Once logged in, locate the Services pane on the right-hand side of the dashboard’s default page.
In the Services pane, click on Drillbit, and on the resulting page, change the filter from Running Services is Drillbit to Running Services is not Drillbit.
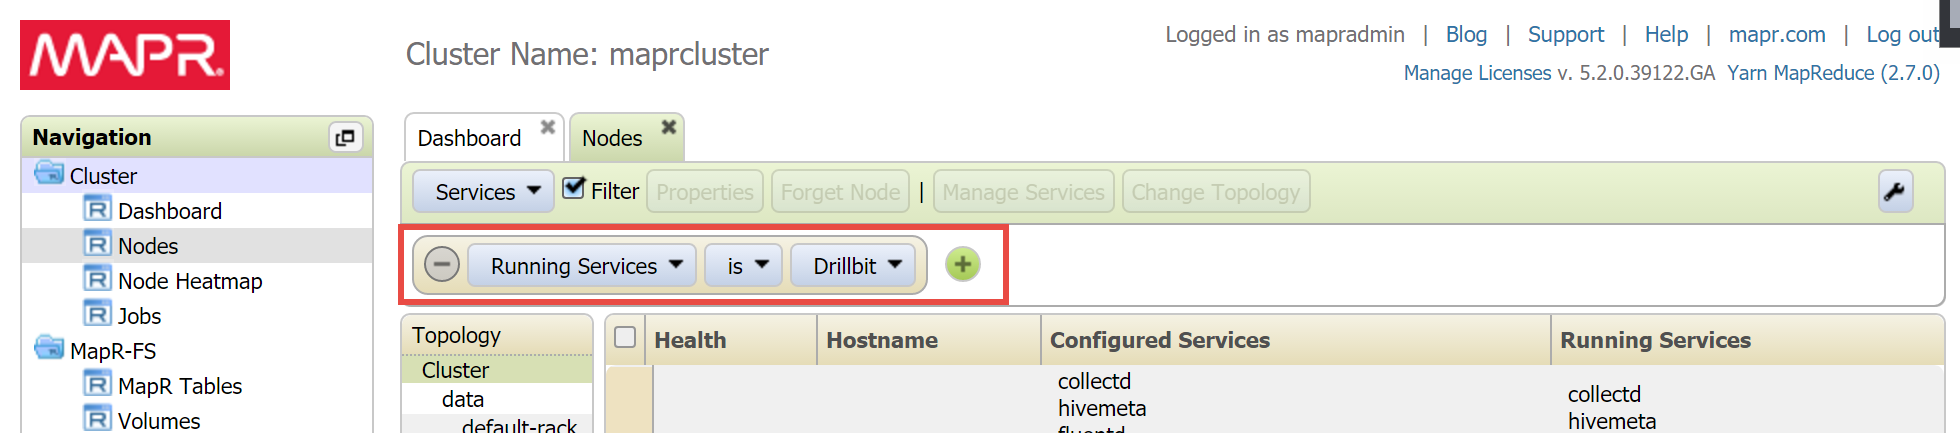
If any nodes are configured for Drillbits (under the Configured Services column) but are not running Drillbits, click on the Hostname to open the host’s page. Scroll to the bottom of the resulting page to locate the Manage Node Services pane, locate the Drillbit service listing in it, and click on the associated Stop/Start button to start the service.

Limit Access to the Cluster
The cluster as it exists in its post-deployment state is fairly exposed on the Internet. This situation may be fine if you intend to limit your work to tutorials or publicly available data sets, but before doing anything potentially sensitive with the cluster, you will want to start exercising more control over inbound communications with it. This alteration can be done rather easily by implementing a network security group on the virtual network containing the cluster.
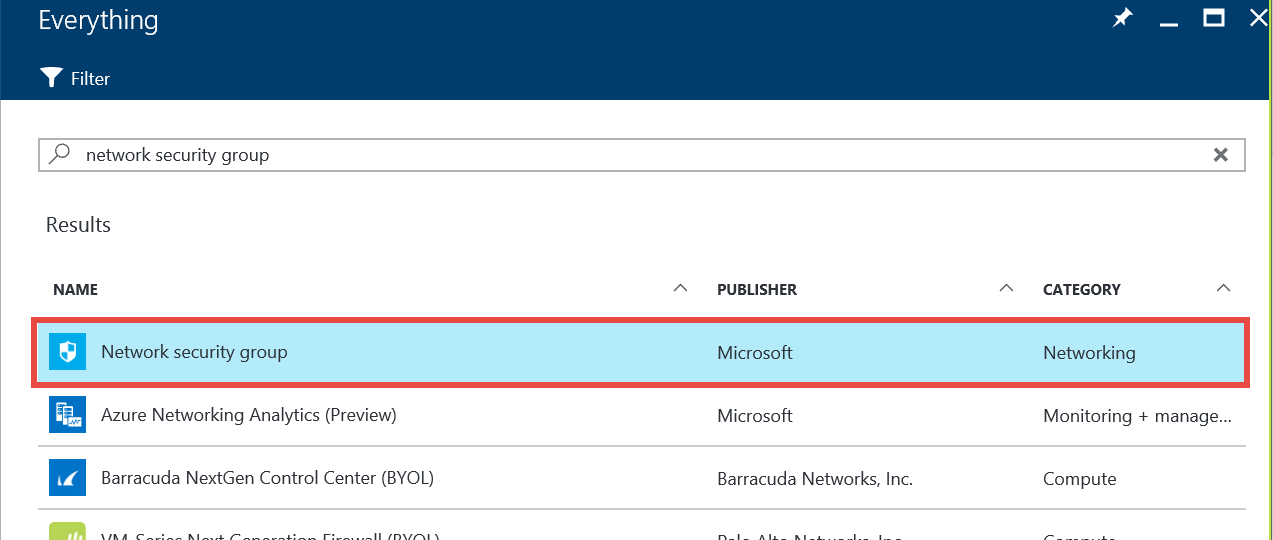
To set up a network security group, click on the +New option in the left-most pane of the Azure Portal dashboard. Enter network security group in the search box and select the Network security group item in the Results list.
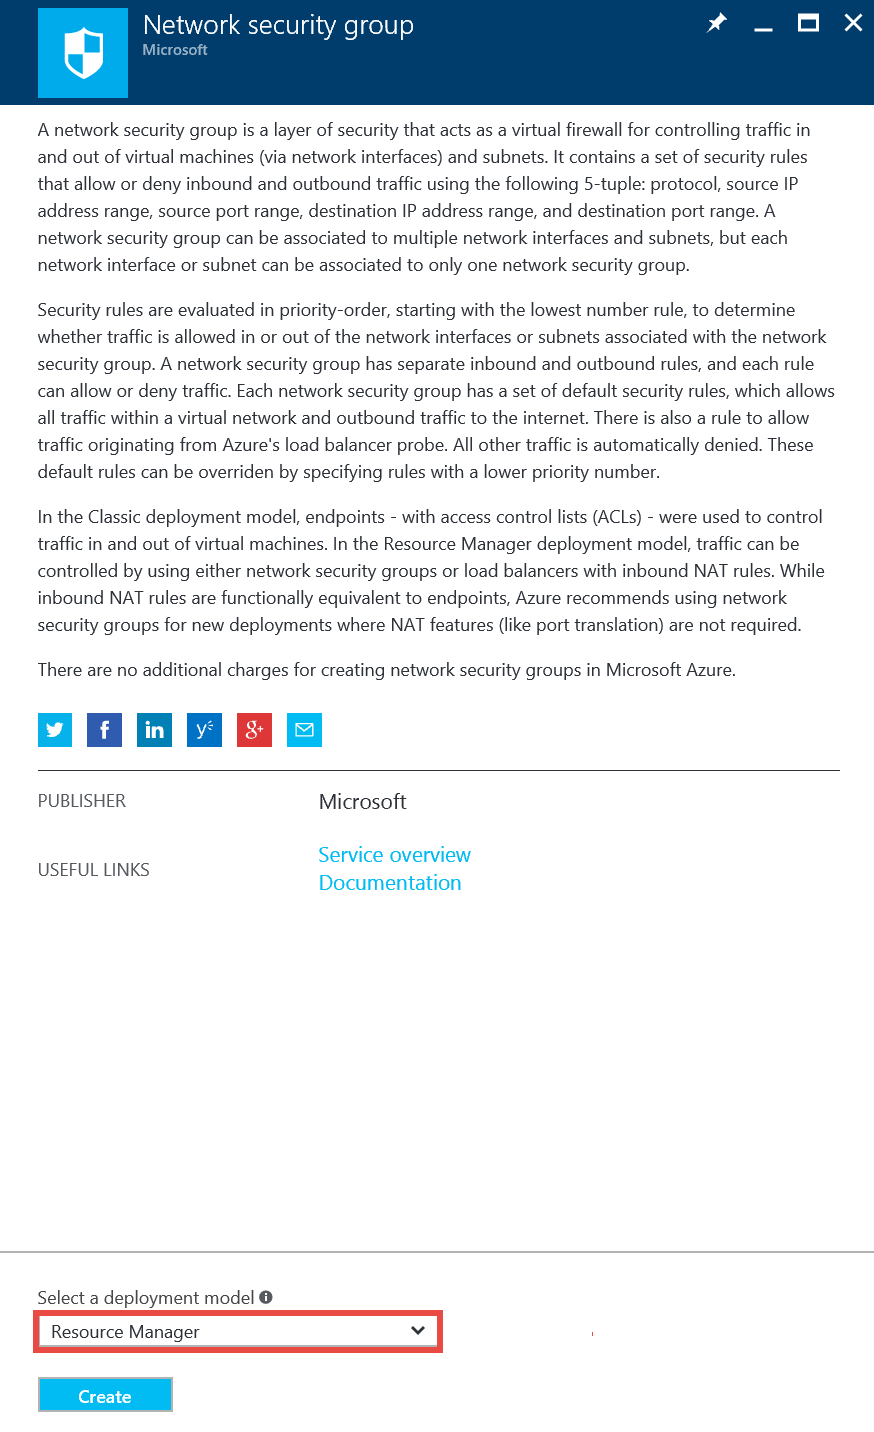
On the panel for the Network security group, make sure the deployment model is set to Resource Manager and then click the Create button to configure the deployment.
In the resulting form, enter a Name for the network security group, set its Subscription as before, and assign it to the same (Use existing) Resource group and Location used for your cluster deployment. Click Create to deploy the network security group. Deployment should take less than a minute.
Once the network security group deployment is completed, click on the resource group tile for your cluster. Note the presence of the network security group item in the list of resource group assets.

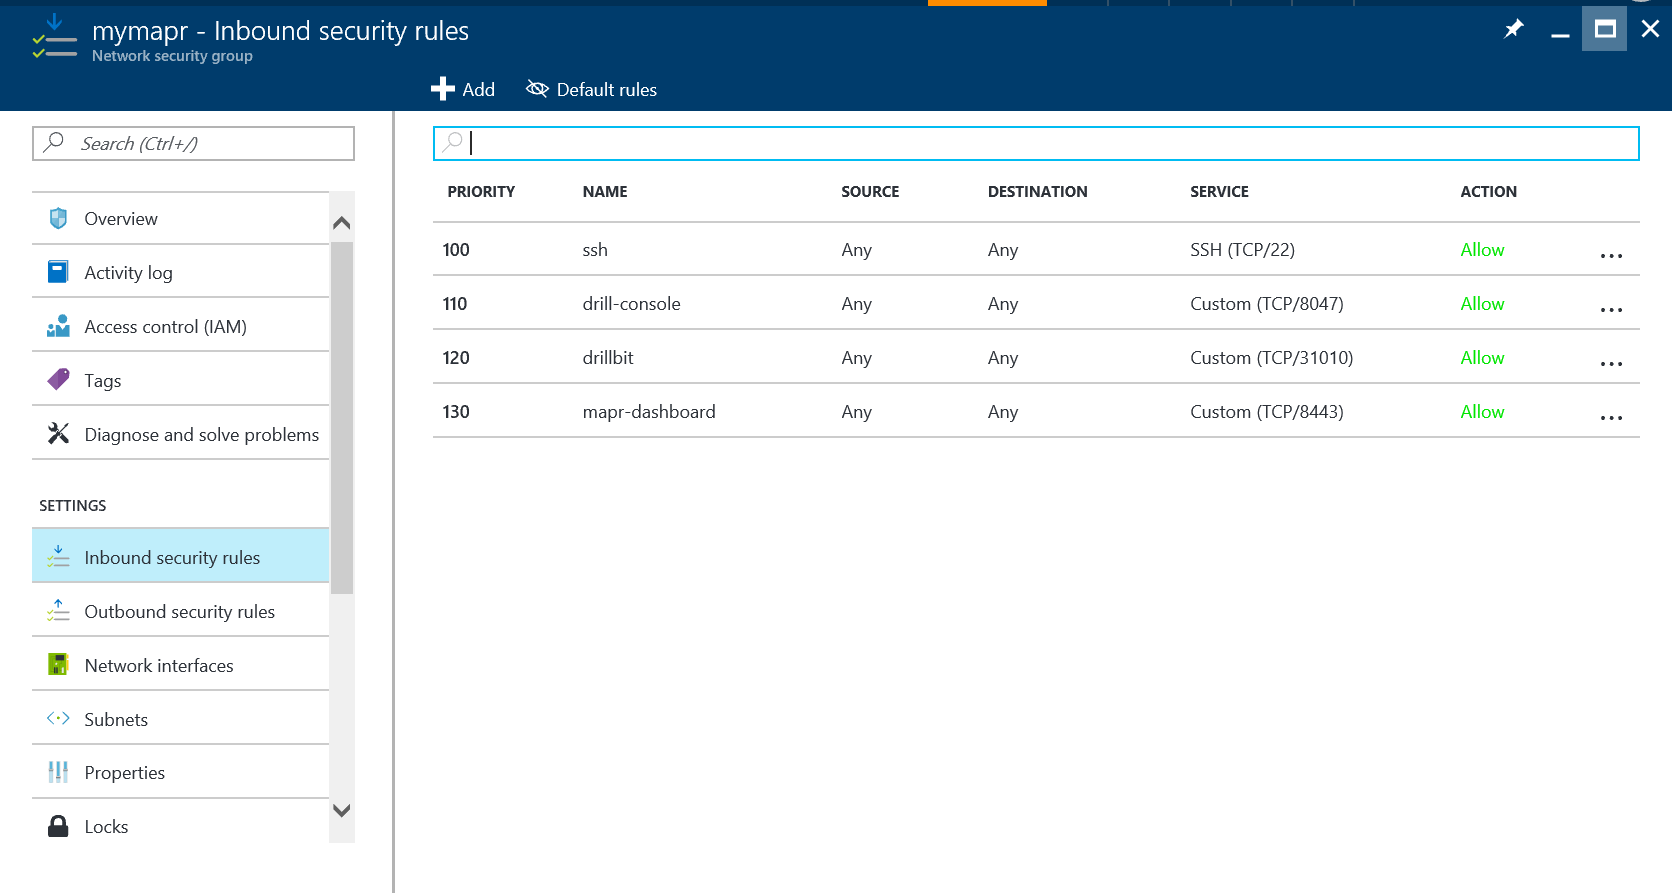
Click on the network security group item. Click on the Inbound security rules item in the left-hand navigation of the network security group’s panel, and click +Add at the top of the resulting pane to create a new rule.
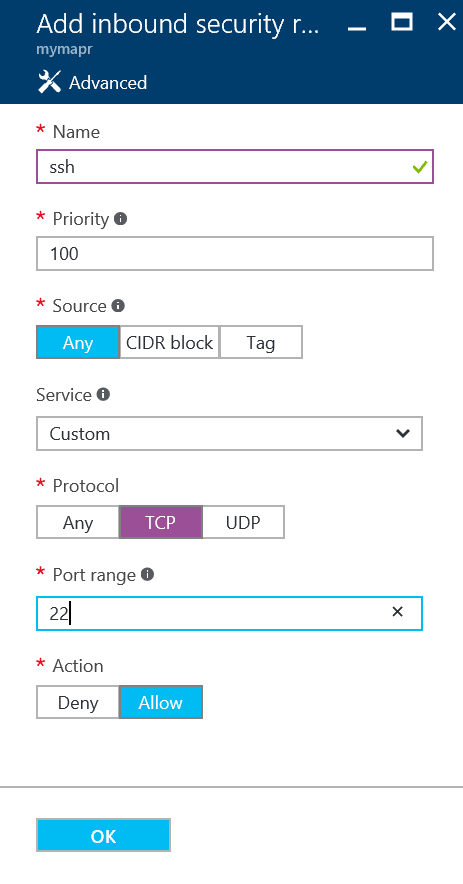
In the resulting Add inbound security rule panel, set the Name to SSH and leave Priority at 100. For the Source, you can leave the port open to Any IP address or specify a CIDR block that corresponds to your environment. Leave Service set to Custom (though SSH is preconfigured in that drop-down). For Protocol, select TCP and enter a Port range of 22 with an Action of Allow. Click OK. You now have a rule that allows SSH through the network security group. (You may need to give the Portal a few seconds for the new rule to appear in the list of Inbound security rules.)
Repeat these steps to add inbound security rules for Drill Console (TCP port 8047), Drillbit Connections (TCP port 31010), and the MapR Dashboard (TCP port 8443). (With each rule, allow the Priority to increment as suggested by the interface.)
With the rules in place, you now need to associate the network security group with the public network interfaces tied to your cluster nodes. To do this step, click on the Network interfaces item under the Inbound security rules item in the left-hand navigation of the network security group panel. Click the +Associate item in the resulting pane and select the first of the network interfaces associated with your cluster. Once associated, repeat this process for each of the remaining network interfaces in the cluster.

With the network configuration changes documented here, you have limited some of the exposure of your cluster to the Internet. The network security group you implemented allows traffic to enter on only 4 TCP ports (and potentially from a limited IP address range if you used the CIDR block option). All other ports are now blocked. If you need even tighter control over network access, consider blocking all Internet traffic into your cluster and implement a VPN to reach it.
Starting and Stopping the Cluster
To control cost, you may want to shut down your cluster when it is not needed. To take this step, return to the resource group associated with your cluster. Click on each virtual machine, starting with the highest numbered one, to access its panel.
At the top of the panel, click on the Stop button. Click Yes to confirm your selection and wait for the virtual machine’s status to change from Running to Deallocated. Once deallocated, the Azure meter is no longer running on the virtual machine. Repeat this process for the remaining virtual machines, working from the highest numbered one to the lowest.
To restart your cluster, simple return to the resource group and select Start for each virtual machine, working from the lowest numbered virtual machine to the highest. Once each virtual machine is in a running state, give the cluster a few minutes for services to start and be responsive before attempting to reconnect to it.
| Reference: | Deploying Drill on MapR in the Azure Cloud from our JCG partner Bryan Smith at the Mapr blog. |
