Building Identity Management, including authentication and authorization? Try Stormpath! Our REST API and robust Java SDK support can eliminate your security risk and can be implemented in minutes. Sign up, and never build auth again!
Massive Update
The code I originally wrote for this post is more suited to non-Spring Boot environments.
Stormpath’s existing Spring Boot integration for its IDSite service makes writing code for it a snap. It takes advantage of all the auto configuration that Spring Boot has to offer.
If your new to this post, read on. If you’ve read it before, jump on down to the Update Your Spring Boot Webapp section. You’ll see that the RestrictedController has been reduced from 40 lines down to 15 and from 4 methods down to 1.
The Main Event – Easy Single Sign-on
I love how Java keeps reinventing itself to stay current and relevant (I can hear all my Node.js and Ruby friends groaning). The ecosystem that supports Java is keeping pace with new developments as well. Today, it’s as easy today to build, test and deploy a rich Java web app as quickly as in Python or Node.js (more groans).
One piece of that is Spring Boot, which makes building and launching a Java webapp in minutes a reality. Heroku’s focus on Java support also speeds things along.
Finally, Stormpath means developers don’t have to build authentication and authorization workflows. Stormpath’s identity API and single sign-on functionality (via IDSite) provide out-of-the-box account registration, login, email workflows and single sign-on across applications. These flows include default forms and views, all of which are customizable.
In this post, we will put all that together and get the added bonus of single sign-on across your applications – all within 20 minutes.
Read on – tick tock!
Here are the prerequisites you need for this tutorial:
- Gradle 2.x
- On Mac:
brew install gradle
- On Mac:
- Heroku
- Create a Heroku account
- Install the Heroku Toolbelt
- Login to Heroku:
heroku login
- A Stormpath Account (which we will also cover below)
Note: You can just as easily use Maven. The source code that goes with this post includes a pom.xml, if that’s your prefered build tool.
To make it super easy, we’ve added a handy Heroku deploy button to each example, so you can see it in action right away. If this takes you more than 20 minutes, please let us know what held you up in the comments. We love feedback.
Launch Spring Boot – 5 Minute Tutorial
Note: If you are already well versed in the world of Spring Boot, you may want to jump to the next section. There – I just saved you 5 minutes. Your welcome.
This section uses the SpringBootBasic tag in the github repository.
![]()
Spring Boot enables you to fire up a fully functioning Java web application just like you would start a simple Java application. It has a main method and everything. For instance, the@SpringBootlApplication annotation does everything that the @Configuration,@EnableAutoConfiguration and @ComponentScan annotations (with their default attributes) do in a vanilla Spring application.
What makes Spring Boot work so well and so easily are Starter packages that add in functionality, including default configuration. The Stormpath Spring Boot Thymeleaf Starter we will use further on bakes in all of the Stormpath functionality for creating new users, logging in and changing passwords. All you do is reference a single jar in your build.gradle or pom.xml file.
For our basic example, we are going to include the core Spring Boot Starter Web and the Thymeleaf Spring Boot Starter. Thymeleaf is a modern HTML 5 Java templating engine.
Here’s our build.gradle:
buildscript {
    repositories {
        mavenCentral()
    }
    dependencies {
        classpath("org.springframework.boot:spring-boot-gradle-plugin:1.2.5.RELEASE")
    }
}

apply plugin: 'java'
apply plugin: 'maven'
apply plugin: 'spring-boot'

group = 'com.stormpath'
version = '0.1.0'

sourceCompatibility = 1.8
targetCompatibility = 1.8

repositories {
    mavenCentral()
}

dependencies {
    compile group: 'org.springframework.boot', name: 'spring-boot-starter-web', version:'1.2.5.RELEASE'
    compile group: 'org.springframework.boot', name: 'spring-boot-starter-thymeleaf', version:'1.2.5.RELEASE'
}
There are three more files we need to get our basic Spring Boot app going.
IDSiteDemoApplication.java is the application’s entry point:
package com.stormpath.idsite_demo;

import org.springframework.boot.SpringApplication;
import org.springframework.boot.autoconfigure.SpringBootApplication;

@SpringBootApplication
public class IDSiteDemoApplication {
    public static void main(String[] args) {
        SpringApplication.run(IDSiteDemoApplication.class, args);
    }
}
The @SpringBootApplication annotation sets up all the configuration necessary to launch the application.
HomeController.java maps a URI and resolves to a Thymeleaf template:
package com.stormpath.idsite_demo.controllers;

import org.springframework.stereotype.Controller;
import org.springframework.web.bind.annotation.RequestMapping;

@Controller
public class HomeController {
    @RequestMapping("/")
    public String home() {
        return "home";
    }
}
The @Controller and @RequestMapping annotations set this class up as a controller and configure it to handle requests at the / URI. Simply returning the String home hooks into the Thymeleaf template architecture which leads us to our final file:
home.html located in the templates folder is the template that will be rendered when browsing to /:
<!DOCTYPE html>
<html xmlns="http://www.w3.org/1999/xhtml" xmlns:th="http://www.thymeleaf.org">
    <head>
        <th:block th:include="fragments/head :: head"/>
    </head>
    <body>
        <div class="container-fluid">
            <div class="row">
                <div class="box col-md-6 col-md-offset-3">
                    <div class="stormpath-header">
                        <img src="http://stormpath.com/images/template/logo-nav.png"/>
                    </div>
                    <h1>Hello!</h1>
                </div>
            </div>
        </div>
    </body>
</html>Note: You may notice the th:include directive in the template above. This is part of the Thymeleaf architecture for including files in other files. The full source code for the example has thetemplates/fragments/head.html file.
Alrighty, then. Let’s round out this first 5 minutes by firing up this most basic of Spring Boot apps.
gradle clean build will do the trick. Then: java -jar build/libs/idsite_demo-0.1.0.jar
Add Stormpath for SpringBoot Authentication
This section uses the SpringBootStormpath tag in the github repository.
![]()
In this section, we’ll:
- Create a Stormpath Account
- Generate a Stormpath API Key Pair
- Add an Application to your Stormpath Account
- Update your Spring Boot webapp to show some Stormpath app information
- Fire it up and watch it work
Create a Stormpath Account
Go to the Stormpath Registration page. Enter your First and Last names, company, email and password.

Click Signup.
Click the link in the verification email you receive. Then, you will see the tenant name that’s been generated for you.
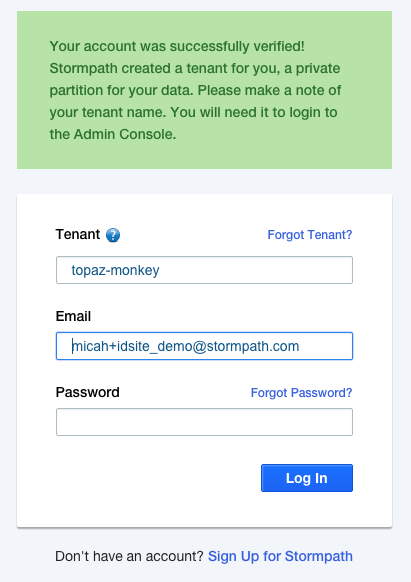
Login. Done.
Note: For more information on multi-tenant applications, we have a handy blog post on it.
Generate a Stormpath API Key Pair
Once you log in to your Stormpath account, you will see this screen:

Click the Create API Key button.

Click the Create API Key button and save the file.
The API Keys stored in that file are used to authenticate your application to Stormpath. In the file, there’s an apiKey.id and a apiKey.secret. You would never want the apiKey.secret exposed. So, for instance, you would never want to have the api keys file checked into a git repository. When we deploy to Heroku later on, I will show you how to configure your app to use the api keys without having to have them in the git respository.
Stormpath uses well documented configuration defaults to make working with our APIs super easy. One of these defaults is the api key file location. The Java SDK will automatically look for the file in your home directory:
~/.stormpath/apiKey.properties
If you copy the file you downloaded to that path, no additional configuration is required to connect to Stormpath from your application.
Add an Application to Your Stormpath Account
Back on the admin dashboard, click the Applications tab.
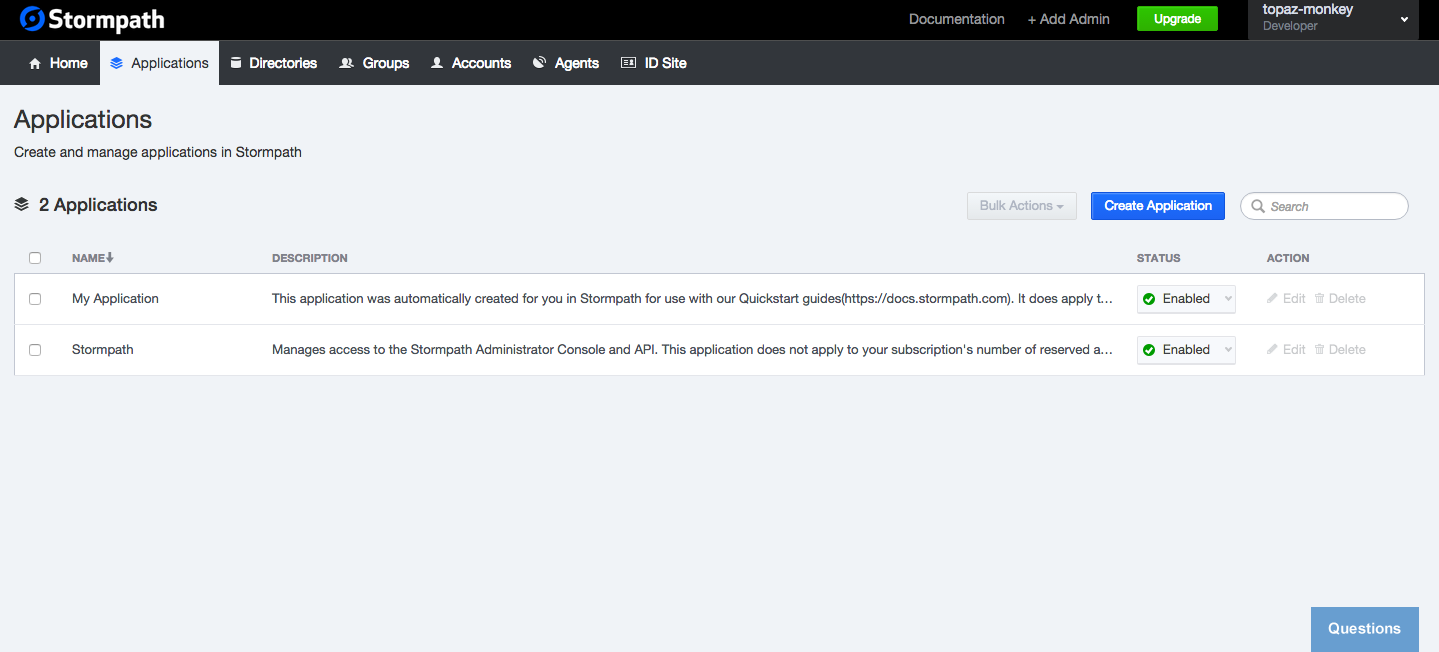
You will notice that there are two applications already present: My Application and Stormpath. They were setup automatically when you registered for Stormpath. Without any other Stormpath applications defined, no further configuration is needed for your Spring Boot application. By default, it will connect to the My Application instance already defined.
However, the ultimate goal here is to get some Single Signon goodness and in order to do that, we’ll need more than one application to sign in to.
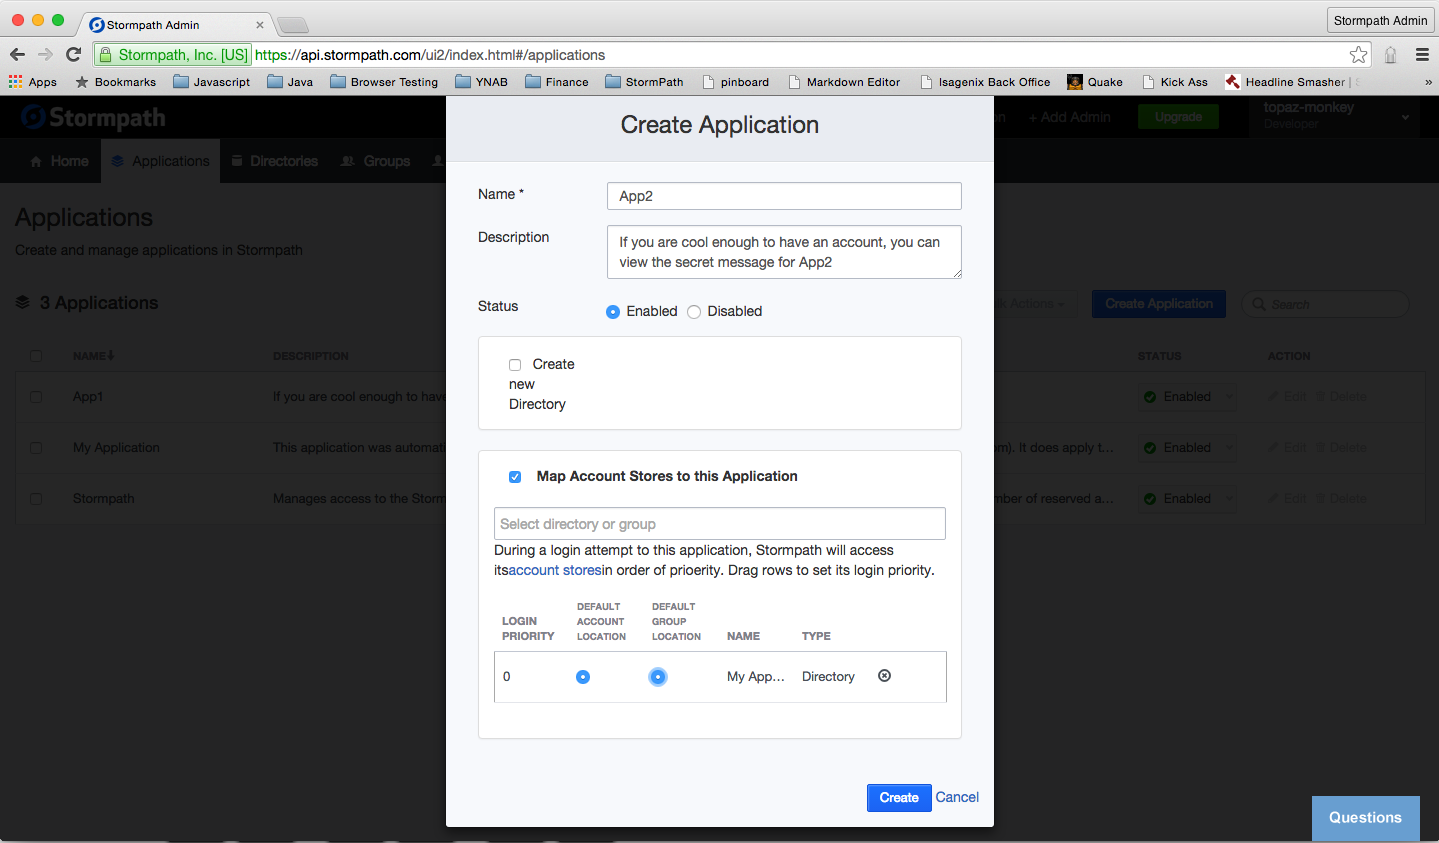
So, let’s create another Stormpath application. Click the Create Application button.
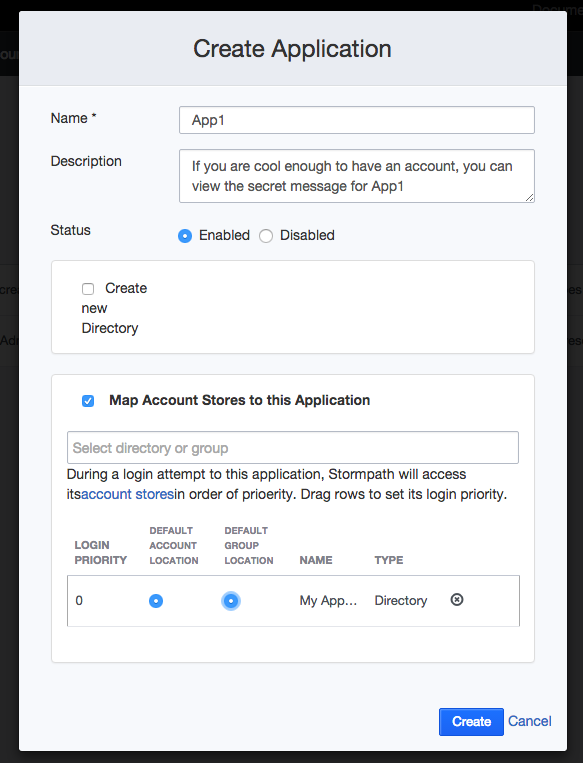
Let’s break down the options here.
Name and (optional) description are self explanatory. And, it makes sense that we want this application Enabled.
By default, the Create new Directory checkbox is checked. For our example, I’ve unchecked this option. Rather, I’ve checked the Map Account Stores to this Application checkbox and chosen theMy Application Directory. Finally, I’ve clicked the DEFAULT ACCOUNT LOCATION and DEFAULT GROUP LOCATION radio buttons.
So, what’s going on here? The way that Stormpath is organized, an application can use any number of directories as its Account Stores. A Stormpath directory is just a bucket that contains accounts and groups. For our purposes, we can use the directory that was automatically created for us when we registered called My Application Directory. In the bonus section below, I will show you how to create a specific type of directory to add Google authentication to your app. Spoiler alert: It’s super easy.
Update Your Spring Boot Webapp
Let’s hook up our basic Spring Boot app to Stormpath to show some Stormpath app information. This will lay the foundation for being able to integrate with the ID Site service.
Take a look at our HomeController:
package com.stormpath.idsite_demo.controllers;

@Controller
public class HomeController {
    @Autowired
    Application app;

    @RequestMapping("/")
    public String home(Model model) {
        model.addAttribute("appName", app.getName());
        model.addAttribute("appDescription", app.getDescription());

        return "home";
    }
}
We’ve now taken advantage of Spring’s @Autowired capability to give us a handle to the StormpathApplication object. Using that, we set the Application’s name and description in the Model object which will be passed on to our template.
This brings us to our next change, the home.html Thymeleaf template:
<!DOCTYPE html>
<html xmlns="http://www.w3.org/1999/xhtml" xmlns:th="http://www.thymeleaf.org">
<head>
<th:block th:include="fragments/head :: head"/>
</head>
<body>
<div class="container-fluid">
<div class="row">
<div class="box col-md-6 col-md-offset-3">
<div class="stormpath-header">
<img src="http://stormpath.com/images/template/logo-nav.png"/>
</div>
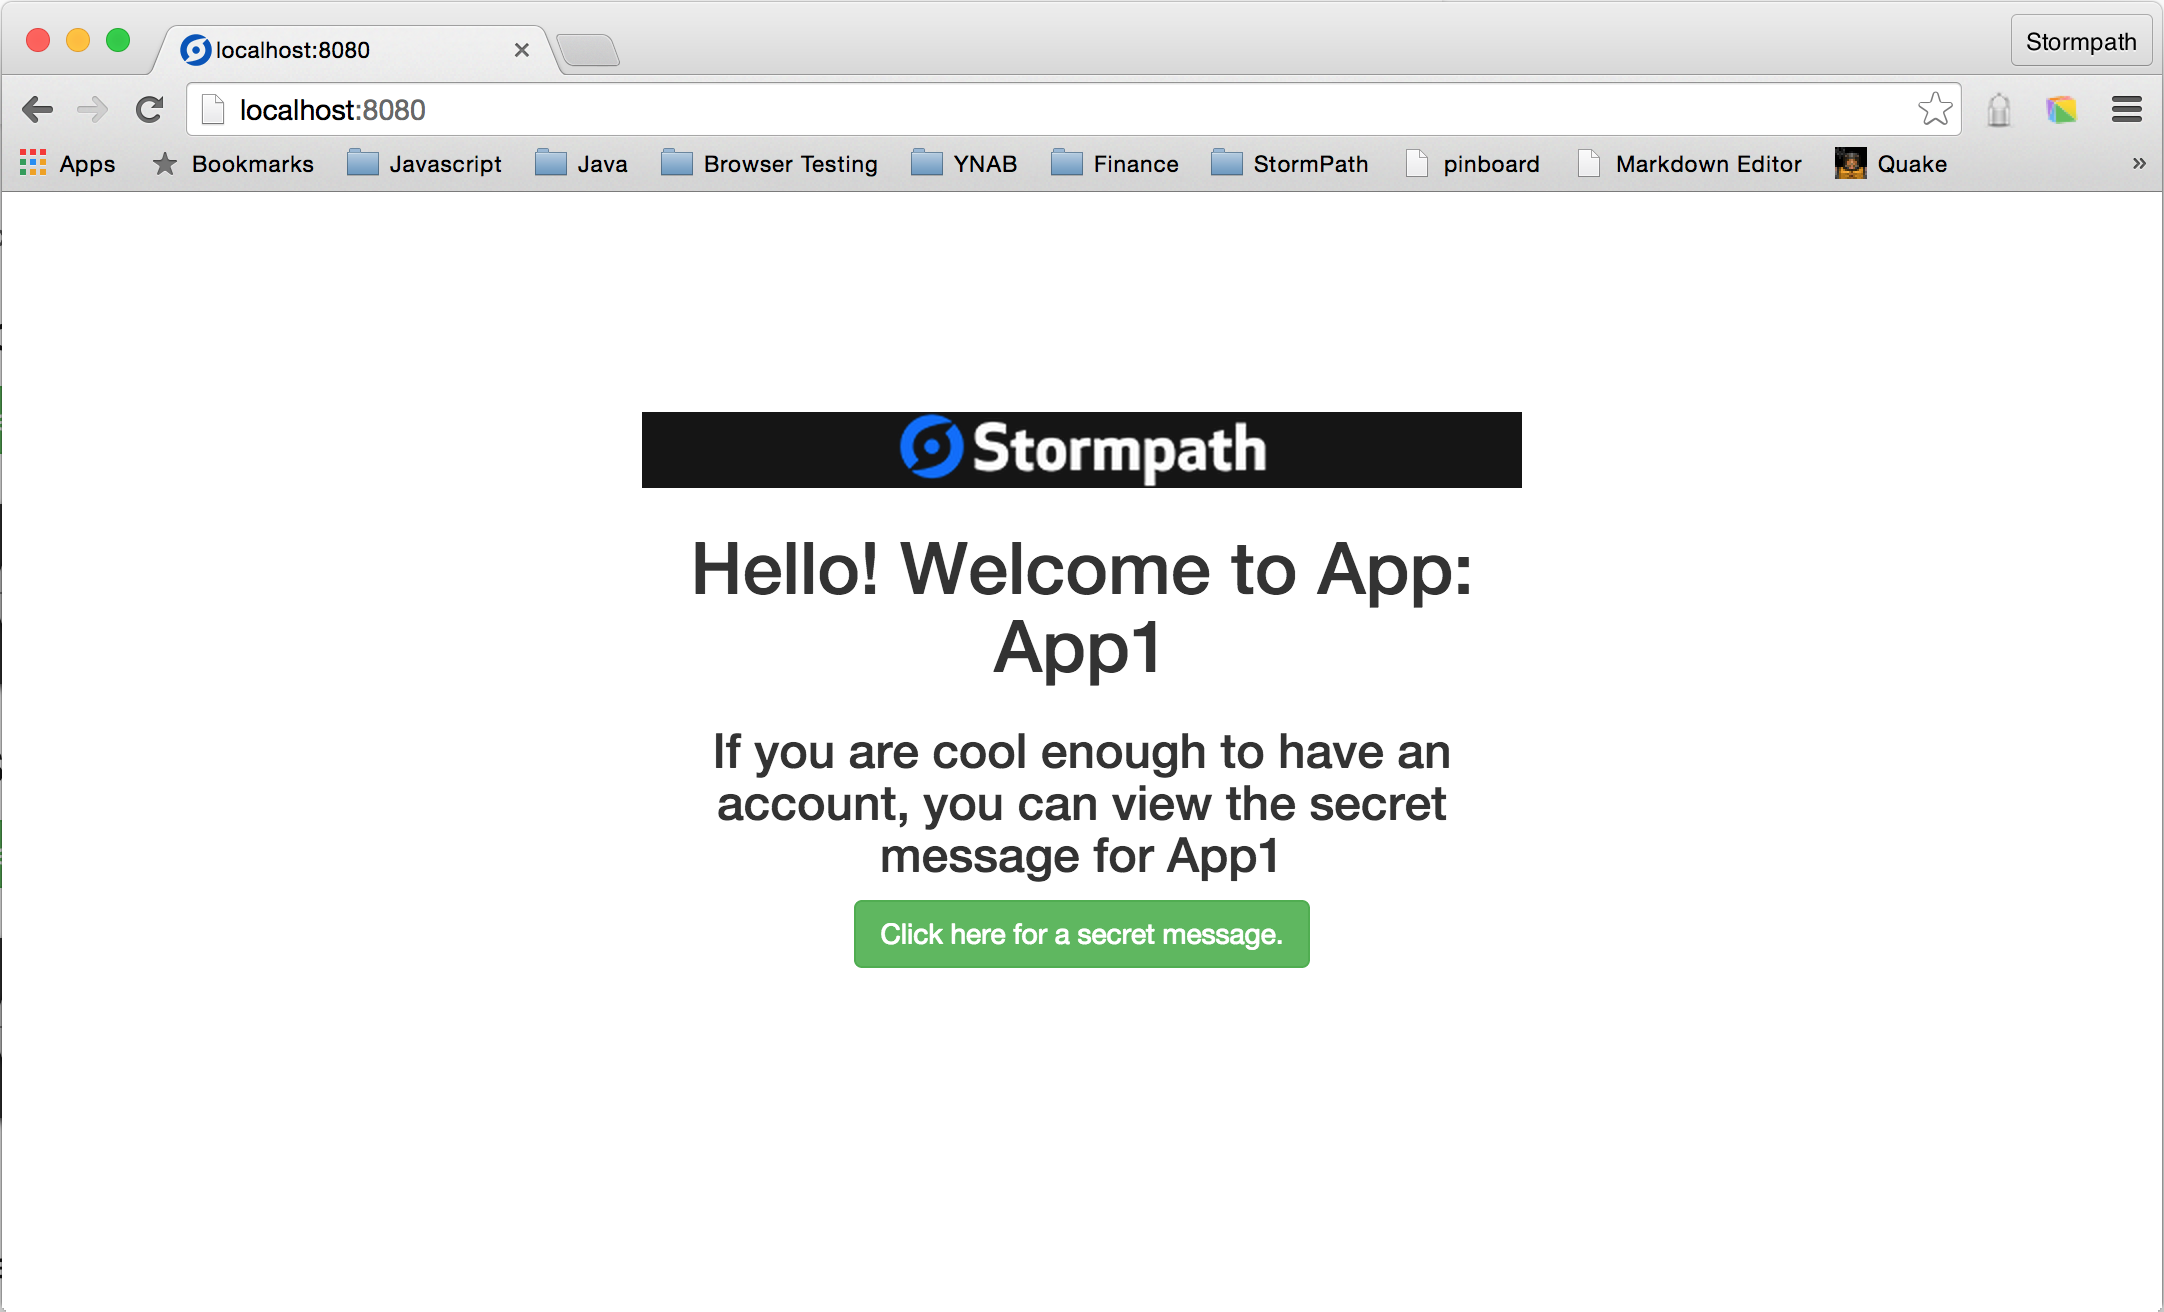
<h1 th:inline="text">Hello! Welcome to App: [[${appName}]]</h1>
<h3 th:inline="text">[[${appDescription}]]</h3>
</div>
</div>
</div>
</body>
</html>Using the Thymeleaf notation to pull information out of the model, we are referencing [[${appName}]]and [[${appDescription}]].
Finally, we’ll make a small (but powerful) update to out build.gradle file. We are changing this line:
compile group: 'org.springframework.boot', name: 'spring-boot-starter-thymeleaf', version:'1.2.5.RELEASE'
to this:
compile group: 'com.stormpath.spring', name: 'spring-boot-starter-stormpath-thymeleaf', version:'1.0.RC4.5'
We’ve swapped out Spring’s Thymleaf Spring Boot Starter for Stormpath’s. Here’s the cool bit: everything needed to interact with the Stormpath Java SDK is included in this Starter.
There’s a total of 7 lines that have changed in our application files and one file,application.properties that we’ve added in order to start hooking in to Stormpath.
Build Your Java Web Application
One extra bit of information we will need here is the URL to the Stormpath Application you created.
You can find this from the admin dashboard by navigating to your Application.
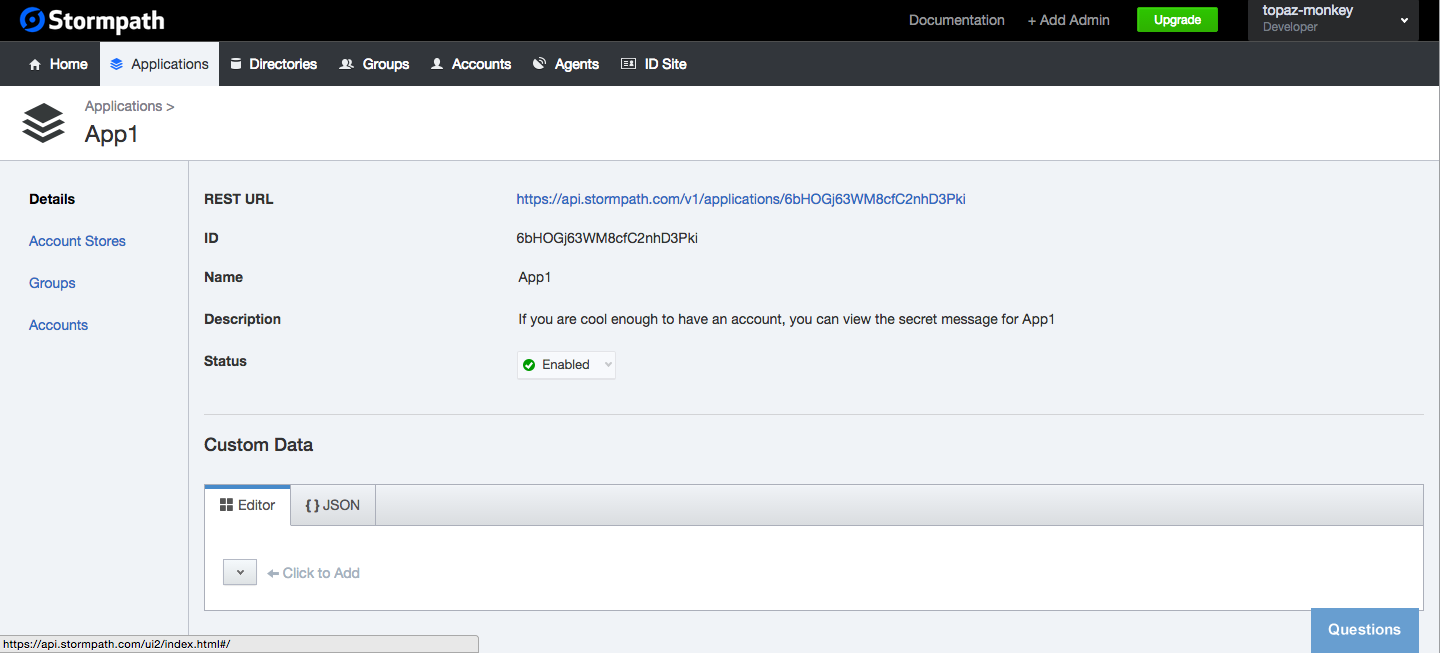
Assuming that you put your api key file in the default location of ~/.stormpath/apiKey.properties, this is all you need to do run this example:
gradle clean build
STORMPATH_APPLICATION_HREF=https://api.stormpath.com/v1/applications/6bHOGj63WM8cfC2nhD3Pki \
  java -jar build/libs/idsite_demo-0.1.0.jar
Of course, you would put your own STORMPATH_APPLICATION_HREF in.
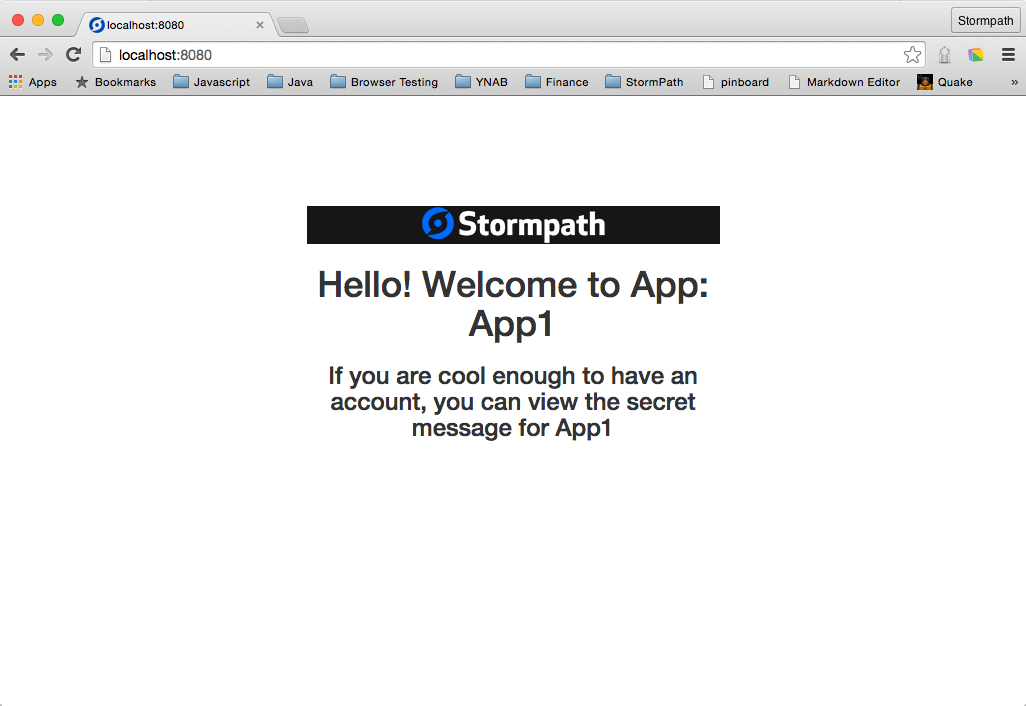
You can see that the page in the browser is now displaying the information from the Stormpath Application that we created.
Stormpath Single Sign-On with IDSite…
…you guessed it. In Five Minutes.
This section uses the SpringBootStormpathIDSite tag in the github repository.
![]()
You may have had the experience of adding authentication and authorization to your applications. Maybe you did it upfront. Maybe it was something you said you’d get to – eventually. Either way it’s a pain. And, it has nothing to do with the problem you are trying to solve. It is critical and necessary, though.
In this section, we are going to add the ability to create new users, login, restrict access to a page to only those users that are logged in and change your password. And, we are going to do it with minimal coding and minimal configuration.
ID Site Configuration
First, we’ll setup IDSite from the admin dashboard. Click the ID Site tab.

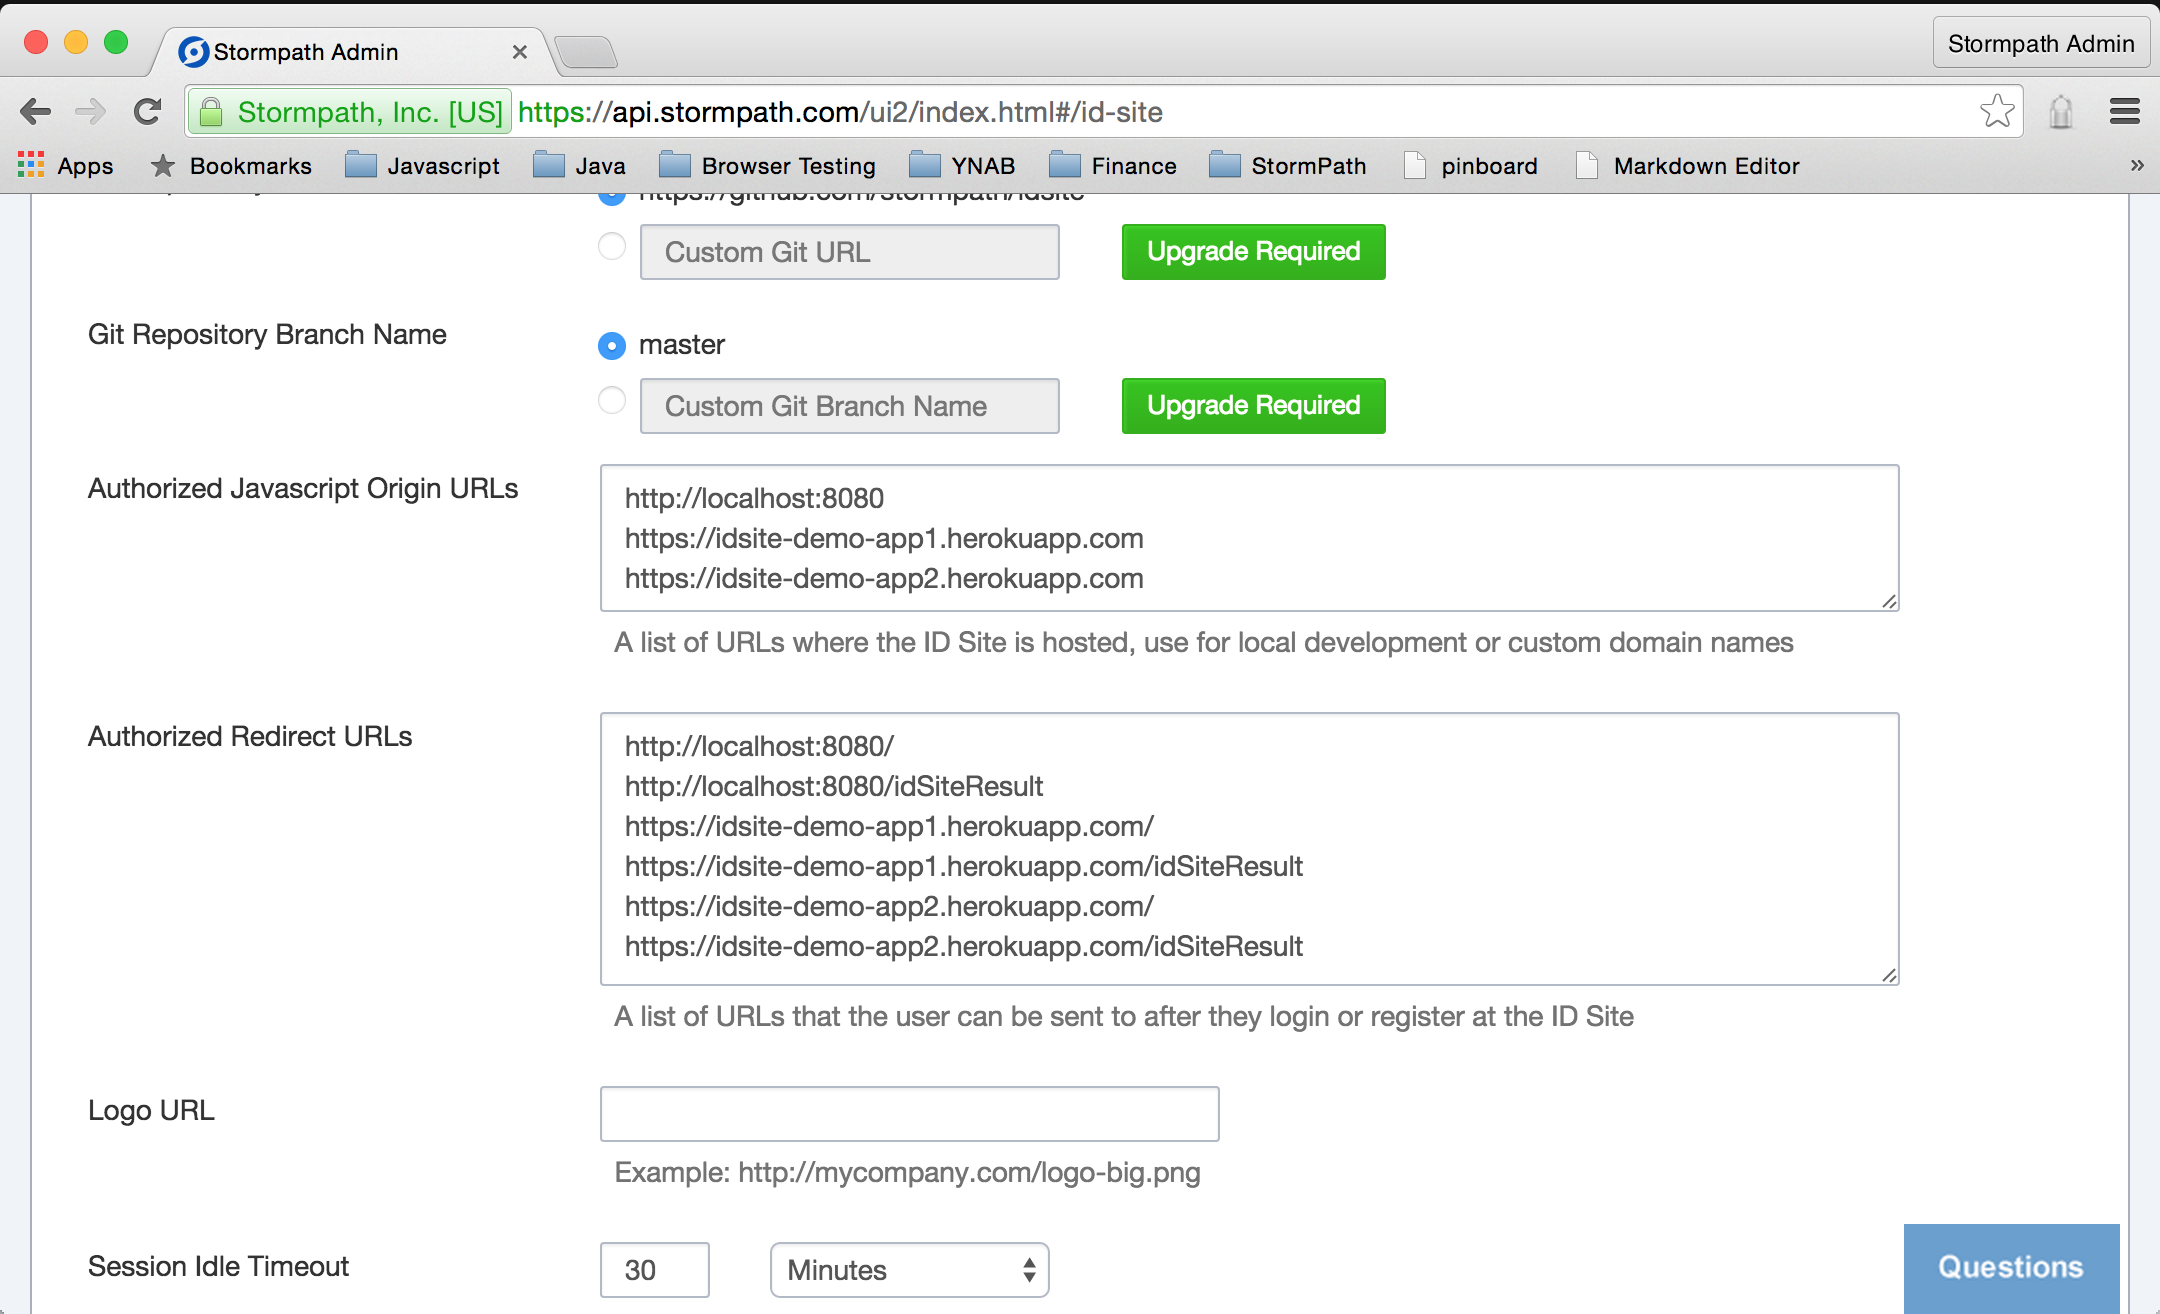
As you scroll around, you will notice that there are a number of fields with the label Upgrade Required. The basic ID Site functionality can be used with our free tier, as we will see momentarily. Having a custom domain or customizing the templates used for authentication requires a paid subscription.
Here, we are simply going to update two fields and save the settings.
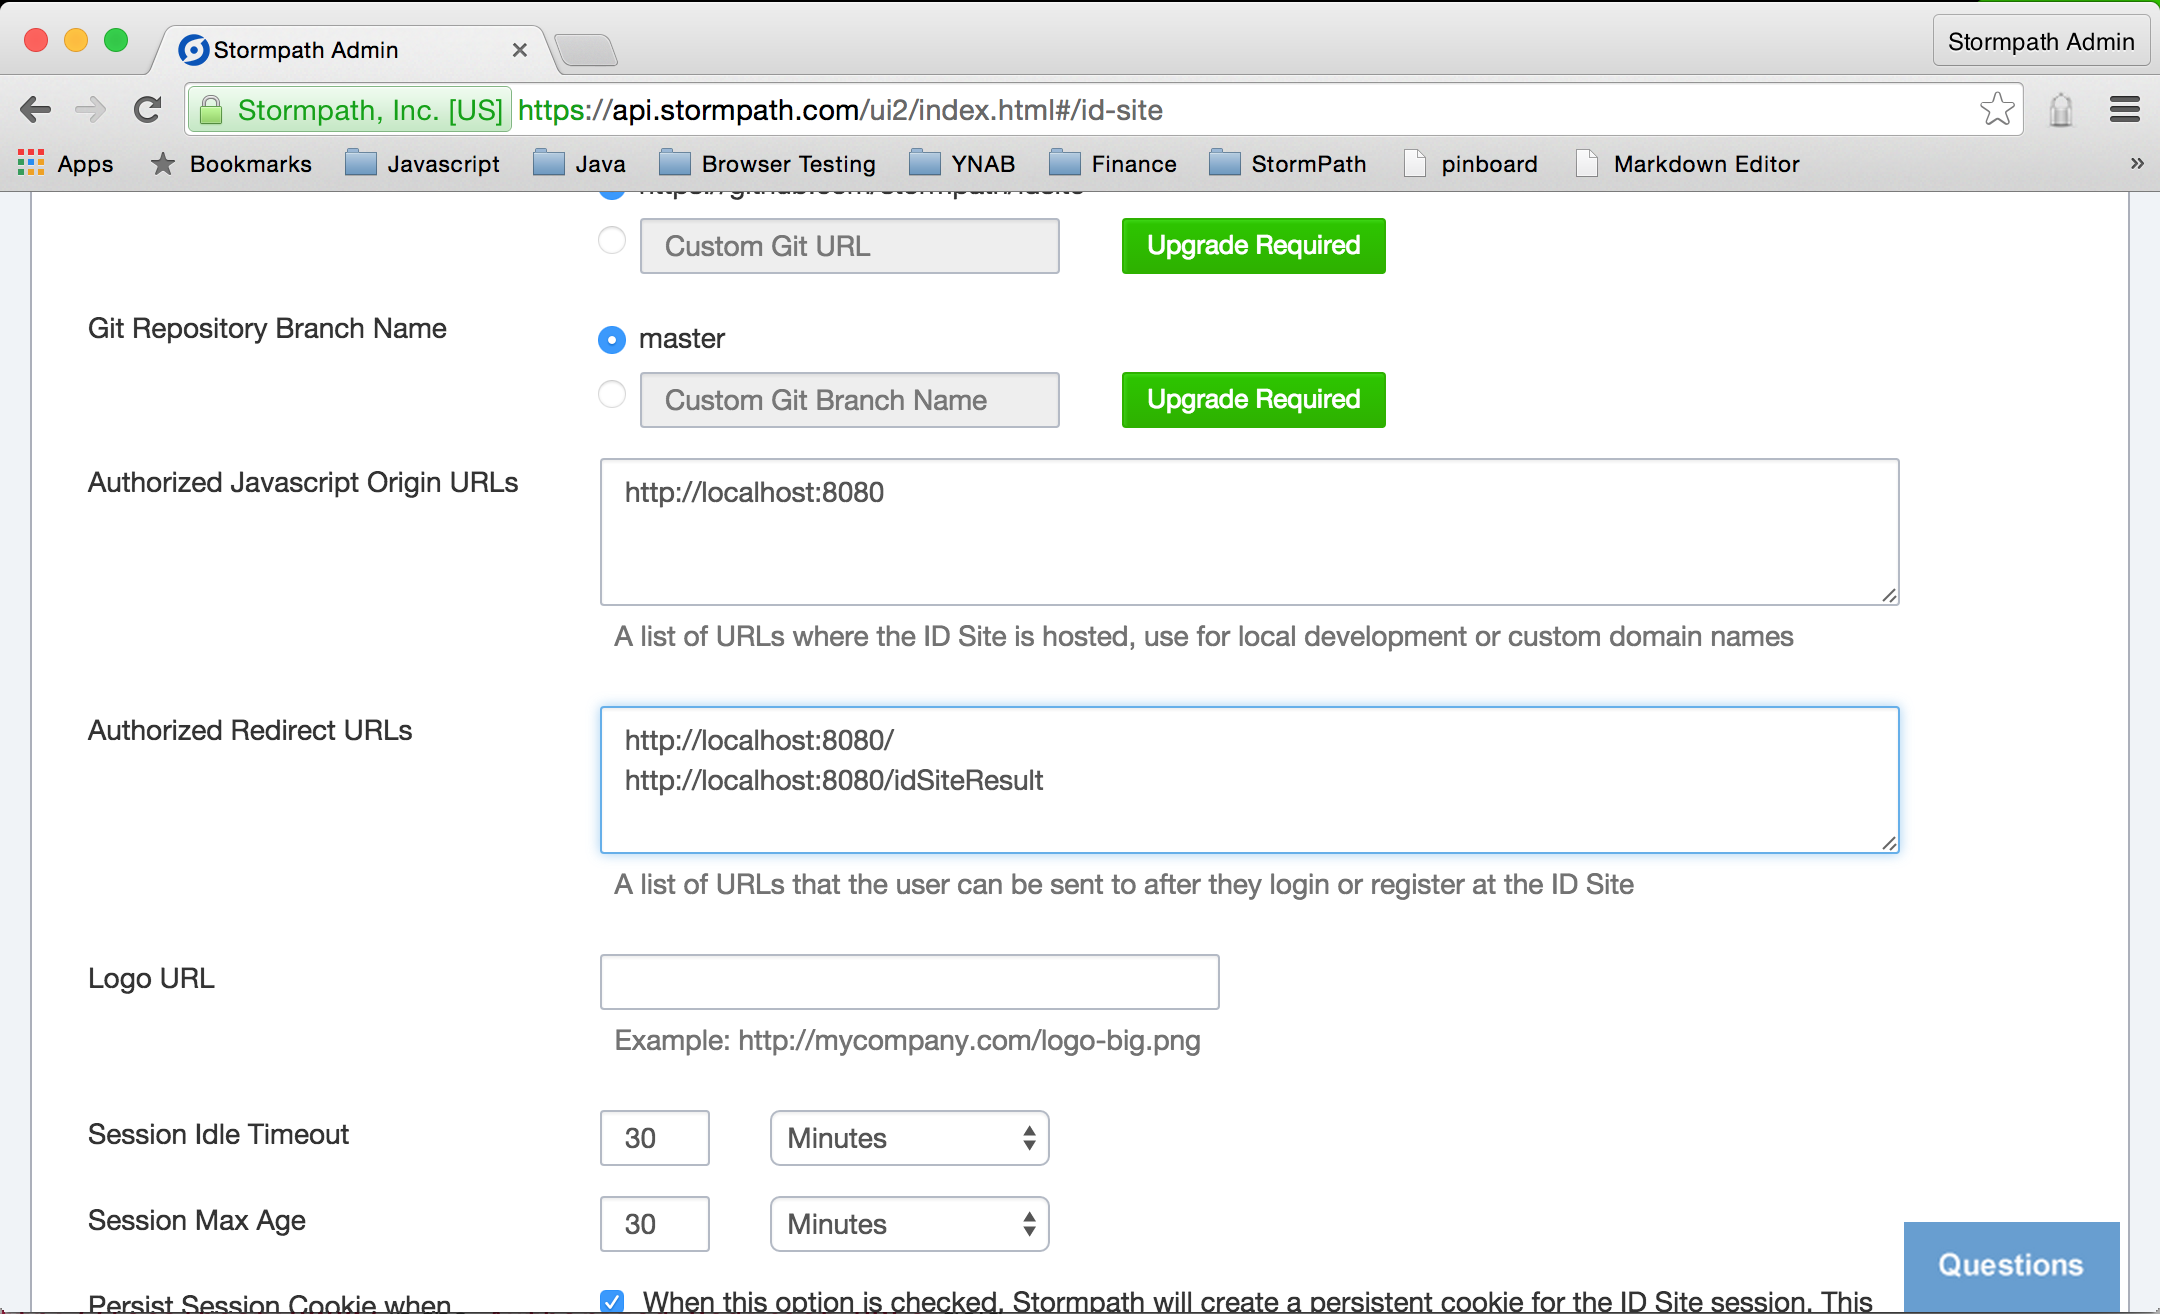
For security, you must specify a list of URLs that are allowed to make connections to your ID Site.
Enter http://localhost:8080 in the Authorized Javascript Origin URLs field.
For the security reasons, you must specify a list of authorized redirect URLs.
Enter http://localhost:8080/ and, on a separate line, http://localhost:8080/idSiteResult in theAuthorized Redirect URLs field.
Click the Save button. That’s all that’s necessary to configure your ID Site to enable authentication and authorization in your app.
Let’s take a step back and use a precious 30 seconds of our 5 minutes to look at the mechanism behind ID Site.
When a user attempts to access a restricted area of your website, they will be redirected to your ID Site, IF they do not already have an active session.
They will be presented with a familiar login form complete with options to create a new user and to reset their password.
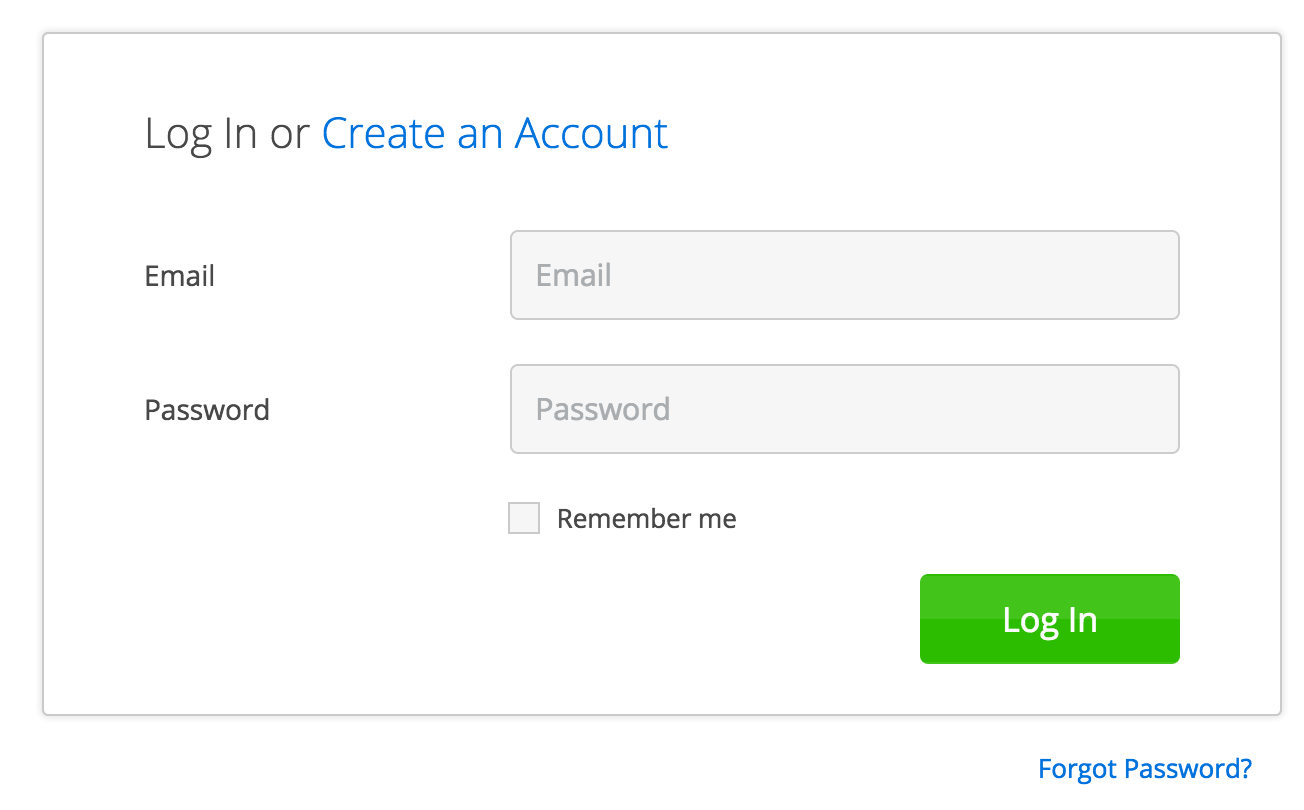
Where did this come from? Is it magic? It’s part of what you get for using ID Site – all the authentication and authorization flows that you usually write on your own. Poorly. (ouch – that was a little harsh. But, seriously – how often do you read about security breaches due to poorly implemented auth code?)
Once authenticated, they will be redirected back to the URL you specify and will be able to access that restricted content.
This process will seem utterly familiar to your users – even mundane. And you will have accomplished it with very little configuration or coding.
Update Your Spring Boot Webapp
Enabling IDSite for your Spring Boot application is handled with a single property inapplication.properties. We’ll also two additional lines to control flow.
stormpath.web.idSite.enabled = true
stormpath.web.login.nextUri = /restricted/secret
stormpath.web.logout.nextUri = /?status=logout
Line 1 enables IDSite for you application. Yup. That’s all it takes!
IDSite has defaults standard auth flows. By default, /login redirects to / after a user is authenticated and /logout redirects to /login?status=logout after the session is destroyed.
For our application, once a user is authenticated, we want them redirected back to/restricted/secret. And, once a user logs out, we will redirect them back to the front door with a status of logout. Lines 2 and 3 above accomplish this.
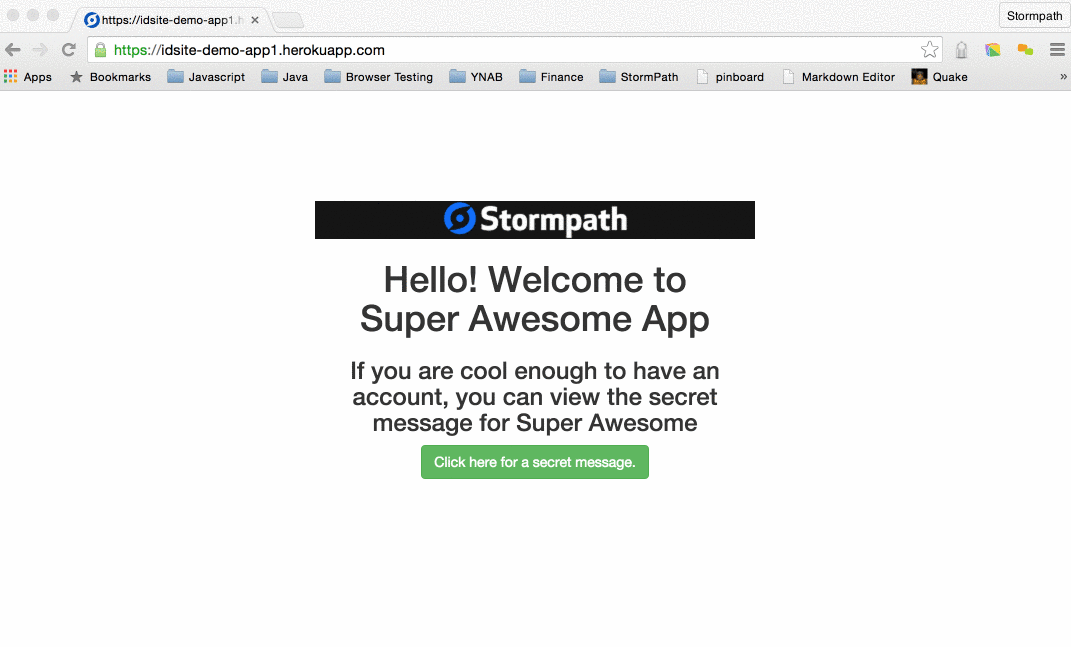
We are adding a single line in to our home.html template that kicks off the whole login flow:
<a class="btn btn-success" href="/restricted/secret">Click here for a secret message.</a>
We are going to add about 15 lines of code in a new controller – total – to hook into ID Site.
Let’s take a look at that controller, RestrictedController.java.
package com.stormpath.idsite_demo.controllers;

@Controller
public class RestrictedController {
    @Autowired
    Application app;

    @Value("#{ @environment['stormpath.sso.cross.link'] ?: '/' }")
    private String crossLink;

    @Value("#{ @environment['stormpath.sso.message.primary'] ?: 'Primary' }")
    private String messagePrimary;

    @Value("#{ @environment['stormpath.sso.message.secondary'] ?: 'Secondary' }")
    private String messageSecondary;


    @RequestMapping("/restricted/secret")
    public String secret(HttpServletRequest request, Model model) {
        Account account = AccountResolver.INSTANCE.getAccount(request);

        if (account == null) {
            return "redirect:/login";
        }

        model.addAttribute("appName", app.getName());
        model.addAttribute("crossLink", crossLink);
        model.addAttribute("messagePrimary", messagePrimary);
        model.addAttribute("messageSecondary", messageSecondary);
        return "restricted/secret";
    }
}
Let’s break this down:
Lines 8, 11 and 14 make use of the standard Spring facility for injecting values.
Referencing environment variables ala @environment['stormpath.sso.message.primary'] pulls in properties found in applications.properties.
Here’s the great part: Stormpath has a built in facility for converting system environment variables into application environment variables. This makes it super easy for us to set environment variables in a deployment environment like Heroku.
Here’s how it works: system environment variables are converted to lowercase and underscores are replaced with periods.
So, STORMPATH_SSO_MESSAGE_PRIMARY is converted to stormpath.sso.message.primary.
crossLink is used in the context of single sign-on. This variable holds a fully qualified URL to the restricted page of another application that’s setup in your IDSite.
messagePrimary and messageSecondary are used to set the messages that are displayed on the restricted page.
These three variables make it possible for us to deploy the same codebase to multiple Heroku applications and show different messages on the restricted page.
Here’s what’s going on behind the scenes with IDSite:
- On the home page, you click on the
Click here for a secret message.which links to/restricted/secret. - The
secretmethod inRestrictedControlleris entered based on the@RequestMappingannotation. - The
accountvariable will come up asnullsince a session has not been established yet. - Based on the conditional on line 22, you will be redirected to the
/loginpage. - The login page is hosted by your IDSite.
- Once you enter your credentials and hit the
Loginbutton, you will be redirected back to your application. - Your Spring Boot application automatically handles the
/idSiteResultcallback that your IDSite redirects back to. - Based on the settings in
applications.properties, the built-in IDSite callback handler will redirect to/restricted/secret - This time through, there is a session and the
accountvariable will not benull. - Finally, the
restricted/secrettemplate will be returned.
All of the redirecting between lines 6 and 10 happens in the blink of an eye.
Let’s take a look at the new template, restricted/secret.html:
<!DOCTYPE html>
<html xmlns="http://www.w3.org/1999/xhtml" xmlns:th="http://www.thymeleaf.org">
<head>
<title>Hello World!</title>
<th:block th:include="fragments/head :: head"/>
</head>
<body>
<div class="container-fluid">
<div class="row">
<div class="box col-md-6 col-md-offset-3">
<div class="stormpath-header">
<img src="http://stormpath.com/images/template/logo-nav.png"/>
</div>
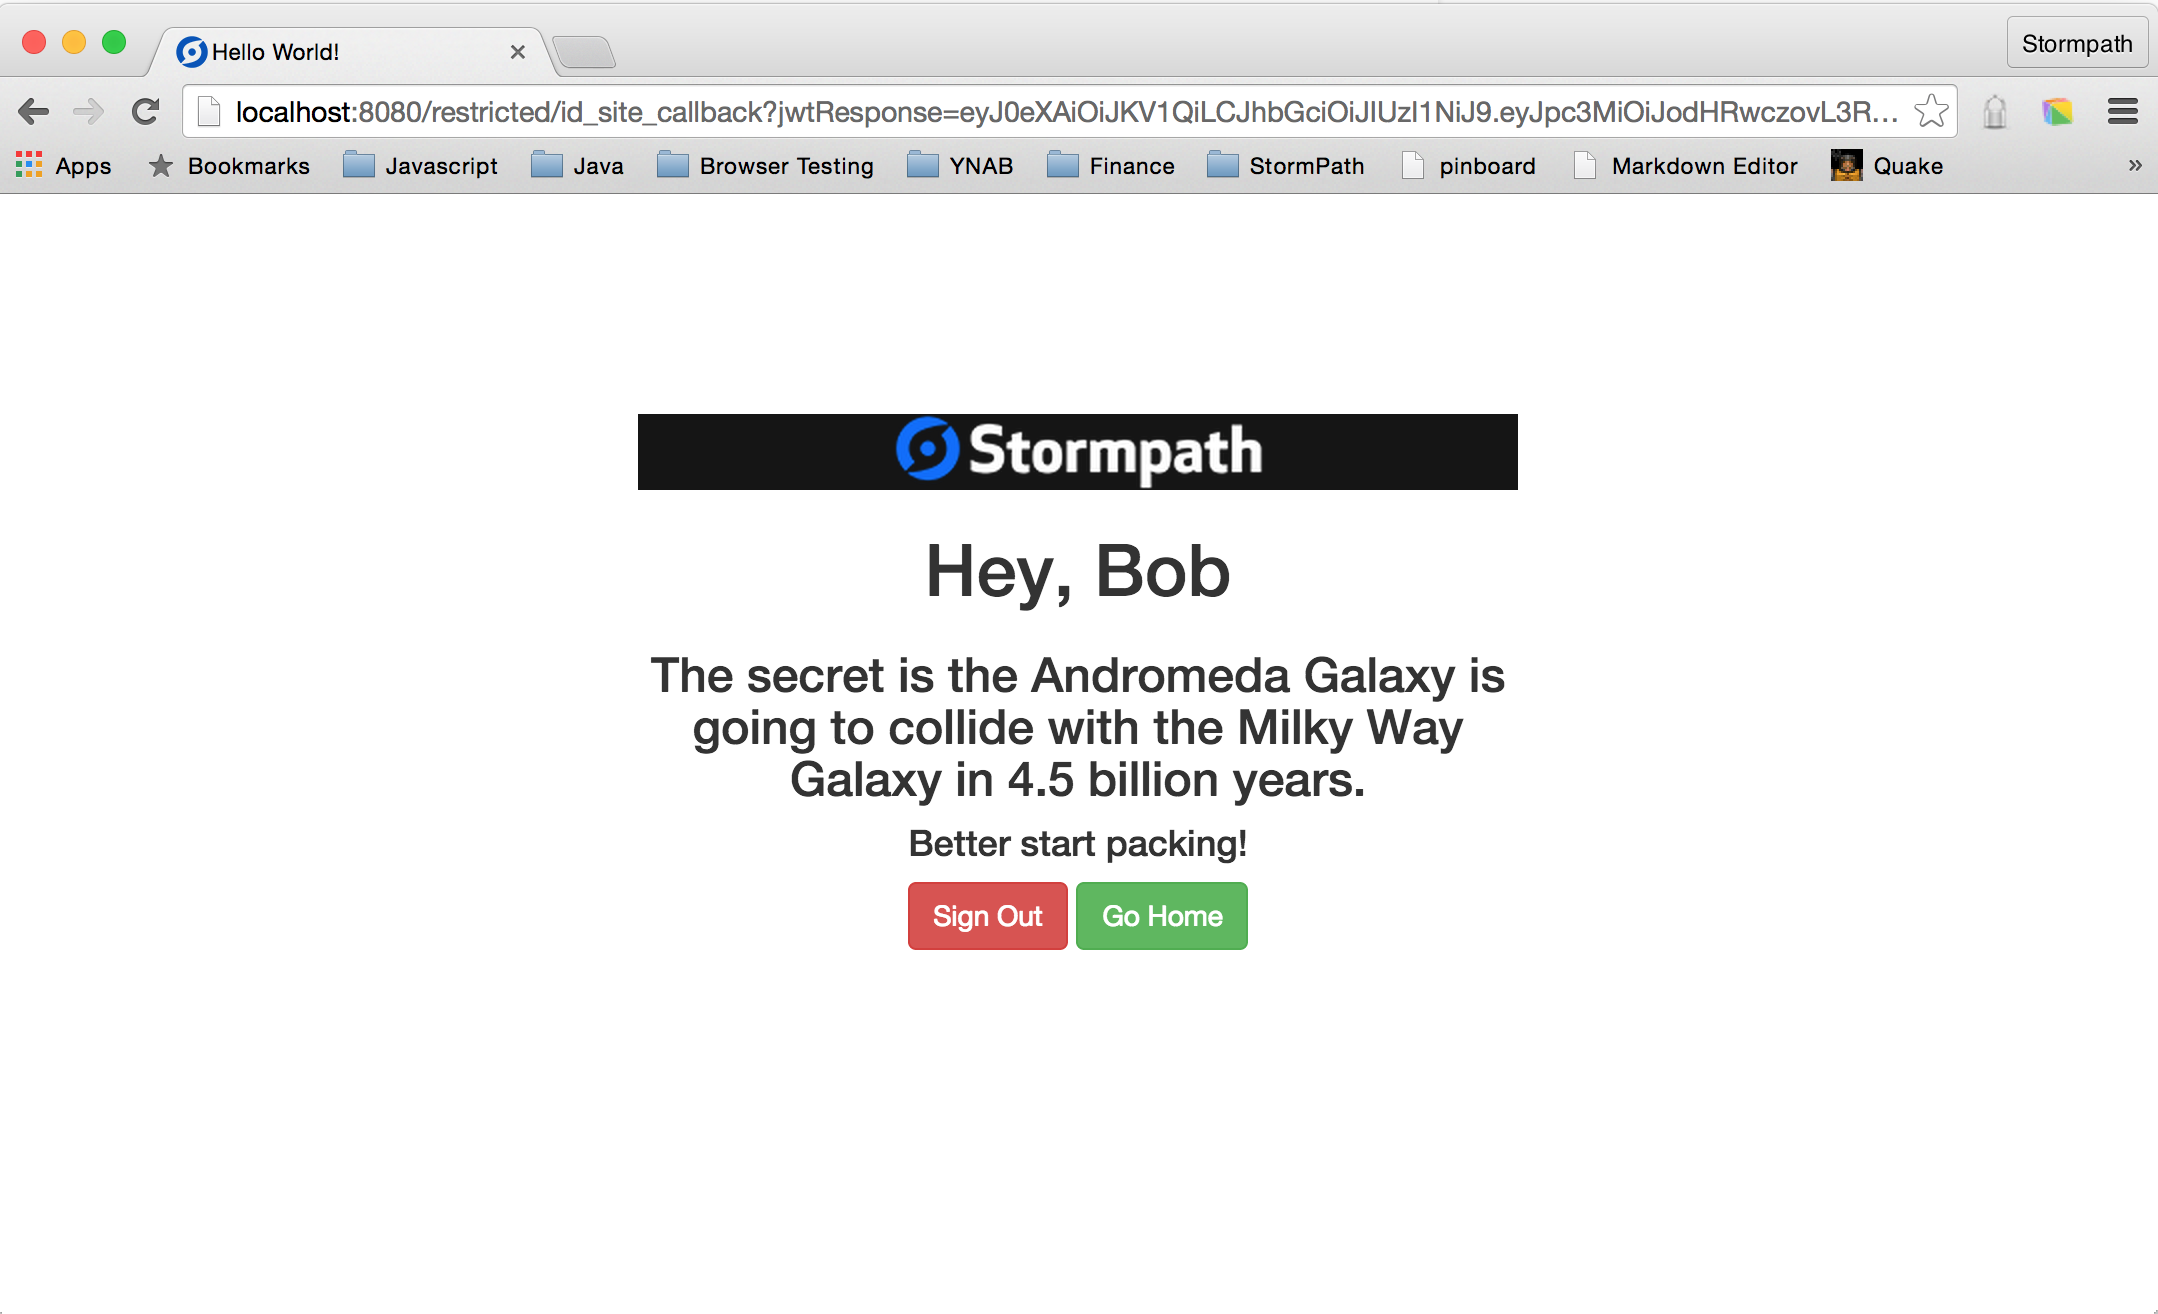
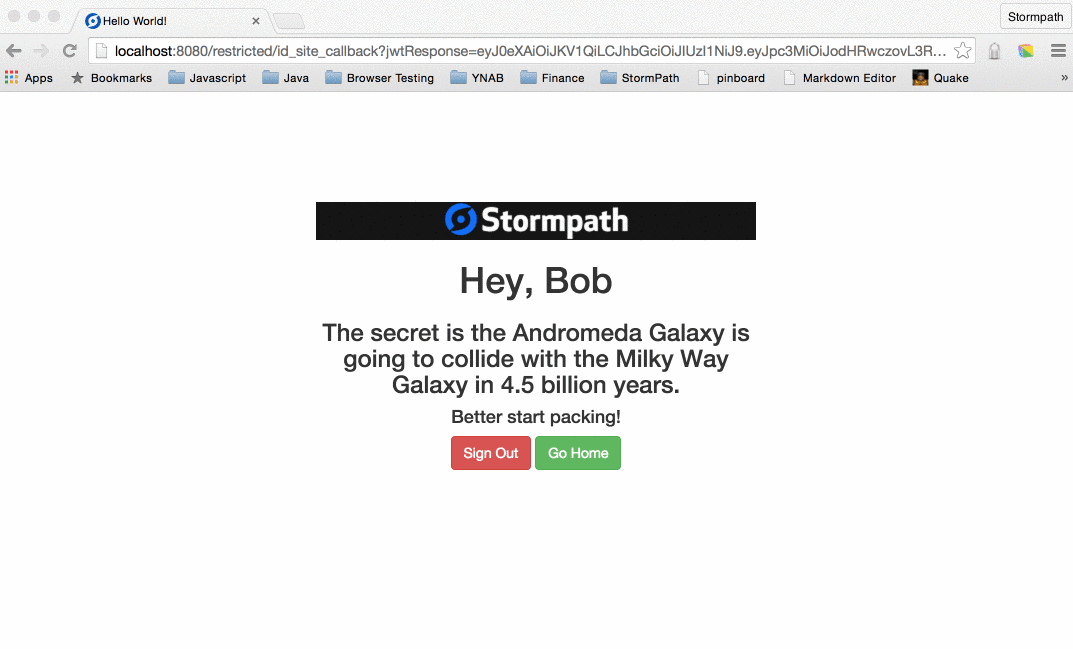
<h1 th:inline="text">[[${appName}]] App</h1>
<h1 th:inline="text">Hey, [[${account.fullName}]]</h1>
<h3 th:utext="${messagePrimary}">Primary</h3>
<h4 th:utext="${messageSecondary}">Secondary</h4>
<a class="btn btn-danger" href="/logout">Log Out</a>
<a class="btn btn-success" href="/">Go Home</a>
<a class="btn btn-warning" th:href="@{${crossLink}}">SSO: Jump to Other Site</a>
</div>
</div>
</div>
</body>
</html>There are two interesting lines here, from the perspective of interacting with ID Site.
<h1 th:inline="text">Hey, [[${account.fullName}]]</h1>This line accesses the fullName property of the Account that is automatically set in the model passed in to the template.
<a class="btn btn-danger" href="/logout">Log Out</a>
The /logout endpoint is automatically handled by IDSite and destroys the existing session.
Fire Up Your Webapp and Try It Out
Start up the app as before:
gradle clean build
STORMPATH_APPLICATION_HREF=https://api.stormpath.com/v1/applications/6bHOGj63WM8cfC2nhD3Pki \
  java -jar build/libs/idsite_demo-0.1.0.jar
Since we don’t yet have any users defined in our Stormpath directory, let’s create a new user and then make sure we can log in and log out as that user.
first, browse to the front door: http://localhost:8080
Click the friendly green button.
Click the Create an Account link.

Click the friendly green button.
Huzzah! We’re in!
If you click the green button now, you will be brought back to the home page. If you then click the green button on the home page, you will go directly to the restricted page. You will not see the login form again. This is because you have established a valid session.
If you click the red button, you will be logged out and redirected to the home page. Clicking the green button brings you to the login form once again as you have trashed your session.
You may notice that after we created our account, we were immediately logged in and sent to the restricted page. You can slow this down by requiring email verification in your Stormpath admin console as part of the account creation process.
Note: There is a known issue whereby you cannot be logged into the Stormpath Admin Dashboard and authenticate using ID Site in the same session. We are working on resolving this issue ASAP. It would never affect your users as they would never be in your Stormpath Admin Dashboard. For now, use a separate browser profile or separate browser instance when using the Stormpath Admin Dashbaord.
Single Sign-On with Heroku in 5 Minutes
This section uses the SpringBootStormpathIDSite tag in the github repository.
![]()
Note: You can use the Heroku Deploy button above to deploy two different Heroku Apps if you want to test out SSO without deploying yourself.
Phew! Home stretch! So, what’s this SSO I keep hearing so much about? With the foundation we’ve built, we are now in a position to deploy multiple instances of this web app to Heroku. So What? I’ll tell you “So What!”
While it’s a novelty that we can deploy multiple instances of the web app, what really gives it power is ID Site’s Single Sign-On capability. By the end of this section you will see that by logging in to one instance of the webapp, you can browse to the restricted page of another instance of the web appwithout having to log in again.
First, we need to add a file so Heroku knows how to launch our app. It’s a one-liner called Procfile:
web: java $JAVA_OPTS -Dserver.port=$PORT -jar target/*.jar
Notice the bash style variable: $PORT. This is automatically populated by Heroku and does not need to be explicitly set by us.
Let’s setup and deploy one Heroku app and make sure it all works
heroku apps:create idsite-demo-app1 --remote idsite-demo-app1
Notice the --remote on the end of the command. Heroku automatically adds a git remote to your local repository in order to be able to deploy your app. By default, this remote will be named heroku. Since we will be deploying multiple instances of the app, we want different remote names.
Now that we’ve created the app, we need to set some config parameters. This is part of the secret sauce that allows us to deploy the same codebase, but link the web app to different Stormpath Applications.
heroku config:set \
  STORMPATH_API_KEY_ID=<your api key id> \
  STORMPATH_API_KEY_SECRET=<your api key secret> \
  STORMPATH_APPLICATION_HREF=<your app href> \
  STORMPATH_SSO_CROSS_LINK=https://idsite-demo-app2.herokuapp.com/restricted/secret \
  STORMPATH_SSO_MESSAGE_PRIMARY="The secret is that chocolate is delicious"'!' \
  STORMPATH_SSO_MESSAGE_SECONDARY="Yummy"'!' \
--app idsite-demo-app1
This assumes that you have a second app setup called idsite-demo-app2 deployed to Heroku. TheSTORMPATH_SSO_CROSS_LINK is used on this app’s restricted page to link to the other app. With everything setup correctly, you will not have to log in again. That’s the sweet power of single sign-on!
Remember I said earlier one of the benefits of how Stormpath configures itself is that you are not required to embed sensitive api key information in your code? Here’s where it all comes together. In the above command, we are setting environment variables for our Heroku instance. The Stormpath SDK automatically checks for the presense of STORMPATH_API_KEY_ID, STORMPATH_API_KEY_SECRET andSTORMPATH_APPLICATION_HREF environment variables. If present, the SDK will automatically use the values in those environment variables when interacting with the API. It’s what connects our Spring Boot web app to the right Stormpath Application.
Ok. The stage is set. Let’s deploy our app!
git push idsite-demo-app1 master
This generates a ton of output, but let’s look at some of the highlights:
remote: Compressing source files... done.
remote: Building source:

...

remote:        [INFO]
remote:        [INFO] ------------------------------------------------------------------------
remote:        [INFO] Building demo 0.0.1-SNAPSHOT
remote:        [INFO] ------------------------------------------------------------------------

...

remote:        [INFO] Installing /tmp/build_a7299c4194f003c6e3730e568a540e82/target/demo-0.0.1-SNAPSHOT.jar to /app/tmp/cache/.m2/repository/com/stormpath/idsite_demo/demo/0.0.1-SNAPSHOT/demo-0.0.1-SNAPSHOT.jar

remote:        [INFO] ------------------------------------------------------------------------
remote:        [INFO] BUILD SUCCESS
remote:        [INFO] ------------------------------------------------------------------------

...

remote: -----> Discovering process types
remote:        Procfile declares types -> web
remote:
remote: -----> Compressing... done, 63.6MB
remote: -----> Launching... done, v6
remote:        https://idsite-demo-app1.herokuapp.com/ deployed to Heroku
remote:
remote: Verifying deploy.... done.
To https://git.heroku.com/idsite-demo-app1.git
 * [new branch]      master -> master
Toward the bottom, Heroku is discovering the process type based on our Procfile. In this case, it’sweb.
Last bit of housekeeping for our first app is to configure ID Site to accept connections from it and to redirect to it. Jump back over to your admin dashboard for ID Site and add https://idsite-demo-app1.herokuapp.com to the list of Authorized Javascript Origin URLs and add https://idsite-demo-app1.herokuapp.com/ and https://idsite-demo-app1.herokuapp.com/idSiteResult to the list of Authorized Redirect URLs.

Make sure you click the Save button at the bottom of the screen.
And, https://idsite-demo-app1.herokuapp.com/ is ready to go! Check it out. Create an account. Log in and log out. Have fun with it.
We’ve now arrived at the gates of the SSO promised land. Here’s all that’s left to do:
- Create another Stormpath Application
- Create another Heroku Application
- Set the configuration of the new Heroku Application
- Deploy our Spring Boot app to the new Heroku Application
- Update our ID Site to include the new URLs for authorized origin and redirect
We are just rinsing and repeating what we did before.
Let’s go create our new Stormpath Application:
Notice that we are mapping the same Account Store for this new application.
Time to create a new Heroku app
heroku apps:create idsite-demo-app2 --remote idsite-demo-app2
And, configure it:
heroku config:set \
  STORMPATH_API_KEY_ID=<your api key id> \
  STORMPATH_API_KEY_SECRET=<your api key secret> \
  STORMPATH_APPLICATION_HREF=<your app href> \
  STORMPATH_SSO_CROSS_LINK=https://idsite-demo-app1.herokuapp.com/restricted/secret \
  STORMPATH_SSO_MESSAGE_PRIMARY="The secret is that ice cream is delicious"'!' \
  STORMPATH_SSO_MESSAGE_SECONDARY="Yummy"'!' \
--app idsite-demo-app2
Make sure you use the full URL of the newly created Stormpath Application.
Deploy time:
git push idsite-demo-app2 master
Finally, ID Site URLs update:
You can now check the box on your ToDo list that says: build and deploy an SSO application. You’ve done it!
You can log in to https://idsite-demo-app1.herokuapp.com. Then, you can jump directly over to https://idsite-demo-app2.herokuapp.com/restricted/secret and you will not have to login again!
Happy SSOing!
In this post, you’ve created a Spring Boot web app that enables Single Sign-On with Stormpath’s ID Site service. Stormpath hosts the login form and all the other links and forms associated with creating a new user and resetting your password.
With a small amount of code in one Controller, you can authenticate and authorize users for your app. And you deployed it quickly with Heroku. I’d love to hear about your experience in working with the examples in this post.
If you’re interested in using more features of Stormpath in Spring Boot, here’s our Spring Boot Webapp Sample Quickstart
Feel free to drop a line over to email or to me personally anytime.
Building Identity Management, including authentication and authorization? Try Stormpath! Our REST API and robust Java SDK support can eliminate your security risk and can be implemented in minutes. Sign up, and never build auth again!