This tutorial describes how to implement IoT push notifications. Using IoT push notifications, we can send notifications to other devices. In this case, we want to send an IoT push notifications from a smart object (like Arduino MKR1000) to a mobile smartphone (i.e. Android smartphone). This project integrates different eco-systems: IoT and Android. This project can have several implementations: for example, we can send a push notification to our smartphone when an alert occurs:
- gas leakage
- motion detection
- higher or lower temperature
- general failure systems
As example, to show how to use IoT notifications, we will use a motion detection sensor. In other words, there is an Arduino MKR1000 connected to a sensor (PIR sensor). When the sensor triggers an event, then MKR1000 makes a call to Firebase server using Firebase API. With API, the smart object sends an IoT push notifications to an Android smartphone. We can use the same way, to send notifications to other devices like iOS and so on.
The idea, that stands behind this project, is shown below:
As you can see, this project uses Firebase API in a different way mixing different worlds!
In the last article, we described how to use Firebase API to create a push notification, in this article we want to expand it and integrate with Arduino.
Moreover, we have already seen in the last post, how to create an Android app that handles push notification and how to configure it in the Firebase console. If you are new to Firebase, I suggest you reading the previous post so that you have a clear idea how things work.
As Android app, this project uses the app we developed in the previous post. You can download it if you want to test the project.
Arduino MKR1000 PIR project
The first step is connecting Arduino MKR1000 to a PIR sensor. The picture below shows how to wire the sensor to MKR1000.
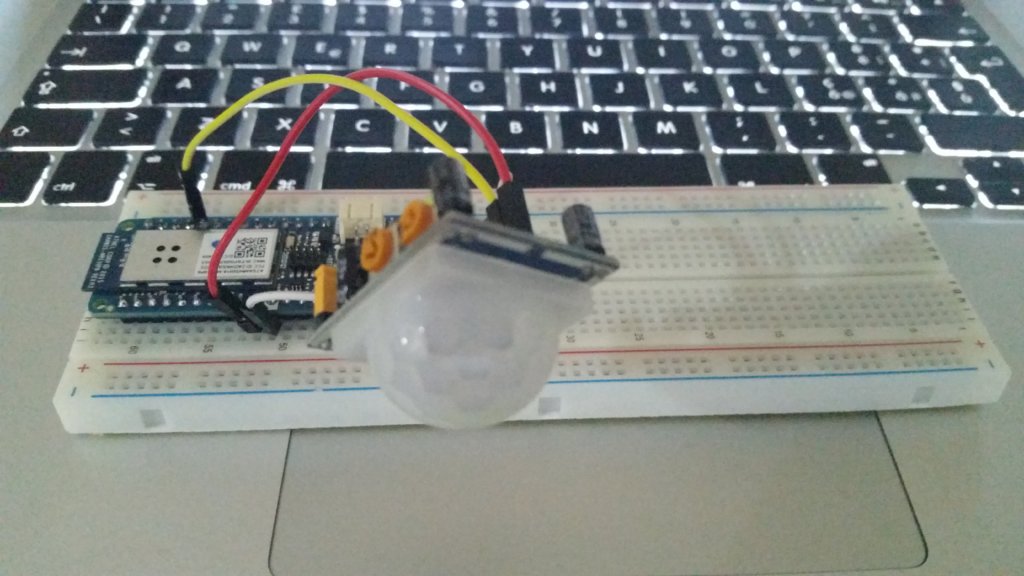
The schema is very simple. To know if the PIR sensor detected a movement we have to check if the signal is 1. The sketch is very simple:
int inputPin = 2;
int pirState = LOW;

void setup() {
  pinMode(inputPin, INPUT);
  Serial.begin(9600);
}

void loop() {
   int val = digitalRead(inputPin);
   if (val == HIGH) {
     if (pirState == LOW) {
       Serial.println("Motion detected");
       pirState = HIGH;
       // Motion detected
     }
  }
  else {
   if (pirState == HIGH) {
     Serial.println("Motion ended!");
     pirState = LOW;
     // Motion ended
   }
 }
 delay(5000);
}
As you can notice, the sketch is very simple. We have to read the signal on the input pin and check if it is 1. If it is 1, then we have detected a motion and we can send the notification.
How to send #IoT Push notifications? Follow this tutorial to know how to integrate #arduino… Click To Tweet
MKR1000 WiFi connection
Before sending a notification, we have to connect Arduino MKR1000 to the internet using WiFi. We can slightly modify the code above and add the WiFi connection:
#include <SPI.h>
#include <WiFi101.h>

int inputPin = 2;
int pirState = LOW;

char ssid[] = "Vodafone-xxxxx"; // your network SSID (name)
char pass[] = "yyyyyyyy"; // your network password
int status = WL_IDLE_STATUS;

WiFiClient client;
void setup() {
  pinMode(inputPin, INPUT);
  Serial.begin(9600);

  // attempt to connect to Wifi network:
  while ( status != WL_CONNECTED) {
    Serial.print("Attempting to connect to WPA SSID: ");
    Serial.println(ssid);
    // Connect to WPA/WPA2 network:
    status = WiFi.begin(ssid, pass);
    // wait 10 seconds for connection:
    delay(10000);
  }
  // you're connected now, so print out the data:
  Serial.println("You're connected to the network");
}
All done! Now everything is ready and we can focus our attention on the most interesting part: sending IoT push notification to smartphone.
Sending IoT push notifications
To send a push notification we use the Firebase API. We assume you have already created a project in the Firebase console, if not go back to the previous article and read how to configure a Firebase project.
To send a push notification using Firebase it is necessary:
- Authenticate our client
- Create the message body in JSON
- Send the message to a smartphone
To do it, it is necessary to send some header HTTP parameters and a JSON message. The first thing is set the Firebase host:
Host: fcm.googleapis.com
then, to authenticate our client we use a secret key, you get from Firebase console:
Authorization: key=AIzaSyC1mHfa_G89CDoNoq2zWhh1iL9---------
then we have to set the content type:
Content-Type: application/json
and finally we specify the HTTP method and the service we want to invoke:
POST /fcm/send HTTP/1.1
The body is in JSON format and is very simple:
{
   "to":"your_phone_key",
   "notification": {
     "body": "test message",
    "title" : "Title"
  }
}
That’s all!! We have to make this request using Arduino HTTP library:
void sendDataToFirebase() {
  String data = "{" ;
  data = data + "\"to\": \"your_smartphone_id\"," ;
  data = data + "\"notification\": {" ;
  data = data + "\"body\": \"Motion detected\"," ;
  data = data + "\"title\" : \"Alarm\" " ;
  data = data + "} }" ;

  Serial.println("Send data...");
  if (client.connect(fcmServer, 80)) {
    Serial.println("Connected to the server..");
    client.println("POST /fcm/send HTTP/1.1");
    client.println("Authorization: key=auth_key");
    client.println("Content-Type: application/json");
    client.println("Host: fcm.googleapis.com");
    client.print("Content-Length: ");
    client.println(data.length());
    client.print("\n");
    client.print(data);
  }
  Serial.println("Data sent...Reading response..");
  while (client.available()) {
   char c = client.read();
   Serial.print(c);
  }
  Serial.println("Finished!");
  client.flush();
  client.stop();
}
So it is very simple to send IoT push notifications and we have integrated two different ecosystems. What will you build using push notifications? Comment below and let me know your experience.At the end of this post, hopefully, you gained a new knowledge about sending IoT push notifications.
At the end of this post, hopefully you gained a new knowledge about sending IoT push notifications.
| Reference: | IoT Push notifications: Arduino – Firebase – Android from our JCG partner Francesco Azzola at the Surviving w/ Android blog. |

Sorry for my English. I’m from Argentina and I speak Spanish. I tried this tutorial and it worked correctly if in the place of data = data + “\” to \ “: \” your_smartphone_id \ “,”; your_smartphone_id = “yhjhe8623hjeeuij3ksa0wqsas” This fictitious value is the token of the destination phone of the notification. data = data + “\” to \”: \”yhjhe8623hjeeuij3ksa0wqsas\”,”; and this works! However, if I want to replace smartphone_id with a variable, example; Destination = “6892171287gvsaugsgsa” in the way: data = data + “\” to \ “: \” destination \ “,” I can not understand the escape characters and… Read more »