I recently attended the Spring One conference 2016 in Las Vegas and had the good fortune to see from near and far some of the people that I have admired for a long time in the Software World. I personally met two of them who have actually merged some of my Spring Integration related minor contributions from a few years ago – Gary Russel and Artem Bilan and they inspired me to look again at Spring Integration which I have not used for a while.
I was once more reminded of how Spring Integration makes any complex Enterprise integration scenario look easy. I am happy to see that Spring Integration Java based DSL is now fully integrated into the Spring Integration umbrella and higher level abstractions like Spring Cloud Stream(introductions thanks to my good friend and a contributor to this project
Soby Chacko) which makes some of the message driven scenarios even easier.
In this post I am just revisiting a very simple integration scenario with RabbitMQ and in a later post will re-implement it using Spring Cloud Stream.
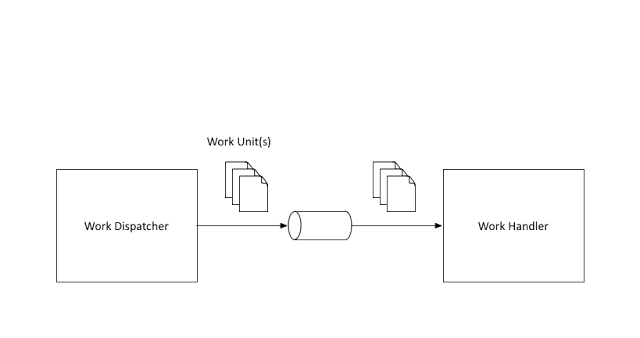
Consider a scenario where two services are talking to each other via a RabbitMQ broker in between, one of them generating some kind of a work, the other processing this work.
Producer
The Work unit producing/dispatching part can be expressed in code using Spring Integration Java DSL the following way:
@Configuration
public class WorksOutbound {

    @Autowired
    private RabbitConfig rabbitConfig;

    @Bean
    public IntegrationFlow toOutboundQueueFlow() {
        return IntegrationFlows.from("worksChannel")
                .transform(Transformers.toJson())
                .handle(Amqp.outboundAdapter(rabbitConfig.worksRabbitTemplate()))
                .get();
    }
}
This is eminently readable – the flow starts by reading a message off a channel called “worksChannel”, transforms the message into a json and dispatches it off using an Outbound channel adapter to a RabbitMQ exchange. Now, how does the message get to the channel called “worksChannel” – I have configured it via a Messaging gateway, an entry point to the Spring Integration world –
@MessagingGateway
public interface WorkUnitGateway {
 @Gateway(requestChannel = "worksChannel")
 void generate(WorkUnit workUnit);

}
So now if a java client wanted to dispatch a “work unit” to rabbitmq, the call would look like this :
WorkUnit sampleWorkUnit = new WorkUnit(UUID.randomUUID().toString(), definition);
workUnitGateway.generate(sampleWorkUnit);
I have brushed over a few things here – specifically the Rabbit MQ configuration, that is run of the mill however and is available here
Consumer
Along the lines of a producer, a consumers flow would start by receiving a message from RabbitMQ queue, transforming it to a domain model and then processing the message, expressed using Spring Integration Java DSL the following way:
@Configuration
public class WorkInbound {

    @Autowired
    private RabbitConfig rabbitConfig;

    @Autowired
    private ConnectionFactory connectionFactory;

    @Bean
    public IntegrationFlow inboundFlow() {
        return IntegrationFlows.from(
                Amqp.inboundAdapter(connectionFactory, rabbitConfig.worksQueue()).concurrentConsumers(3))
                .transform(Transformers.fromJson(WorkUnit.class))
                .handle("workHandler", "process")
                .get();
    }
}
The code should be intuitive, the workHandler above is a simple Java pojo and looks like this, doing the very important job of just logging the payload:
@Service
public class WorkHandler {
    private static final Logger LOGGER = LoggerFactory.getLogger(WorkHandler.class);

    public void process(WorkUnit workUnit) {
        LOGGER.info("Handling work unit - id: {}, definition: {}", workUnit.getId(), workUnit.getDefinition());
    }
}
That is essentially it, Spring Integration provides an awesome facade to what would have been a fairly complicated code had it been attempted using straight Java and raw RabbitMQ libraries.
Spring Cloud Stream makes this entire set-up even simpler and would be the topic of a future post.
I have posted this entire code at my github repo if you are interested in taking this for a spin.
| Reference: | Integrating with Rabbit MQ using Spring Integration Java DSL from our JCG partner Biju Kunjummen at the all and sundry blog. |
