In a previous post I wrote about how to run a Spring Boot application on AWS by using Elastic Beanstalk. I also described earlier how to make your Spring Boot application making use of HTTPS instead of HTTP in combination with BoxFuse. I ended up in that solution to include the necessary SSL certificate in my application sources. Another way to accomplish the SSL connection would be to have the Elastic Load Balancer (ELB) in the Beanstalk Application terminate the SSL for us and let the Spring Boot application just communicate over HTTP with the ELB. This set up might be a very handy (perhaps minimal but sufficient) way to add security to the communication level of the API/web application.
To accomplish this set up I need to take several steps of which I will describe the first one in this post. The steps to perform are:
- Assign a (sub)domain to a Beanstalk application
- Obtain a certificate for the subdomain from the AWS Certificate Manager
- Configure AWS Beanstalk application to use SSL
As said before in this post I will only show how to assign a subdomain to the Beanstalk instance. In my situation the parent domain is registered elsewhere (a provider other than AWS). The parent domain that I have registered is ‘palmapps.nl’. The sub-domain I want to register is ‘test.palmapps.nl’.
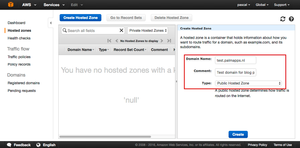
The first step is to create a new Hosted Zone in AWS Route 53. Since this is something I will do only once I chose to do this by the Management Console because no scripting will be necessary here. In the Management Console I open up Route 53 and click the button ‘Create Hosted Zone’. Just fill in the fields and click ‘Create’:
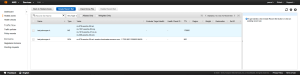
The Hosted Zone is created together with two Record Sets, one of type ‘NS’ and one with type ‘SOA’ which are shown in the next screen:
Next step is to create a ‘A’ record pointing to the Beanstalk application. You can simply fill the screen after clicking ‘Create Record Set’ like this:
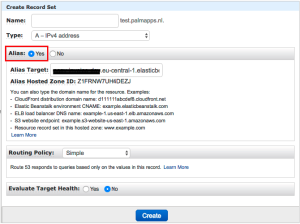
Just make sure you select ‘alias’ as ‘yes’ so you can pick your Elastic Beanstalk application as ‘Alias Target’ for the domain name. To get more info about the other options see the documentation of Route 53.
The final step to get this working is adding some DNS records at your top level domain provider. With these records we will tell the provider that for that subdomain it should use AWS Route 53 DNS servers to resolve the domain name. Now this step will be different for each provider but in the end you will have to add a record set like these:

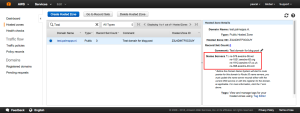
To get the AWS Route 53 servers select the hosted zone in the Management Console and you will see the servers at the right side of the panel:
When all this is in place you are automatically taken to the Elastic Beanstalk application when calling for ‘http://test.palmapps.nl/health‘:
![]()
(Please note it may take some time before all necessary DNS servers are updated with the new information.)
| Reference: | Assigning a subdomain to a Beanstalk application with AWS Route 53 from our JCG partner Pascal Alma at the The Pragmatic Integrator blog. |
