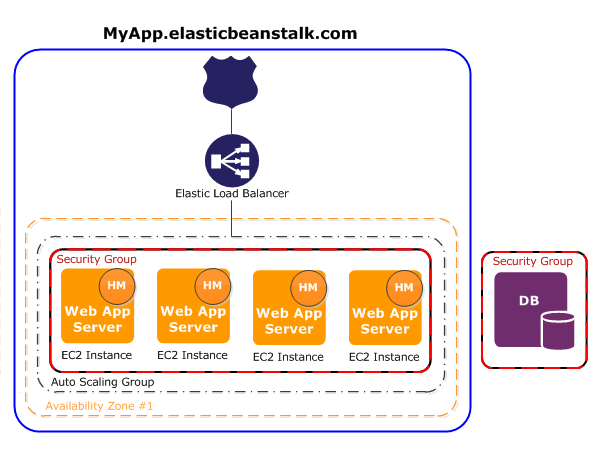
Although I previously wrote how easy it is to get your Spring Boot application up and running on AWS by using Boxfuse I think it is good idea to have notion of some alternative ways to achieve the same. One of these alternatives is by using AWS Elastic Beanstalk. In this post I will describe the basic configuration to get your Spring Boot application running in the cloud on AWS. After the Elastic Beanstalk is created you will have at least one EC2 instance running on AWS with an Elastic Load Balancer in front of it. Also an Auto Scaling Group is provided and of course some Security Groups. When put in a diagram it looks like this (by the way, the database part will not be used in the example of this post):
I assume you already have an account for AWS. If not, go get your free subscription for the first year (mind the conditions to make sure it stays free).
Setup AWS IAM
The first step to take is to create a new user that will be able to run AWS Elastic Beanstalk. This user will only have these permissions so if the account details might fall in wrong hands the damage will be minimised (explained here). When you create your user don’t forget to download your credentials for that user, you will need these later on.
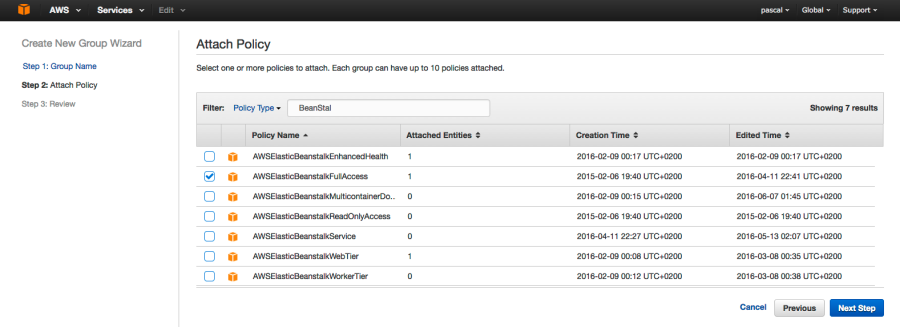
I put the new user in a group ‘spring-boot-users’ and assigned the following roles and policies to that group:
‘AWSElasticBeanstalkFullAccess‘:
While we are here you might also want to create the following two roles (they should be created automatically when creating your first Elastic Beanstalk environment with the Management Console or EB CLI but I recall I had some issues with them and ended up creating them myself):
- aws-elasticbeanstalk-ec2-role: with the following policies attached: AWSElasticBeanstalkWebTier
- aws-elasticbeanstalk-service-role: with the following policy attached: AWSElasticBeanstalkEnhancedHealth
Install Elastic Beanstalk client interface
With all this in place we are almost ready to get our hands dirty. I prefer using the CLI instead of the Management Console because by using the CLI you can script the whole thing which makes live much easier. To install the CLI (I am using a Mac) simply run:
brew install awsebcli
Setup your credentials of your new user to be used with the CLI. I add them to my ‘~/.aws/credentials’ file like this:
[default]
aws_access_key_id = 1234567890
aws_secret_access_key = hrhyueiryt983745983erti+UXsF6IvC

[spring-boot]
aws_access_key_id = 0987654321
aws_secret_access_key = hdgdfghkjg384957893745dc7/Xrsekgu7V4
So in my credential file I have added a profile ‘spring-boot’ with the corresponding key and secret.
Setup your Spring Boot project
Now everything is setup to get a EB environment up and running. Go to your Spring-boot project folder and in that directory perform the following command:
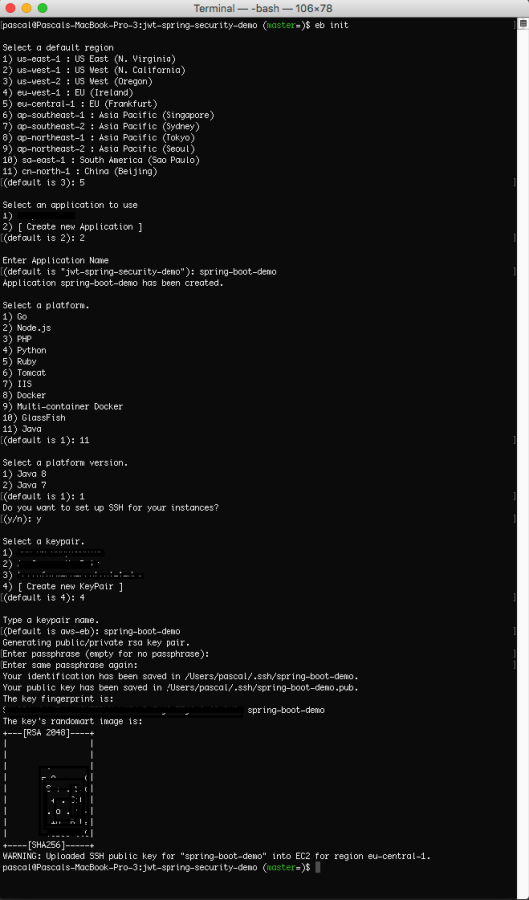
eb init
The configuration for the EB will now be set up based on the input you supply:
In your project folder you will now see a new folder ‘.elasticbeanstalk’ with in it a file ‘config.yml’. Since I build my application with Maven I add the following line to the ‘config.yml’ so it will deploy my latest build snapshot version to the Elastic Beanstalk:
deploy:

artifact: target/jwt-spring-security-demo-1.0.0-SNAPSHOT.jar
Also I enter a value for the profile so the CLI will pick the correct credentials from my credential file that I modified before. The configuration file ends up like this:
branch-defaults:
  master:
    environment: null
    group_suffix: null
deploy:
  artifact: target/jwt-spring-security-demo-1.0.0-SNAPSHOT.jar
global:
  application_name: spring-boot-demo
  default_ec2_keyname: spring-boot-demo
  default_platform: Java 8
  default_region: eu-central-1
  profile: spring-boot
  sc: git
Create the Elastic Beanstalk instance
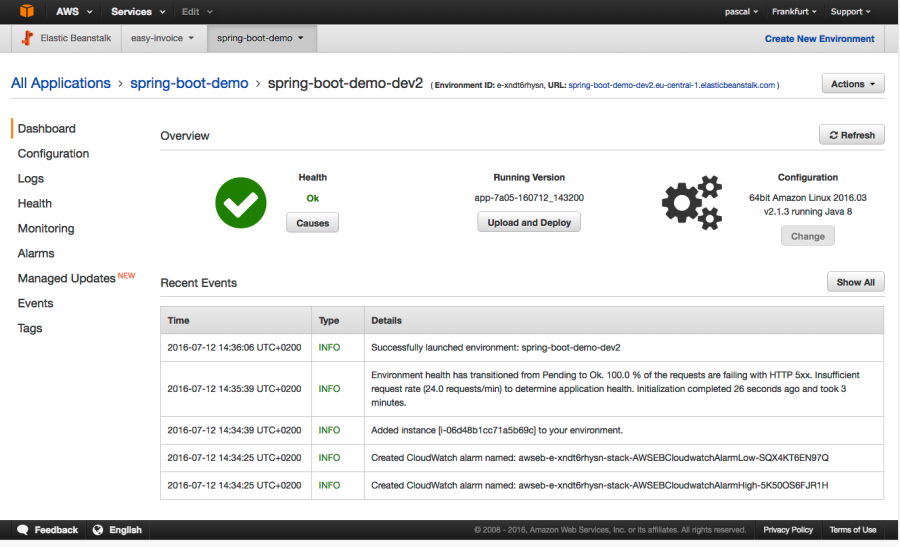
If you perform ‘eb create’ in the prompt and accept the default values you will get your own Elastic Beanstalk instance with your Spring Boot application on it (please note that it takes few minutes for everything to be up and running). When the creation is finished you can see your Elastic Beanstalk instance in the Management Console:
Test the Elastic Beanstalk instance
When you now run ‘eb open’ a browser will be started pointing to your application. Right now mine is saying 502 Bad Gateway:
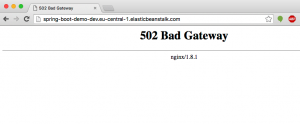
There is one issue left that I have to solve. The default stack is supplied with a EC2 instance that has running Nginx on it as a reversed proxy and it listens to port 80. My spring-boot applications runs on port 8888 but this port is not accessible from the outside (not opened in the default security group that was created by the Elastic Beanstalk). The issue can be solved in three ways (at least):
- Open up port 8888 on the EC2 instance and have the Elastic Load Balancer ‘talk’ to that port. That way we are bypassing the Nginx on port 80.
- Configure Nginx so it passes the incoming traffic on port 80 to 8888.
- Make our Spring Boot application run on port 5000 since that is the default the Nginx is forwarding too.
I will choose for the last option for this post to keep the Elastic Beanstalk configuration simple. After modifying the port in the ‘application.yml’ file like this:
server:

port: 5000
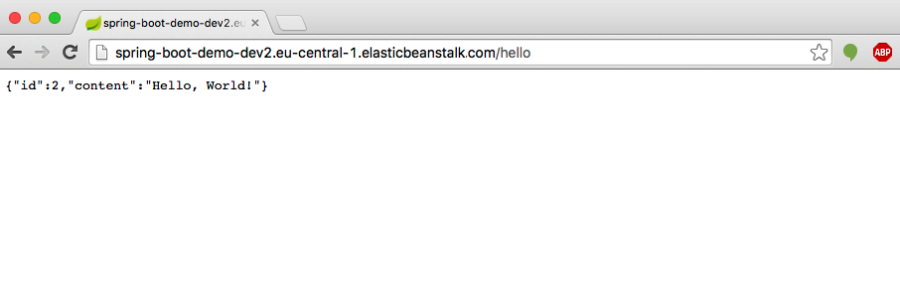
and rebuilding the application, I can redeploy it with:
eb deploy
Now when I access the url “http://spring-boot-demo-dev2.eu-central-1.elasticbeanstalk.com/hello ” I get the expected result:
That’s it for this post. There is a lot more to show about AWS Elastic Beanstalk in combination with a Spring Boot application which I will show in some future posts.
| Reference: | Run your Spring Boot application on AWS using Elastic Beanstalk from our JCG partner Pascal Alma at the The Pragmatic Integrator blog. |
