Sometimes ago, we published one article sharing a custom approach to implement stateless session in cloud environment. Today, let explore another popular use case of setting up Oauth2 authentication for a Spring Boot application. In this example, we will JSON Web Token (JWT) as the format of the Oauth2 token.
This sample was developed partly based on the official sample of Spring Security Oauth 2. However, we will focus on understanding the principal of the Oauth 2 request.
The source code is at https://github.com/tuanngda/spring-boot-oauth2-demo.git
Background
Oauth2 and JWT
We will not go to detail when you want to use Oauth2 and JWT. In general, you may want to adopt Oauth if you need to allow other people to build front end app for you services. We focus on Oauth2 and JWT because they are the most popular authentication framework and protocol in the market.
Spring Security Oauth 2
Spring Security Oauth2 is an implementation of Oauth 2 that built on top of Spring Security, which is a very extensible authentication framework.
In overall, Spring Security includes 2 basic steps, creating an authentication object for each request and applying authorization check depending on authentication. The first step was done in a multi layer Security Filter. Depending on the configuration, each layer can help to create authentication for basic authentication, digest authentication, form authentication or any custom authentication that we choose to implement ourselves. The client side session we built in previous article is one custom authentication and Spring Security Oauth 2 is another custom authentication.
Because in this example, our application both provides and consume token, Spring Security Oauth 2 should not be the sole authentication layer for the application. We need another authentication mechanism to protect the token provider endpoint.
For a cluster environment, the token or the secret to sign token (for JWT) suppose to be persisted but we skip this step to simplify the example. Similarly, the user authentication and client identities are all hard-coded.
System Design
Overview
In our application, we need to setup 3 components
- Authorization Endpoint and Token Endpoint to help providing Oauth 2 token.
- A WebSecurityConfigurerAdapter, which is an authentication layer with hard-coded order of 3 (according to Dave Syer). This authentication layer will setup authentication and principal for any request that contains Oauth 2 token.
- Another authentication mechanism to protect Token endpoint and other resources if the token is missing. In this sample, we choose basic authentication for its simplicity when writing tests. As we do not specify the order, it will take default value of 100. With Spring security, the lower order, the higher priority; so we should expect Oauth 2 come before basic authentication in the FilterChainProxy. Inspecting in IDE prove that our setup is correct.
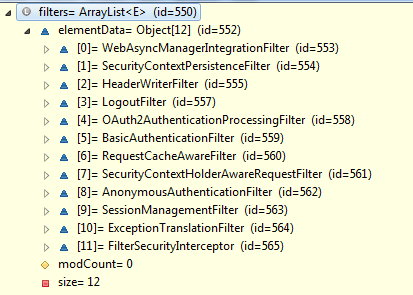
In the above picture, Oauth2AuthenticationProcessingFilter appear in front of BasicAuthenticationFilter.
Authorization Server Configuration
Here is our config for Authorization and Token Endpoint
@Configuration
@EnableAuthorizationServer
public class AuthorizationServerConfiguration extends AuthorizationServerConfigurerAdapter {

    @Value("${resource.id:spring-boot-application}")
    private String resourceId;

    @Value("${access_token.validity_period:3600}")
    int accessTokenValiditySeconds = 3600;

    @Autowired
    private AuthenticationManager authenticationManager;

    @Bean
    public JwtAccessTokenConverter accessTokenConverter() {
        return new JwtAccessTokenConverter();
    }

    @Override
    public void configure(AuthorizationServerEndpointsConfigurer endpoints) throws Exception {
        endpoints
            .authenticationManager(this.authenticationManager)
            .accessTokenConverter(accessTokenConverter());
    }

    @Override
    public void configure(AuthorizationServerSecurityConfigurer oauthServer) throws Exception {
        oauthServer.tokenKeyAccess("isAnonymous() || hasAuthority('ROLE_TRUSTED_CLIENT')")
            .checkTokenAccess("hasAuthority('ROLE_TRUSTED_CLIENT')");
    }

    @Override
    public void configure(ClientDetailsServiceConfigurer clients) throws Exception {
        clients.inMemory()
            .withClient("normal-app")
                .authorizedGrantTypes("authorization_code", "implicit")
                .authorities("ROLE_CLIENT")
                .scopes("read", "write")
                .resourceIds(resourceId)
                .accessTokenValiditySeconds(accessTokenValiditySeconds)
        .and()
            .withClient("trusted-app")
                .authorizedGrantTypes("client_credentials", "password")
                .authorities("ROLE_TRUSTED_CLIENT")
                .scopes("read", "write")
                .resourceIds(resourceId)
                .accessTokenValiditySeconds(accessTokenValiditySeconds)
                .secret("secret");
    }
}
There are few things worth noticing about this implementation.
- Setting up JWT token is as simple as using JwtAccessTokenConverter. Because we never setup the signing key, it is randomly generated. If we intended to deploy our application to cloud, it is a must to sync the signing key across all authorization servers.
- Instead of creating authentication manager, we choose to inject an existing authentication manager from Spring container. With this step, we can share the authentication manager with the Basic Authentication filter.
- It is possible to have trusted application and not trusted application. Trusted application can have their own secret. This is necessary for client credential authorization grant. Except client credentials, all 3 other grants require resource owner’s credential.
- We allow anonymous for checking token endpoint. With this configuration, the checking token is accessible without basic authentication or Oauth 2 token.
Resource Server Configuration
Here is our configuration for Resource Server Configuration
@Configuration
@EnableResourceServer
public class ResourceServerConfiguration extends ResourceServerConfigurerAdapter {

    @Value("${resource.id:spring-boot-application}")
    private String resourceId;

    @Override
    public void configure(ResourceServerSecurityConfigurer resources) {
        resources.resourceId(resourceId);
    }

    @Override
    public void configure(HttpSecurity http) throws Exception {
         http.requestMatcher(new OAuthRequestedMatcher())
                .authorizeRequests()
                 .antMatchers(HttpMethod.OPTIONS).permitAll()
                    .anyRequest().authenticated();
    }

    private static class OAuthRequestedMatcher implements RequestMatcher {
        public boolean matches(HttpServletRequest request) {
            String auth = request.getHeader("Authorization");
            // Determine if the client request contained an OAuth Authorization
            boolean haveOauth2Token = (auth != null) && auth.startsWith("Bearer");
            boolean haveAccessToken = request.getParameter("access_token")!=null;
   return haveOauth2Token || haveAccessToken;
        }
    }

}
Here are few things to take note:
- The OAuthRequestedMatcher is added in so that the Oauth filter will only process Oauth2 requests. We added this in so that an unauthorized request will be denied at the Basic Authentication layer instead of Oauth 2 layer. This may not make any difference in term of functionality but we added it in for usability. For the client, they will received 401 HTTP Status with this new header versus the old header:
- WWW-Authenticate:Basic realm=”Realm”
- WWW-Authenticate:Bearer realm=”spring-boot-application”, error=”unauthorized”, error_description=”Full authentication is required to access this resource”
- With the new response header, a browser will auto prompt user for username, password. If you do not want the resource to be accessible by any other authentication mechanism, this step is not necessary.
- Some browsers like Chrome like to send OPTIONS request to look for CORS before making AJAX call. Therefore, it is better to always allow OPTIONS requests.
Basic Authentication Security Configuration
As mentioned earlier, because we need to protect the token provider endpoint.
@Configuration
@EnableGlobalMethodSecurity(prePostEnabled = true)
@EnableWebSecurity
public class SecurityConfiguration extends WebSecurityConfigurerAdapter {

    @Autowired
    public void globalUserDetails(AuthenticationManagerBuilder auth) throws Exception {
        auth.inMemoryAuthentication().withUser("user").password("password").roles("USER").and().withUser("admin")
                .password("password").roles("USER", "ADMIN");
    }

    @Override
    protected void configure(HttpSecurity http) throws Exception {
     http
        .authorizeRequests()
            .antMatchers(HttpMethod.OPTIONS).permitAll()
            .anyRequest().authenticated()
            .and().httpBasic()
            .and().csrf().disable();
    }

    @Override
    @Bean
    public AuthenticationManager authenticationManagerBean() throws Exception {
        return super.authenticationManagerBean();
    }
}
There are few things to take note:
- We expose the AuthenticationManager bean so that our two authentication security adapter can share a single authentication manager.
- Spring Security CSRF working seamlessly with JSP but is a hassle for RestAPI. Because we want this sample app to be used as a base for users to develop their own application, we turned CSRF off and add in a CORS filter so that it can be use right away.
Testing
We wrote one test scenario for each authorization grant type following exactly Oauth2 specifications. Because Spring Security Oauth 2 is an implementation based on Spring Security framework, our interest is veered toward seeing how the underlying authentication and principal are constructed.
Before summarizing the outcome of experiment, let take a quick look at somethings to take notes.
- Most of the requests to token provider endpoints were sent using POST requests but they include user credential as parameters. Even though we put this credential as part of url for convenient, never do this in your Oauth 2 client.
- We created 2 endpoints /resources/principal and /resources/roles to capture the principal and authority for Oauth 2 authentication.
Here is our setup:
| User | Type | Authorities | Credential |
| user | resource owner | ROLE_USER | Y |
| admin | resource owner | ROLE_ADMIN | Y |
| normal-app | client | ROLE_CLIENT | N |
| trusted-app | client | ROLE_TRUSTED_CLIENT | Y |
| Grant Type | User | Client | Principal | Authorities |
| Authorization Code | user | normal-app | user | ROLE_USER |
| Client Credentials | NA | trusted-app | trusted-app | No Authority |
| Implicit | user | normal-app | user | ROLE_USER |
| Resource Owner Password Credentials | user | trusted-app | user | ROLE_USER |
This result is pretty as expected except for Client Credentials. Interestingly, even though the client retrieve Oauth 2 token by client credential, the approved request still does not have any of client authorities but only client credential. I think this make sense because the token from Implicit Grant Type cannot be reused.Here is what we find out
| Reference: | Spring Oauth2 with JWT Sample from our JCG partner Nguyen Anh Tuan at the Developers Corner blog. |

Hey, Great article. Just trying to learn this stuff. I am just wondering in the authoization code grant flow Test you first call to get a cookie and then set it in the header for the second call to fetch the auth code which is used in the next call. But why do you need to get/set the cookie in first step. Can you not just request an auth code straight away and then exchange that for token? Also in the implicit flow. You do same cookie get/set and then call “oauth/authorize”. Should implicit not just call /oauth/token as we… Read more »